Procedure to Run Power troubleshooter in Windows 10 – Many times you tweak and customize power options settings resulting in issues and errors on your PC. An improper or defective power supply is usually one of the major reasons for many Windows 10 PC problems. Power troubleshooter helps in detecting the problems arising due to any issue in the power supply. See an error and solution regarding the power options – Fix: Shut down Instead Hibernate on Critical Battery Level Windows 10.
Power troubleshooter works to fix the issues regarding entire Power options and settings, Power plans and screen timeout settings. Ever since Microsoft launched the Automated Troubleshooting Solutions, these have turned to be the life saver and are in increased demand over a period of time. These Troubleshooting Solutions helps the user to resolve the issues related to the Windows 10 operating system in a click. The same is the case with Windows 10 Power troubleshooter after the current Windows update. If the PC is facing power consumption problems then you may like to know how to run Power troubleshooter in Windows 10. see ahead for this –
Way to Run Power troubleshooter in Windows 10
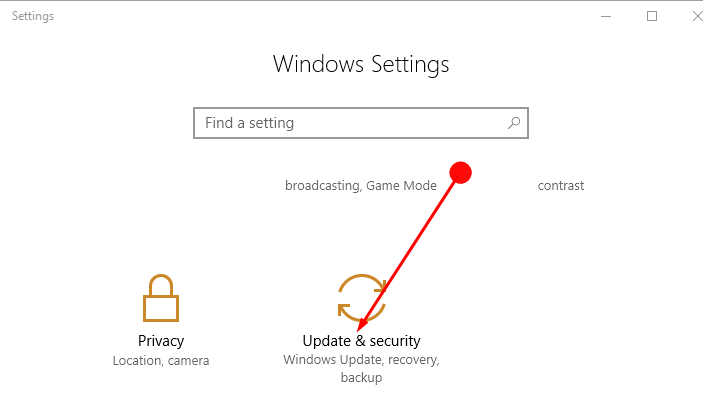
Step 1 – To get the Power troubleshooter start working click on the Start button and select the Settings icon. If you prefer to use the keyboard then press Win and I at the same time. Now choose the Update & Security icon from the application.
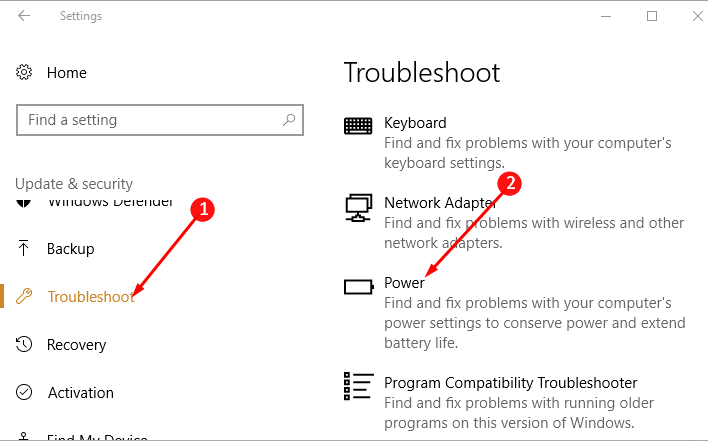
Step 2 – Here, under the Update and Security, find the option Troubleshoot and click on the same in the left pane.
Step 3 – Now move to the opposite pane and under Find and Fix other Problems click the option Power. Once you click on the Power option it opens in an expanded form.
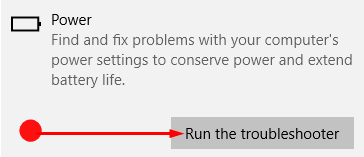
Step 4 – Select Run the Troubleshooter under Power. Then allow the Troubleshooter to start for detecting any problems related to the power supply.
Step 5 – After the scanning is completely over the Power troubleshooter will give you an analysis of the issue. Most probably the Troubleshooter will fix all the issues related to the Power supply. But in a few cases, it may give some guidelines to follow.
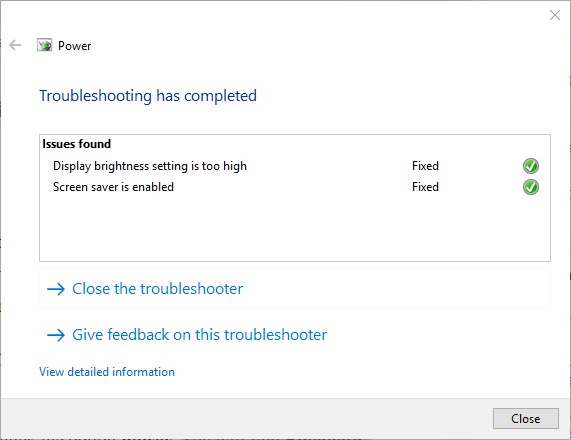
Step 6 – If there are any guidelines on the Power troubleshooter then follow the same. Click on the buttons it suggests and it will troubleshoot any of the Power related issues.
Follow a very important bonus tip How to Turn On or Off Fast Startup in Windows 10.
Closing words
When any problem occurs try the above steps given in Run Power troubleshooter in Windows 10 and this will sort out your issue. This will help you in giving a long life to the power and battery of your device also. So Troubleshoot the power problems in Windows 10 and then enjoy an uninterrupted session with your device.