Windows 11 and 10 users are surprisingly facing Windows Update Error 0x80096004. The issue occurs during the update phase and it is limiting them from installing an update by terminating it. Detailed research on this error reveals that the code stands for TRUST_E_CERT_SIGNATURE – The signature of the certificate could not be confirmed.
This simply means that your update package includes certain invalid or broken certificates. And this eventually causes Windows Update Error 0x80096004 to occur. The entire message that shows up in the Windows Update page is –
“There were some problems installing updates, but we’ll try again later. If you keep seeing this and want to search the web or contact support for information, this may help: (0x80096004)”.
In addition to the certificates, DNS Conflict, as well as corruption in Windows Update components, are also responsible for TRUST_E_CERT_SIGNATURE. Unfortunately, when this happens, users have to discard the download process. There are a few promising solutions that you can give an attempt to bypass it. So, let’s get into the workarounds one after the other.
Windows 10 or 11 update Error 0x80096004 TRUST_E_CERT_SIGNATURE Solutions
Here is how to fix Windows Update Error 0x80096004 TRUST_E_CERT_SIGNATURE in Windows 11 or 10 –
Solution-1: Uninstall Third-Party Antivirus Products
The prime suspect of Windows Update Error 0x80096004 TRUST_E_CERT_SIGNATURE is the presence of third-party antivirus products. These foreign virus scanners usually damage the package during the inspection after the download. So, the first thing you should do is to uninstall such solutions.
You might wonder that after removing the antivirus, your PC would be unsafe. Don’t worry because the OS has a built-in protection called “Windows Defender Security Center“. It scans your computer from time to time and keeps system secure from malicious intruders and threats.
Keep in mind that merely uninstalling will not solve the issue. You should run the antivirus Clean Tool to clear out the files that are left even after uninstalling the product. Popular antivirus vendors provide clean-up utilities on their web pages.
Use the tool to remove the remnants left behind deep on your PC. So, visit the website of antivirus and use its Clean Tool clear out all its leftovers from the system.
We recommend to use Revo Uninstaller and manual methods in post How to Clean Windows 10 PC on Malware or Virus attack to rescue the scenario.
Solution-2: Check and Repair System Files
In some cases, corrupted Windows or broken certificate is also the root cause behind Windows Update Error 0x80096004 TRUST_E_CERT_SIGNATURE. Hence, you should try to check and repair system files using the built-in tools of Windows 11 ad 10.
Step-1 – To get rid of Windows Update Error 0x80096004, launch an elevated Command Prompt. To do so, first, type in cmd on search field. Right-click on the result and select Run as administrator.
Step-2 – When UAC prompts up, click Yes to open the black panel.
Step-3 – Now, type in or copy/paste the below command and hit Enter key –
sfc /scannow
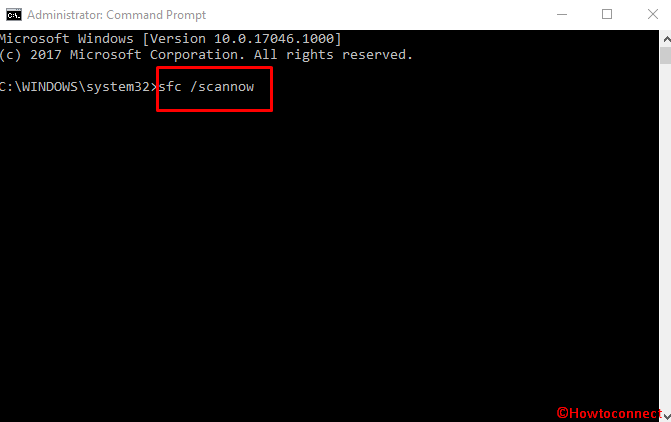
Step-4 – Wait for a little and let the scan get over. If it detects any damaged files, it tries to repair them instantly.
Solution-3: Scan and Repair Windows Component Store Integrity
Broken packages in Windows component store can also be the reason for Windows Update Error 0x80096004 TRUST_E_CERT_SIGNATURE. Microsoft has its own tool, the DISM command to scan and repair Windows component store integrity.
Step-1 – Here also, open an elevated Command Prompt by using any of your preferred ways.
Step-2 – Copy/paste or type in the commands below to check and repair Windows component store integrity.
Dism /online /cleanup-image /ScanHealth
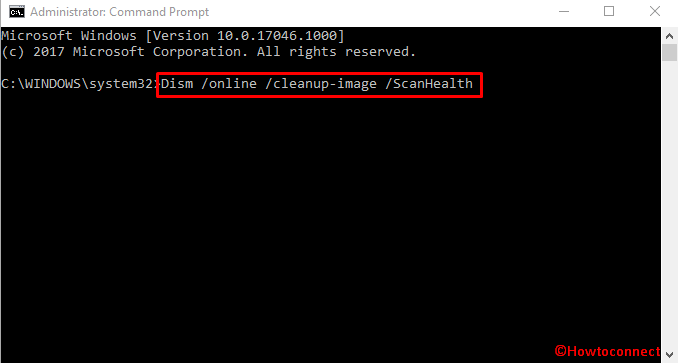
It detects the component storage for damage and may take a few good minutes to finish.
Dism /online /cleanup-image /CheckHealth
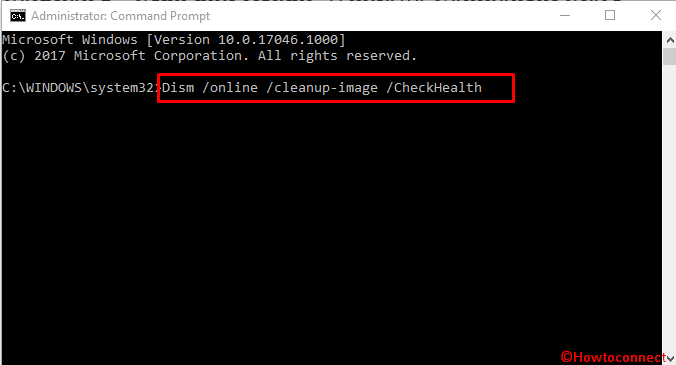
The CheckHealth command scans a registry entry and reports. It tells you about the damages and tries to repair the damaged components.
Dism online /cleanup-image /RestoreHealth

The above command tries to repair the broken packages with internal methods.
Note – Let the first command run completely, then execute the second one and finally enter the third command.
Learn more about these tools from our guide SFC /Scannow, DISM.Exe, CHKDSK Windows 10.
Solution-4: Use Microsoft Update Catalog
Experts are with the view that Microsoft’s infrastructure is the reason for Windows Update Error 0x80096004 TRUST_E_CERT_SIGNATURE. When Microsoft does not sign the packages correctly with the certificates, you tend to receive such problems. So, what you can try in this situation is to download the package manually from Microsoft Update Catalog. When you visit the web page, search for the update using its KB number or update name.
Note – In case, you are not aware of the update number, go to Windows 10 update history page.
Solution-5: Run Windows Update Troubleshooter
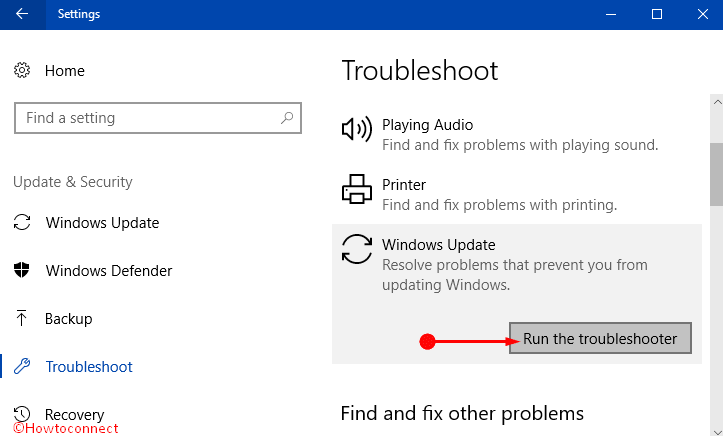
Step-1 – To fix Windows Update Error 0x80096004 TRUST_E_CERT_SIGNATURE, open Settings by using Windows + I keys. However, you can use any other way to launch the same.
Step-2 – From the various categories, reach out to Update & Security.
Step-3 – Go to Troubleshoot section on the left sidebar. On its adjacent right pane, select Windows Update.
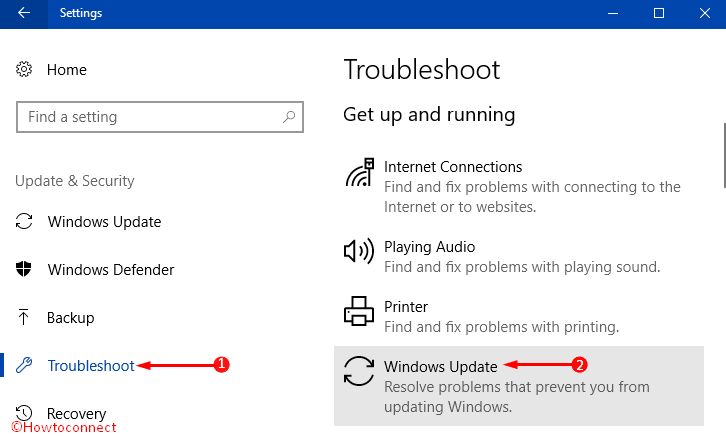
Step-4 – Click on Run the troubleshooter as shown in the given image.
Step-5 – Follow the guidelines on the troubleshooter and complete the scan. In the end, it tells you about the error found and its repair status.
Solution-6: Restart Windows Update Service and other related Services
Step-1 – Type services.msc on taskbar search field and hit Enter.
Step-2 – A window comes into view with a list of services. Now locate respectively Windows Update service, Background Intelligent Transfer service, and Cryptographic services.
Step-3 – Double-click each at a time and from another dialog box, click on Stop.
Step-4 – Now navigate to the following path:
C:\Windows\SoftwareDistribution\ Download
Step-5 – Select all the items from this folder and delete them. You can press Ctrl + A in order to select them. Then from the right click option, choose Delete. And again affirm the deletion process in the dialog that appears.
Step-6 – Open the Services window again.
Step-7 – Here also, locate Windows Update service, Background Intelligent Transfer service, and Cryptographic services again and select each at a time. Right-click on service and select Start from options.
Step-8 – Close all Windows and restart the computer. Upon Start, run the Windows Update again in order to check for Windows Update Error 0x80096004 TRUST_E_CERT_SIGNATURE.
See all the necessary steps for the operations – How to Start, Stop, Configure Windows Services in Windows 10.
These ways are found to be effective in most cases. However, if you fail to resolve the error using above solutions, you need to use Media Creation Tool. You can download it easily from Microsoft’s website.
Conclusion
Any of the update error is completely nagging as they restrict the users from getting an update. Therefore, whenever, you come across any of the errors like Windows update Error 0x80096004 or TRUST_E_CERT_SIGNATURE, you need to fix them in the first place. We have discussed the three ways above which are very effective in fixing the error. Try reading these and apply appropriately to update Windows smoothly avoiding error.
Solutions:
Solution-1: Uninstall Third-Party Antivirus Products
Solution-2: Check and Repair System Files
Solution-3: Scan and Repair Windows Component Store Integrity
Solution-4: Use Microsoft Update Catalog
Solution-5: Run Windows Update Troubleshooter
Solution-6: Restart Windows Update Service and other related Services
That’s all!!