While installing the feature update (or upgrade), many users are confronting an Error Code 0x80190001 which eventually terminates the install process. This specific error appears after a long wait for the download to start and it affects almost every version of Windows. As a matter of fact, this issue also seems to block the Update installation.
This error appears with a message to check the network settings.
Something went wrong
Couldn’t download Windows 10, please check your network settings and try again. You can contact Microsoft support for help with this error. Here is the error code 0x80190001.
According to some users, they are actually receiving Error Code 0x80190001 while upgrading to Windows 11 or 10. Experts are with a view that it is the MDM (or Mobile Device Management) registration error. Another probable cause may be the communication problem between Windows client and Microsoft update server.
However, a deep analysis also reveals that the Error Code 0x80190001 can be triggered by the presence of antivirus solutions. In addition to this, another possible cause may be installing Windows 11 or 10 from an unauthorized source rather than the genuine ISO files. So, here, we present you with certain promising solutions that can help you to bypass 0x80190001 Windows Update error.
Let us walk towards the workarounds one by one and see which works best for you.
Error Code 0x80190001 Windows Update in Windows 11 and 10 Workarounds
There are two different ways in order to resolve this error. We will be discussing them in bellow description:
Workaround 1: Run Windows Update Troubleshooter
A good number of users got rid of this nagging Error Code 0x80190001 by running the Windows Update troubleshooter. So, give an attempt at it and see if this works for you also.
For Windows 10 –
Step 1 – Open Settings by pressing Winkey + I.
Step 2 – Find and select Update & security.
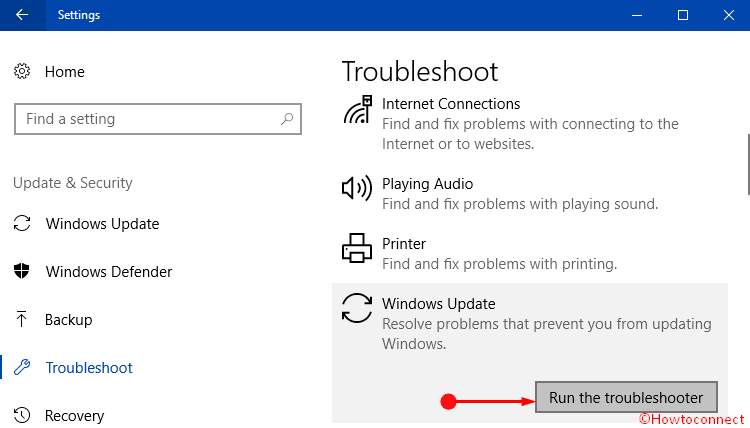
Step 3 – On the left sidebar of the next page, click Troubleshoot. Shift to its right pane and click on – Additional troubleshooters.
Step 4 – Select Windows Update and click the button Run the troubleshooter as indicated in the below screenshot.
Step 5 – Follow the guidelines on the wizard and let the troubleshooter scan for the faults. In the end, it repairs the problem and hopefully, you should not get Error Code 0x80190001 anymore.
For Windows 11 –
- Press Windows key and I.
- Select Troubleshoot from the right pane of the Settings app.
- On the next page, click Other troubleshooters.
- Select Run in the Windows update section.
Though for many, troubleshooting Windows Update hardly bought any relief. But few of them have reported in the forums that this specific update error got resolved with the troubleshooter.
Workaround 2: Use Windows Media Creation Tool
The safest and most recommended resolution process in this regard is to upgrade the computer to latest Windows edition using the “Windows Media Creation Tool“. We will show you the way to use this and here are the steps for you.
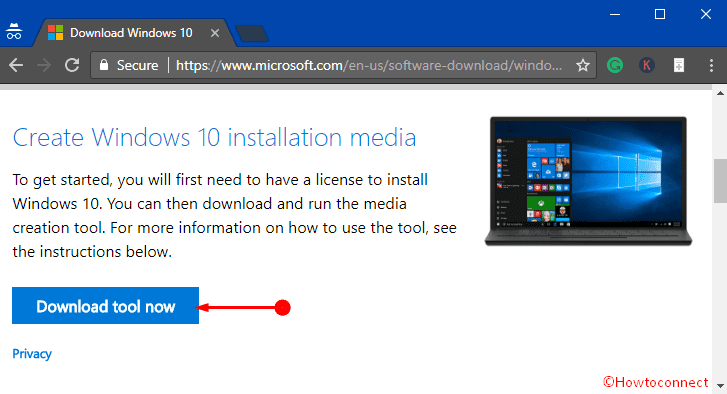
Step 1 – Visit the website of Windows 10 download or Windows 11 download by Microsoft and grab the installation media tool. To do so, click Download tool now (see screenshot).
Step 2 – Once you downloaded the tool, open the Downloads folder and double-click the file MediaCreationTool.exe.
Step 3 – Accept the License terms and move ahead by selecting the option Upgrade this PC now. Afterward hit the button Next.
Step 4 – Proceeding forward, select the option Keep personal files and apps in order to leave the apps, files, and settings untouched.
Step 5 – Finally, click on the option Install to start the upgrading process.
Workaround 3 – Configure Internet Time Settings
Many a time, when there is a conflict between your time and internet server time, there are possible chances for various errors to show up during the update. So, configure the Internet time settings and check if it is in sync with the server.
For Windows 10 –
Step 1 – Press Windows + I.
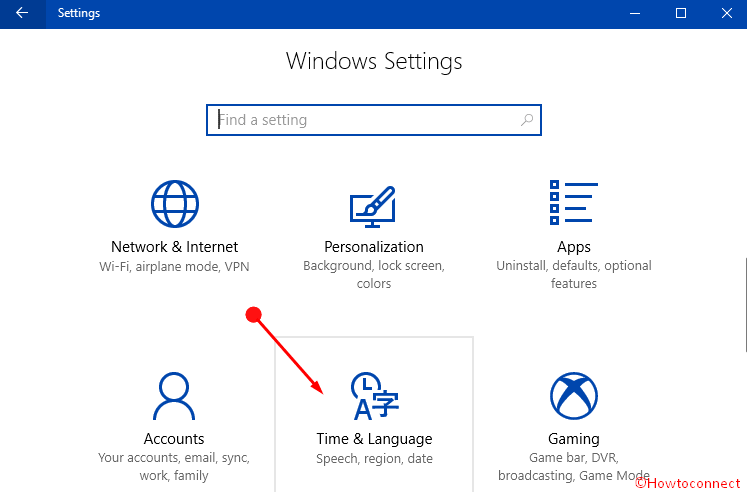
Step 2 – Here, select Time & Language tab as shown in the given image.
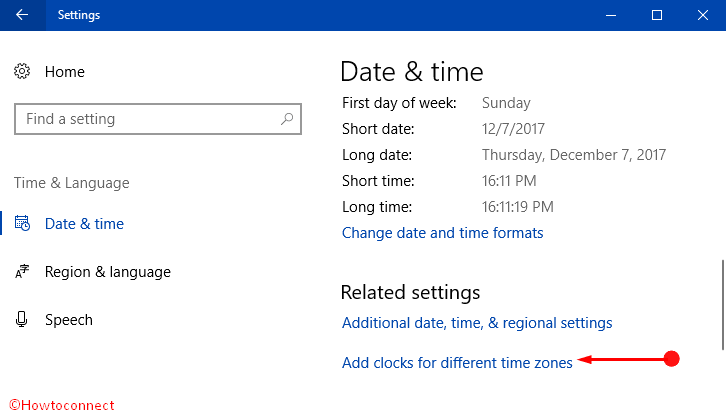
Step 3 – On the right pane of the following page, click the option Add clocks for different time zones. This immediately opens a small window of Date & Time on the PC screen.
Step 4 – Switch to the Internet Time tab and make a click on the button namely Change settings.

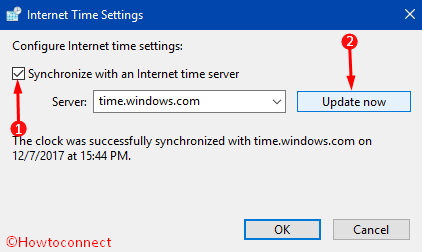
Step 5 – Now, ensure to check mark the box “Synchronize with an Internet time server“. Finally, click Update now button on the dialog.
Step 6 – Close all the windows and this should bypass the Windows Update errors.
For Windows 11 –
- Hit – Winkey+I.
- Select – Time & language.
- Click – Date & time.
- Move down and click on – Additional clocks.
- Now follow from Step 4 in the above method.
Workaround 4 – Disconnect Internet Connection
If you are using the ISO file, ensure to disconnect the internet connection during the setup phase to avoid the occurrence of any errors. So, during setup, the computer should not have any internet connectivity.
Furthermore, if you are updating through Windows Update, then remove the internet connection once the download reaches out 100%. For many, this solution worked like a charm and they did not encounter any further errors in the upgrade process.
Workaround 5 – Diable Antivirus
Before upgrading the machine, conduct a full PC scan using your antivirus solution. Once you complete the scan, disable the antivirus program. This is important to perform because experts reviewed that presence of antivirus is also a cause of this Error Code 0x80190001. After disabling the program, try installing the updates.
You may like to read How to Disable / Enable Virus & Threat Protection in Windows 10.
Workaround 6 – Disconnect External Peripherals
Disconnect all external connections like USB drives, game controllers, Printer, External Hard disk and other peripherals from the PC. Moreover, also check whether any non-essential device is connected to the computer or not. If you find any, detach it from the computer and then start the install process.
After performing these, go for upgrading the Windows.
Conclusion
Error Code 0x80190001 Windows update is indeed an annoying error since it keeps you on hold a long time while updating. Besides, it also blocks the upgrading process. As a result, if you come across this error and the message, you need to take steps soonest possible in order to fix this. We have discussed the resolution process in simple language to make you understand easily. Read the instructions carefully and apply keenly and eventually, you can update flawlessly.