Here, you will find 3 easy ways to Enable and Disable Nearby Sharing in Windows 10. Microsoft brought Windows 10 April update 2018 into daylight in this week with thousands of special features, new UI, sleek appearance and many more. To make the sharing easier than ever, “Nearby Sharing” made debut in this release. This is a kind of superfast file sharing technology using integrated Bluetooth and Wireless connection.
The tech giant has also introduced easier means to Enable Disable Nearby Sharing in Windows 10 to serve the purpose. You can use the latest Windows Settings app, Action center or even the Registry tweak to do the charm. Let’s move on to easier ways to Enable Disable Nearby Sharing in Windows 10 in below chapter:
Enable Disable Nearby Sharing in Windows 10
Here are all the 3 Ways to Enable Disable Nearby Sharing in Windows 10 easily –
Way-1: Using the updated Action Center – The quickest mean
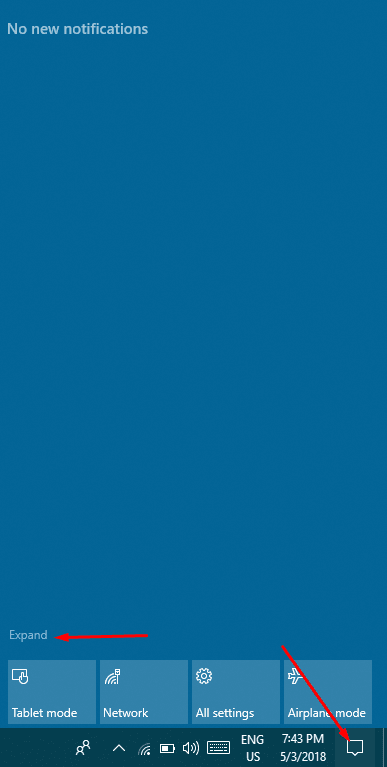
Step-1: Move the mouse pointer across Desktop area to the bottom right side and perform a click on Action Center from the Notification area. Upon viewing the quick actions, choose the Expand option from the left side to access more buttons.\
Step-2: Make a click on the Nearby Sharing tile to enable the option in your Windows.
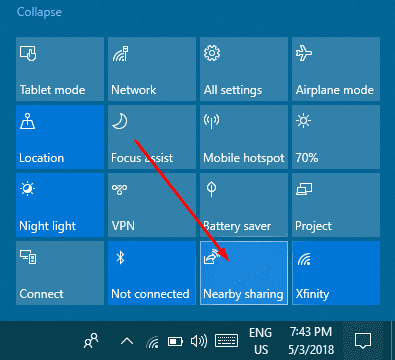
The feature will be active once the tile turns blue. Now, if you like to Disable Nearby Sharing in Windows 10, follow the same method and make a click on the tile once more. When it turns into Gray-blue, you can be sure that the feature is disabled.
Way-2: Using the Latest Windows Settings app
Windows Settings app is now more resourceful and enriched with more advanced options. You can use this also as a platform to Enable Disable Nearby Sharing in Windows 10.
- Do a joint press of Win+I hotkeys and let the Windows 10 to launch Settings app.
- Once it rolls down to display, hover the cursor to System and hit a click on it when selected.
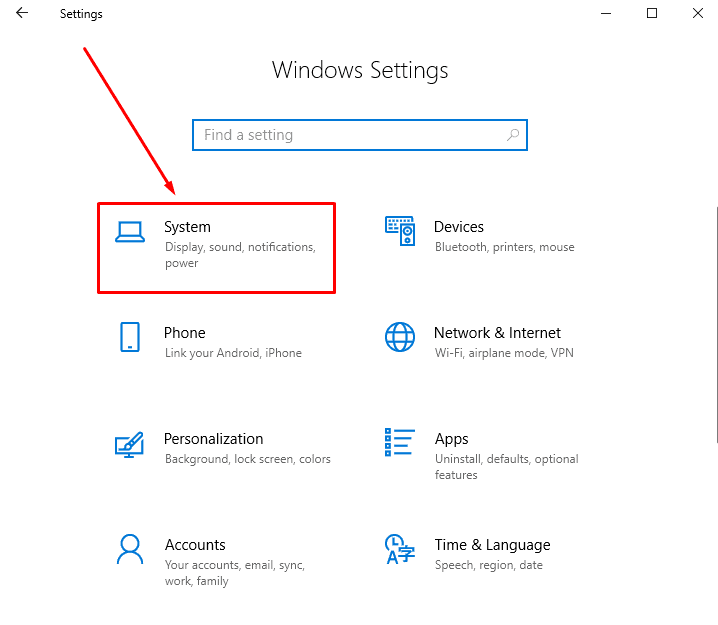
- Subsequent to reaching on the new page, choose the latest Shared experiences option and jump alongside right pane.
- Reach out to Nearby Sharing section and toggle the switch under it to On position.
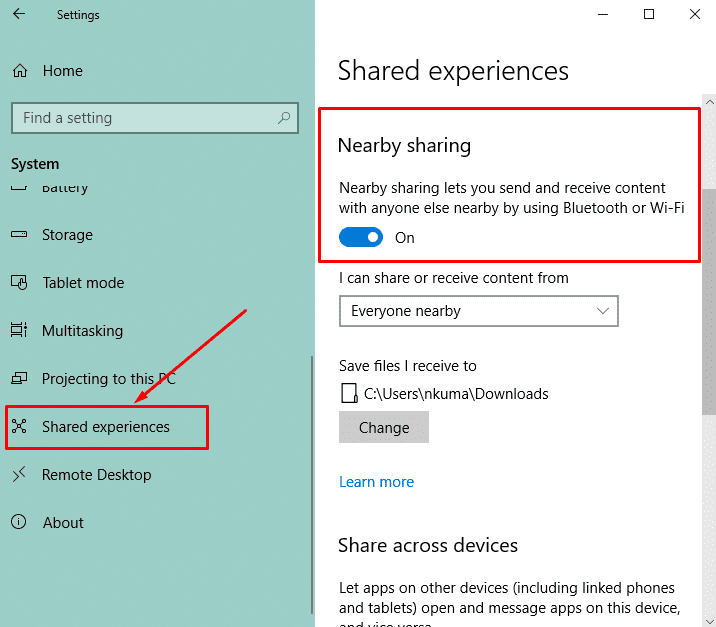
Thus the feature is enabled. You can send as well as receive any contents like files, documents, photos, videos over Bluetooth or Wi-Fi direct. However, you have the authority to allow the devices that might participate in this sharing. To do so,
- Move forward to “I can share or receive content from” and do a click on the dropdown menu under it.
- Choose the convenient option from the menu to customize based on choice.
Now, to Disable Nearby Sharing in Windows 10, just turn the Switch to Off under Nearby Sharing proceeding with same instructions.
Way-3: Modifying the DWORD value in Registry Editor
Step-1: Perform a click on the Cortana search box and write “Regedit” in the void space.
Step-2: When it appears in the result, select it to open in your Windows.
Step-3: UAC might prompt you for permission to make changes in the computer. Select “Yes” from the warning dialog box.
Step-4: Once the “Registry Editor” comes to view, navigate to the following path in the left pane:
HKEY_CURRENT_USER\Software\Microsoft\Windows\CurrentVersion\CDP
Step-5: Upon reaching to CDP make a right click on it, select New and then DWORD (32-bit) value option.
Note- Create 32-Bit DWORD value even if you are using a 64-Bit device and save a back up of the whole process before putting registry changes into effect to avoid any unintentional damage to your Windows.
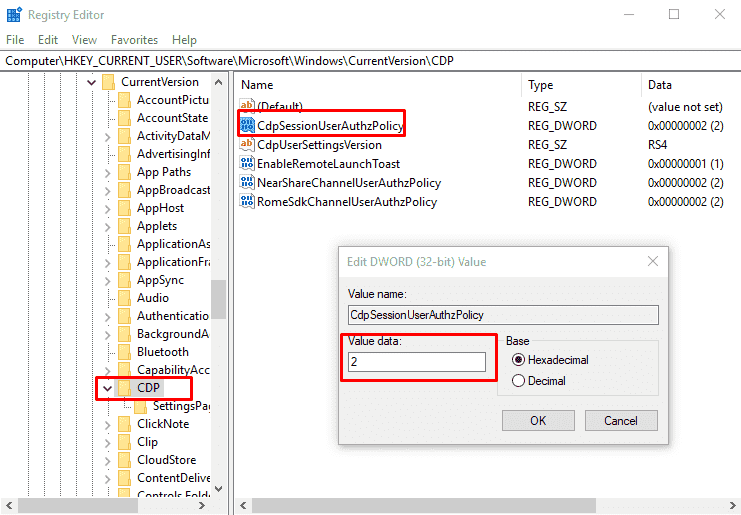
Step-6: Rename this value to CdpSessionUserAuthzPolicy.
Step-7: Put a double-click on it and set the value as following for respective actions under “value data” option and click the “Ok” button:
| Value | Action |
| 0 | Disable Near Share |
| 1 | Enable Near Share for ‘My devices only |
| 2 | Enable Near Share for ‘Everyone nearby |
Step-8: Following the same way above, create a new DWORD in CDP key as NearShareChannelUserAuthzPolicy and edit this for changes as follows:
| Value | Action |
| 0 | Disable Near Share. |
| 1 | Enable Near Share for ‘My devices only |
| 2 | Enable Near Share for ‘Everyone nearby |
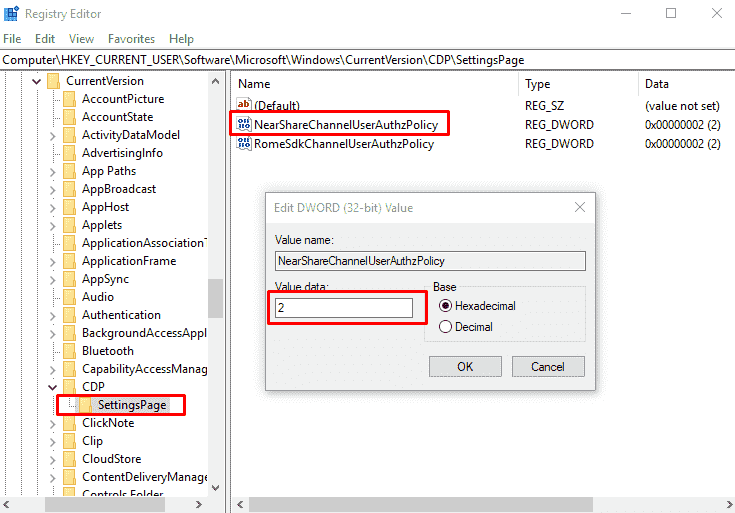
Step-9: Now, navigate again to the following key path:
HKEY_CURRENT_USER\Software\Microsoft\Windows\CurrentVersion\CDP\SettingsPage
Step-10: Move aside to the corresponding right side and perform a double click on the DWORD NearShareChannelUserAuthzPolicy to edit and put the following value in Value data space.
| Value | Action |
| 1 | Enable Near Share for ‘My devices only’ |
| 2 | Enable Near Share for ‘Everyone nearby’ |
Step-11: Proceeding forward, edit the “BluetoothLastDisabledNearShare” complying with same instruction as before and set the value to “0” to disable Near Share
Step-12: Leave the “Registry Editor” and Reboot the Windows to put these registry changes into effect.
Therefore, these are the 3 simple ways to Enable Disable Nearby Sharing in Windows 10. Undoubtedly April update is a blessing to the modern age as for the special features like Nearby Sharing. Probably you are having an amazing time with the updated Windows 10. Make your finger crossed for newer inclusions to come ahead soon.