Add or Remove User that can Remotely Access This PC is another example of Microsoft’s dedication towards the users. The motive is to provide the maximum ease of access and flexibility in use. Users can add multiple users in order to access the computer remotely. When a user allows a remote desktop connection to his computer, he is able to use and have full access to all the programs and the files of the remote device if he wants sitting down at any place.
This useful feature is built-in one and running from the earlier versions of windows. When you log in as Administrator, you are always capable of connecting your computer remotely to a dissimilar device. Even, if you are not connected as either as the members of the group of Remote Desktop Users you can are equally efficient. However, we will present a super simple method about how to Add or Remove User that can Remotely Access This PC while you require logging in as Administrator in your Windows 10 PC. In order to give you a clear idea, we will divide the whole task into a number of pieces. So, let’s focus on the topic without any further delay.
Ways to Add or Remove User that can Remotely Access This PC on Windows 10
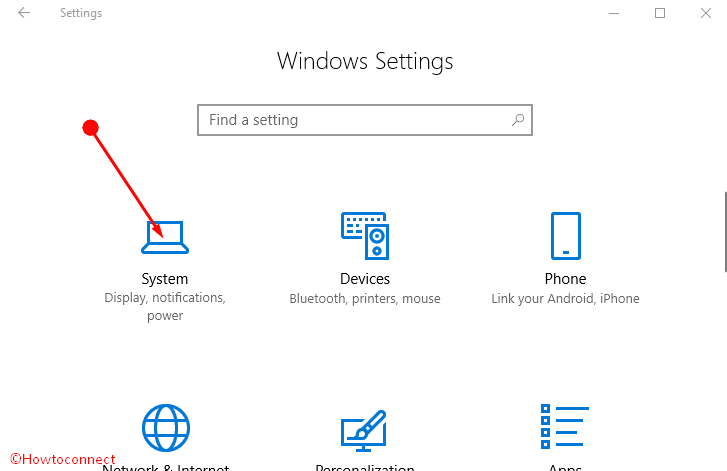
Step-1: First of all, open the Start menu by clicking on the Start icon located on the taskbar.
Step-2: After opening the Settings page, you will see an option in the name of System. Make a click on it.
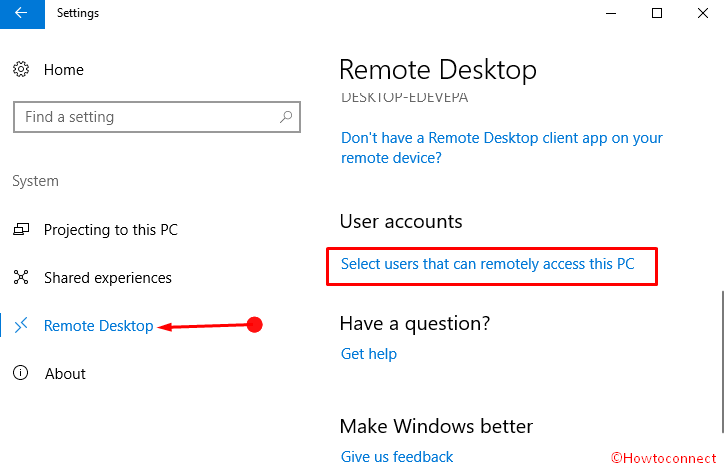
Step-3: It will open another new page where you will find “Remote desktop” option in the left pane. Performing a click will load all the settings of Remote desktop in the right section. Scroll in the downward direction and click on Select users that can remotely access this PC.
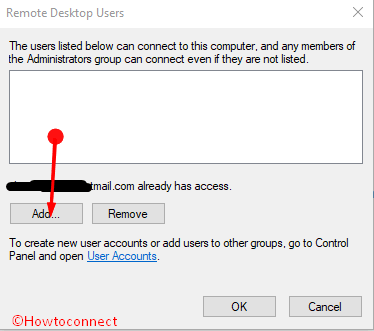
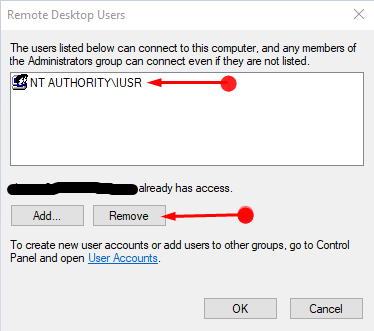
Step-4: You will be able to see a pop up named Remote desktops having Add and Remove buttons. To add a user, obviously, select the Add button and allow the Select user pop up to appear.
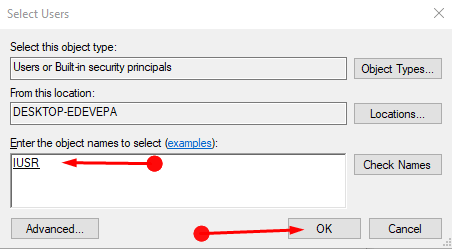
Step-5: Enter the user name in the Object box you have decided to add that can Remotely Access This PC in Windows 10 and press Check. Click on Ok after you have found the name correct.
Step-6: Removing a user from the list of Remote desktop users is pretty easy. Simply select that user and click on Remove. Thus, it will delete the user from the list.
Conclusion
Using the above procedure you will easily Add or Remove User that can Remotely Access This PC in Windows 10 to hold a complete approach to entire programs and files of another device. Remote access is a demand of time now a day. Often we feel the necessity of accessing our important documents from another device to cut our time short as well as the smoothness of work process. This feature in Windows is definitely a very effective one and if we can use it properly, it will help you to increase your productivity in the long run.