Procedures to Completely Disable Windows 10 Live Tiles – A Substantial number of people understand no significance of the reshuffling square shaped boards on the Start menu? These slabs refer to the pinned applications spontaneously and periodically refreshing at the interval of certain seconds and showcase the movements occurring on the respective apps like Weather, News headlines, Sports.
According to the opinion of many users, this is in vain and looks a bit awkward too. Fortunately, If it seems fruitless this feature can be simply disabled.
How to Completely Disable Windows 10 Live Tiles
Group Policy Editor
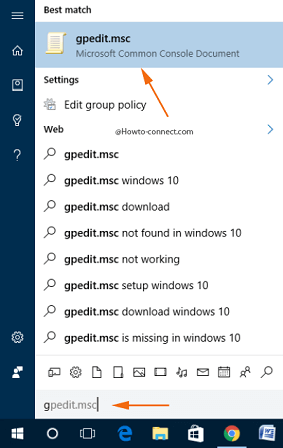
Step 1 – Hit the Windows key and in the appeared taskbar search, write the code gpedit.msc then soon you will see the same at the top of the result, click or hit it.
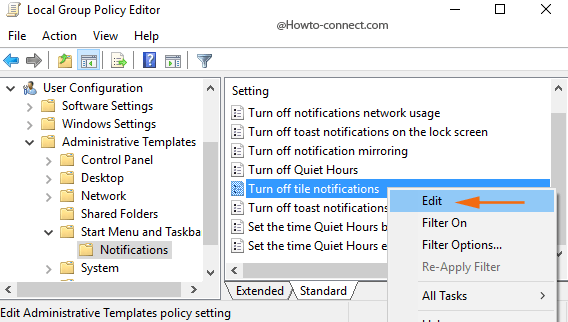
Step 2 – On the Group Policy Editor, you will notice a console tree on the left sidebar. Travel through these folders – Local Computer Policy => User Configuration => Administrative Templates => Start Menu and Taskbar => Notifications.
Step 3 – Now, locate the opposite portion, trace out a policy entitled Turn off tile notifications, and perform a right-click on it followed by a click on the choice Edit on the right-click context menu.
Step 4 – In the next arrived Turn off tile notifications window, three round cells are visible on the upper left side, so, click or hit the second one labeled as Enabled.

Step 5 – Memorize to hit Ok button to Completely Disable Windows 10 Live Tiles on Start.
Registry Editor
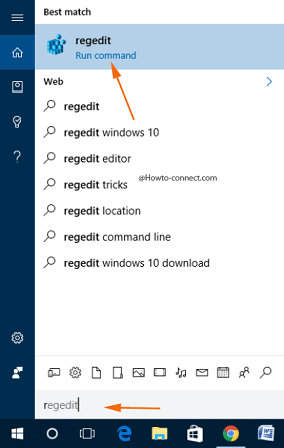
Step 1 – Strike on the Windows key and when the Cortana search arrives, write regedit then as Cortana showcases the identical regedit at the top, click on it.
Step 2 – UAC pop up comes on the screen, grant permission by clicking or hitting the Yes button.
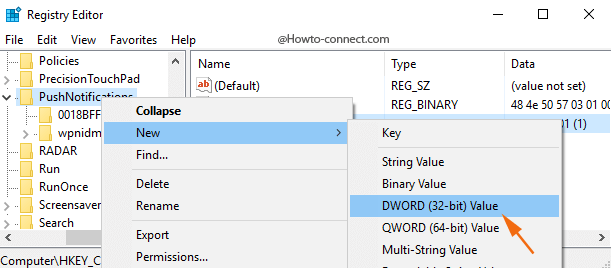
Step 3 - Once the Registry Editor gets widespread on the screen, navigate to this path HKEY_CURRENT_USER\SOFTWARE\Policies\Microsoft\Windows\CurrentVersion\PushNotificationsStep 4 – Perform a right-click on the PushNotifications key, point to New followed by a click, or hit the choice DWORD (32-bit) Value in the next emerged sub menu.
Step 5 – Name the Dword as NoTileApplicationNotification.
Step 6 – On the right portion, you will notice the Dword, right-click on NoTileApplicationNotification and click or hit the choice Modify.
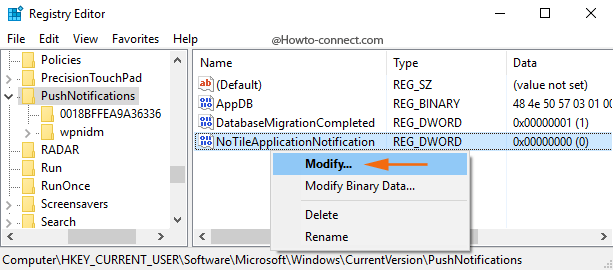
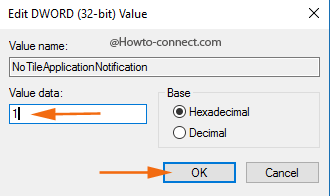
Step 7 – Put its Value data as 1 in the popped up Edit box and click or hit OK button.
Disable Windows 10 Live Tiles One by One
Most of you must be aware that the live tiles can be disabled one at a time, but what if you desire to turn off all of them in one move. So this is not a perfect process. If you pursue this method you need to Disable the Live Tile of the freshly installed application every time.
However, if you are unaware of this method then follow the way –
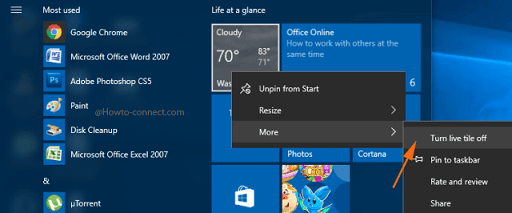
Step 1 – Perform a right-click on the application for which you like to disable Live tile.
Step 2 – On the right click context menu move your mouse pointer to More and when a sub-menu prompts, click on the first choice Turn live tile off.
If you are convinced to permanently and completely Disable Windows 10 Live Tiles, proceed with either of the two above elaborated methods and the alterations will be implemented straight away without the requirement of a reboot.