High CPU usage by Service Host is one of the most prominent factors responsible for system’s low processing speed. The svchost.exe is one of the processes that run consistently on Windows whereas others operate automatically. Unlike other causative elements like virus infection, outdated windows and running of computer programs, poor processing speed attributable to Service Host (svchost) or any other Windows processes requires some more complex steps.
Deciphering High CPU usage by Service Host in Windows 10 is relatively easier than the earlier version. This is because; services that run on this process are separated from others, thereby making the identification process less complicated.

Certain applications like the Svchost Viewer and Svchost Process are helpful in the identification of the exact services. They tell you correctly about those services that run on the specific Service Host on the Windows machine.
High CPU usage by Service Host in Windows 10
Step 1 – Determine the exact svchost process that is responsible for the computer’s low processing. To achieve this, open Task Manager by pressing “Ctrl, Shift and Esc” keys altogether.
Step 2 – Task Manager comes into view with all the processes running on your Windows machine.
Step 3 – Figure out processes according to CPU utilization by clicking on the CPU column. Once you do this, those processes that consume most of the computer’s CPU appears at the top.

Before attempting to resolve the issue, it is very imperative to know more about the services that make use of most of the computer’s CPU. You can either research about them on the internet, or use the Services Manager to access its description.
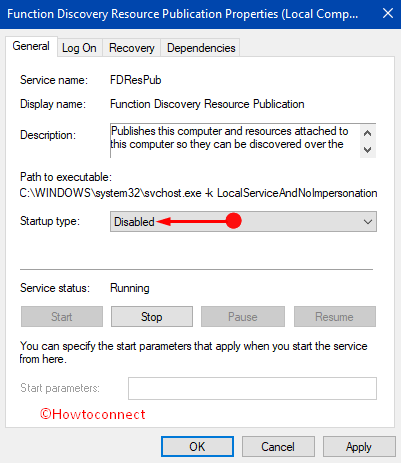
Step 4 – Moving ahead, type in “services.msc” on Cortana and press Enter. Locate the specific service such as “Function Discovery Resource Publication” and study its status.

Step 5 – The services that consume high CPU usage always have a running status. Additionally, you can also look at its startup type and description.
So, it is now time to resolve the Service Host issue and there are two common ways to do this. You can reset the process priority value or disable the service altogether.
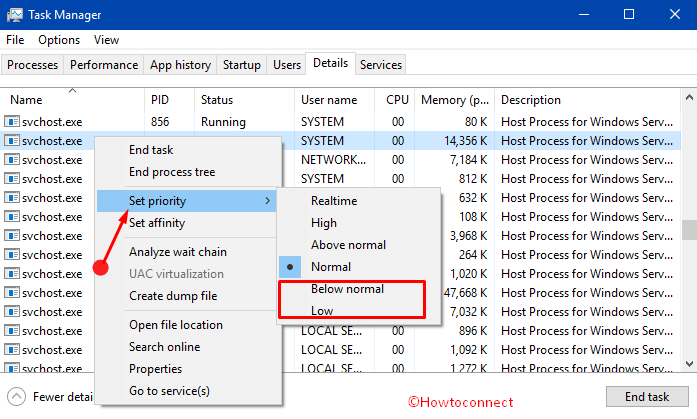
Step 6 – To reset the priority value, go back to the Task Manager and right-click on the specific service of interest and then select Go to details.

Step 7 – Details tab opens up with the correct svchost.exe process already highlighted. Now, right-click on the specific service, hover over Set Priority and select either Below Normal or Low.
Step 8 – Another alternative is to disable the service. To do so, launch Services manager, locate the service and double-click on it. Then, modify the “Startup type” from Manual to Disabled. This disables the service instantly.
Run System File Checker
CPU usage can happen due to file corruptions which eventually freezes and crashes the device. Windows 10 contains a built-in tool that lets you trace out the corrupted ones.
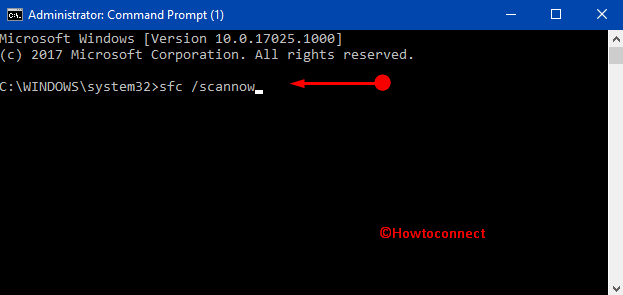
Step 1 – Load an elevated Command Prompt and to attain this, type cmd on Cortana. Moving ahead, keep a hold on Ctrl and press Shift and Enter keys.
Step 2 – Upon the promptness of UAC, click Yes.
Step 3 – Copy/paste the given syntax and press Enter to detect the corrupted files.
sfc /scannow
Check for Update
Ensure that your machine is up to date because sometimes, it is an issue or bug that is causing this. Microsoft often releases fixes in the updates, so its’ great idea to check for updates.
Step 1 – Launch Settings application by using Windows -I hotkeys. Navigate to Update & Security => Windows Update.
Step 2 – Click Check for updates button and wait until the entire procedure completes.

Conclusion
Hopefully, by following the above sequence of steps, you can overcome High CPU usage by Service Host in Windows 10 PC. As already indicated, this is usually accomplished by either resetting the process priority or disabling the service altogether. However, you must be cautious when selecting the service to disable. For instance, critical services that use by Windows should never be disabled for any reason. Such action will definitely cause the computer system to malfunction.