Procedures to Disable and Enable Windows Key in Windows 10 with steps. – On the Keyboard, Windows key performs multiple tasks such as open Start menu, Supports other keys to work as shortcuts. Some users find the key in the disabled state on Windows 10. Moreover few want to disable it for their own reasons.
So you will see here a guide explaining How to Disable / Enable Windows Key on Windows 10 with different methods. You should know that Ctrl+Esc functions as a substitute for the key on the keyboard. So in absence of the Windows key, you can effectively use this shortcut combination. See a very interesting article How to Create Keyboard Shortcut for a Website on Windows 10 in this regard.
Ways to Disable / Enable Windows Key on Windows 10
This will take a few minutes to perform. Just read the steps given below to accomplish the task.
Method 1 – Using Registry Editor
Step 1 – Click the Start button, type regedit and press Enter. This will open the Registry Editor on your screens.
Read this guide to find more ways to Access Registry Editor in Windows 10.
Step 2 – Navigate to the following path:
HKEY_LOCAL_MACHINE> System> CurrentControSet> Control> Keyboard Layout
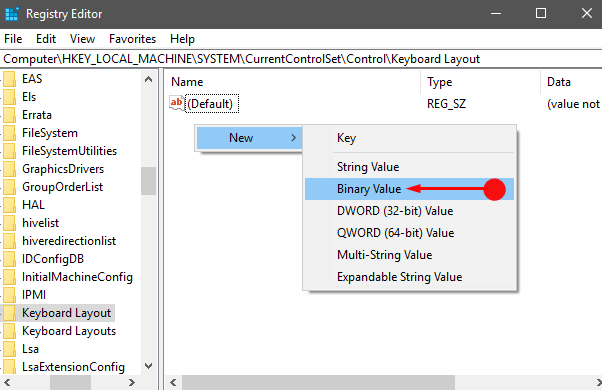
Step 3 – Go to the right pane, right click on an empty field and select New followed by Binary Value. Name the value Scancode Map.
Step 4 – Right click on the Scancode Map Binary value and select Modify.
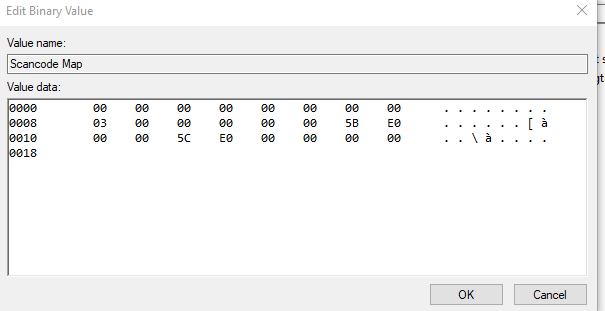
Step 5 – Edit Binary Value pop up appears. Type the following value data manually in the value data field –
00 00 00 00 00 00 00 00
03 00 00 00 00 00 5B E0
00 00 5C E0 00 00 00 00
and click OK.
Step 5 – Close the Registry Editor and restart the system. When you need to again enable the key just delete Scancode Map value and restart the PC.
Method 2 – Again Disable / Enable Windows Key on Keyboard Windows 10 using the Registry editor
Step 1 – Access the Registry Editor (Click Start, type regedit, and press Enter).
Step 2 – Navigate to the following keys:
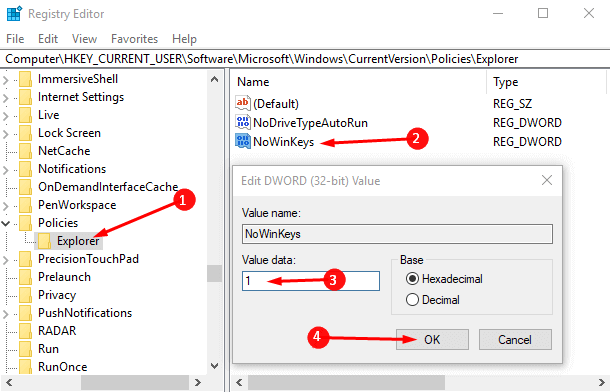
HKEY_CURRENT_USER\Software\Microsoft\Windows\CurrentVersion\Policies\Explorer
Step 3 – Navigate to the right pane, right-click on an empty space and select DWORD (32-bit) value from the list. Name it NoWinKeys.
Step 4 – Double click on NoWinKeys, and put value 1 under Value data and select OK. Oppositely, use the value data 0 to restore the previous status.
That’s it. Simply close the system and restart it.
Method 3 – Using the Group policy Editor
Step 1 – Press the shortcut key Win+R. Run dialog box will appear in the bottom left of the screen.
Step 2 – Type gpedit.msc and click OK.
Follow the additional methods to Open Group Policy Editor in Windows 10.
Step 3 – Navigate to the following path in your Group Policy editor
Computer configuration > Administrative Templates > Windows Components > File Explorer
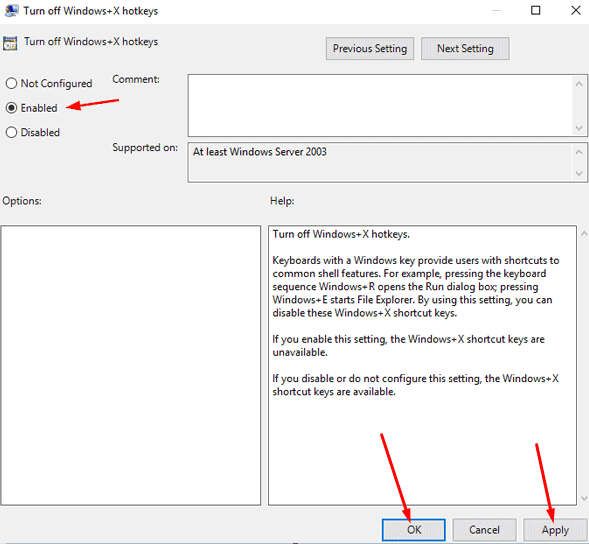
Step 4 – Check in the right pane, an entry name Turn off Windows + X hotkeys. Double click on it and select Enabled.
That’s all done now.
Finalizing words
So these are the ways leading to Disable / Enable Windows Key on Keyboard Windows 10. Once you make the key working it supports you perform the above-said works. And disabling the same you prevent using to open the Start menu, pay supportive role as keyboard shortcuts.
Hi there,
this was extremely helpful, do you know if there is anyway to disable the Esc Key using one of these methods?