WSQMCons.exe in Windows 10 is an executable (in short .exe) file which is basically considered as the Windows Software Quality Management Consolidator. This Windows SQM Consolidator accumulates moreover send usage data to Microsoft. The team utilizes this info to improve the quality of the products which the customers often use and to fix any kind of issues related to it.
For example, if you participate in CEIP, (Customer Experience Improvement Program), then Window runs the WSQMCons.exe daily. Furthermore, the OS automatically sends the info to Microsoft about how you use certain products. This file is not harmful but at times throws several error messages during runtime. So, in this article, we will discuss every detail of WSQMCons.exe in Windows 10 and its possible workarounds as well.
Disable and Fix Wsqmcons.exe in Windows 10
It is important to have some idea about various Wsqmcons.exe errors and different solutions.
What are .exe files?
Before we go any further, for the beginners here, EXE files a kind of executable files. These are the files which are made up of some particular instructions which are executed when you open it. These files also contain embedded resources which might be useful for your interface. These files are necessary to run any program on your PC.
See Fix: Corrupt .exe File Association in Windows 10.
Is WSQMCons.exe harmful?
WSQMCons.exe in Windows 10 can strongly affect the working of the operating system. It has not been given a security rating till now. But there is a good chance that if this file is not located in the System 32 folder, it can be a Trojan. The proof of the authenticity of this file is a digital signature provided by Microsoft itself. Hence, its technical security rating is approximate ‘3% dangerous’. But if it turns out to be malicious, the chances that it can harm your PC are high. So, ensure that it is an authentic file because many viruses enter with this name and can affect the system.
Causes of WSQMCons errors
There can be many reasons for the failure of a .exe file. All the factors that can damage a .exe file can cause WSQMCons error in Windows 10. It could be a corrupt driver, faulty shutdown or the application itself. It may be malware infection, corrupted files, and invalid registry. Damaged RAM or hard drive can also be responsible for crashing a .exe file. Running multiple files together or incomplete installation can be responsible for these errors as well. The above kind of errors may also occur if the file accidentally gets deleted or moved from its location.
The generally found roots of WSQMCons errors are missing or corrupted files or a virus or malware infection.
End Wsqmcons.exe
Step-1: Right-click on the taskbar and choose Task Manager option (see snapshot).
Step-2: Once you open Task Manager, go to the Processes tab. Here, locate and right-click the process namely Windows Software Quality Management Consolidator. Alternatively, you can switch to the Details tab and find out Wsqmcons.exe from the list.
Step-3: Click End task option from the context menu.
Restore Corrupted/missing Files
Run System File Checker, the built-in as well as the handy tool of Windows to restore all the faulty files on the system.
Go to the Start. In the Search box type cmd.
Hold the “Ctrl + Shift” hotkeys and press Enter to access an elevated Command Prompt. Click ‘Yes’ on the UAC dialog box that appears.
In the Command Prompt, type the given code and press Enter to execute.
sfc /scannow
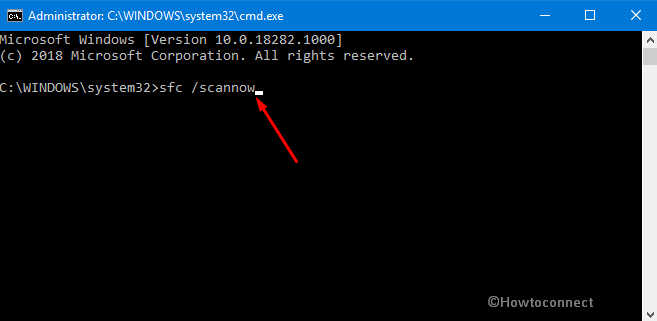
Wait for sometime as the scan will take time to finish. Once it gets over, see for the occurrence of Wsqmcons.exe errors.
To know more, read SFC /Scannow, DISM.Exe, CHKDSK Windows 10.
Install Pending Updates
Microsoft constantly improves the operating system by sending updates that are related to the Wsqmcons.exe. So, you need to ensure that the system has installed all the pending updates.
Open Windows Settings and to do so jointly hit “Win + I” keys. Select Update & Security.
Click Check for Updates button. Once they are available, download and install them right away.
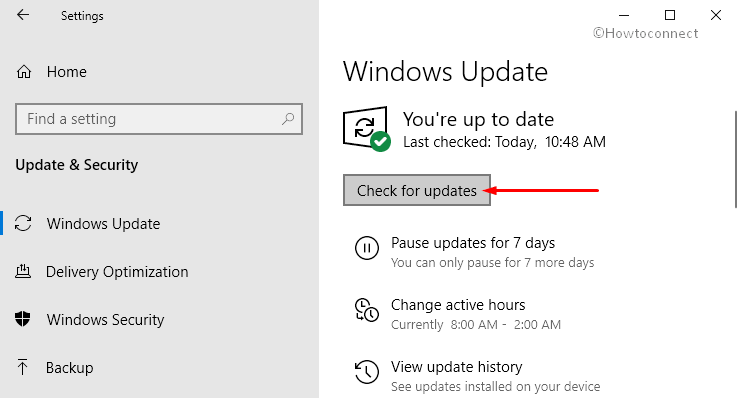
After installing the updates, see if you still get errors related to Wsqmcons.exe in Windows 10.
Run Windows Security
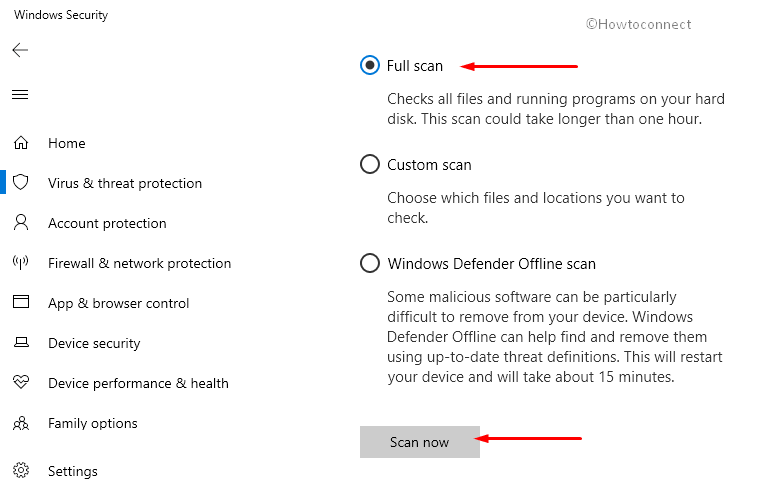
The errors related to Wsqmcons.exe can also be due to malware attacks on the system. So, the best workaround is to run Windows Security from time to time and avoid threats and viruses. However, you can also use third-party antivirus software to detect attacks. But the built-in utility Windows Security works best.
Click the shield icon on the taskbar. When Windows Security will show up, go to the Virus & threat protection category.
On its right pane, click Scan options.
Choose Full scan and hit Scan now button.
Use Disk Cleanup
Wsqmcons.exe in Windows 10 may also pile several junk items on the system. These unnecessary files often lead to various errors and also slows down the machine. Hence, use the Disk Cleanup tool and get rid of those unwanted items.
Hit “Win + R” keys in one go to open Run dialog box. Type cleanmgr and hit Enter.
Choose Windows installation drive and click OK. When the wizard will open up, choose all the boxes and click OK to delete those items.
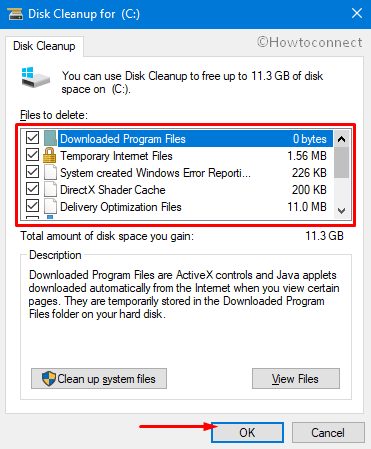
To do a deep cleaning, click Clean up system files.
Next, follow the guidelines here: Windows 10 – How to Open and Use Disk Cleanup.
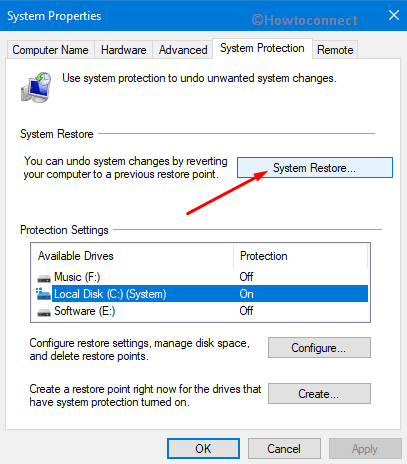
System Restore
By reversing any potentially affecting system changes, you stand a chance to eliminate the error messages. To restore the system go through these sequence of steps.
On Cortana search, type “System Restore” and hit Enter.
Click System Restore button as shown in the below picture. Follow the guidelines on the wizard and undo the changes by reverting the system to a previous restore point.
That’s all!!!