If you are looking for perfect solutions to fix DMA_COMMON_BUFFER_VECTOR_ERROR in Windows 10, you are definitely at the right place. With a bug check value of 0x000001DC, this Blue Screen of Death indicates a driver has misused the DMA vectored common buffer APIs. It causes irregular flashing, makes the screen blue, displays random text messages while opening or closing a program. Besides, the OS may freeze for some time making desktop inaccessible. But the most annoying issue you will experience is Automatic Rebooting of the device.
DMA COMMON BUFFER VECTOR ERROR comes up in Windows mostly when you have outdated and defective device drivers in the system. Furthermore, you can have the error as for missing system resources due to malware or virus attack, a collision of similar applications, incorrect memory allocation, and bad areas in the RAM and Hard Disk itself. Even if the Hard Disk is running low or the system is having dreadful Windows image files while using an additional HDD, you can get the problem. The bug can be severe if not resolved in the beginning. So, we are here to elaborate a good number of resolution processes owing to fix this BSOD error.
DMA_COMMON_BUFFER_VECTOR_ERROR BSOD in Windows 10 Solutions
Here are the ways to fix DMA_COMMON_BUFFER_VECTOR_ERROR BSOD in Windows 10 –
1] Put a stop to the Windows from Restarting Automatically
The most annoying problem in the system diagnosed with DMA_COMMON_BUFFER_VECTOR_ERROR is it will undergo Automatic Restarting periodically. This is so annoying that you will feel a little bored. Neither you can assume what’s going on really, nor can deploy a workaround properly. In such a scenario, the only relief is to disable this action. Well, let’s complete the task moving with the below proceedings –
First of all, we recommend you to save all the ongoing processes. Can also minimize if they are quite good in a number.
Step-1: Later on, transfer self to the Desktop area directly by pressing Win+D keys together.
Step-2: Once the place comes to view, roll the cursor to This PC icon and make a right click on it.
Step-3: Choose Properties option from the appearing menu. It will allow the Windows to unveil System Properties wizard.
Step-4: Moving ahead to the appearing window, choose “Advanced system settings” lying in the left sidebar.
Step-5: When a new unrolls, shift into its Advanced tab.
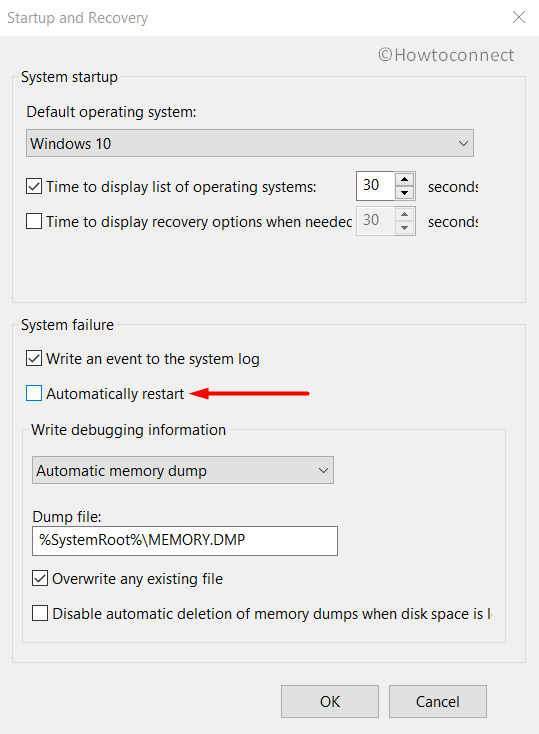
Step-6: Hover downward a little to Startup and Recovery area in the current tab. In due course, perform a click on the Settings button.
Step-7: After another wizard arrives, proceed to the System failure section. Now, unmark the checkbox against option Automatically restart.
Step-8: Finally, choose the Ok button to save these changes in Windows.
This task will, therefore, disable the automatic rebooting of Windows from now on. Meanwhile, you will get enough scope to deploy the following resolutions and fix the issue.
2] Run the default utility- Windows Blue Screen Troubleshooter
Windows 10 is well renowned for its versatile operations most importantly, while fixing issues evolved. Since BSOD errors are daunting, Tech giants came out with the best utility ever in Windows 10 Fall Creators Update edition in the Settings page. The Windows Blue Screen Troubleshooter can solve your problem smoothly and you can definitely rely on that. Being a default tool, you don’t have to download an additional program as well. Here is how to move to the utility –
- Get access to the Start menu and to do so hit the Windows logo key.
- Once unrolled, select the gear icon and let the Settings app show up on the PC screen.
- When in the app UI, move ahead to Update & Security and eventually do a click on it.
- After the next page loads completely, choose the Troubleshoot section in the left-hand side.
- Jump up to the adjacent right pane and reach out to Blue Screen option.
- Expand the same by clicking it and hit Run the Troubleshooter button.
Now, the default utility will start detecting for BSOD issues in the system and fix automatically. Once the process ends, there should not be any DMA COMMON BUFFER VECTOR ERROR BSOD in Windows 10.
3] Boot the Windows in Safe Mode to Fix DMA_COMMON_BUFFER_VECTOR_ERROR
Among the available fixes for DMA_COMMON_BUFFER_VECTOR_ERROR in Windows 10, Booting in the Safe Mode is the oldest. In every critical issue for the operating system, it came out as savior. This special startup method forces the Windows loads only the basic processes and that heals most of the issues. To boot the device in Safe Mode, follow the below instructions –
- Make a combined press of Win+R hotkeys and invoke Run dialog on display.
- When it appears, type msconfig in the blank text area and hit the Enter key as well.
- Once the System Configuration wizard arrives, jump into the Boot tab.
- Move down to the second half in the current tab indicted as Boot options.
- Put a checkmark in the box beside Safe boot to activate grayed out options.
- Proceeding ahead, choose the radio button before Minimal.
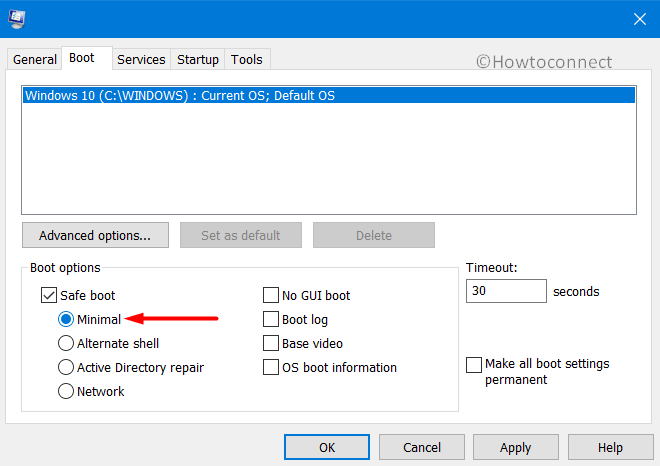
- Hit the Apply button first and then Ok from bottom to save these changes.
- Now, leave the current wizard and make a click on Start.
- Upon expanding the menu, hit the Power icon and select the Restart option from there.
- When Windows is booting after completing the restarting process, keep pressing F8 key continuously.
- You will come across a new page with option Safe Boot in Advanced Boot options.
- Select it and Boot into Safe Mode on succeeding move.
4] Unplug the External Hard Drive and reconnect later
Some users have experienced the DMA COMMON BUFFER VECTOR ERROR just because of using an External Hard Disk. This is quite frustrating though, and nowadays, we really need one of such devices. Well, the resolution is much simple. Only disconnecting will resolve the existing issue. If the error resolves, you can reconnect the External HDD in the below process –
- Unplug the External Hard Drive from PC and keep it in a safe location.
- When disconnecting is completed, press Windows key to launch the Start menu.
- Now, hit Power icon once and choose the Restart option.
- Windows will reboot with the action.
- After performing the cycle of the reboot, check for the DMA COMMON BUFFER VECTOR ERROR BSOD in Windows 10.
- If the error resolves, start connecting the external hard drive again.
- On accomplishing the task, make a visit to its manufacturer’s website using the default browser.
- Download and install the up to date driver to use safely.
5] Update all the Drivers to Fix DMA_COMMON_BUFFER_VECTOR_ERROR
Whenever we have come across any BSOD issue, the main reason comes up is a defective or outdated device driver. We might often ignore them and leave outdated. In the end, the Windows suffers from DMA COMMON BUFFER VECTOR ERROR BSOD. We have the top-notch platform for this task, Windows Device Manager will serve the best. To accomplish the task, follow the below instructions –
- Move the pointer to the bottom left end of Desktop and finally, do a right-click on the Start menu.
- Choose Run and invoke dialog on display.
- In the appearing wizard, type devmgmt.msc in the provided search box.
- Now, choose the Ok button located beneath the typing area and allow opening the Windows Device Manager.
- When the console unrolls, have a close look for an exclamation mark by the side of any device.
- If found, expand the same by doing a click on it.
- Make a right click on each driver and select the Update driver option.
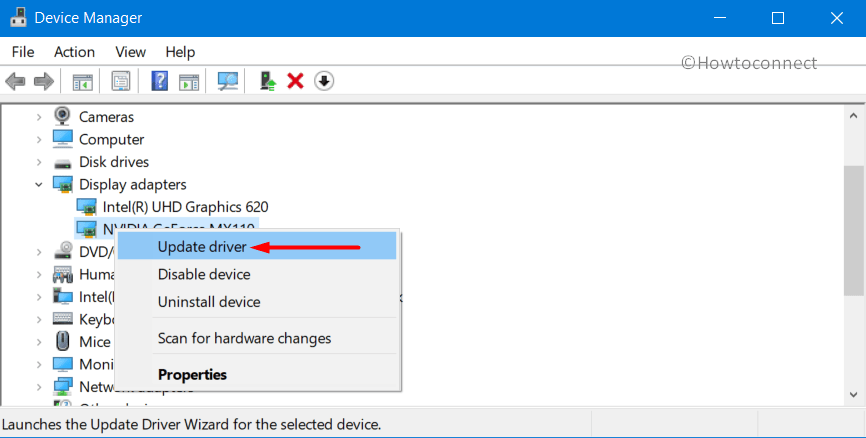
- In correspondence with the action, the system will update all the drivers. You might have to follow the on-screen guidelines to accomplish the task completely.
6] Execute System File Checker to fix corrupted Windows components
There might be a lot of reasons for which Windows System files fall into deterioration. DLL files go missing sometimes as well. When all these combines together, causes DMA_COMMON_BUFFER_VECTOR_ERROR BSOD in Windows 10. However, we can fix these issues using a single tool. The utility named System File Checker. Here is how to proceed –
- Make a combined press of Ctrl+ Alt+ Del keys to open up new startup page.
- Select Task Manager from there to launch the app.
- When in the app area, perform a click on File option located at the top left corner.
- Select Run a new task from the options.
- When a dialog opens up, type cmd in the given search box area.
- Moving ahead, check the box against “Create this task with administrative privileges”
- Press Enter to access the Elevated Command Prompt.
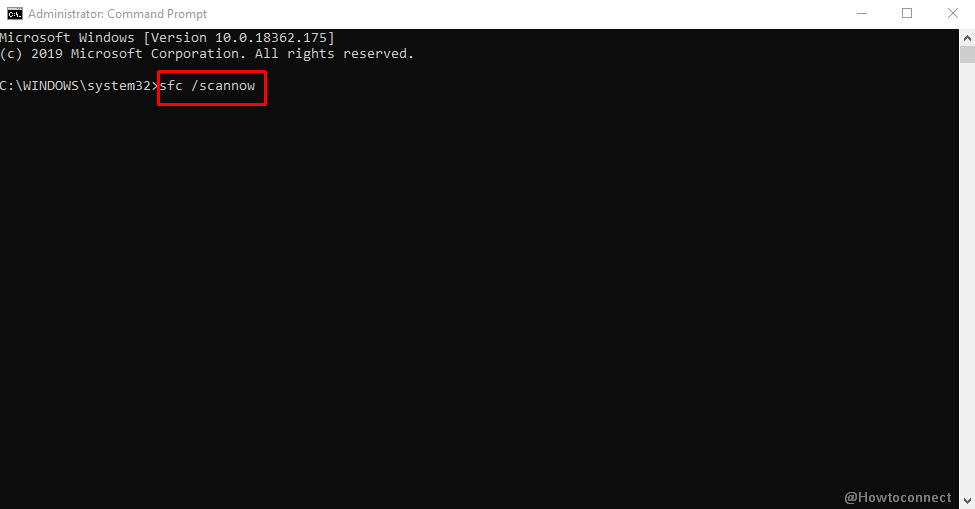
- Being in the black window, type the following command at the base of the blinking cursor –
sfc /scannow - Now, hit the Enter key and it will activate the System File Checker tool. This will detect the corrupted system components and missing DLL files in the process.
- Fixing will take place in a while automatically as well.
- The process might take a little longer time and thus you are required to be patient and wait till it ends.
- Once done, restart the device and upon coming back, check if there is any DMA COMMON BUFFER VECTOR ERROR BSOD in Windows 10.
7] Dismiss all the Malicious Invaders using Windows Security
Malware is rated as number one culprit and they can lead the system to so many issues. Nowadays, they are present everywhere and anytime we can be easy prey. Once these bugs get the entrance to the Windows, delete system components necessary for running the Operating System. In due course, DMA_COMMON_BUFFER_VECTOR_ERROR evolves in the system. Windows Security is the utmost perfect utility in this arena. Here is the way to proceed –
- Open up Taskbar Search by pressing Win+S hotkeys together.
- In the given search box, type security first.
- When Windows Security arrives in the result, select it to launch.
- Arriving at app UI, do select Virus & threat protection sitting in the left pane.
- Jump to the adjacent right side and make a click on the link available with Scan options.
- When all methods are displayed, hit the radio button before the Full scan option.
- In due course, select Scan now to start the searching process.
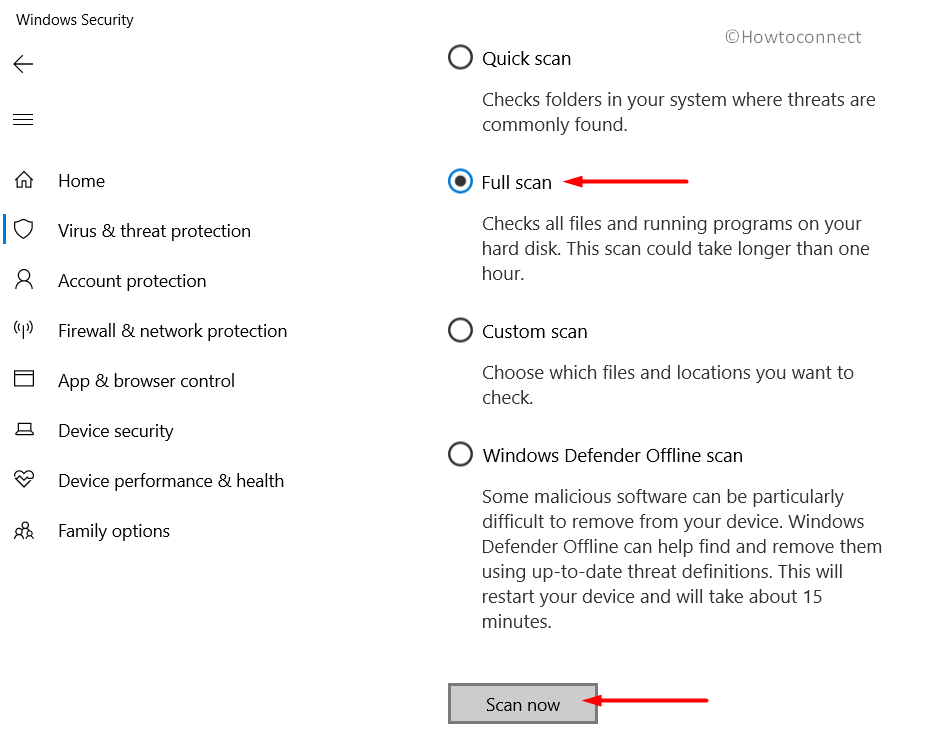
- Upon finishing the process, results will come in front. If you see any potential malware there, hit Clean Threat option to get rid of it.
- After the succeeding page loads fully, there will be three options available.
- Perform a click on Remove first and then Start actions to eradicating these viruses.
8] Download and install all released patches to update Windows
Microsoft schedules the release of major cumulative updates and builds on a regular basis. The motive is to offer you all the latest features. Adding with the previous one, fixing of existing bugs and problems are available in these files. Outdated Operating System is very much prone to get affected with DMA_COMMON_BUFFER_VECTOR_ERROR BSOD in Windows 10. Therefore, we need to update Windows 10 through Settings app. Here is the method –
Note – You have to get connected with a speedy internet connection. We recommend using a broadband one or wireless. While using from Mobile Data connection, disable Metered Connection going to the Network settings.
- Roll the cursor to the left bottom corner of Desktop and eventually do a click on Start menu.
- On unrolling the menu, perform a click on the Gear icon to open up the Settings app.
- Head to Update & Security tile from there directly and do a click on it.
- When the next page come into the view, select Windows Update located at the left pane.
- Moving ahead to the alternate right side, hit a click on Check for updates button.
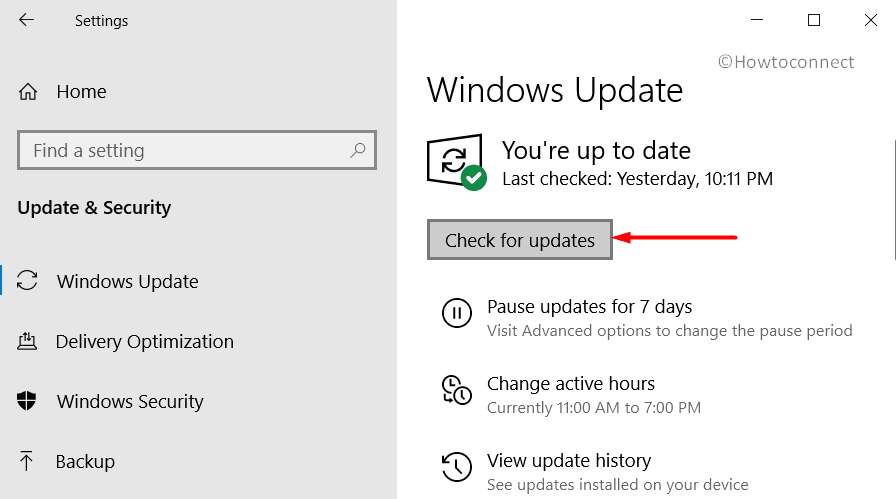
- When all the patches are upfront here, make a click on Download button under each of them.
- Downloading will start immediately and installation as well once the process is finished.
- Keep the desktop attended as you might have to restart when Windows prompt.
9] Run the System Restore to resolve DMA_COMMON_BUFFER_VECTOR_ERROR
Sometimes we make changes on Windows by installing a program or deleting any. This is okay to go through these sorts of tasks. But if anything goes wrong due to an adverse effect on Windows Registry, DMA COMMON BUFFER VECTOR ERROR BSOD will come up. In that case, it’s wise to get back to an earlier state by performing System Restore. Follow the below instruction and undo the recent changes –
- Open the Run dialog by pressing “Windows and R” keys together.
- In the given box here, type rstrui and press Enter.
- System Restore wizard will unroll immediately. Perform a click on Next from here to proceed.
- Moving ahead to the succeeding page, select Show more restore points to check all previous ones.
- Select the latest one in the list eventually.
- Finally, from the bottom end, select Finish to start the process.
10] Fix Troublesome Windows image Files using the DISM tool
Windows Image Files quite often fall in corruption and causes DMA_COMMON_BUFFER_VECTOR_ERROR BSOD in Windows 10. “Deployment Image Servicing and Management” tool will come handy to fix this issue. Here is how to accomplish this process –
Step#1: Hover the cursor to the bottom left corner of Desktop and end up making a click on the search icon.
Step#2: When Taskbar Search unrolls, type cmd.exe in the blank writing area.
Step#3: Once Command Prompt appears in the result, perform a right click on it and select Run as Administrator.
Step#4: If User Account Control prompts for permission, choose Yes to provide consent.
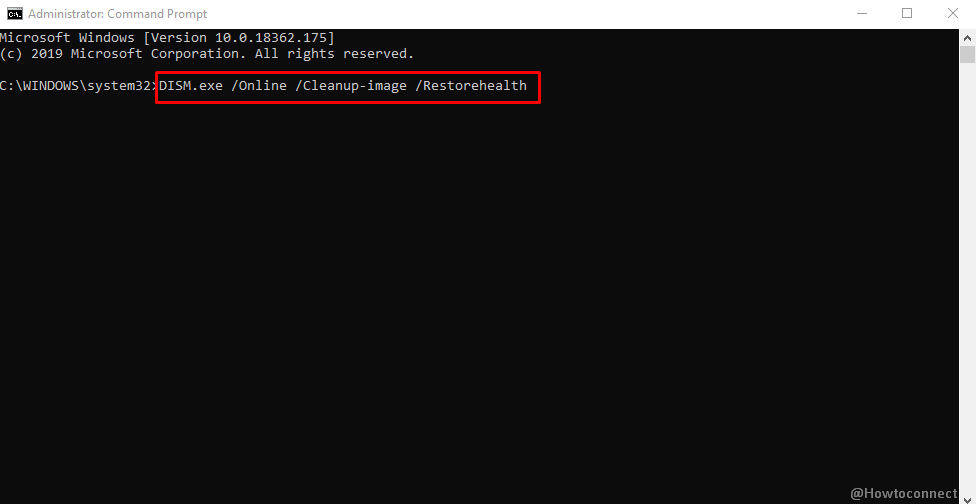
Step#5: Moving in the Elevated Command Prompt Black window, type following command at the place of winking cursor –
DISM.exe /Online /Cleanup-image /Restorehealth
Step#6: Pressing Enter key now will execute the DISM tool and it will detect as well as fix defective Windows image files present in the system.
Step#7: Wait patiently as this process will end in a few minutes.
Step#8: Once it gets over, reboot the device and once starts again, try checking DMA COMMON BUFFER VECTOR ERROR BSOD in Windows 10.
11] Solve Memory issues using Windows Memory Diagnostic
Memory problems indicate poor sectors present in the RAM and incorrect allocating of it. The same issue brings up DMA_COMMON_BUFFER_VECTOR_ERROR in Windows 10 as well. Windows Memory Diagnostic tool can handle these things properly. Move ahead with below guidelines for that –
- Launch the Windows Settings app pressing Windows key and I together.
- In the app area, you will see a search box provided. Type memory in it.
- Choose “Diagnose your computer’s memory problems” from the results.
- In a sharp moment, Windows Memory Diagnostic app will appear.
- When the wizard cuts your view, choose “Restart now and check for problems (recommended)”.

- Windows will prepare for the first cycle of rebooting.
- When it comes back to operation next, a blue screen will appear and will detect memory issues present in the system.
- As the progress rate is indicated in percentage, wait for it to reach 100%.
- When reaches to that, Windows will again restart automatically.
- Report of this diagnosis will be available for you in the Notification area of System Tray.
12] Never allow third-party Anti-virus program to stay-over in the system
Since Windows Security offers the best deal in malware issues, other anti-virus programs are unnecessary in Windows 10. Moreover, there is always a sharp chance of getting DMA_COMMON_BUFFER_VECTOR_ERROR also while using that. Therefore, it’s legit to uninstall them if you have. Here is how to remove such an application –
- Call up the Run dialog on screen pressing Win+R keys.
- Type appwiz.cpl in the text box provided.
- Hit Enter key to open up Programs and Features window.
- Move out to Third party Anti-virus program listed.
- Make a right click on the app and select Uninstall when available.
- Continue moving with the on-screen guidelines until the program uninstalls finally.
13] Delete abnormally terminated Windows Update Files
Cumulative update patches during installing through Windows Settings app really doesn’t fall in manipulation too often. Unfortunately, when the autonomous Windows Updating terminates at midway, DMA_COMMON_BUFFER_VECTOR_ERROR BSOD may arise. As to resolve, these defective files need to remove from the system. The simple way to do this task is as follows –
- Open the Windows Settings app using any of the prevalent methods we discussed before.
- Move out to Update & Security from the app UI and make a click on it.
- When the consequent page unrolls, choose Windows Update from the left side.
- Later on, jump to the corresponding right side.
- Here, do a click on View update history link to pass over to the next window.
- Select Uninstall updates link located here and open Installed Updates.

- Reach out to the recently received update patch file and do a right click on it.
- Select Uninstall and start deleting it.
- Follow the on-screen guidelines until you have completely removed that.
14] Detect and fix Poor areas in HDD using Disk Checking Utility
Hard Disk after using for a prolonged period of time, experience bad areas in it. Disk Checking Utility executed in Elevated Command Prompt is the right platform to deal with that. The tool can potentially detect and fix up these poor segments quickly. To complete the task, move with below instructions to fix DMA_COMMON_BUFFER_VECTOR_ERROR –
- Head for Elevated Command Prompt directly using any of the above-stated guidelines.
- While in the dark window, type the command in below format at the winking cursor –
chkdsk [Drive:] [parameters]
- Now, press Enter key for activating the Disk Checking tool.
- With the above command, the tool will show the Disk Status only. Since we need to detect the poor areas in volume and fix them later on, have to rearrange the command as follows –
/f /r /x
Here,
- f will represent the fixing the poor areas found in the whole volume.
- r stands for detecting those dreadful areas in all over volume.
- x forces the data in the whole volume to dismount before the process begins.
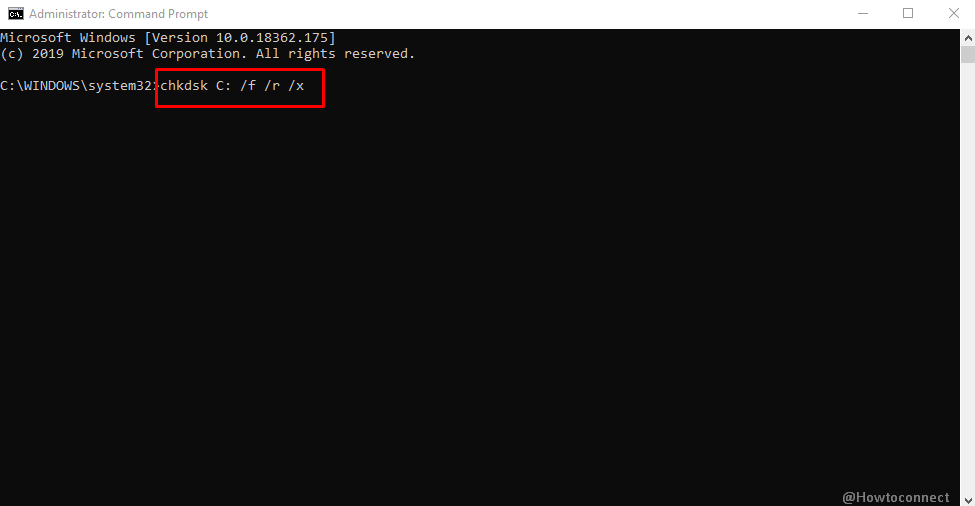
Therefore, the final command will look like chkdsk C: /f /r /x
Note that, in the above command line tool, we added C: representing Disk Drive where we have installed the Windows. You can replace it with D:. E: alternatively as you do.
- Hitting Enter key now will for the tool to rectify the issues accordingly. It might consume a good amount of time, wait until it finishes off normally.
- After the process ends, Restart Windows 10 PC and check for the error.
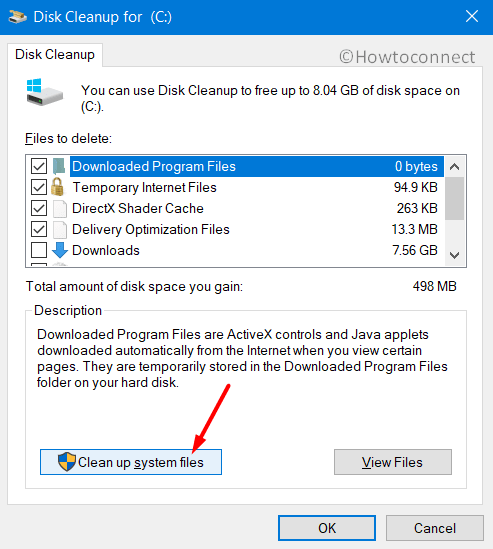
15] Remove the junk files from Disk Storage
After finishing an operation, junk files are temporary and useless. Unnecessarily they take up space in the storage. When pile up in large quantity, occupy lots of necessary space in it. In the end, the storage runs in low space and DMA_COMMON_BUFFER_VECTOR_ERROR comes up. Disk Cleanup Utility can delete these files easily in a click and make free space. Here is how to do it-
- Press the Windows key and keep typing cleanmgr from the keyboard.
- Disk Cleanup Desktop app will come in the result, do a click on it.
- Immediately, a small pop up will ask to choose the drive where you want to carry out the freeing up.
- Select C: by making a click in the drop-down menu.
- Press the Enter button from keyboard to continue.
- Disk Cleanup Utility will start with calculating how much space it can retrieve out of the drive and then show the wizard. Move little down in the wizard and make a click on the Clean up system files button.
- When the small dialog will again show up, select C: and hit Ok option.
- Disk Cleanup for C: will appear in a wizard next after calculating retrievable space.
- Put a check mark in all the boxes under Files to delete area without Downloads.
- Hit the Ok button from the tail end and start the cleaning process.
Note – Make a good check in the Recycle Bin and ensure there is nothing important in it. If it has, restores in the respective location.
16] Uninstall similar Applications to limit the risk of their collision
When similar applications stay in the singular platform, intend to collide with others. In the process, removes necessary OS resources. Therefore, DMA_COMMON_BUFFER_VECTOR_ERROR BSOD powers up in the system. To reduce the risk of collision, we need to uninstall these programs. Follow the below guidelines –
- Manage to open the Windows Settings app pressing “Win+I” together.
- Proceed to Apps tile passing over the area and make a click on the tile.
- From the next page upon appearing, select Apps & features located at the left overlay.
- Sharply jump on the corresponding right where the system shows up installed apps altogether in a list.
- Reach to the applications colliding and select it.
- Hit Uninstall option from the extended pane.
- Keep moving with on-screen instructions to completely uninstall the program.
- Restart the Windows after performing the above task.
- When powers up next, perform a check for the trace of error in the system.
- If DMA COMMON BUFFER VECTOR ERROR BSOD does not occur, download and install the removed programs again if necessary.
As you have come to this point, we can estimate that you have successfully resolved DMA_COMMON_BUFFER_VECTOR_ERROR BSOD in Windows 10. If that happens so, feel blessed and keep working with the PC. It’s unfortunate and frustrating if you are failed to do so. Well, in that case, we suggest the last resource – a complete installation of Windows 10. By doing so accurately, there will be no more issues coming up next.
Before moving to perform the task, save a backup for all the necessary files. Recommend to save these in an external drive preferable in USB storage. Then, connect the device with the speedy internet connection via wireless or broadband network. If you are not well confident, better to ask help from professionals. This will limit the risk of more issues evolving later on.
Methods:
1] Put a stop to the Windows from Restarting Automatically
2] Run the default utility- Windows Blue Screen Troubleshooter
3] Boot the Windows in Safe Mode
4] Unplug the External Hard Drive and reconnect later
5] Boot the Windows in Safe Mode
6] Update all the Drivers
7] Dismiss all the Malicious Invaders using Windows Security
8] Download and install all released patches
9] Run System Restore
10] Fix Troublesome Windows image Files using the DISM tool
11] Solve Memory issues using Windows Memory Diagnostic
12] Never allow third-party Anti-virus program
13] Delete abnormally terminated Windows Update Files
14] Detect and fix the Poor areas in HDD using Disk Checking Utility
15] Remove the junk files from Disk Storage
16] Uninstall similar Applications to limit the risk of their collision
That’s all!!