Remote Desktop Configuration aka SessionEnv comes pre-installed Win32 service in Windows 10 and 11. This controls all Remote Desktop services moreover related configurations that require system context such as per-session temporary folders, RD themes, and RD certificates. In short, “SessionEnv” is accountable for session maintenance activities of entire RDS. By default, the startup type of RDCS is Manual. But you can Enable or Disable Remote Desktop Configuration Service anytime with simple tweak.
Because the startup type of this SessionEnv is Manual, it can’t get started automatically unless a user, or an application or other services run it. It starts logging on by using the Local System account and runs as localSystem in a shared process of svchost.exe. If it fails to start, you will get notified and the failure details will be logged into the Event Log.
Ways to Enable and Disable Remote Desktop Configuration Service Windows 11 and 10
Here is how to Enable/Disable Remote Desktop Configuration Service Windows 11 or 10 –
Note – Remote Desktop Configuration Service will not be enabled if Remote Procedure Call (RPC) and Workstation services are disabled, deleted, or working improperly.
1] Use the built-in Services Console
Step-1: Call up Windows search bar by pressing Windows+S keyboard shortcut.
Step-2: Type services.msc in the text field and hit Enter when the result appears under Best match.
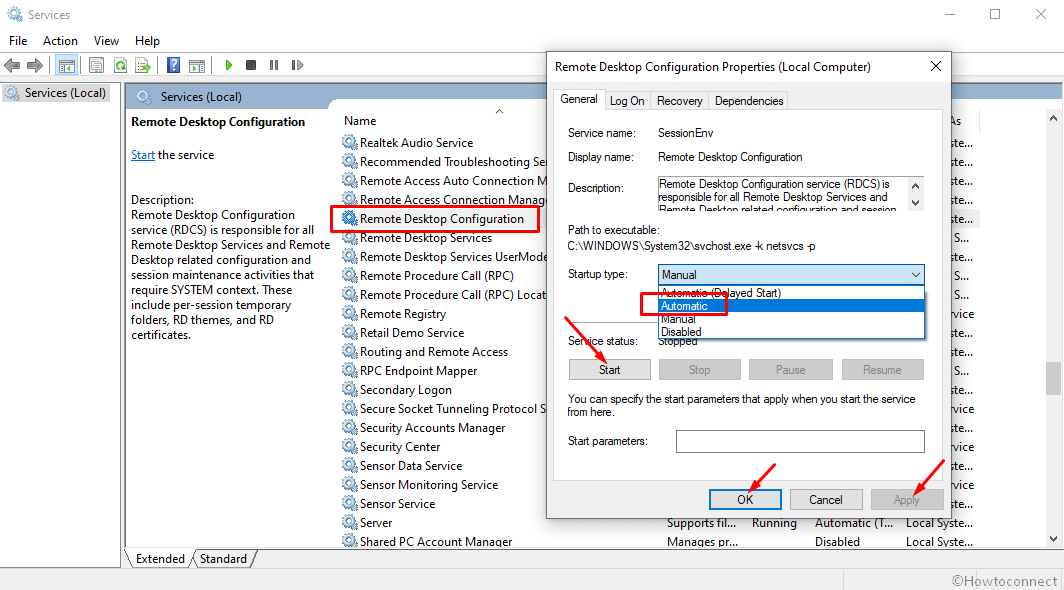
Step-3: On the console, you will see the list of all available services under Name column. Locate Remote Desktop Configuration there.
Step-4: Once found, double-click on the same or right-click on “Remote Desktop Configuration” and select Properties.
Step-5: In the General tab, move down to Startup type and select Automatic using the drop-down menu.
Step-6: To enable SessionEnv hit the Start button.
Step-7: If you want to disable SessionEnv, click the Stop button.
Step-8: Finally, click on Apply and then OK button to make the changes effective.
2] Enable and Disable SessionEnv through System Configuration
- Right-click on Start button and choose Run from the Win+X menu.
- Once appears, write down msconfig in the text box and hit Enter.
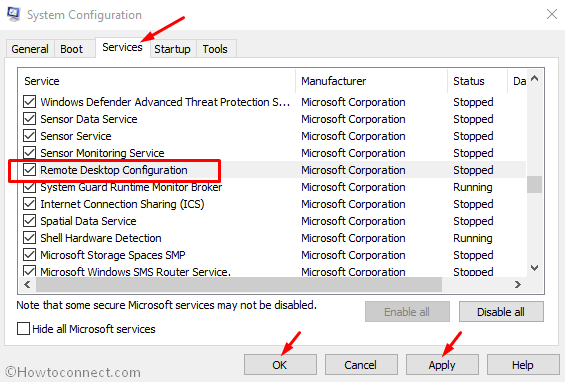
- When System Configuration wizard comes into the view, shift to its Services tab.
- Here, find Remote Desktop Configuration.
- In order to enable Remote Desktop Configuration, put a tick mark in checkbox located beside it.
- If you want to disable Remote Desktop Configuration Service, simply uncheck the box.
- Finally, click Apply followed by pressing the OK button.
- Finally, Reboot the device.
3] Using Command Prompt
- Open Run dialog box by pressing Win+R at one go.
- Type cmd.exe in the given area and hit Ctrl+shift+Enter altogether to run Command Prompt as admin.
- A UAC dialog will roll up, click Yes to give your consent.
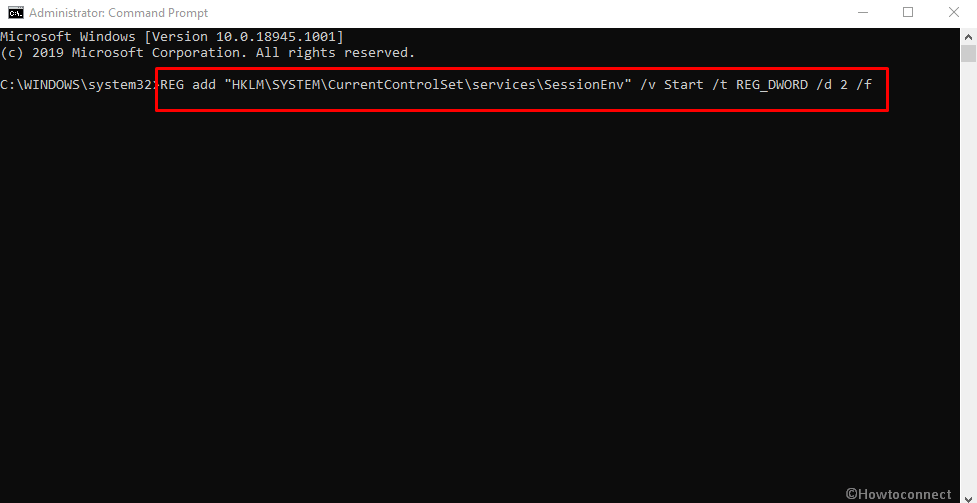
- Type the below command in elevated Command Prompt and hit Enter to disable Remote Desktop Configuration Service –
net stop SessionEnv
- In order to enable SessionEnv Service, type the following and hit Enter to execute –
net start SessionEnv
After executing the command, your system may fail to enable Remote Desktop Configuration Service if the Startup type of this service is Disabled. To switch the type, run the below command –
Automatic –
REG add “HKLM\SYSTEM\CurrentControlSet\services\SessionEnv” /v Start /t REG_DWORD /d 2 /f
Manual –
REG add “HKLM\SYSTEM\CurrentControlSet\services\SessionEnv” /v Start /t REG_DWORD /d 3 /f
Disabled –
REG add “HKLM\SYSTEM\CurrentControlSet\services\SessionEnv” /v Start /t REG_DWORD /d 4 /f
Automatic (Delayed Start) –
REG add “HKLM\SYSTEM\CurrentControlSet\services\SessionEnv” /v Start /t REG_DWORD /d 2 /f
4] Via Registry Editor Disable Remote Desktop Configuration Service
Note – Be careful while modifying the registry key, otherwise your system might get affected.
Step#1: Click on search bar and type regedit.
Step#2: When you see Registry Editor in the search result, hit Enter.
Step#3: If a UAC dialog prompts, click on Yes to move ahead.
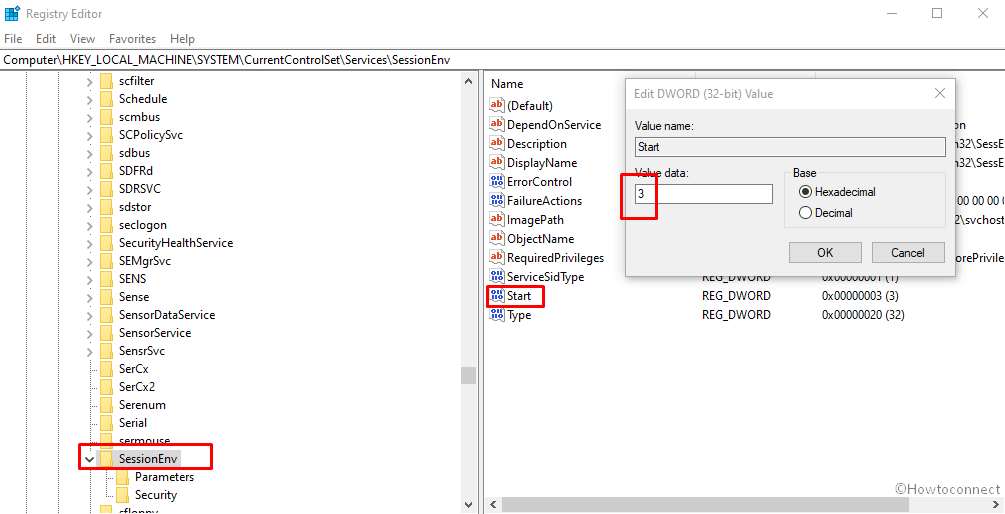
Step#4: In the Registry Editor window, navigate the following path –
HKEY_LOCAL_MACHINE\SYSTEM\CurrentControlSet\Services\SessionEnv
Step#5: When you reach there, Locate Start DWORD from the right pane and double click on the same to modify its value.
Step#6: In the Value data box, put preferred value to change the startup type of Remote Desktop Configuration Service.
Automatic – 2
Manual – 3
Disabled – 4
Automatic (Delayed Start) – 2
Step#7: After setting the value, click the OK button to save the change.
Methods:
1 ]Using built-in Services Console
2] through System Configuration
3] Using Command Prompt
4] Via Registry Editor
That’s all!!!