While trying to access webcam through an app such as Skype or Zoom, Windows often fails to find the camera. Mostly, the camera seems to work fine one minute and the next shows an error message that reads “We can’t find your camera”. The issue is accompanied by code 0xA00F4289 and there are some troubleshooting tips included too. When the fatal code shows up, the camera might flicker on the app followed by the error message.
0xA00F4289<ActiveCameraUnplugged> Webcam Error usually remains on display for a few seconds and then the screen turns black. This mainly indicates that the webcam has been disconnected, as a result, the system is failing to read it. The error usually occurs due to loose webcam connection, disabled camera service, faulty or incompatible camera program, and driver. As the error message doesn’t tell you what actually caused it, you will have to try out different methods to fix the same. See – Fix – Windows 10 Camera not working.
0xA00F4289<ActiveCameraUnplugged> Webcam Error in Windows 10
Here is how to fix 0xA00F4289<ActiveCameraUnplugged> Webcam Error in Windows 10 –
1] Check the camera connection
From the error message, it’s pretty much clear that the fatal code shows up when the system fails to access the camera. Reason is really weird especially when you are using the built-in webcam and not the external one. However, this may happen oftentimes if the camera is dislodged or becomes loose. As the system fails to access the built-in webcam, it shows the message ActiveCameraUnplugged.
In almost every case of error 0xA00F4289, the loose connection of the webcam found to cause the issue. If this is the case for you, resolving the error code is super easy and the process hardly needs a minute. Simply, press around the area of the camera lens from both the back and front. Do the task gently or else the webcam may get damaged permanently due to excessive force. Once the LED power of the Camera turns on, you should not get 0xA00F4289<ActiveCameraUnplugged> error anymore.
2] Make sure the webcam is enabled
If the webcam is disabled itself, you may encounter camera error as the system won’t be able to access the same. By default, the camera remains active but sometimes users keep it disabled due to security concerns. To allow the webcam access again, here are the steps to follow –
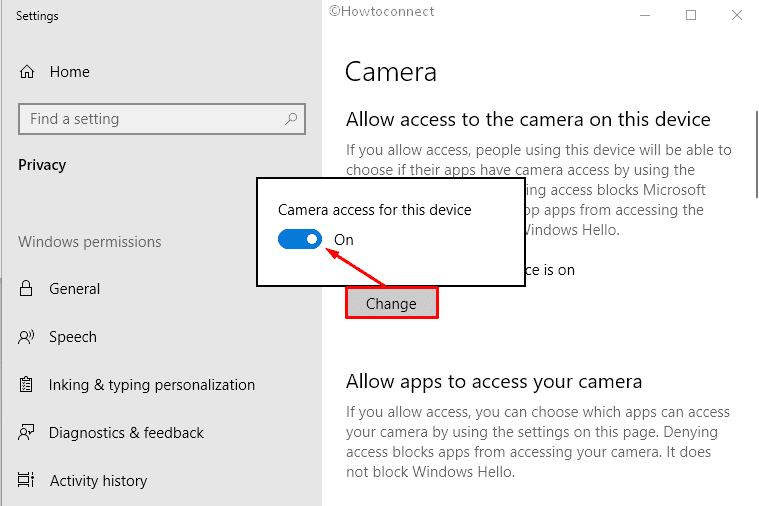
- Press – Windows + S.
- Type – camera access.
- Hit – Enter.
- From the right pane of the settings page, click – Change.
- Turn on the switch button to allow camera access for this device.
If you are getting 0xA00F4289<ActiveCameraUnplugged> error for a specific app, make sure that the program has permission to use the camera. To ensure that –
- Go to the same settings page.
- Switch on the toggle button present beneath Allow apps to access your camera.
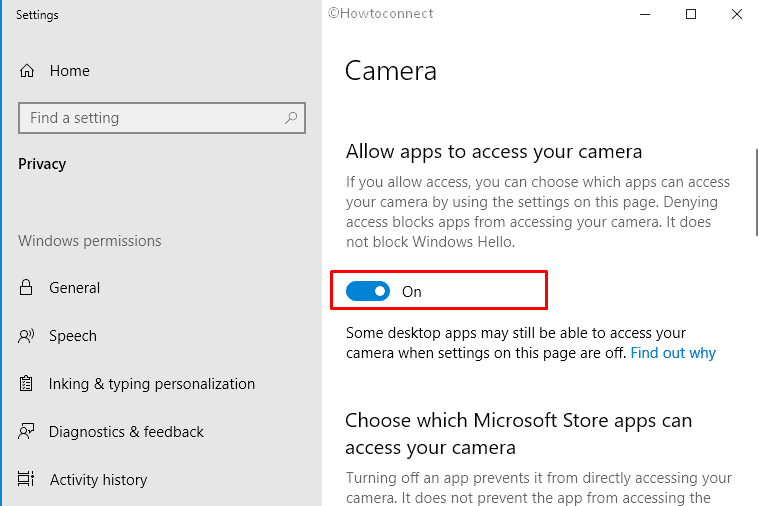
- Scroll down a bit.
- Find the app that is getting the error and allow the same to use the webcam.
3] Start Windows Camera Frame Server Service
Windows Camera Frame Server service is dedicated to your laptop’s camera and it ensures the smooth functioning of the same. If the service gets disabled intentionally or unintentionally, Windows 10 may bring issues like 0xA00F4289<ActiveCameraUnplugged>. To get rid of this error code as well as make the camera work properly, ensure that the status of its service is running. Steps are as followed –
- Click – Start button.
- Type in – services.msc.
- Hit – Enter.
- Find – Windows Camera Frame Server.
- Right-click the same and select – Properties.
- Set the Startup type to Automatic or Manual.
- Click – Start.
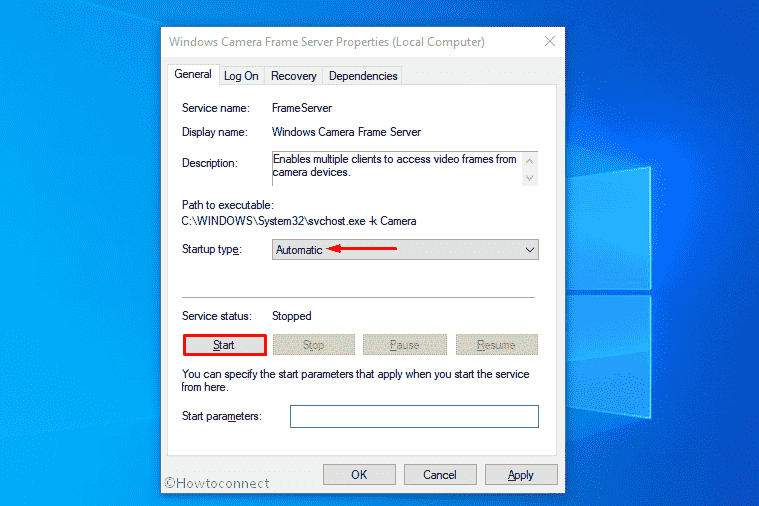
- Hit Apply and then OK.
4] Prevent the interaction with Skype
Error 0xA00F4289<ActiveCameraUnplugged> may appear when Skype runs in the background. This happens because of the interaction of this app with the camera. To get rid of the issue, close the application completely. Keep in mind that minimizing Skype will never work here. If the camera error still persists after taking exit from SKype, uninstall the same. Here’s how –
- Click the search icon from the taskbar.
- Type in – appwiz.cpl.
- Hit – Enter.
- From the Programs and Features window, find – Skype.
- Right-click the same and select – Uninstall.
- Comply with on-screen instructions to remove Skype completely.
5] Disable your security suite for a while
Sometimes, antimalware programs block some applications from using the integrated camera. As a result, issues like 0xA00F4289<ActiveCameraUnplugged> evolve. In such a case, turn off the security suite and see if it helps.
Turn off Windows Security
- Press – Windows + Q.
- In the search bar, insert – virus and threat protection.
- Hit – Enter.
- From the right-hand side, click Manage settings.
- Switch off – Real-time protection.
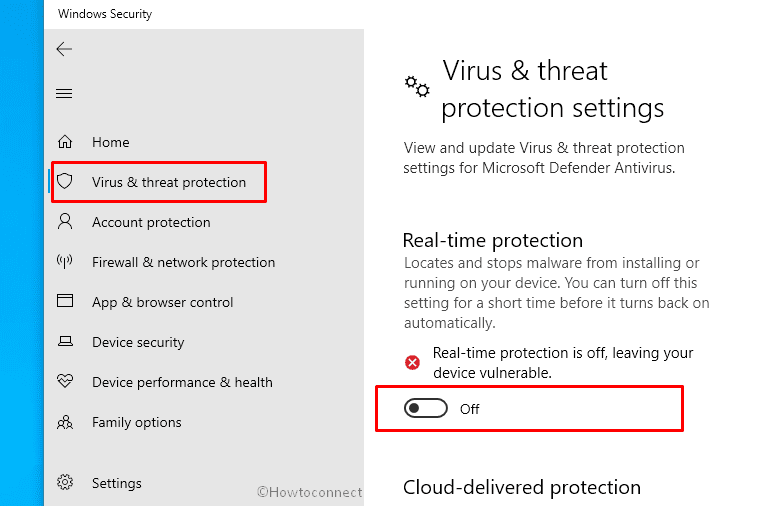
- To give final consent, click – Yes.
Put third-party antivirus program out of action
- Click the up arrow icon present on system tray.
- Right-click on the antivirus icon installed on your PC.
- Choose Disable or anything with similar meaning.
- If prompted, choose a time slot after which the program will be enabled automatically.
Note – Don’t forget to turn on the antimalware program later.
6] Reinstall Camera driver
If none of the above worked to fix 0xA00F4289<ActiveCameraUnplugged>, there is a chance that the driver is either corrupted or incompatible. If so, you will have to uninstall the driver and then install it afresh. Here are the steps to follow –
- Press – Windows key.
- Type in – devmgmt.msc.
- Hit – Enter.
- When Device Manager shows up, double-click – Cameras.
- Right-click the camera driver and select – Uninstall device.
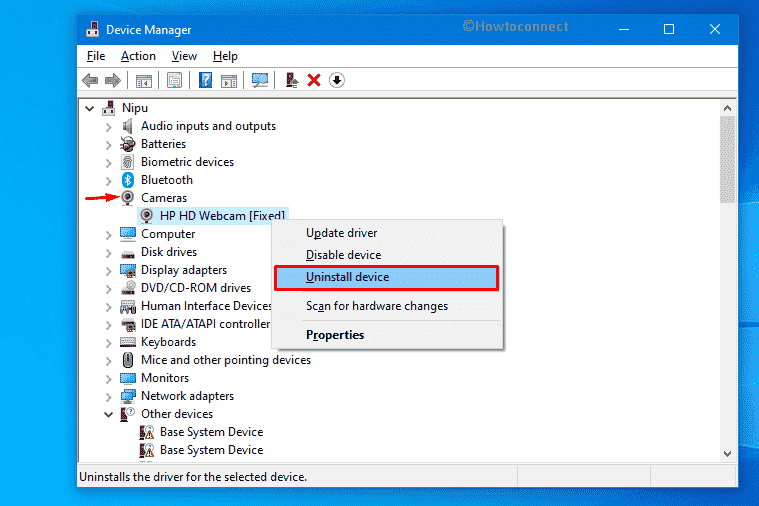
- To give final consent, click – Uninstall.
- Now, restart the device.
- After logging back in, Windows will attempt to install the driver.
See solutions to more Windows 10 camera errors –
1] Fix 0xa00f4243 CameraReservedByAnotherApp (0xc00d3704) Windows 10
2] How to Fix Windows 11 Camera not working (Solved!)
3] Fix – Error Code 0xa00f4244 <nocamerasareattached> in Windows 10
Methods list
1] Sort by Apps
2] Reinstall the Store
3] Delete LocalCache
4] Reset Store cache1] Check the camera connection
2] Make sure the webcam is enabled
3] Start Windows Camera Frame Server Service
4] Prevent the interaction with Skype
5] Disable your security suite for a while
6] Reinstall Camera driver
That’s all!!