Many Windows 10 users complain about PC to run slow or often not respond at all and freeze desktop apps when upgrading. Task Manager shows 100 percent disk usage commonly in every case during increased workload. The hard disk utilization percentage lowers down to nearly 10% which is normal after closing applications and works.
Despite light workload, if 100 percent disk usage is very much prominent then there is a high chance that something is constraining your hard drive for excessive work. There might be various factors to bring forth such an issue in Windows 10, but a PC that has Message Signaled Interrupt (MSI) mode active is more likely to cause. Furthermore, a failed hard drive can generate the same error. When the hard disk fails, the system continuously gets stuck while rereading any sector and the procedure keeps running on until it succeeds to read the corrupted portion. Consequently, disk usage starts rising up to a higher point from where corruption rapidly spread across the whole drive and end up degrading system performance.
100 percent disk usage windows 10
Here is how to fix 100 percent disk usage Windows 10 –
1] Restart the system
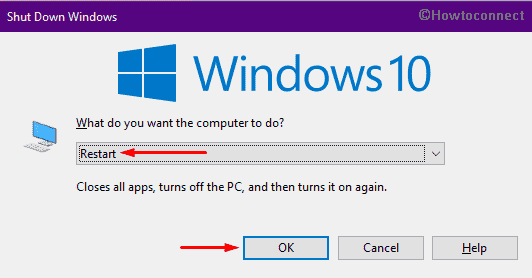
Usually, the High disk usage requires only a reboot to be fixed. Here one notable thing is shut down and start of the PC will no longer solve the issue. Restart lets the system start from a fresh state while normal shutdown preserves the faulty situation. To reboot the system –
- Save all ongoing tasks and close them.
- Once in the desktop area, press Alt and f4 hotkey together.
- When a new pop-up appears, choose Restart using the available drop-down list.
- Click OK to initiate the restarting process.
2] Uninstall Windows 10 update
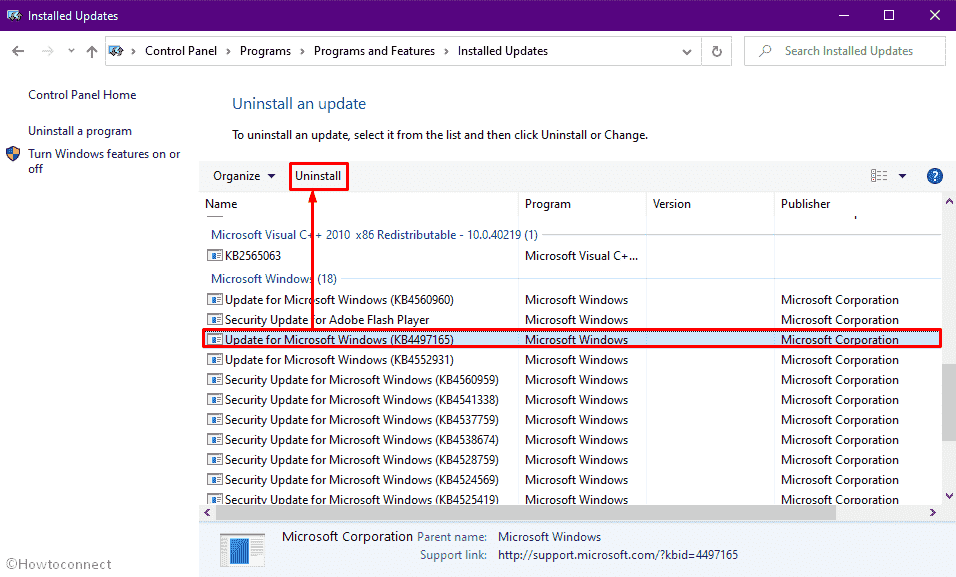
A lot of people experienced 100 percent disk usage Windows 10 after installing a recent update which clearly indicates that the build or patch itself is faulty. Though Microsoft pushes solutions for such reported issues in their next cumulative updates, waiting a long time for that automatic resolution will not be a great idea. Hence, uninstall the update responsible to lead high disk usage. Here are the steps –
- Press Win+R keyboard shortcut at one go.
- In the Run command box, type appwiz.cpl.
- Click the OK button.
- Click View installed updates link from the left sidebar of the upcoming window.
- Scroll down to reach Micrososft Windows section.
- Click the most recent KB version you installed and then hit Uninstall from the top ribbon.
- Keep going with the instructions coming on-screen to finish the procedure completely.
3] Disable MSI mode to fix 100 percent disk usage Windows 10
MSI or Message Signaled Interrupt mode, in turn on condition, presents a hurdle for SSD while completing the input or output. As a result, the system stops responding correctly and while trying hard to read those unresponsive sectors, high disk usage issues arise. To resolve the problem, you will have to disable MSI mode. For that –
- Click on taskbar search (or use Win+S) and type devmgmt.msc.
- Hit Enter key when you see Device Manager under Best match.
- Once the console shows up, expand IDE ATA/ATAPI controllers by double-clicking.
- Right-click on Standard SATA AHCI Controller and choose Properties.
- Go to the Details tab of newly appeared wizard.
- Click the down arrow icon located under Property and opt for Device instance path.
- Note down the path that becomes visible in the Value section.

- Now, open Registry Editor.
- Navigate the following directory –
HKEY_LOCAL_MACHINE\System\CurrentControlSet\Enum\PCI\
- Once there, click on the device instance path you noted earlier located under PCI.
- Move to the right-pane and double-click the DWORD key MSISupported.
- In the Value data box, put 0 and click OK button to save the changes.
- After completion, close all opened windows and reboot the machine.
4] Change the hard drive
Due to prolonged use of hard drive, bad sectors may form in it which leads to freezing moreover unresponsive desktop. There are various factors responsible for making the hard disk corrupted among them firmware bugs, power surge, overheating, and corrupt files are mostly found to be guilty. Changing hard drive before it crashes completely may leave you alone with internal data loss. Therefore, backup all important data to an external disk and then change the existing HDD with a new one. Hopefully, 100 percent disk usage Windows 10 issue will get fixed.
5] Upgrade Firmware for SSD to fix 100 percent disk usage Windows 10
Occurrence of high disk usage after installation of SSD on your Windows 10 may be a result of faulty firmware. Solid-state drives are fast and it never rises up 100 percent unless some program is trying to access the disk all the time. If the usage remains high always, upgrade the firmware for SSD. To check the current version of firmware, go through the below steps –
- Press Win+D at once to arrive at desktop screen.
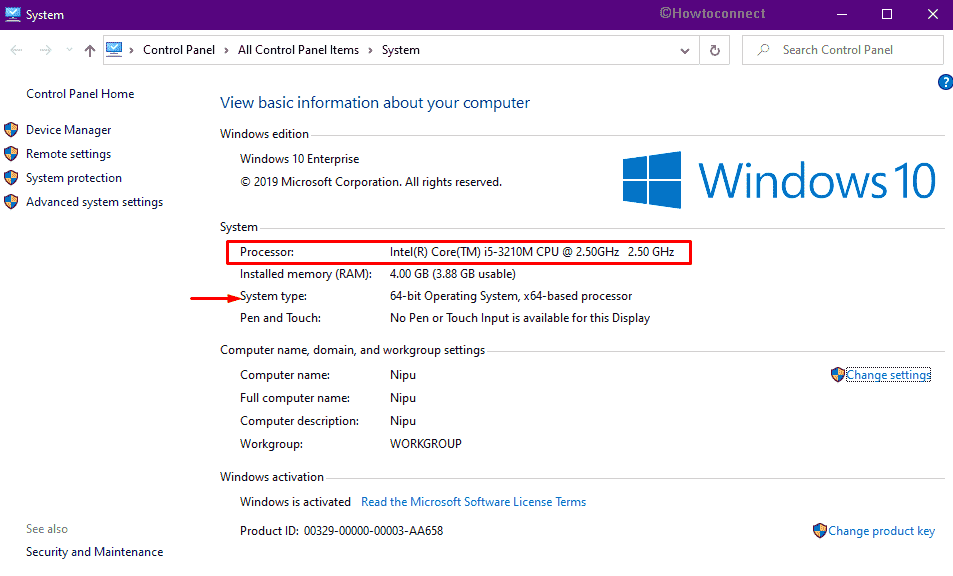
- Right-click on This PC icon and choose Properties.
- Note down whether you are running a 32 Bit or 64-bit version of Windows. Also, look into the processor name.
- Now, click Device Manager link from the left sidebar.
- Double-click on Disk drives to expand the driver lists.
- From the available options, right-click on your SSD and choose Properties.
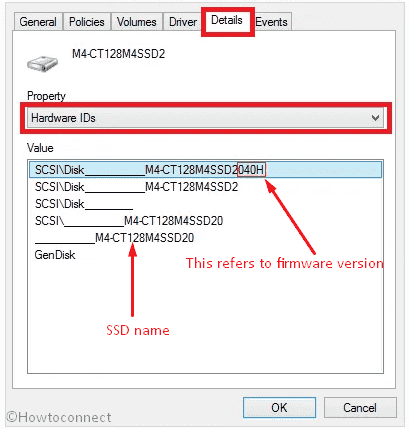
- When a dedicated wizard shows up, jump into the Details tab.
- Click the drop-down menu located beneath Property and choose Hardware IDs.
- Note down the name of solid-state drive and version of the firmware. See screenshot –
- Once you got every information you need, go to the manufactures website and download the greater version of Firmware that you are currently using for SSD.
- Install the same and after completion reboot the system.
6] Check for disk error
Before changing 100 percent disk usage Windows 10 we recommend running Microsoft’s built-in utility to solve bad sectors. Usually, the utility settles the faulty sectors automatically but if the problem is big, you have no way left rather than changing the HDD. Let’s see the procedure to run the disk checking tool –
- Right-click on Start button and choose Run.
- When Run dialog shows up, type cmd.exe in the available bar.
- Press Ctrl+ Shift+ Enter hotkey altogether to bring forth Command Prompt with admin privilege.
- If a UAC prompts, click Yes button.
- In the black panel, enter the following command after winking cursor –
chkdsk C: /f /r /x
- Hit the Enter key to initiate the process of Disk Checking tool.
- As the utility scan each and every file of your hard disk, the full process may take time to be done.
- When the process ends, restart the PC and check if the high disk usage issue is gone.
7] Activate High Performance mode to reduce 100 percent disk usage Windows 10
Regular power mode sometimes makes the system use high disk in Windows 10 and to fix it up, you can set the performance mode to high. To do so –
- Press Win+X to invoke Power user menu.
- From the available lists, pick Power Options.
- When related settings page appears, click the link Additional power settings from the most right column.
- From the subsequent window, hit the link Change plan settings located beneath Selected plan section.
- Once on the next page, click on Change advanced power settings link.
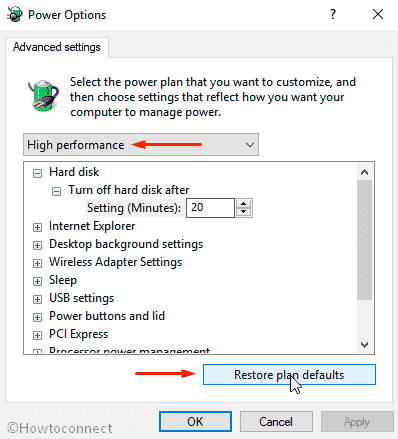
- When Power options wizard becomes apparent, choose High performance where Balanced was selected.
- Thereafter, click the button Restore plan defaults.
- If a pop-up prompts for confirmation, give consent by clicking Yes.
If High performance is missing in the wizard, you need to create a custom plan. For that –
- Navigate to Control Panel => All Control Panel Items => Power Options.
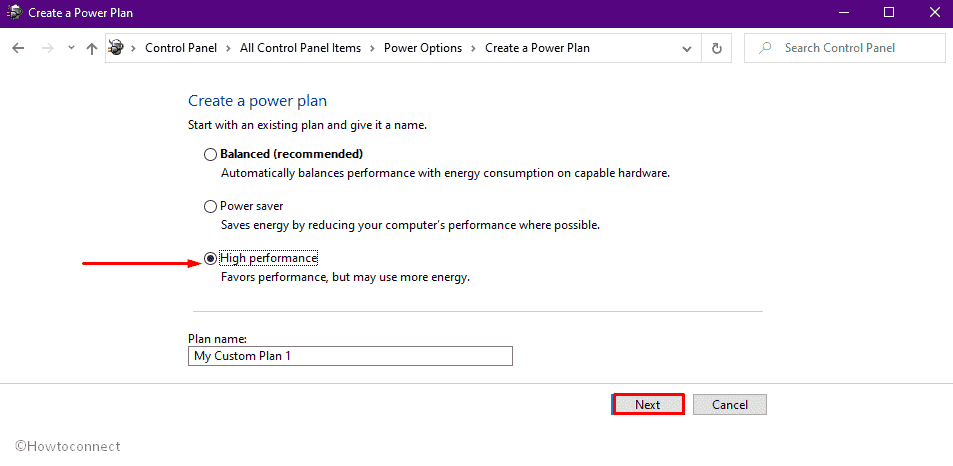
- Click Create a power plan from the left column.
- From the subsequent page, select the radio button set aside High performance.
- Hit Next button from the bottom.
- Following that choose the sleep and display settings that you want to use and eventually click Create button.
8] Turn off third-party anti-malware for a while
Often a trusted Antivirus, when one doesn’t go well with your system, ends up causing various bugs and problems including 100 percent disk usage. Similar case with you points out that you need to disable third-party antimalware programs to solve the problem and bring back everything on track. Here is how to proceed –
- Click on the upward arrow icon on taskbar to unfold the system tray.
- Right-click on the antivirus icon and opt for the option Disable.
9] Reset Virtual memory
Virtual memory is used to store temp files when RAM fails to perform a task. It’s mainly an amalgamation of RAM and HDD considered as an extension of your system’s physical memory and often it found to cause high disk usage. When RAM is not sufficient for performing a particular task, the hard disk drive comes as a supplement of Random Access Memory but later the data moved to RAM if required. Many people reported that 100 percent disk usage Windows 10 issue got fixed when they reset virtual memory. So, you can try it once. Steps are as followed –
- Press Windows logo key, type sysdm.cpl and then hit Enter.
- Shift yourself to Advanced tab in System Properties wizard.
- Click Settings button lying under the Performance section.
- When a new wizard named Performance Options prompts, again move to Advanced tab.
- Click Change button present below Virtual memory segment.
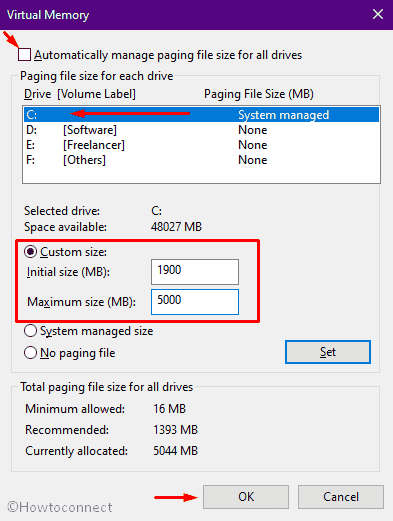
- Make sure that the checkbox lying before Automatically manage paging file size is deselected.
- Now highlight the system drive C: as drive and then click the radio button Custom size.
- Set Initial size and Maximum size followed by clicking Set button.
- Finally, hit the OK button to make the changes effective.
- Now, again invoke Run command by pressing Win+R together,
- Put temp in the text bar and hit Enter.
- When a new page becomes visible, press Ctrl+A to save all items and hit delete icon from the top bar.
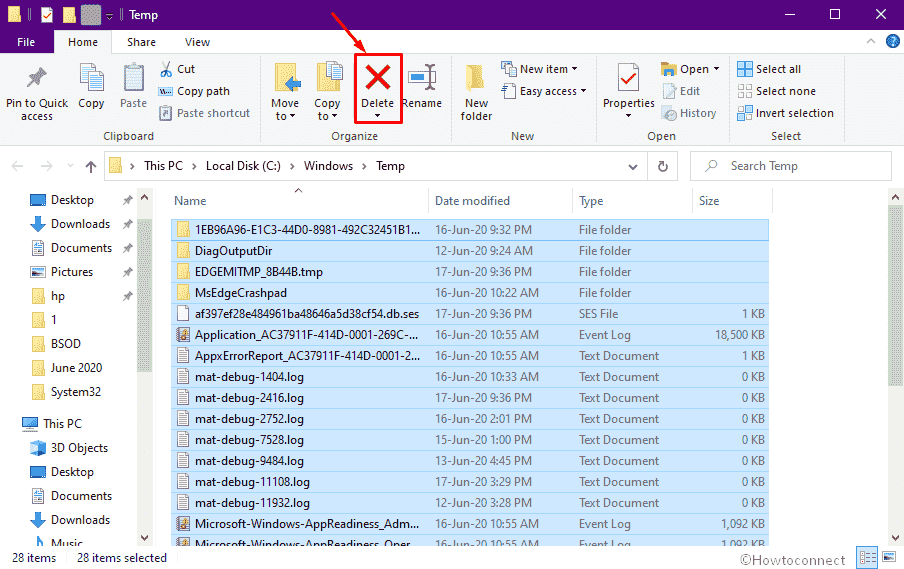
- After completion of deletion, check if the disk usage issue got resolved.
See – How to Tweak Paging File for better Windows 10 Performance.
10] Make your SATA driver up-to-date to resolve 100 percent disk usage Windows 10
Almost all Windows 10 devices use SATA connections for HDD, SSD and not to mention optical drives. If the driver is not updated, 100 percent disk usage Windows 10 issue may arrive. To settle down the problem, here are the steps you need to follow –
- Type devmgmt.msc in the taskbar search (Win + Q) and hit Enter key.
- When Device Manager floats up, double-click Storage controllers.
- Locate the correct controller of your SATA devices and right-click the same followed by choosing Update driver.
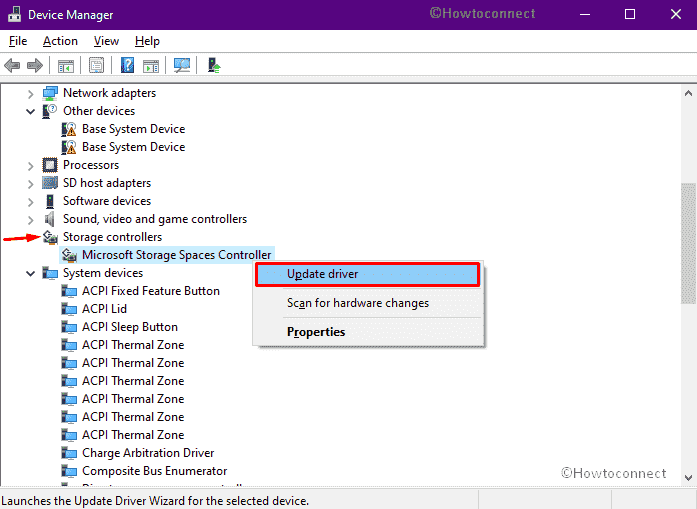
- From the imminent pop-up, opt for Browse my computer for driver software option.
- Thereafter, choose the option Let me pick from a list of available drivers on my computer.
- Choose the Standard AHCI Controller and click on Next.
- When the system ends installing updates, reboot the device.
Note – If the system fails to get an updated version, go to the manufactures webpage and download the recent and compatible one. Finally, install the same and restart Windows 10 PC.
11] Tweak Chrome along with Skype
According to some tech experts, a particular combination of Skype and Google Chrome browser settings makes hard disk to overwork. Though the logic behind is not clear yet, give it a try as many people found this resolution effective for them. Steps are as followed –
change settings in Chrome
- Press Windows key to invoke Start menu.
- Approach alphabetically and opt for Google Chrome.
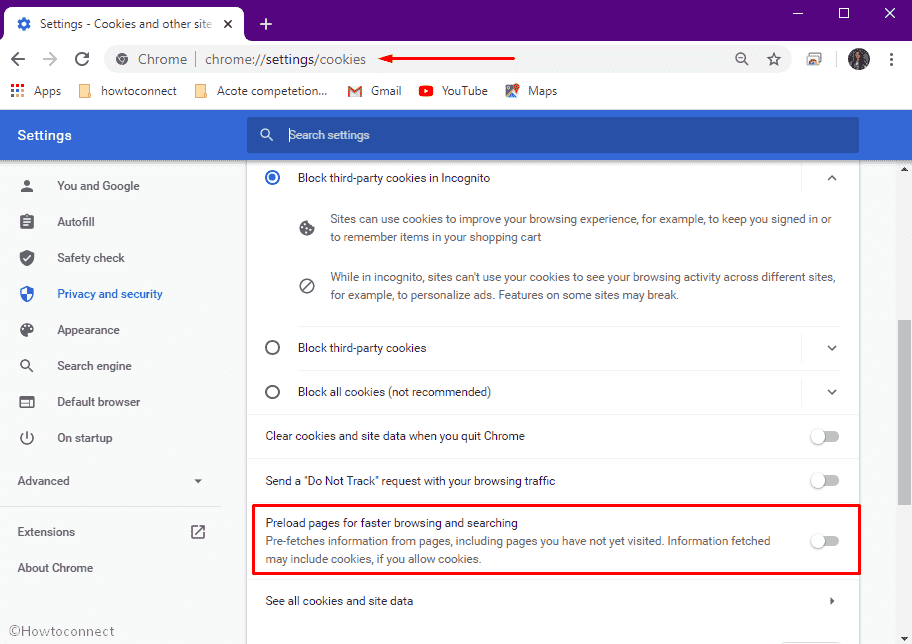
- When the browser comes into the view, put chrome://settings/cookies in its address bar and hit Enter.
- Scroll down a bit and make sure the toggle switch for Preload pages for faster browsing and searching is off.
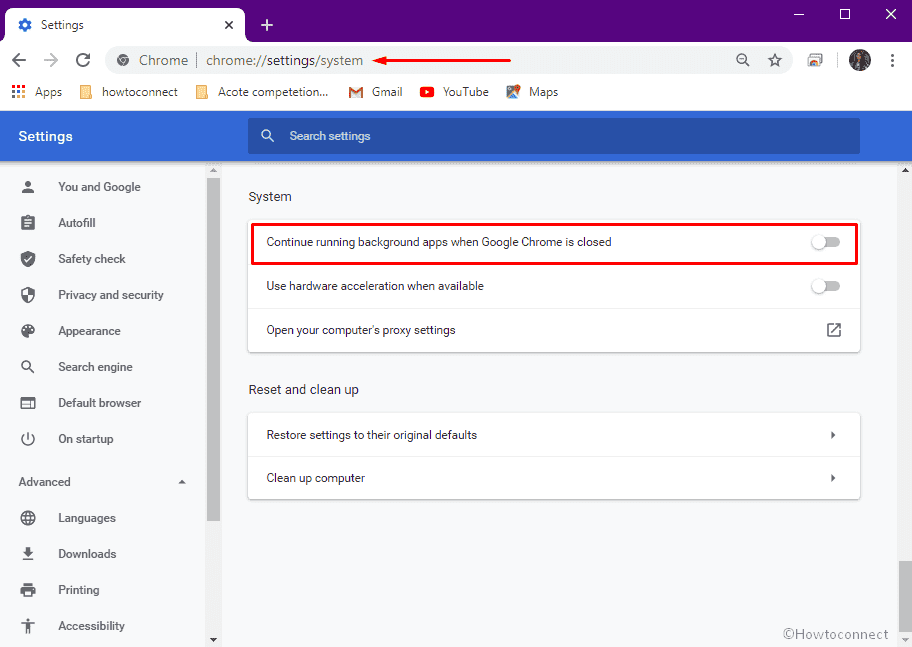
- After that, navigate to chrome://settings/system.
- Ensure that “Continue running background apps when Google Chrome is closed” is not turned on.
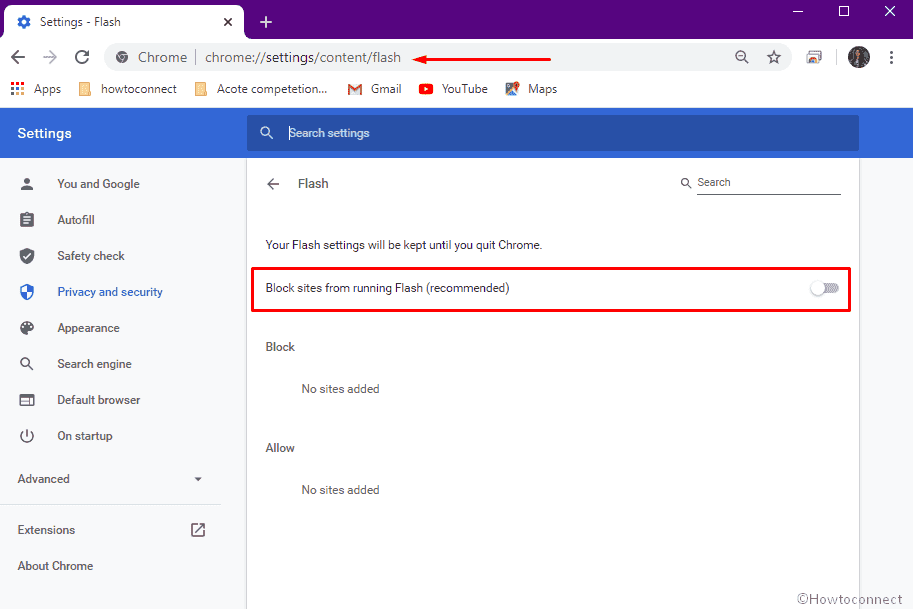
- Now, you need to disable flash as well. For that, go to “chrome://settings/content/flash” and from there turn off the toggle button set for Block sites from running Flash (recommended).
Modify Skype settings
- Open File Explorer by pressing Win+E at one go and reach the following directory –
C:\Program Files (x86)\Microsoft\Skype for Desktop
- Once there, scroll down until you get Skype.
- Right-click on the same and choose Properties.
- Pass yourself to Security tab.
- Hit Edit button.
- From the forthcoming wizard, highlight ALL APPLICATION PACKAGES as Group or user names.
- Then, check the Allow box set for Write.
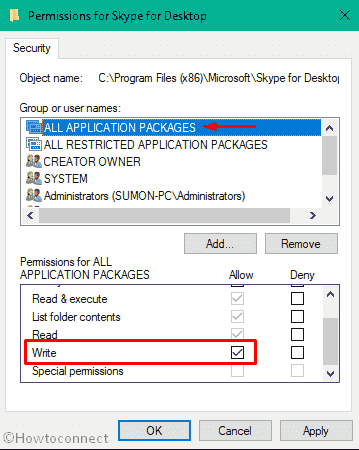
- Finally, click on Apply followed by OK.
12] Update your built-in antimalware and perform a full scan
Due to virus attack often the performance of the system gets affected badly. 100 percent disk usage Windows 10 can be a result of the same.
To keep your defense system stronger, Microsoft comes with inbuilt Windows Security that works to keep you safe in every way possible. But when the tool itself becomes outdated, it doesn’t work well as it should be. Usually, all these updates are automatic when you carry out a Windows update. If you somehow missed it, get Protection update manually and then perform a full scan with updated version.
Get Security intelligence update
- Click the search icon from the taskbar, type in security and hit Enter key.
- Click on Virus & threat protection.
- Choose the link saying “Check for updates located under “Virus & threat protection updates”.
- From the consequent page, again click Check for updates in Security Intelligence section.
Run full scan
After making sure the Windows Security is up-to-date, do a full virus scan to eliminate existing malware.
- Once updated, click on Back arrow to return back to Virus & threat protection page.
- Click Scan options link.
- Click the radio button of Full scan and then hit Scan now button.
- When the scanning process ends, follow on-screen guidelines to eliminate found malware.
13] Turn off the service SysMain to fix 100 percent disk usage Windows 10
Former Superfetch service which is currently known as SysMain reduces the duration a startup requires and ensures that the most used software becomes more productive. This service sometimes causes 100 percent disk usage Windows 10 issue and disabling the same may work to fix. But, keeping it disable for always may end up generating other bugs and issues later. Therefore, disable the SysMain service for a while and check if the high disk usage issue is gone. Whether the problem goes or not, don’t forget to enable the service again to avoid further damage.
- Right-click on Start button and choose Windows PowerShell (Admin).
- If a UAC prompts, click Yes button.
- When the tool becomes ready to execute a command, put
net.exe stop sysmainand hit Enter key. - Check if it has had any effect on your system’s performance.
14] Try using any other web browser rather than Chrome
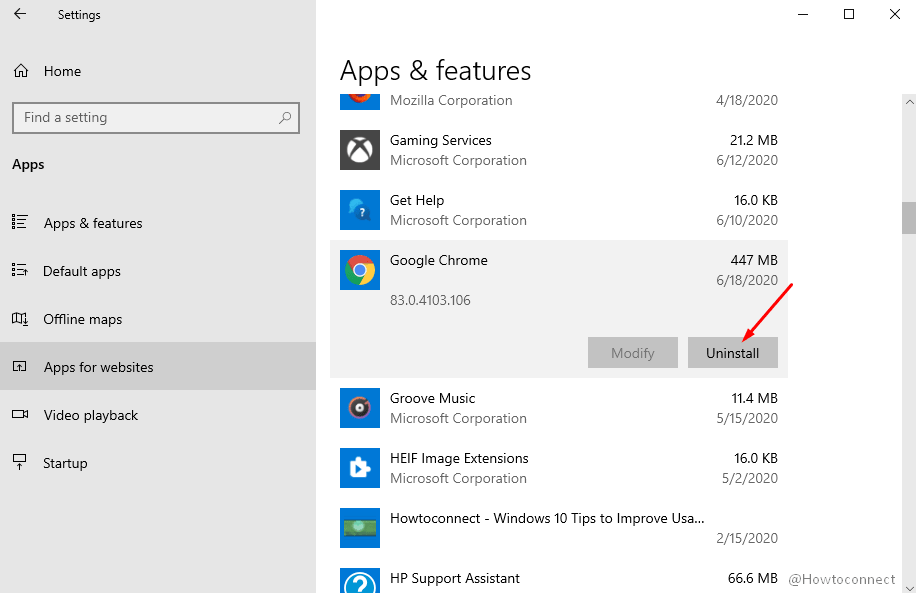
Though it sounds baseless, a substantial number of people confirmed that they got high disk usage issue only the time Chrome is running. As several users fixed the problem just by using another browser, you can give it a try. Hence, uninstall Google chrome to check if the browser is actually guilty and causing 100 percent disk usage Windows 10. Here is the process –
- Press Win+I and select Apps from the Windows Settings homepage.
- Go the right pane, and click on Google Chrome.
- Choose Uninstall from the expended pane and follow the further guidelines on the screen.
15] Change the power supply of your PC
100 percent disk usage Windows 10 issue is more prominent on laptops and not in desktop PC. So, there is a chance power-related inconvenience is causing the issue. In such a case, remove the battery from the device and then plug in the power adaptor to run the system. Hopefully, it will reduce disk usage within a short period of time. In case of using a desktop PC, install a new PSU to resolve a similar issue.
16] Modify File explorer options
- Press Win+E simultaneously to bring forth File explorer.
- Click on View from the menu bar.
- Hit Options.
- When Folder Options wizard rolls out, go to its Search tab.
- Make sure the checkboxes located beside both “Include compressed files (ZIP, CAB…)” and “Always search file names and contents (this might take several minutes)” is unticked.
- Lastly, click on Apply first and then OK to save the changes.
17] Delete Steam if installed to fix 100 percent disk usage Windows 10
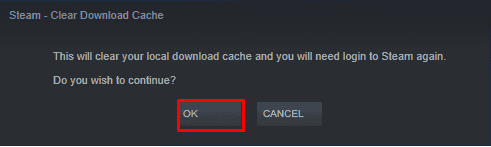
People who love to play games often install digital deliver system app Steam in their Windows 10 PC. When the app receives an update, the background downloader sometimes gets stuck in a loop. As a result, 100 percent disk usage Windows 10 issue occurs. So, if you are using Steam, clear the cache of this app to control the disk usage. Here is how to proceed –
- Make sure the app is not running in the background. For that, open Task Manager and end task of the software.
- Now, invoke Run dialog box and type in steam://flushconfig.
- Press Enter key.
- A pop-up will prompt for final consent; click OK to clear the cache.
Methods:
1] Restart the system
2] Uninstall Windows 10 update
3] Disable MSI mode
4] Change the hard drive
5] Upgrade Firmware for SSD
6] Check for disk error
7] Activate High Performance mode
8] Turn off third-party anti-malware for a while
9] Reset Virtual memory
10] Make your SATA driver up-to-date
11] Tweak Chrome along with Skype
12] Update your built-in antimalware and perform a full scan
13] Turn off the service SysMain
14] Try using any other web browser rather than Chrome
15] Change the power supply of your PC
16] Modify File explorer options
17] Delete Steam if installed
That’s all!!