Blue Screen error has gone passed most of the serious bugs and problems in recent times in terms of creating havoc and The ACPI DRIVER INTERNAL BSOD is no exception. The snag has a bug check code of 0x000000A3 and it usually indicates that an internal inconsistency is detected by ACPI driver. Like all other Blue Screen errors, this one too emerged from incompatible device drivers and from missing system components. The issue has a dual source and most likely to occur from software complications where hardware troubles are not really ignorable.
When encounters a device, it usually go for abnormal rebooting very frequently as to prevent important data loss. The machine might hang repeatedly with unusual error messages as well and you cannot truly afford quite long. Well, you will definitely look for some real effective solutions to fix ACPI DRIVER INTERNAL BSOD and that’s the reason we are here for. In the below part, there will be describing some top-notch workarounds you were looking for, so let’s begin –
ACPI DRIVER INTERNAL
Here is how to fix ACPI DRIVER INTERNAL BSOD Error in Windows 10 –
These workarounds are truly effective and can very easily resolve ACPI DRIVER INTERNAL BSOD in Windows 10 if executed properly. But as we know that Windows will restart automatically without bothering any warning message, you cannot really deploy them in perfect way. Hence resolving Blue Screen error gets complicated until you disable the Automatic Restarting in the following way –
Note – Before jump into the steps straight away, save as well as close the ongoing tasks to prevent unfortunate data loss.
- Press Win+D hotkey at once to arrive at desktop area.
- Right-click on This PC and opt for Properties option.
- When System window appears, click Advanced system settings located in the left pane.
- Shift to Advanced tab of System Properties.
- Click Settings button located under Startup and Recovery section.
- Once a new wizard turns up, roll down to System failure and uncheck the box set for Automatically restart option.
- Now, select OK button from bottom to save the changes you made.
From now on, Windows will no more Reboot automatically and therefore, you will be able to apply the probable workarounds smoothly.
1] Use Device Manager to update all drivers
Drivers play the most important task of maintaining communication between hardware and a Computer Bus. In addition, these are the things providing Software interference as well as controls the specific Hardware connected with the Device. When a Blue Screen error shows up in a smoothly running machine, we primarily suspect a device driver has gone faulty. In most cases, ACPI DRIVER INTERNAL BSOD Error comes up from the outdated drivers.
Microsoft, as to prevent such cases, made the update process of the device drives autonomous along with Windows update. Still people are facing the same issues quite regularly since the automatic process ends up boxed in a closed loop of Internet connection. Therefore, we urge you not to always rely on autonomous system and proceed manually by your own initiative. When made up your mind, Device Manager can give you the best deal in updating the drivers. The guidelines are as follows –
- Bring forth Run dialog by pressing Win+R keys together.
- When the command box arrives, type devmgmt.msc in the empty text area.
- Click OK button to launch Device Manager.
- Look for the devices having a mark of exclamation and expand the same by double-clicking.
- From the extended list, right-click on the driver having yellow sign and select Update driver option and let the process begin.
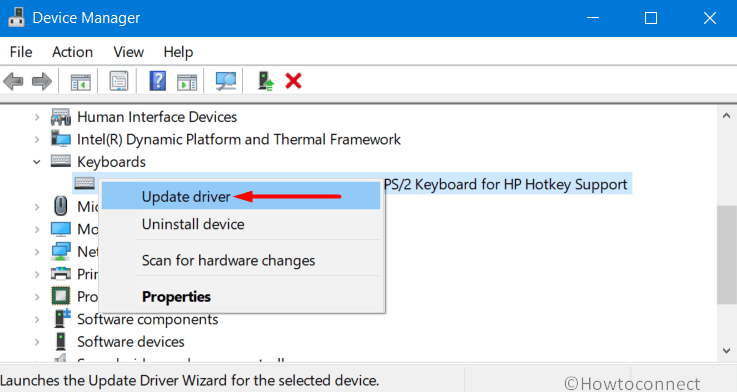
- However, you will get two options, choose Select drivers automatically.
2] Keep Windows 10 updated and healthy to fix ACPI DRIVER INTERNAL BSOD
Windows Operating System must be maintained in a good health condition as it is very much prone to get affected with bugs and issues when left in ignorance. Update patches are being available quite regularly who actually comprises of newest features and fixes of Bugs. For the ease of users, Microsoft has made this process automatically when you have a 24/7 internet connection available with the device. But often this process fails to provide the best service as poor internet connection creates snag here as well. An outdated operating system can be easily affected with BSOD error having a bug check code of 0x000000A3. Therefore we believe, updating the Operating system can helpful hand proceeding through below instructions –
- Press “Win logo key and I” together to open Windows Settings app.
- Once the main interface arrives, proceed to Update & Security category.
- Move to the right pane of succeeding settings page.
- Even though you see You’re up to date, click Check for updates button.
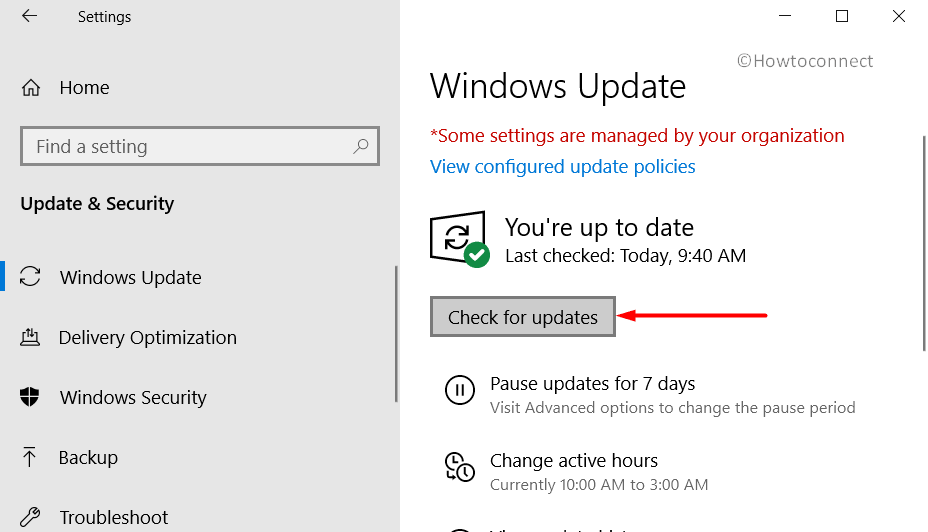
- Once the system presents list of pending patches, click on Download.
- Upon completion of downloading process, installation will start automatically.
- You might be asked to Reboot the device more than once, hence, be present in front of the PC until the process of updating Windows 10 finishes.
3] Fix up Memory problems in the device
Windows Memory is a very sensitive part of the Operating system where no plight is allowed really. If it is affected with any hitch, it will have a tendency to be encountered with ACPI DRIVER INTERNAL BSOD Error. Same issue will be prominent whenever the RAM stick is faulty or having bad areas inside. These issues may happen when a device falls on the ground usually and that is quite easy to prevent by maintaining well and carefully handling the machine. Even after that, if a memory issue comes in the path, Windows has the default utility to detect and fix that. Hope, you have already heard about Windows Memory Diagnostic tool who offers the best deal in such Bad RAM cases. Here is how you should proceed –
- Press Win+S and type memory in the taskbar search.
- Select Windows Memory Diagnostic from the appearing result.
- When the tool shows up in a new wizard, choose the option “Restart now and check for problems (recommended)”.
- Windows will now reboot itself and when it returns to operation, you will notice a blue screen detecting RAM issues in the system.
- After being completed, Windows will restart itself for the second time.
- Once the system backs in action, a consequence of the diagnosis will be available in the System Tray of Notification area.
4] Rectify Windows core components using sfc/ scannow command
Windows have some core components who are usually little and help the OS to run in smooth conditions. In the worst-case scenario even, these files need to be maintained in the best condition. Whenever the system files will lose their originality, there is huge risk of having Blue Screen error like ACPI DRIVER INTERNAL in Windows 10. Such things usually happen when Malware replicates themselves into their shape or some go missing when a software conflict happens in the system. Consider you could not control the causes and files are already affected, you have still a way to fix them up. The Windows OS has got a default System File Checker utility to serve this purpose being powered up in the elevated Command Prompt. The process is available when you proceed with below-guided way –
- Press Windows key and type cmd.exe.
- After viewing the search result, right-click on Command Prompt and choose “Run as administrator”.
- Click the Yes button when UAC asks for permission.
- On the black panel, insert
sfc /scannowcommand and hit Enter to activate so that the tool starts detecting issues in files moreover fix them automatically. - This process may take little longer so wait patiently until finishes and don’t interrupt the progress in between.
- When the procedure is over, restart Windows and prior to signing back in, check if bug check code 0x000000A3 has resolved already.
5] Disable corrupted drivers or rollback them to default
We have got to know that, updating process for the drivers has made autonomous along Windows itself. This blessing may often turn into a curse when the internet connection stops in the midway creating an invalid upgradation loop. Some of the drivers are installed in the system who are not successfully downloaded or having insufficient files in it. Meanwhile, some of the invalid ones get into the system automatically as well. All these together manage to call the ACPI DRIVER INTERNAL BSOD Error in Windows 10. In terms of resolving the error, we have to disable a suspicious driver or rollback it to the default state. To do that, follow the below guidelines –
- Right-click on Start icon and choose Run.
- Type devmgmt.msc in the empty text bar and hit Enter.
- Look carefully in the Device Manager console and locate the device whose driver you want to disable, rollback.
- Once found, double-click on the device to unveil the driver list.
- Right-click on the driver that was modified earlier, thereafter, select Properties.
- When a new wizard makes an appearance, shift to its Driver tab and click either Disable or Roll Back Driver.
6] Use Windows Security as the Default anti-virus tool and eliminate malware
Viruses are programs that have the characteristics of replicating them to a usual file and thereby you cannot really distinguish them easily. Such things are created to steal potentially sensitive data from a device. Our security system is not so strong in internet-based technology nowadays as malicious codes are present everywhere. Such bugs get spread at a considerably faster rate coming through links embedded with emails, websites or through a removable drive like USB. Once they get into the system, it deteriorates system files and you may observe Blue screen error with abnormal bug check code 0x000000A3.
To prevent their entry, Windows Security is the best ever utility as it has a robust infrastructure to detect and fix the malware both Online and Offline. This program comes in Windows 10 as pre-installed and you dint need to move to and fro in dilemma. Just follow the below guidelines and eliminate all the malware present in the system:
- Click on Up arrow icon located in the rightmost corner of Taskbar area.
- Select the shield icon from here to let Windows Security app launch.
- After coming across, select Virus & threat protection you will find in the left pane.
- Take your mouse pointer to adjacent right side and make a click on Scan options link.
- When all available methods are displayed, hit the radio button set for Full scan option.
- Following that, click Scan now button to commence the process.
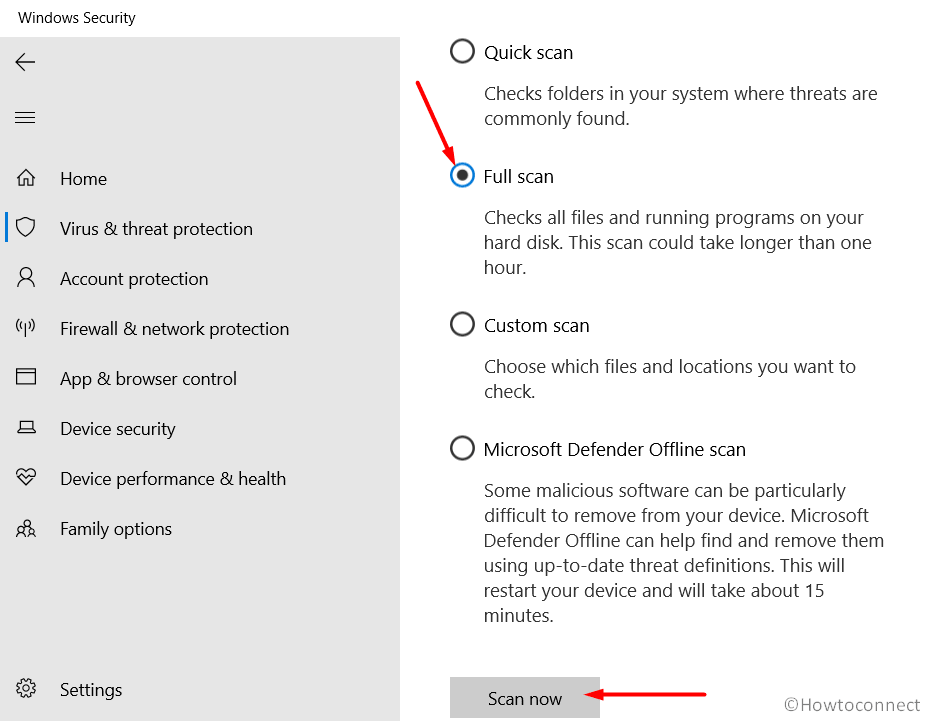
- After the scanning process gets over, results will be displayed. In case of getting any potential malware, click the Clean Threat option to get rid of the same.
- On the succeeding page you will get three options, select Remove first and then Start actions to allow the app take actions.
7] Update BIOS and resolve ACPI DRIVER INTERNAL BSOD error
Basic Input/Output System, in short, we call BIOS usually is actually a Firmware that performs hardware initiation at the time the computer is booting. It also offers the Runtime services for Operating System and installed programs. When you start a machine for the first time, BIOS is the 1st program to run in it. This sensitive organ needs to keep updated always as ACPI DRIVER INTERNAL BSOD often starts in a system having outdated BIOS. To update, follow the below guidelines –
- Open Power user menu by pressing Win+X at one go.
- Choose Run from there and type msinfo32 in the text box eventually hit Enter key.
- When System Information page makes appearance, type BIOS version in its search bar followed by clicking the Find button.
- Keep the information noted to use later and then close the window.
- After that, launch a web browser and visit the manufacturer’s website for your BIOS using the info you get few moments ago.
- In the end, download compatible files for your system and install them as well.
8] Delete all the faulty Windows update patches
We always advise users not to trust in automatic processes like Windows Update as patches often come in the wrong shape when the system falls into a loop of poor data connection. When the update files come in invalid format and you install them in the same state, ACPI DRIVER INTERNAL BSOD Error makes its way out in Windows 10. When such cases are upfront, you have to uninstall those patches immediately moving through below guidelines –
- Get access to the built-in Settings app using Win+I hotkey.
- When in the App area, opt for Update & Security.
- Once the consequent page loads, choose Windows Update from left pane and shift to right.
- Moving ahead, perform a click on the option saying View update history.
- Hit Uninstall updates link from the succeeding page.
- Doing so will redirect you to Programs and Features window. From there locate the recent patch you have received.
- Right-click on the last patch and select Uninstall option from there to proceed.
- Finish up the procedure by following on-screen guidelines.
9] Use only one Security solution
Security on the internet is a myth now as you can be easy prey anywhere anytime. Viruses nowadays have strong codes and they can sneak through any defense very easily. To prevent, you may always look for a real-time solution and to be honest, there is quite a good number of anti-virus solutions available in the market. You can choose to install any based on demand but, obviously, Windows Security is the best ever you can get. You can have any of the programs but we urge you to continue with only one Security solution as having two similar programs will cause a software conflict and make the issue more complex. To uninstall the programs, follow the below guidelines –
- Make a click on Start icon and hit the gear icon.
- When Windows Settings app pops up, move ahead to the Apps tile and click on the same.
- Transfer the mouse pointer to right surface of currently running page where you will come across the installed apps list.
- Find out the third party antivirus program and select the same.
- Hit Uninstall option from the extended tray.
- Choose Yes if a UAC prompts up for your consent.
- Eventually, end the process completely by proceeding with guidelines appears in desktop screen.
10] Erase all the junk and temporary files to make space in the disk
Every task we execute in Windows creates temporary files referred to as junks and these are useless after a certain period of time. Yet they take up some space in the disk like usual one and when piled up largely, a big portion of HDD or SSD gone wasted. As a result, the machine gets slower as well as BSOD error with bug check code 0x000000A3 arises. As to make some space in the disk, you can clean them all and to make the task easier, Disk Cleaning Utility will help. To get help from the default tool, follow the below instructions –
- Click the search icon located in the taskbar and type cleanmgr in the provided bar.
- Press Enter button immediately after viewing the result.
- A small pop-up will ask to choose the drive name to continue with.
- By default the system selects C: for this purpose, all you need to do is hitting the OK button.
- The tool will now take few seconds to calculate total memory space in Drive C: it can recover.
- When a new wizard arrives, come down to bottom left end of it and click on Clean up system files.
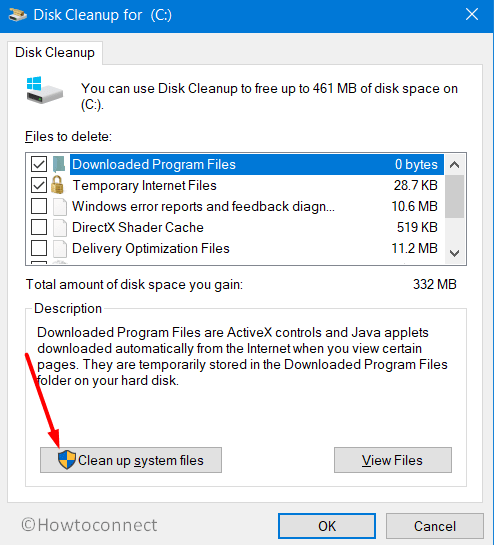
- Once again a small popup will float up asking for the preferable drive where C: is pre-selected.
- Either press Enter key or click the OK button.
- After calculating retrievable space in it, when Disk Cleanup for (C:) appears, check all the options sitting under Files to delete.
Note – Make sure to keep Downloads and Recycle Bin unchecked as important files may exist there which you don’t want to lose.
- Lastly, click the OK button to begin the cleaning process.
11] Uninstall similar program and eliminate chance of their collision
Software programs help to execute a task you need and they usually shorten your hectic working all day long. We also install them a lot for serving versatile purposes. Sometimes, we even install some unnecessary ones including similar programs from different vendors. Yet similar programs comprise of same files and they are very eager to have a collision in them. When a software conflict takes place, plenty of usable and sensitive files go missing while few lose their originality. As for the devastating case, ACPI DRIVER INTERNAL BSOD Error makes its way out in Windows 10. In order to keep this conflict away, we need to uninstall unnecessary and similar programs going through following way –
- Press Win+I hotkeys at once and upon opening the Windows Settings app, select the Apps tile.
- Proceeding on next page, select Apps & features page located in the left side pane.
- Moving on to the right, head to the application you opt to uninstall prior to loading the Apps here.
- Select the same followed by choosing Uninstall option from extended pane.
- If UAC prompts up, hit Yes to continue uninstallation.
- Perform a restart to the Windows when the process gets over.
12] Fix up Hard Disk bad areas in Elevated Command Prompt
Due to poor maintenance and using the same Hard Disk for long time, it causes to have bad areas formed in it which eventually causes Blue Screen Error with Bug Check code 0x000000A3. A hard Disk needs to maintain good health as it is considered as soul the device. There is quite a good number of ways to maintain a Hard Disk in good condition but when it has already some bad areas, you have to deploy the Disk Checking Tool. This Default tool activates is the Elevated Command Prompt and the process is as follows –
- Press the Windows key and type cmd.exe in the empty text area.
- When Command Prompt pops up, do a right-click on the same and select “Run as Administrator” option.
- User Account Control will ask for permission, hit Yes to give consent.
- On the black Command Prompt window, insert following text followed by pressing Enter key-
chkdsk C: /f /r /x
- In a moment the Disk Checking tool will start detecting bad areas in the disk and will apply to fix automatically.
- Wait until the process finishes normally and restart the device once done.
- Prior to returning back, check for the existence of any BSOD error in the system.
13] Try using Automatic Repair in Windows 10
When the device senses any of the snags like ACPI DRIVER INTERNAL BSOD, the Operating System launches Automatic Repair at the Third Boot usually. In this step, the OS runs a few effective tests to diagnose and fix the error and the whole process becomes a little lengthy. To some extent, a lot of unnecessary tests are carried out and you actually get delayed while resolving the error. To save the time, you can disable this default feature using below guidelines –
- Open the Start menu and hit Gear cog. to launch Windows Settings app.
- Click on the Update & Security tile and from the next page, select Recovery option on left pane.
- Shift to the adjacent right side and click Restart now button. You will find it located under Advanced startup.
- On further Startup next, select Troubleshoot =>Advanced options => Startup Repair
- When the Automatic Repair page shows up, provide your Microsoft account id and password.
- Finally, hit the Continue button to initiate the repairing process.
14] Disable Fast Boot to block carry over ACPI DRIVER INTERNAL Blue Screen Error
An amalgam feature of Computer’s usual Shutting down and Hibernate procedure is referred to as Fast Startup or Fast Boot. In this process, all the internal information in a device remains intact even after a shutdown is carried out. Therefore, the Blue Screen Error with bug check code 0x000000A3 that usually should resolve after a restart doesn’t really eliminate as the process keeps everything unchanged. As to prevent this carry-over, you have to disable the Fast Boot proceeding through the below guidelines –
- Hover the pointer to bottom right corner of Desktop and do Right-click on the battery icon.
- From appearing menu, choose Power Options.
- On the next page, click “Choose what the power buttons does” link from left column.
- On the following page, perform click Change settings that are currently unavailable to unveil the hidden options.
- Head to the below portion and uncheck the box set for Turn on fast startup (recommended).
- Finally, hit the Save Changes button from the bottom.
15] Rollback Windows 10 to previous state
Whenever we perform some tasks in Windows, it actually modifies registry which is usually a lot sensitive. Installing new programs or removing an existing one will do the same as well. In these tasks, if you forcibly stop a process before normal completion, often system suffers from ACPI DRIVER INTERNAL BSOD Error in Windows 10. In case of that, you can head back to the previous state of the system where there was no drawback. The process is called System Restore and you can perform that using the below-guided way –
- Take the pointer to Start menu and make a right-click on it.
- Select Run option to allow opening the wizard.
- Type rstrui in the null text field of the dialog.
- Press Enter key now and System Restore will arrive in a second.
- Hit Next button from appearing wizard to move ahead.
- On the consequent page, choose option Show more restore points to see all available points.
- Select the last restore point from the list and hit Next once more.
- After the following window loads, choose Finish to initiate the process.
16] Dis-engage all the Hardware accessories at once
Hardware accessories like an additional keyboard, USB/ wired mouse, speakers, printers can make your life easier a lot. Unfortunately, some people have got Blue Screen error in their systems after connecting the external hardware items. The news may spread frustration all around but we tell you very optimistic news. People have resolved the same issue only by dis-connecting these items temporarily.
While taking out, stay careful to prevent any unwanted damage and place them carefully. Later on Reboot the system and when powers up next, try checking for the issue. if you don’t find any, connect and use them for your own good.
17] Perform a Clean Boot to Windows 10
Clean boot makes the OS start with launching only the basic programs it needs for running and also helps in detecting vulnerabilities like BSOD errors. In addition, it also helps to improve the device performance as well as eliminate the risk of software conflict in the operation. In the process, the Blue Screen error with bug check code 0x000000A3 stays away from the system. If you are already affected also, this workaround might be a savior as well. Let’s proceed to it using below guidelines –
- Press Windows key and navigate to the W alphabet of Start menu.
- Upon reaching, locate Windows Administrative Tools and double-click it.
- From the stretched-out list, scroll down to find System Configuration, right-click on the same and hereafter choose Open.
- Select the radio button before Selective startup and also untick the checkbox set for Load startup items.
- Transfer yourself to Services tab and put a tick mark to the box against Hide all Microsoft services.
- Hit the Disable all button from same wizard.
- Proceeding forward, jump into the Startup tab and click the labeled link Open Task Manager.
- Once Task manager rolls out, right-click on each program listed in this console one after another and choose Disable for all.
- In the end, Go back to System Configuration wizard and click Apply followed by OK.
18] Boot Windows 10 in Reliable Safe Mode
Safe Mode is a Special type of Startup method where Windows powers up with default programs and features only. This is so simple but serves a lot in case of emergencies like Blue Screen errors when you perform. Once the device is booted in the Safe Mode and the issue is resolved, you can have the cure already. On the contrary, if the issue still exists, you will make your diagnosis easier as it will be assured that no default programs are responsible for causing the snag. For the very ancient time, this Workaround turned out to be very reliable and you can give a try using below guidelines –
- First of all, close all running programs and make your way to desktop area.
- Press Alt+f4 together and choose Restart using the drop-down list located beneath What do you want the computer to do?
- When Windows completes the first cycle of reboot and you see a blue screen holding few options, Choose Troubleshoot.
- Following that, select Advanced options consequently Startup Settings.
- Later on, make a click on the Power cog. from the right bottom corner and select Restart to let Windows 10 reboot for second time.
- Once the system restarts, you will have options to Boot in Safe Mode in the startup menu
19] Use the default Windows Blue Screen Troubleshooter
Windows Blue Screen Troubleshooter was introduced first in the Fall Creators Update version as the drawback was found far-reaching. This default utility can easily diminish vulnerability and you don’t need to look for so many complex resolutions. In the past, it was available in the Settings app which is now shifted to Control Panel making your job simple. The procedure to avail the tool is as following –
- Press Widows+Q and then write down bluescreen in the text bar.
- From the search result, opt for Find and fix bluescreen problems option.
- Doing so will make the Troubleshooting wizard active.
- Once the tool finishes detecting the issue related to Blue Screen error, apply the workaround it suggests.
20] Repair all the dreadful Windows image files
Windows image files are important components when you prepare for updating the Operating System or and Up-gradation. These files can get corrupted due to some reasons and finally causes ACPI DRIVER INTERNAL BSOD Error in Windows 10. To get these fixed, the DISM tool comes handy and this default utility is accessible only in the Elevated Command Prompt. The guidelines are as follows –
- Manage to get access to the Elevated Command Prompt using any of the guidelines discussed before.
- In the black window, type the command as below at the base of winking cursor-
DISM.exe /Online /Cleanup-image /Restorehealth
- Hit the Enter key and the tool will start rectifying defective image files.
- As the process is a lengthy one, hold the patience until it finishes.
- Once it ends normally, Reboot Windows to make changes effective.
Methods:
1] Use Device Manager to update all drivers
2] Keep Windows 10 updated and healthy
3] Fix up Memory problems in the device
4] Rectify Windows core components using sfc/ scannow command
5] Disable corrupted drivers or rollback them to default
6] Use Windows Security
7] Update BIOS
8] Delete all the faulty Windows update patches
9] Use only one Security solution
10] Erase all the junk and temporary files to make space in the disk
11] Uninstall similar program
12] Fix up Hard Disk bad areas in Elevated Command Prompt
13] Try using Automatic Repair in Windows 10
14] Disable Fast Boot
15] Rollback Windows 10 to previous state
16] Dis-engage all the Hardware accessories at once
17] Perform a Clean Boot to Windows 10
18] Boot Windows 10 in Reliable Safe Mode
19] Use the default Windows Blue Screen Troubleshooter
20] Repair all the dreadful Windows Image files
That’s all!!