While using Windows 10, often a blue screen appears with a specific code which makes the system inaccessible for a while and forces the device to restart frequently. ACTIVE_EX_WORKER_ THREAD_TERMINATION is one of such issues that usually come up due to closing an active work thread. Work thread is a task that works as a background process and the system generates it without user’s interaction. Like other BSOD, this one holds a fixed bug check code as identification value i.e 0x000000E9.
ACTIVE EX WORKER THREAD TERMINATION mostly turns up because of outdated moreover incompatible device drivers especially video drivers. Furthermore, buggy Windows update and defective system files are equally responsible to bring forth such BSOD. An error like this can be a real bother if you don’t take proper steps at the right time.
ACTIVE_EX_WORKER_ THREAD_TERMINATION Solutions
Here is how to fix ACTIVE_EX_WORKER_ THREAD_TERMINATION BSOD in Windows 10 –
1] Update outdated device drivers
If any of it becomes corrupted, incompatible, and outdated; the Windows 10 performance gets affected badly. Also, critical error may rise up which is very hard to resolve.
Though corrupted drivers can generate ACTIVE EX_WORKER THREAD TERMINATION BSOD error, outdated Graphics card driver is mostly found a reason. To update, you can think to take the help of third-party software but doing the same using Device Manager will be more useful. Here are step by step guideline –
- Press Win+S.
- Type in devmgmt.msc and hit Enter key.
- When Device Manager floats up, locate Display adapters and double-click the same.
- Right-click on the graphics driver and select Update driver.

- Choose Search automatically for drivers.
- Now, the system will search for available updates online. If it gets any, that will be downloaded and installed automatically.
- Once done, restart the PC and check if the issue is fixed.
If ACTIVE_EX_WORKER_ THREAD_TERMINATION still persists, update all drivers that are outdated and defective as well. An easy way to know which driver needs to be updated is checking if any device has a yellow exclamation mark beside them. Once you get one, expand the same and update the drivers listed there by using the usual method. In case of failing to do so, visit the manufacturer’s website and search for the driver manually. When you get the compatible version, download then install the same. Lastly, reboot to make all the changes effective.
2] Install latest Windows 10 patch to fix ACTIVE_EX_WORKER_ THREAD_TERMINATION
Microsoft always thinks about the best user experience and security, they keep releasing major updates and cumulative updates at regular intervals. These packages mainly comprise pragmatic features, improved system settings, security fixes and not to mention bug fixes. But there might be an instance when some of you prevent Windows 10 from receiving updates in order to keep away upcoming trouble.
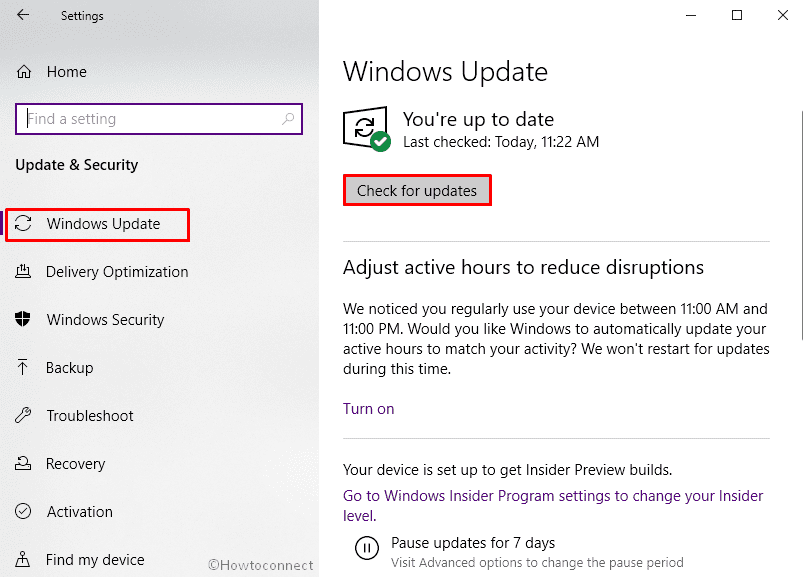
If ACTIVE_EX_WORKER_ THREAD TERMINATION appears because of system fault, Microsoft will get to know about the issue and they will provide a solution for it in their next update. So, you should always keep Windows 10 up-to-date to get rid of any kind of error code. However, the updating process is automatic, the procedure can be delayed sometimes. Therefore, check updates manually to get it right away. Here are the steps –
- Press Windows and I keyboard shortcut.
- From the Settings interface, click Update & Security.
- Once the next page rolls out, move to its right pane.
- Click the button Check for updates.
- If any version is available for your OS, click Download button.
- After completion of download, the system will install the downloaded files automatically.
- While the process is running, be present in front of the PC as the system often asks for a manual restart.
3] Settle down corrupted system files
Necessary system elements that are pretty much needed for the Windows often go missing or become corrupted. This usually happens because of malware infection, wrongly modifies registry values, and not to mention collision between software. If any took place, there is a high possibility of getting a blue screen error in Windows 10.
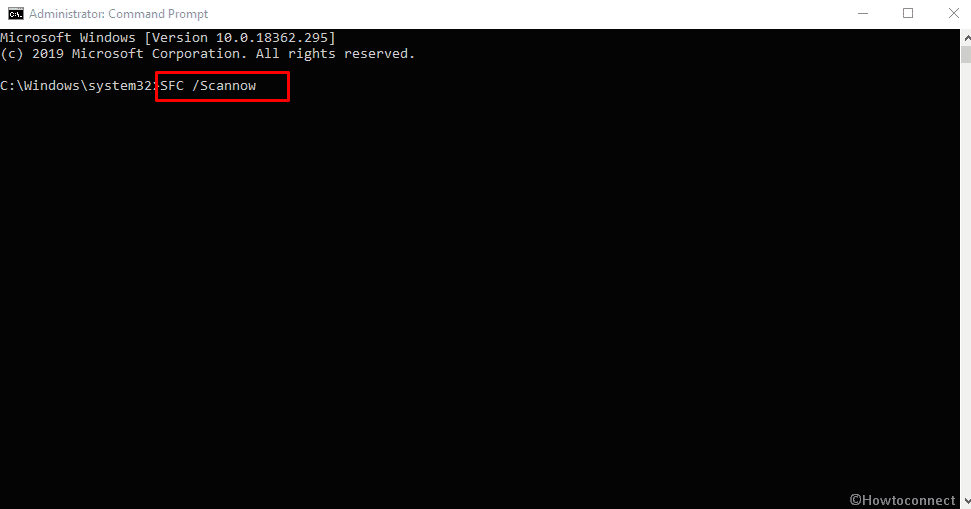
To resolve the defective system elements and at the same time recover missing DLL files, Microsoft offers a very handy tool named System File Checker. When you run its command, the utility goes through the full system and in most cases, fix any kind of error automatically. To run the tool –
- Right-click on Start icon and choose Run.
- Type cmd in the dialog box.
- Press Ctrl+Shift+Enter keys.
- Click Yes if a UAC prompts for your permission.
- Once the black panel arrives, insert the below command and hit Enter key –
Sfc /scannow
- Once the System File Checker becomes activated, it will start scanning the full system for missing DLL files and corrupted system components.
- When the process hits 100%, you will see the diagnostic result.
- Usually, the system fixes up the corruption and recover missing files automatically. As a result, ACTIVE_EX_WORKER_ THREAD_TERMINATION goes away.
- If the problem exists, go through the scan result and take further steps.
4] Uninstall faulty Windows update to fix ACTIVE_EX_WORKER_ THREAD_TERMINATION
Most of the time, Windows 10 update process is carried out behind the user’s notice if the device is connected with an active Wi-Fi network. During the process, there might be an instance when the internet connection failed and some incomplete installation took place. Furthermore, Microsoft itself provide defective update sometimes that lacks important elements. Due to these incomplete update files, you may conflict blue screen errors.
If this is the case for you, the only way to get rid of ACTIVE_EX_WORKER_ THREAD_TERMINATION is uninstalling the faulty update. Though Microsoft provides a fix for reported issues in their cumulative updates, that may take a longer time to happen. It is a good idea to uninstall the patch you got recently rather than waiting for a fix. Steps are as follow –
- Open Windows Settings app first.
- Click the tile Update & Security.
- When the Windows Update page appears, click View update history option located in the right pane.
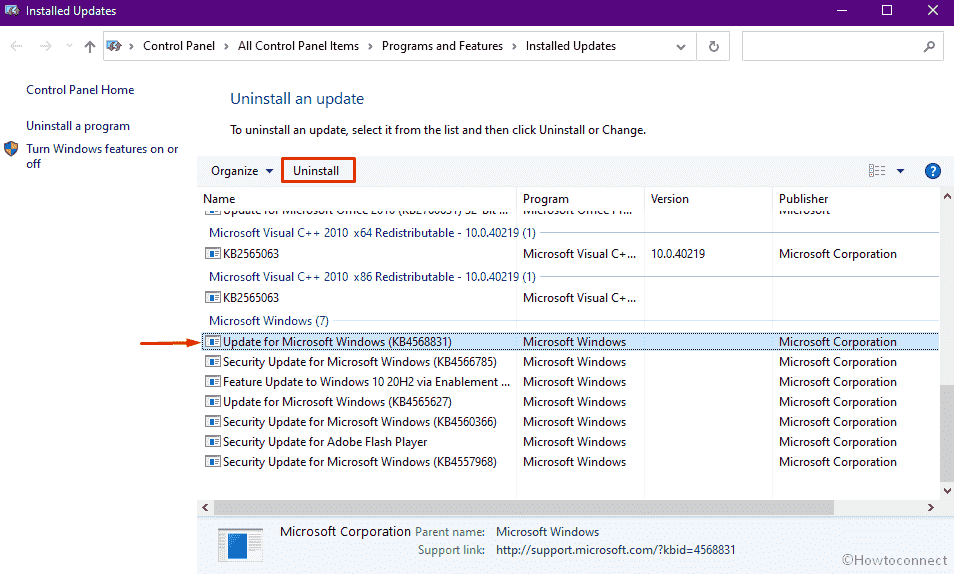
- From the consequent page, select the link Uninstall updates.
- When a wizard named Installed Updates shows up, scroll down a bit to reach the Microsoft Windows segment.
- Search for the most recent received patch you installed and select the same.
- Hit Uninstall lying in the top ribbon.
- Comply with on-screen instructions to uninstall the problematic update completely.
Methods:
1] Update outdated device drivers
2] Install latest Windows 10 patch
3] Settle down corrupted system files
4] Uninstall faulty Windows update
That’s all!!