Windows 10 often throws stop errors that are supposed to be the most frustrating issues for a user. Here we will discuss workarounds for BLUETOOTH_ERROR_RECOVERY_LIVEDUMP. The code points out that the Bluetooth radio driver (bthport.sys) has initiated error recovery to attempt to recover and reset the radio from an irremediable internal condition. Bug check value of this BSOD is 0x000001A6 that can be used to identify live dumps.
Possible reasons for blue screen error BLUETOOTH ERROR RECOVERY LIVEDUMP is driver bthport.sys carrying outdated files or having some bugs. Problematic Patches rolled out by Microsoft may equally be responsible to display such kind of issue. Furthermore, third party software or antivirus, malware, corrupted system files has the capability to create this stop error.
BLUETOOTH_ERROR_RECOVERY_LIVEDUMP
Here is how to fix BLUETOOTH_ERROR_RECOVERY_LIVEDUMP error in Windows 10 –
1] Disconnect all the devices connected through ports
Blue screen error seems much annoying but sometimes it can be fixed with a minute effort. In many cases, the issue occurs because of the accessories connected to a computer. So when you encounter this blue screen of death first of all try to disconnect all the devices attached to the system through ports. Keep them in a safe place so that you can easily find later and restart your PC. Hopefully, you will not get the blue screen error again.
2] Prevent Windows 10 from automatic restarting
Windows 10 has a handy configuration to save your PC from serious damage while you are working. Because of this, a system automatically restarts when a crash or bug check occurs that could lead to system failure. Unluckily, the setting works in reverse order in case the blue screen of death occurs, and the same stops you from deploying a solution.
While digging for a workaround, your computer abruptly starts rebooting and your efforts go in vain. Therefore the initial method to fix this blue screen of death error should be disabling automatic restart settings. Follow the instructions to do the same –
- Press Win and X key and select System from list of options.
- About section in Settings page will appear; click on “System info” link.
- Choose Advanced system settings from the left pane of visible window.
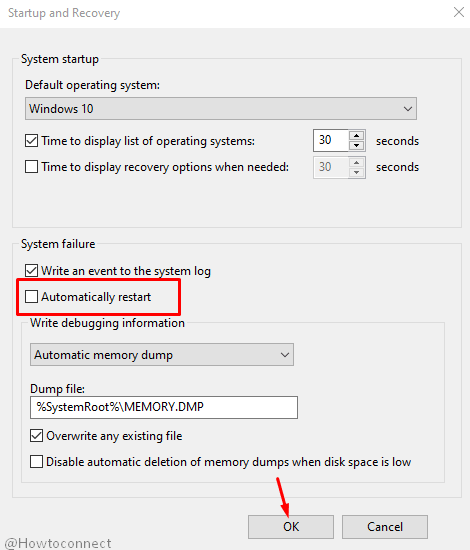
- Click Settings in the startup and recovery area of the wizard.
- Move down to the System failure section and clear off Automatic restart checkbox.
- Select OK and close all the running windows.
3] Update Bluetooth Driver
This BSOD occurs when Bluetooth radio driver has initiated error recovery to attempt to recover and reset the radio from an irremediable internal condition. The driver is a communicator between hardware and software in a device Keeping this component intact is the necessity for a system.
Outdated bthport.sys driver application may be a primary cause behind this situation and getting update of the same is the resolution. Follow the guidelines to update the driver in easy mode –
- Hold down Windows logo and X keys at the same time and choose Device manager from the long list.
- Once the application appears, locate Bluetooth.
- Expand the devices by clicking on it.
- Right click on Bluetooth radio device in the tree and select “Update driver”.
- A wizard will unfold asking you – “How do you want to search for drivers”.
- Choose the option on the top saying ‘Search automatically for the drivers’.
- Wait patiently until the installation of the new software is fully completed.
- Reboot your system and check the BLUETOOTH_ERROR_RECOVERY_LIVEDUMP error still shows up.
4] Use Blue Screen Troubleshooter to solve BLUETOOTH_ERROR_RECOVERY_LIVEDUMP
Microsoft previously used to provide blue screen troubleshooter in Control panel and Settings areas in Windows 10. But recently the tool has been removed from both the locations and an arrangement has been made to fix Blue screen of death or BSOD errors via online mode. However, this method has drawbacks – first you have to manually follow the steps and second the limited blue screen issues are addressed.
You are given some choices in the troubleshooting webpage to select and detailed methods appear as per your need. Finally, you are able to settle down the stop error after following the instructions. To use online blue screen troubleshooter –
- Navigate to this webpage which will access Microsoft official troubleshooting website.
- Choose the option for When did you get the error?
- After an update was installed
- While using my device
- Once you selected as per your requirement, you can see that detailed workarounds to fix the error is available. Follow the methods and resolve.
5] Uninstall all third party software
Microsoft developed Windows 10 keeping good compatibility for each component with other in mind to provide an error-free OS. Third party software spoils the game here when it doesn’t meet the standard of coding and create bugs inside. Conflicts between the system files and the outsiders’ program get chances which can ultimately result in Blue Screen error.
So the prior thing is you should avoid third-party software as much possible and prefer to use the built-in one instead. You will have less chance to encounter BLUETOOTH_ERROR_RECOVERY_LIVEDUMP blue screen of death error you don’t use specifically open source outside application. Currently, if you have installed any third-party software then uninstall it quickly using the steps ahead –
- Make a click on Start, and select gear icon indicating Settings.
- Select Apps.
- Once “Apps and features” section of settings page appears, go to the right pane.
- Locate the third party software apparent the list you have to uninstall. You can filter the same using search box on the upper part.
- Click on the software and select Uninstall from the extended pane.
- Choose Yes from the UAC dialog to give consent for removal and follow the guidelines until the end reached.
- Restart your system to and see if the Screen of death error having bug check 0x000001A6 occurs again.
See – How to Uninstall Software From Windows 10 After Creators Update.
6] Remove faulty Windows update
Windows 10 receives different types of updates on a regular basis for example “Cumulative update”, “Feature update”, “Security update”, “Definition update”, and more. Many times the files in certain patches carry bugs that may cause BLUETOOTH_ERROR_RECOVERY_LIVEDUMP BSOD error.
Therefore if you recently installed any updates and now confront the problem then there is a risk of corruption of Windows due to the files in this. The only solution is the removal of the same so follow the steps –
- Unfold Windows settings using “Win+I” shortcut keys.
- Select Update & security from the interface came out.
- Cross over to the right side of the next page and click on the link that says View update history.
- Select Uninstall updates available at the uppermost of the next page.
- Control panel Program and features window prompts up; right click on the culprit update and choose uninstall.
- Follow the onscreen instructions until the end comes for complete removal and at last reboot your system.
7] Uninstall and Reinstall device driver
Improperly installed device driver is a prominent reason behind blue screen error in Windows 10. Actually missing or corrupt files in application develop this issue preventing the software from installing. As a result, the driver is available in system components but is not correctly set up. The workaround that can solve this issue is the removal of the application and then installation –
- Click on start, write devmgmt.msc and then hit Enter.
- Select “Bluetooth” for the expansion of the devices’ list.
- Right click on radio Bluetooth to disentangle some options.
- Choose “Uninstall device”.
- Quickly a dialog box will turn out showing a warning – you are about to uninstall this device from your system. Give your approval by selecting Uninstall. Don’t be afraid because the driver file is still available in the installation directory and when you will reboot the system everything will be fine.
- Reboot device to reinstall the same and examine if the problem is troubling again.
You can get assistance from – How to Uninstall, Disable, Roll Back, Update Device Drivers in Windows 10 / 8 / 7.
8] Scan and quarantine if malware exists
Malware is no doubt a pestilent threat for Windows coming through internet using email, malicious software and external hard drive. Once threats penetrate security system by any method, system files such as DLL, exe, and others get devastated. Badly manipulating viruses shatter whole system configuration that may end up with the Blue Screen of death issue. Once the DLL files go missing there is a high chance of BLUETOOTH_ERROR_RECOVERY_LIVEDUMP error.
So Scan for malware and quarantine if existing is a necessary and helpful measure when you encounter a BSOD issue. Follow the steps and complete the method –
- Hit Win + Q, type Security, and then enter.
- An application will prompt up on the screen where 7 settings banners are available.
- Select Virus & threat protection under Security at a glance.
- Scan options link is showing just below Quick action, click on it.
- The action will reveal 4 choices; check the radio sign for Full scan and finally select “Scan now”.
- Wait for a substantially long time because Windows security may take hours to complete the detection process.
- When the scanning comes to end and you notice some sort of malware then click on Clean threat to get rid of them from the system.
- To get additional information, click See threat details link.
- The subsequent page will offer you three actions for the threat. Choose the radio button for either Quarantine or Remove and click Start actions button.
9] Use System file checker to fix corrupt components
Corrupt files in a system, whatever the reason is, may lead to Blue Screen error anytime. The main causes of corruption are malicious attack, bugs in Windows update or installation files itself. The operating system Cannot recognize the DLL files and shows BLUETOOTH_ERROR_RECOVERY_LIVEDUMP instead of loading the screen.
Thankfully, Microsoft offers a pretty easy tool to rectify the broken system files. This is none other than system file checker that can be executed through command prompt to repair the corruption in components. Here is how to proceed with the SFC tool –
- Launch Run dialog box simply by clicking Win+X and selecting “Run”.
- Put in cmd.exe.
- Press Ctrl + Shift + enter that throws a User account control dialog.
- Pick Yes option and allow the elevated command prompt to appear.
- Now type
SFC /Scannowjust after C:\WINDOWS\system32> and press Enter.
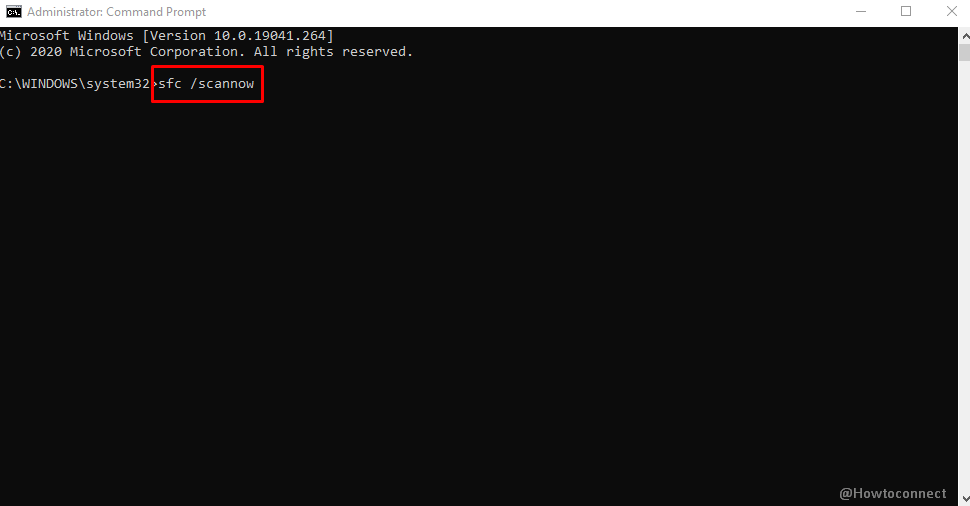
- Take a cup of coffee because the process will end in quite some time.
- Once it shows 100% reboot your system.
10] Run Deployment Image Servicing and Management (DISM) Utility
Anything wrong in Windows image file may result in BLUETOOTH_ERROR_RECOVERY_LIVEDUMP error in Windows 10. Microsoft offers built-in utility called DISM to deal with the issue. This is also called Deployment image servicing and management that when executed through elevated command prompt rectifies the problem. Windows images, Recovery, Setup, and Environment furthermore Windows PE get settled when you run the tool. Follow the guidelines to run DISM –
- Once more get access to the command prompt with the help of steps in the previous method.
- Copy the underneath syntax and paste into the running window of cmd.
DISM.exe /Online /Cleanup-image /Restorehealth
- Press enter, wait for some time, and let the process complete.
- Once finished, restart Windows 10 and check for 0x000001A6 BSOD error.
11] Bring Disk cleanup into action
Windows follow your every action such as cut copy paste and create temporary files for each. After a long time, these items convert into a heap of files that disturb the processes and services running on Windows. Literally, they consume a big amount of space on your computer disturbing the normal behavior of the OS.
Apart from this, Previous installation media (Windows.old) also takes a huge space (more than 20GB) which can cut down the necessary room for normal operations of Windows. The garbage also causes BLUETOOTH_ERROR_RECOVERY_LIVEDUMP error which can be resolved by running disk cleanup.
- Hit Win +S jointly, type cleanmgr and then press enter.
- The utility will itself recognize the installation drive and start calculating the quantity of unwanted files.
- In the subsequent wizard, click on Clean up system files.
- When the disk Cleanup for C:/ window comes, you will notice removable files categorically with their amount.
- So, under Files to delete section, check all the boxes. Note that if the Recycle bin is in the option make sure that there is nothing is important here and if something uncheck this.
- Restart system and check for the BSOD that couldn’t appear now.
12] Install latest update to fix BLUETOOTH_ERROR_RECOVERY_LIVEDUMP
Microsoft follows a perpetual routine to release cumulative and security update for Windows 10. The patches empower the system to fight with threats and resolve various bugs creating problems at the same time. Endeavoring to avoid any error you must have to install the updates as the tech giant rolls out. And if you confront with blue screen on your computer prefer to install a patch rather than using other methods. Pursue the steps below to update Windows 10 –
- Click on start and select settings cog.
- Choose update and security on the appearing interface.
- Next setting page will show Windows update section by default; focus on the right pane.
- Perform a click on Check for updates.
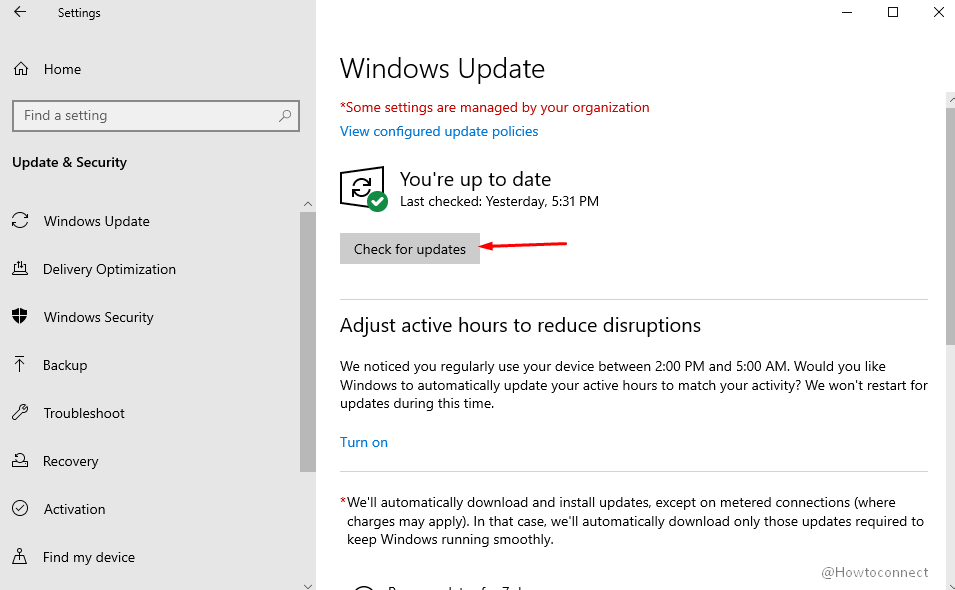
- Windows will scan for available packages start download automatically.
- When the download gets completed you will see an install button, click on it and wait until the completion.
- Your system will restart several times to finish the installation, check for the BLUETOOTH_ERROR_RECOVERY_LIVEDUMP blue screen error after it gets over.
Explore – Windows 10 Cumulative Updates.
13] Boot into Safe mode and deal with BLUETOOTH_ERROR_RECOVERY_LIVEDUMP
Safe mode mechanism in Windows to deal with errors and prevent you from bugcheck annoyance. This method loads only basic applications, drivers, and files that make do Windows running. 3rd-party software, gadgets, themes, antivirus, and other programs are not acceptable in this mode. So when you encounter blue screen error because of any of these factors it is resolved after going into safe mode, moreover, you get an opportunity to know the real culprit.
You are able to check the reason by removing the software one by one and returning back to the normal mode. Once you have found out, you can permanently remove the software from your computer to get rid of the problem. Underneath is the way to boot into safe mode –
- Press the “Win + I” shortcut combination from the keyboard and invoke Settings app.
- Once becomes visible, move on to Update & Security section and make a click on it.
- After the additional settings page turns up, choose Recovery from the left sidebar and move to the adjacent right.
- Proceed to Advanced startup field and click the button namely “Restart now“(see screenshot).
- Quickly the system will reboot and ask you to choose the next step. Select Troubleshoot shown on the Startup Screen.
- Subsequently, from the Troubleshoot menu, click Advanced Options and follow by selecting Startup Settings.
- Now the System will display that the device can be restarted with the use of extra settings one of which is “Enable Safe Mode”. choose Restart.
- After rebooting click on ‘Enable Safe Mode’ by pressing F4.
14] System Restore Windows 10
Sometimes when BLUETOOTH_ERROR_RECOVERY_LIVEDUMP Blue screen of death appears and you are unable to find the cause. Using this method, you can send your Windows 10 to the previous date and time where Windows was Immaculately running.
The tool removes all the software and installed after the date and time. most of all it is pretty easy and straightforward and takes you out of the error only after a few clicks. Follow instructions to perform system restore –
- Type restore in Windows search (Win+Q) and press enter.
- You will come across a wizard showing System protection tab by default.
- Click on System Restore.
- On the next wizard, check the radio box against Choose a different restore point and select next.
- Tick mark the box for “Show more restore point”.
- Highlight the date and time after when the error appeared and click on Next.
- Finally, click on Finish.
- A popup is thrown out asking you to confirm the process, select Yes.
Methods:
1] Disconnect all the devices connected through ports
2] Prevent Windows 10 from automatic restarting
3] Update Bluetooth Driver
4] Use Blue Screen Troubleshooter
5] Uninstall all third-party software
6] Remove faulty Windows update
7] Uninstall and Reinstall device driver
8] Scan and quarantine if malware exists
9] Use System file checker to fix corrupt components
10] Run Deployment Image Servicing and Management (DISM) Utility
11] Bring Disk cleanup into action
12] Install the latest update
13] Boot into Safe mode
14] System Restore Windows 10
That’s all!!