CMOS error is an unusual issue that happens at the time of Startup because of conflict between CMOS and BIOS of your system. While powering off a device, CMOS traces out a number that should match with another one generated by BIOS while booting. Unmatched number leads to trigger CMOS checksum error in Windows 10 that you can fix using following the instructions here.
Before starting up, Windows loads various processes and motherboard controls all these low-level tasks, prefabricate system data as well as transfer them to OS for running it. Basic Input Output System well known as BIOS is the firmware located on the motherboard acts as a medium for conveying information. Furthermore, BIOS controls other settings for Hardware such as voltage, speed, boot priority, time & date, etc. All these settings are stored in a separate non-volatile CMOS RAM chip on the motherboard. The chip is a battery-driven one and it’s a metal oxide semiconductor. If the battery is drained out or the data generated by BIOS does not match, you will experience CMOS checksum error in the form of the following message –Diskette drive 0 seek failure
CMOS checksum error – Defaults loaded
Press F1 to continue, F2 to enter SETUP
CMOS checksum error
Here is how to fix CMOS checksum error Defaults loaded in Windows 10 –
1] Restart Windows 10 PC
The CMOS checksum error is a result of abnormal power cut of the system, which can be resolved easily only by restarting Windows 10. The issue will mitigate when you shut down the system correctly from next time. You need to go to Start menu, click the Power icon and select Shut down. At the time of the next startup, remove the residual power first by unplugging the cord from the socket. Hold down the Power button on the CPU for about 30 seconds. When the device will start, hopefully, the aforementioned error will not appear again.
2] Replace the Dead Battery to Resolve CMOS checksum error
CMOS is a DC power driven semiconductor chip and the battery is somewhat like the one used in watches with the longevity of 2-3 years maximum. This battery ensures the BIOS loading the correct information every time until it is fully functional. If you have shut down the computer correctly in the previous session and still getting the CMOS checksum error, it means the battery has completely drained out or the voltage is pretty low. To replace the battery, follow the below instructions –
- Purchase a new battery checking the model of the device and instruction manual.
- Shut down the device completely.
- Cut off the power supply for CPU by disconnecting the cord from socket.
- Dismantle the computer case and locate the old battery on the motherboard.
- Remove the dead or old CMOS battery carefully.
- Insert the new battery into the place and check the position is correct as of the old one.
- Assemble the casing and connect the power supply to CPU.
- Start the computer and check if the error has resolved.
3] Fix up terminals of CMOS battery
The CMOS checksum error may still be prevailing in the display after replacing the battery just because of loose terminals of the power supply. The battery is usually of 3 volts and CMOS should function properly after replacing it and return the correct BIOS settings. When the battery is placed inverted to negative and positive pins, it will not deliver any power supply. Sometimes, the battery can be loosely fitted for which, the system could not draw the power from it. To avoid these issues and resolve the error, follow the below guidelines –
- Shut down the device again and remove the Power supply from CPU.
- Open the casing cover and also remove the CMOS battery carefully.
- Bent the negative and positive pins in such a way that, they can hold the battery tightly.
- Insert the battery checking the positive and negative sign indicated there.
- Put back everything on the casing cover. Connect the power supply to the CPU.
- Restart the device and check the error has resolved.
4] Update the BIOS to fix CMOS checksum error
BIOS is a ROM chip resides on the Motherboards and its an integral part of the computer which comes as a built-in component in Windows. This part of the Microprocessor helps setting up the device from the very basic level and also energizes the system when it turns on initially. Outdated BIOS is a great source of various bugs and errors in the operating system and we must keep it updated always. Updating BIOS keeps in sync with the Operating System as well as the hardware accessories connected with the device. Oftentimes CMOS checksum error occurs when some potential viruses change the checksum settings value and corrupt the BIOS. Therefore, updating is the key to resolve the error and the steps to complete the task are as follows –
- Open the Taskbar search pressing Win+Q hotkey at once.
- Type “System” in the blank text box and select System Information from the results.
- In the newly opened window, find out BIOS Version/Date on the right-side panel.
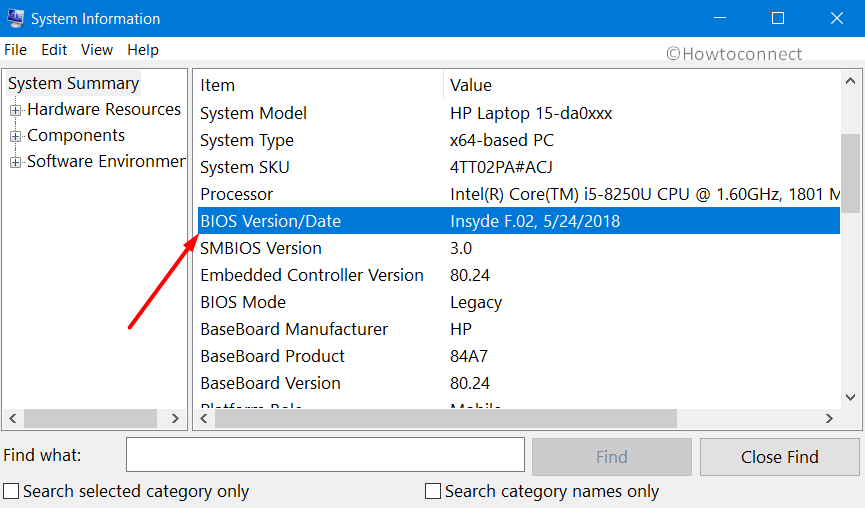
- Check the given information against this category and note it down.
- Quit the System Information window and launch any web browser.
- Visit the maker’s web page for your BIOS using the previously noted information regarding it.
- Download the latest BIOS file complying with the specification from here.
- Install the downloaded file to update the BIOS.
5] Reset the BIOS of the Operating System
When the CMOS checksum error occurs again after updating the BIOS of the operating system, it might be from the malware or virus attack or due to sudden power failure. Oftentimes if the BIOS updating process is not correct or any mistake in the task also misleads to the same issue. For resolving these cases, resetting the BIOS to its default settings will be key. Before proceeding to reset the BIOS, conduct a full scan of Windows 10 for any threat in the system using Windows Security app to eliminate any infection. Then follow the below steps –
- Start the computer and the CMOS checksum will appear with black screen on display.
- Just below the error, you can see these options – “Press F1 to continue, F2 to enter SETUP“. Press the F2 key and enter into the BIOS settings.
Note: Often the BIOS settings opens with other keys like Del depending upon the configuration and model of the device. So check and press accordingly to open the BIOS settings.
- When the Keys Usage information shows up on display, select the Load Defaults option.
- Hit the key Y if the system displays “Load BIOS Defaults(Y/N)?”.
- Close the BIOS Settings and Shut down the computer. Turn on the device and check if the error has resolved.
- If it persists, again enter into the BIOS settings like before and select the Standard CMOS Features.
- Check the Date and Time settings and adjust them if found incorrect.
- Moving ahead, also re-check the SATA or Drive.
- If the system has no diskette drive, choose Disable/None/Not Detected in order to stop it’s scanning.
- Save the modifications, close the BIOS settings, and restart the device to check if the error has resolved.
Note – Every BIOS has different option descriptions and interfaces as well. These options discussed above may vary depending upon the devices and BIOS versions, so check before taking any action.
6] Replace the Motherboard of the computer
If you are still getting the same CMOS checksum error in your system, it might be a dangerous motherboard malfunction. Sometimes, a sudden power surge or outage, physical damage to the motherboard could lead to the error as well. You can carry out a few more tests by own self but the best way to call a technician and replace the motherboard to a far extent. The error is a very annoying one and creates a disturbance while working. Try fixing the problem as soon as possible.
7] Perform Automatic Repair
To fix the issue that prevents the computer from starting normally, you should also try to conduct the automatic repair. This repair will detect the possible issues within the system and will eventually make an attempt to fix them as well.
- Open Windows Settings hitting Win logo + I hotkey.
- Click Update & Security.
- Go to Recovery subsection on the left pane. Switch to the right side and click Restart now button that appears underneath “Advanced startup”.

- When the WinRE screen comes into view, select Troubleshoot => Advanced Options => Automatic/Startup Repair.
- Automatic Repair will start detecting the issues and upon completion check for CMOS checksum error.
Methods:
1] Restart the Windows
2] Update the BIOS to fix Cmos checksum error
3] Replace the dead battery
4] Fix up terminals of CMOS battery
5] Reset the BIOS of the Operating System
6] Replace Motherboard of the computer
7] Perform Automatic Repair
That’s all!!