Do you get CMUSBDAC.sys Blue Screen of Death in Windows 10 repeatedly? When this BSOD occurs system often restart frequently and does not allow you to do anything. Usually, this nagging error troubles when you use USB microphone, Wireless charging stand for phone, play games, download updates or after reboot your PC.
CMUSBDAC.sys has a common association with SYSTEM_THREAD_EXCEPTION_NOT_HANDLED Stop code. You unexpectedly see the message Your system ran into a problem and needs to restart including the scanning status in percent on a Blue screen. Though no official fixes for CMUSBDAC.sys Blue Screen is available right now, however, you can fix it by following workarounds. See the error in the screenshot –

Now go to the solutions –
CMUSBDAC.sys Blue Screen of Death in Windows 10 Solutions
Here is How to Fix CMUSBDAC.sys Blue Screen of Death in Windows 10 –
Fix-1: Remove if Malware exists
The main cause of CMUSBDAC.sys Blue Screen is a malware so it’s better to scan your full system to check if it really exists. So it’s better to scan your full system to check if it really exists. Here is the procedure –
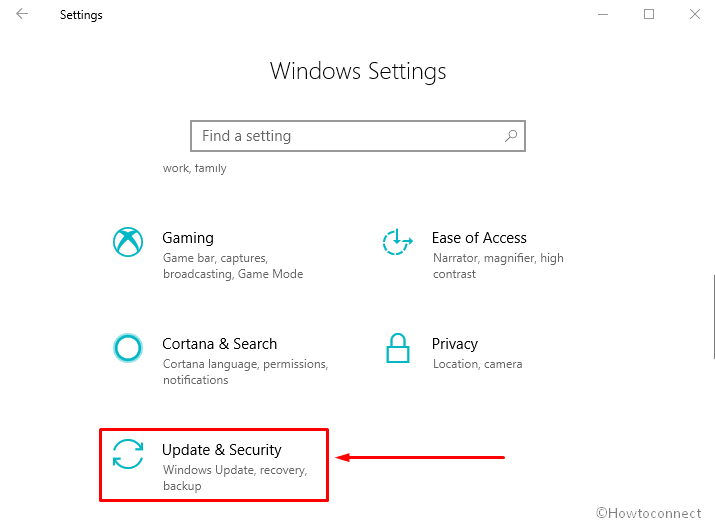
Step-1: Press Win and I altogether to launch Windows Settings and then do a click on Update & Security.
Step-2: Now Select Windows Security from the left column and go to the right side.
Step-3: After that, Perform a click on Virus & threat protection. When a new Window rolls in, click on Run a new advanced scan Located under threat history.
Step-4: Make sure that radio button of Full scan is marked. Then do a click on Scan now to start the procedure.
Your system will start scanning your computer and also resolve by removing the malware
Fix-2: Reinstall C-Media USB Device Audio Class Driver
We already said USB microphone is might be the culprit of this issue. So you can think to put the USB out. Unplugging cable of the mic from the port might help you sometime but reinstalling the driver is better. Let’s see the procedure –
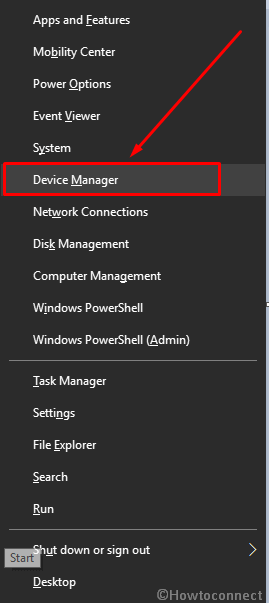
- Do a right click on Start button and Select Device Manager from the list that turns up.
- Once it appears on the screen locate Sound, video and game controllers and perform double click to expand.
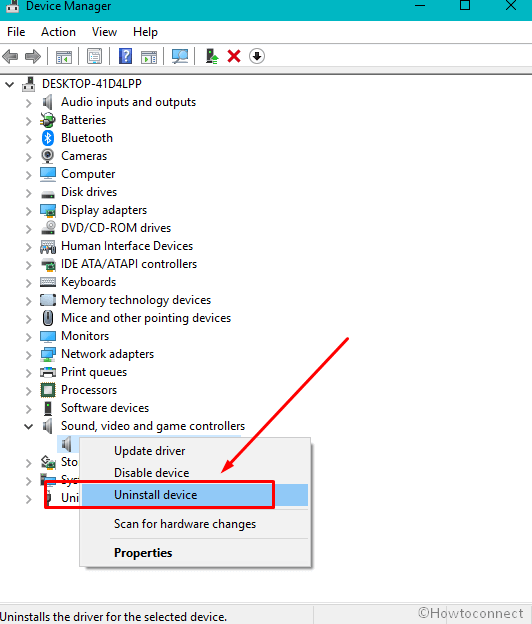
- Now right click on C-Media USB Device Audio Class Driver and Select Uninstall. You will get a warning pop up, where click on Uninstall. If you don’t find it in this section then check out in Audio Inputs and Outputs.
- Thereafter, Reboot your Computer.
- Again open Device Manager. Moreover, right click on “Sound, video and game controllers” and select Scan for hardware changes.

- When the scan result is ready, click Install driver. The system will automatically find out the latest driver for C-Media USB Device Audio Class. In case it failed to get that, you can manually download it from the manufacturer website.
Fix-3: Update all the Drivers
Commonly, BSOD creates minidump files that tell the faulty driver causing CMUSBDAC.sys Blue Screen of Death in Windows 10. But you need to decipher the data to understand that. Therefore, the option left in your hand is to update all drivers manually. Here’s how –
- Press Win+R at once and when the Run Dialog appears type devmgmt.msc in the available box and hit Enter.
- You will view Device Manager window in the display. Locate the drivers that may need the update.
- Do a right click on the driver you prefer and Select Update.
To complete the procedure easily you can follow – Update All Drivers in Windows 10 Simultaneously.
Perform the same process for all as you don’t know which one is causing the error. Once done, Restart your computer to save the changes.
You can also Use BlueScreenView to Detect the Cause of Blue Screen.
Fix-4: Look over Minidump file
To locate the driver that is causing BSOD problem, you have to analyze minidump files. Though it’s complicated still if you want to do it follow the below method –
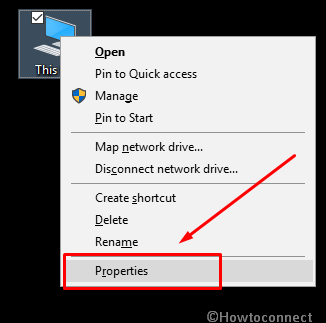
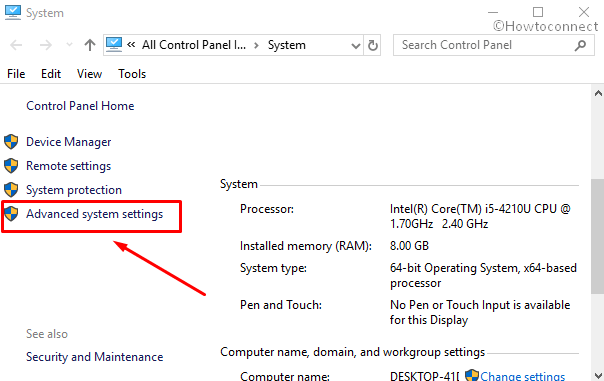
Step-1: Do a right click on This PC and Select Properties.
Step-2: Now click on Advanced system settings from the left column.
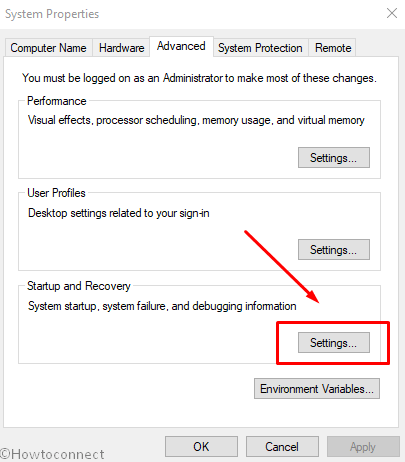
Step-3: When System Properties rolls in on the screen, move to the Advanced tab. Perform a click on Settings located under Startup and Recovery section.
Now check the box of preferred settings located under System Failure section that you want Windows to perform when an error occurs –
Here one thing is important to say that Startup and Recovery have the options to enable and disable Write an event to the System log and Automatically restart but we are giving here to do the same using Command prompt.
Go to System failure section in the lower part of the wizard and check the box for Write an event to the system log.
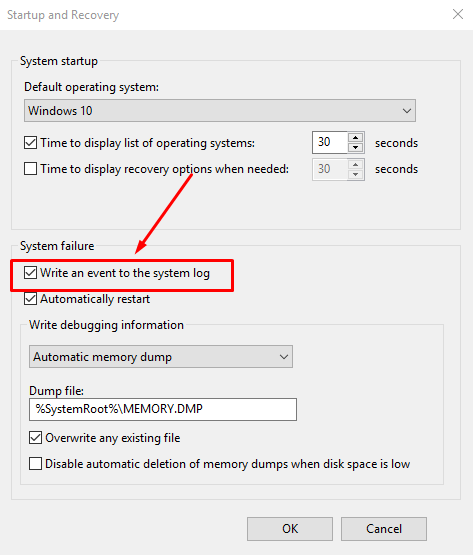
Write an event to the System log choice defines the system information that is recorded.
Though this option is turned on by default you can disable the same by modifying the registry.
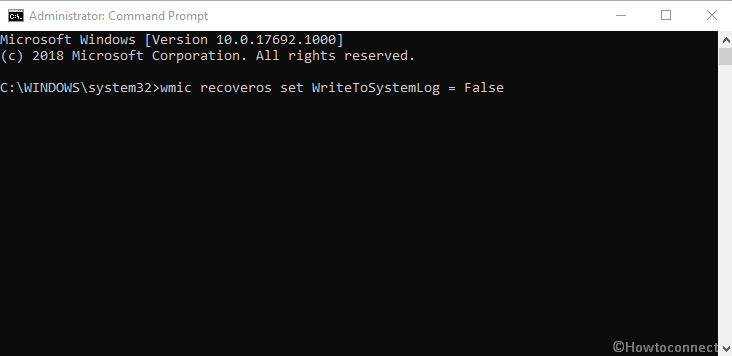
To do so, you can copy paste the following text in Command Prompt and Press Enter –
wmic recoveros set WriteToSystemLog = False
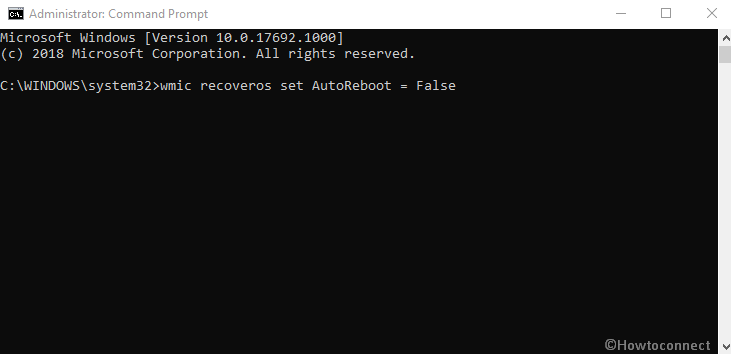
Check Automatic restart.
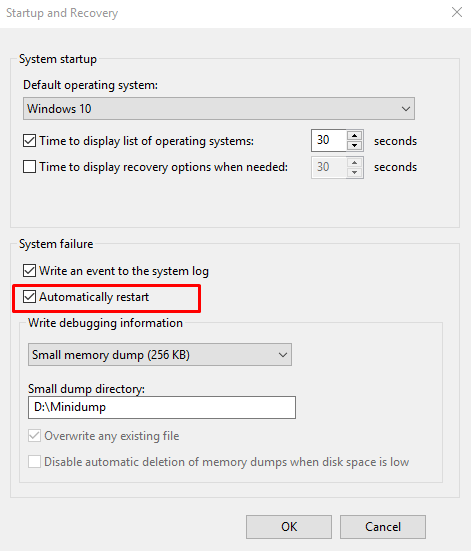
The automatically restart defines that your Windows will itself reboot your PC and It is also enabled by default. To turn it off by modifying the registry, copy and paste the below text in Command Prompt and hit Enter –
wmic recoveros set AutoReboot = False
Click on the drop-down underneath Write debugging information from the options and then choose Small memory dump (256kb).
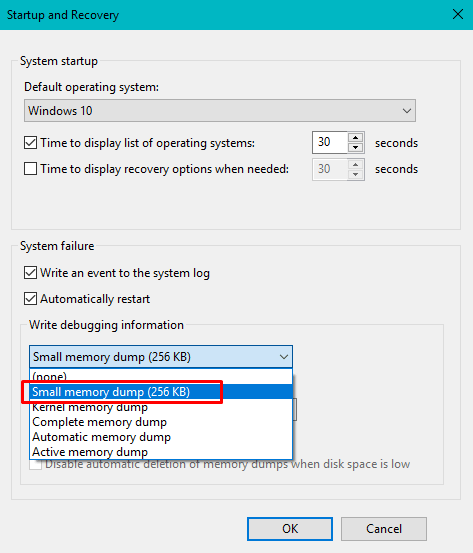
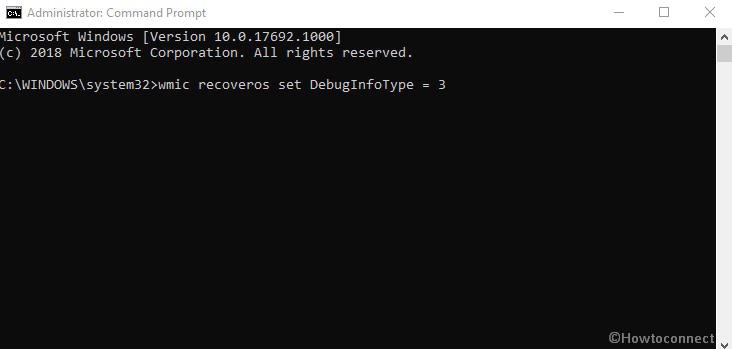
The Small Memory Dump keeps the least amount of information in order to identify the problem. If you want to use this by modifying the registry then run below text in the Command Prompt –
wmic recoveros set DebugInfoType = 3
Enter the directory shortcut path in the box of System Dump Directory. You can leave the same or change the folder in another drive D:\Minidump if you want to keep a separate location.

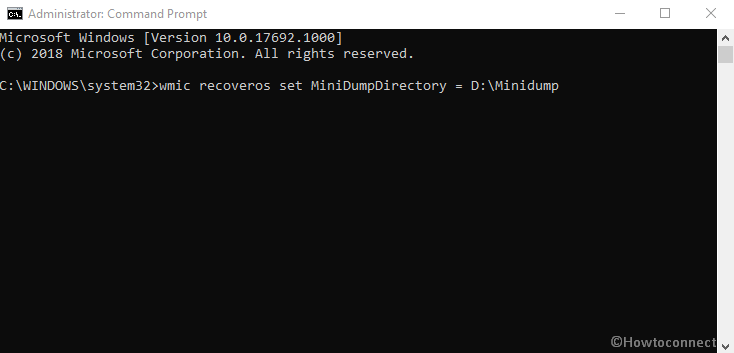
To specify that you want to use the D:\Minidump folder as your Small Dump Directory you will again need to edit an entry in the registry. This will be setting the Value data MinidumpDir Expandable String Value to D:\Minidump. To perform the modification using command prompt simply copy and paste the underneath command and then hit on the ENTER key –
wmic recoveros set MiniDumpDirectory = D:\Minidump
Kernel Memory Dump allows the Windows to record only kernel memory. This option saves more info rather than small memory dump file. This option saves info in a greater extent rather than small memory dump file. And it also takes comparatively less time to complete than a complete memory dump file.
There are some other options available too but we recommend to use Small Memory Dump because it includes enough information to resolve CMUSBDAC.sys Blue Screen of Death in Windows 10. Proceeding further, let’s see how can you get and read minidump files. Follow –
- Go to this link and Download Windows Driver Kit.
- Once the downloading is completed, open the file and install it by following the instructions that will be shown on the display.
- Now do a click on start search and type cmd. When the result appears, make a right click on Command Prompt and Select Run as administrator.
- Type the following command after blinking cursor in order to change to the Debugging Tools for Windows folder –
cd c:\program files\debugging tools for windows
- To load the dump file into a debugger again type any of the following commands and then Press Enter –
windbg -y SymbolPath -i ImagePath -z DumpFilePath
kd -y SymbolPath -i ImagePath -z DumpFilePath
- If you want to save the file in C:\windows\minidump\minidump.dmp folder then use the following command –
windbg -y srv*c:\symbols*http://msdl.microsoft.com/download/symbols -i c:\windows\i386 -z c:\windows\minidump\minidump.dmp
- In the end, check the file to get the error and check the bugs in Google to resolve the issue.
Fix-5: Reset your PC
In most of the cases Resetting PC helps to resolve CMUSBDAC.sys Blue Screen of Death in Windows 10. The procedure is right below here –
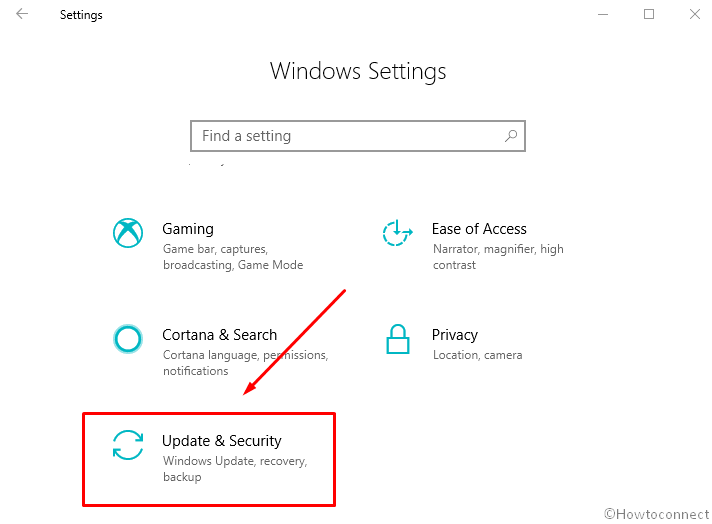
Step-1: Hold Win+I down to launch Windows Settings and then select Update & Security.
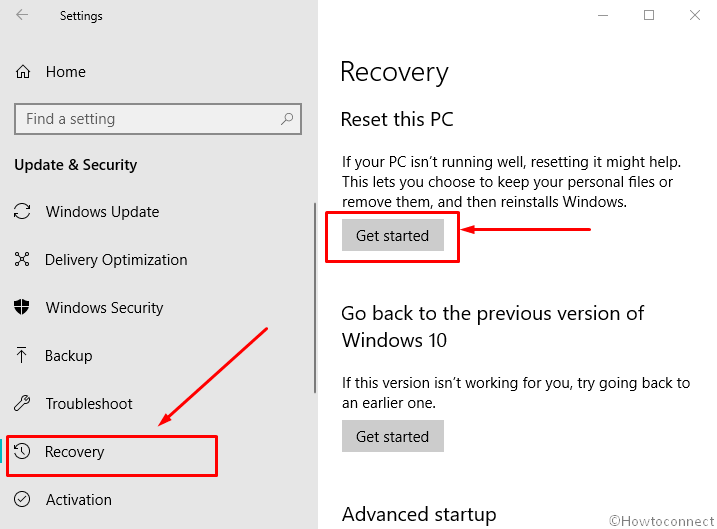
Step-2: Now do a click on Recovery from the left column and move to the right side. Thereafter perform a click on Get started located under Reset this PC in order to start afresh.
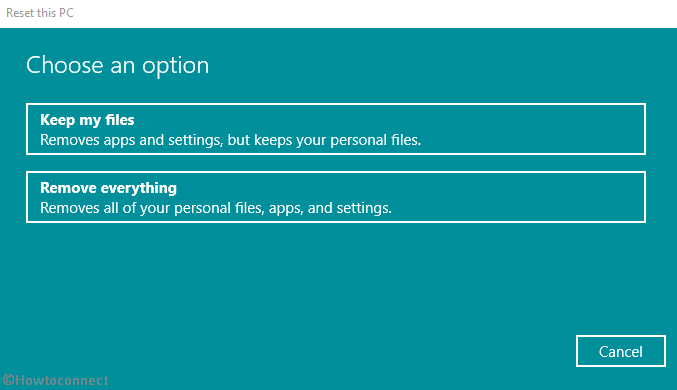
Step-4: When a blue pop up rolls in, Select either Keep my files or Remove everything depending upon your choice. And then do a click on Next.
Step-5: Finally, select Reset when it asks for final confirmation.
Now the system will take some time to complete the process and Restart it once done.
Read – How to Reformat Windows 10
Fix-6: Restore your system
You can also resolve this issue by bringing back your system to an earlier date and time. Here is the method –
- Click on Start search, type rstrui.exe and then hit on Enter.
- Once System Restore wizard rolls in, click on Next.

- Check the round button for the “Choose a different restore point” from the bottom part and then press Next.
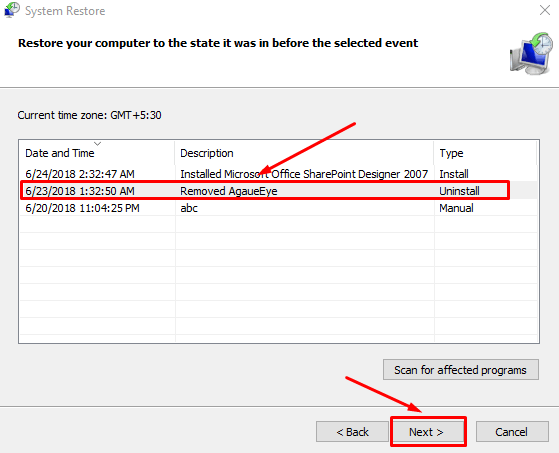
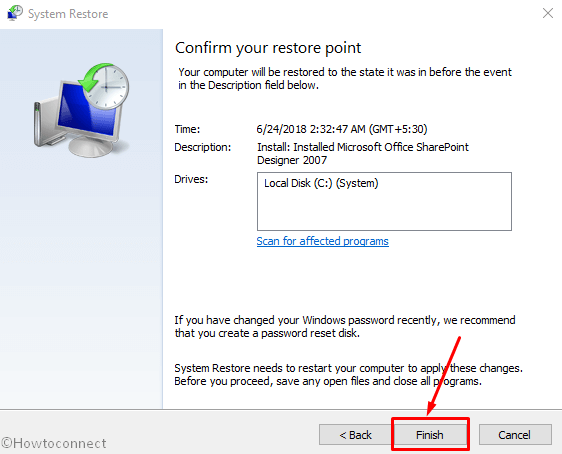
- In the end, Select the latest date and time and again do a click on Next to continue.
- Finally, click on Finish.
That’s all. Hope you have resolved CMUSBDAC.sys Blue Screen of Death in Windows 10. Let us know which method helped you in this regards.
That’s all