Steam gamers encounter various problems in their gameplay. Connection error in Steam is one such issue that you might come across despite having a steady and working internet connection. As a result, a client fails to register or login and it occurs while playing multiplayer or single-player games. You see an error message – “Could not connect to Steam network” – when the issue appears.
Some experts found out that, the issue comes up because of broken configuration of Steam installation or Windows system files. Today in this write-up, we will discuss some methods to fix the error.
Could not connect to Steam network
Here is How to Fix Could not connect to Steam network –
1] Delete all files except Steam apps and .exe
Abundant of cases are resolved using only this method when logging in Steam is problematic and you encounter the above-said error. Actually, the corruption in configuration causes the error and mess up and the Store app has no role. So, delete all the files except Steamapps and .exe files. Leaving the Steamapps will keep all the games safe and .exe will help to run the setup again. Follow the instructions –
- Open File Explorer from Taskbar (or use Win+E).
- Paste C:\Program Files (x86)\Steam in the address bar and hit Enter.
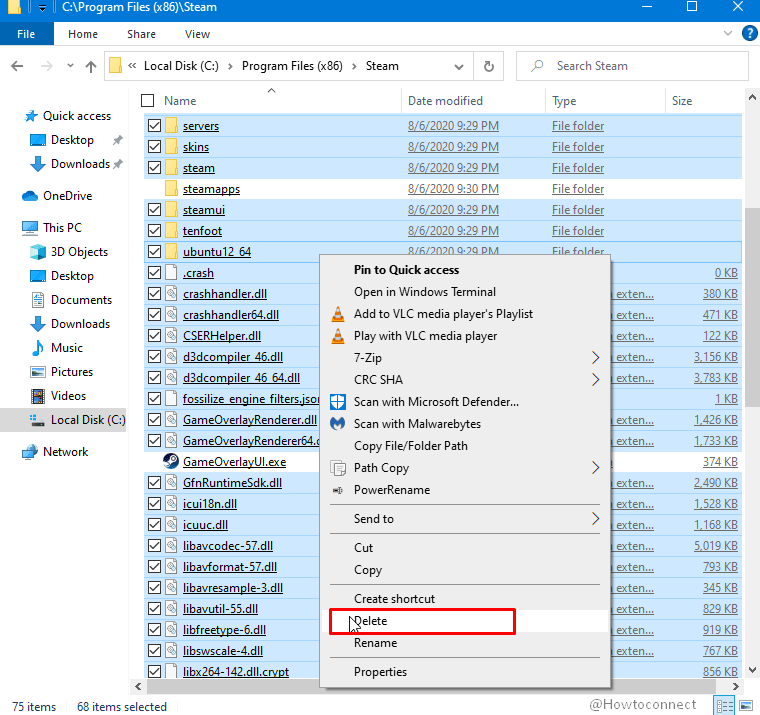
- Select all the items except Steamapps and some .exe files such as Steam.exe, GameOverlayUI.exe, steamerrorreporter.exe, and more.
- Delete them by pressing Del on keyboard (or right-click and select Delete).
- Restart your computer and access the same location.
- Double click on steam.exe and install the app.
2] Stop all services related to Steam
Sometimes Could not connect to Steam network has a very easy fix and you can do that by terminating all the related services from Task Manager. The reason is, steam may have a conflict with hardware or software in the system, therefore, causing the error. Hence, ending all Steam related processes forcibly will be very much helpful to fix it. To continue, follow the below steps –
- Right-click on Taskbar and from the list of options select Task Manager.
- Move into the Services tab.
- Locate ‘Steam Client BootStrapper’ and right-click the same.
- Select End task to terminate the service.
- Repeat the same for all other Steam related services.
- Once all the services are stopped, leave the Task Manager window.
- Restart Windows 10 and launch Steam with administrator privileges.
3] Delete clientregistry.blob
In many computers, corruption in the Steam client registry is the main culprit to cause Could not connect to Steam network error. Steam uses Clientregistry.blob file for storing and holding all the registration data for the games installed on the device. Deleting this file will be helpful to resolve the error since it is very much prone to any sort of corruption.
Next time when you will try to log in to the Steam, it will ask the username and password for obvious reasons. Therefore, keep the credentials beforehand or ignore this workaround if you don’t have the log in information as game progress will be affected. Steam usually stores the progress in the cloud therefore; getting rid of clientregistry.blob won’t be a problem if you have the login credentials. Here is how to remove the file –
- End all Steam services from Task Manager using guidelines from the above workaround.
- Click This PC icon from the desktop and navigate to the below path –
C:\Program Files\Steam
- Once into the directory, locate ‘ClientRegistry.blob’ file.
- Right-click the file and select Rename option. Change the name to ClientRegistryOld.blob.
- Alternatively, right-click the same file and select Delete. Re-launch the Steam and let the system to recreate the file all by itself.
This will resolve the error as the client will run as expected but if that doesn’t happen, follow the below guidelines –
- Head back to the Steam directory and find out the file namely ‘Steamerrorreporter.exe’.
- Run the application and re-launch the Steam.
4] Reinstall Steam to fix Could not connect to Steam network
The presence of certain faulty files in Steam can possibly trigger error Could not connect to Steam network. So reinstalling the program completely can provide some relief and can make the connection again. However, by doing this, all the games in the Steam will be uninstalled. Once it fixes the issue, you can install them again freshly. To reinstall Steam, follow the below guidelines –
- Navigate to the Steam installation folder. Locate the Steamapps folder in there.
- Move this folder to a safe location with all contents inside.
- Open Run dialog box pressing “Win+R” hotkey. Type appwiz.cpl in the empty text space and press Enter.
- When you access Programs and Features window, locate Steam and right-click it.
- Select the Uninstall option. Click Uninstall again when the wizard shows up on display.
- Restart the device and Download the latest Steam client installer. Install the client to the computer.
- Move the backup Steamapps folder you had created beforehand to the Steam directory.
- Launch the Steam client and see if this resolves the connection error.
5] Add a Launch option (-tcp) in Steam
In order to transmit the data, Steam uses User Datagram Protocol (in short UDP). If we can change the same to Transmission Control Protocol (TCP) the error can possibly be fixed easily though UDP is faster. However, interchanging might help in resolving Steam connection error 2020 and the guidelines are as follows –
- Open File Explorer pressing Win+E hotkey together.
- Navigate to the following directory –
C:\Program Files (x86)\Steam
- Locate and right-click Steam.exe file and select Create Shortcut from context.
- Now, do a right-click on the shortcut file and choose Properties.
- When the popup shows on display, enter into Shortcut tab.
- Reach to the Target area and add (space) –tcp at the end of the path here. The final line appears –
“C:\Program Files (x86)\Steam\Steam.exe” –tcp
- Click the Apply button followed by a hit on OK to save the changes.
- Launch Steam now and try to connect to the network.
6] Allow Administrative Authorities to Steam
Steam sync various system files in order to read and write the operation at a relatively higher speed. To execute this task correctly, Steam needs administrator privileges, memory usage, and a lot of processing power. It may happen that Could not connect to Steam network error has come up as it doesn’t have admin powers leading to stuck amidst of the task.
Therefore to settle down the issue, we can modify the Steam directory settings to an administrator to check whether it helps in resolving the error. Here are the guidelines to grant admin authorities –
- Open the Steam directory first. The usual default path is
C:\Program Files (x86)\Steam. If you have customized the install location, go there. - Find out Steam.exe file and make a right-click on it. Select Properties.
- Enter the Compatibility tab.
- Locate and check the box that reads “Run this program as an administrator”.
- Click Apply button first and then OK.
- Restart Steam and check for the connection error.
7] Run Steam in Compatibility Mode
Often Could not connect to Steam network error may show up whenever its client encounters some problems with the Operating System. Steam tends to keep the games and its client up to date always keeping pace with the OS. If you have not installed the latest updates for Windows 10 recently, can try running Steam in Compatibility mode for the previous versions. To complete the task, follow the below instructions –
- Navigate to the below directory, locate Steam.exe file, and do a right-click on it.
C:\Program Files (x86)\Steam
- Select Properties and highlight Compatibility tab.
- Hover down to Compatibility mode area and check the box that says “Run this program in compatibility mode for:“.
- Click the dropdown menu under it and select Windows 8 or Windows 7.
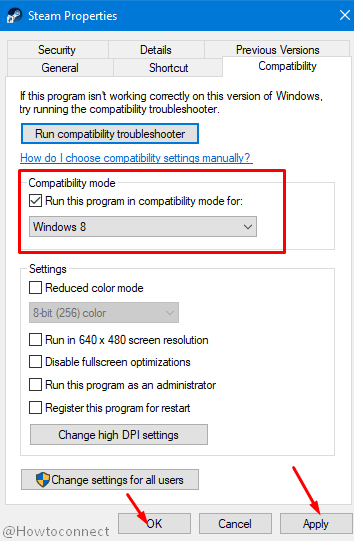
- Hit Apply, OK, and then re-launch the Steam client to check if this is working properly.
8] Change the language of Steam client in Windows 10
In certain cases, Could not connect to Steam network error also occurs due to some bugs which restrict Steam from connecting to the internet. In such situations, changing the Language settings in Steam Client might resolve the error. After getting connected properly, you can revert back the language to the present one.
- Launch the Steam Client (it will be in offline mode).
- Click Steam option located at the top left corner of the screen.
- Select Settings from the dropdown menu.
- Enter into the Interface tab and click the box set for “Select the language you wish Steam to use (requires Steam to restart)“.
- Choose the desired language, re-launch Steam, and check for the connection.
9] Disable Beta Programs to Fix Could not connect to Steam network Error
Another possible cause of Could not connect to Steam network error could be the Beta participation. Generally, it makes the program acts unusual and goes out of order as well. Beta participation is used to receive the game content slightly before they are out to the market. Often these contents may be unstable and the developer also intends to release frequent updates in order to fix these bugs.
Therefore, try to disable the Beta programs as there is no possible harm in it and the act may help in resolving the error as well. To complete the task, follow the below steps –
- Invoke Run dialog pressing Win+R hotkey.
- Type taskmgr in the blank field and click OK.
- When the Task Manager is upfront, close all the processes related to Steam.
- Terminate all the Third-party applications and refresh the screen as well as opt-out for the Steam beta.
Note – Opting out Beta refers to disabling the updates until the official version is launched online. The Beta phase has its own positive and negative characters like, you may avail an update a few months earlier but the cons are, it may appear buggy causing additional problems.
- Moving ahead open Steam client and click Steam on the top left corner. Click Settings.
- Enter Account tab and reach Beta participation area.
- Click the dropdown and select “NONE- Opt out of all beta programs“.
- Make sure that the client you are using is not a part of beta phase and then click OK.
- Close the Steam client and open Task Manager again. End all the Steam associated processes from here.
- Reboot the Windows 10 and Launch Steam again to check whether the error is resolved.
- If the Client you were using is a part of Beta program, Steam will install a few updates before you start playing a new game again.
Trouble Opting Out Beta?
If you confront trouble in opting-out the beta, directly navigate to the Steam directory and delete beta files from there. To do so,
- Access Run dialog, insert “C:\Program Files (x86)\Steam” and press Enter.
- Open the Packages folder and delete all the contents that start with beta.
- Close the window and opt-out beta programs using the above guidelines.
- Re-launch the Steam client and check if it is going online using the internet connection.
10] Start Steam in Safe Mode with Networking
Safe Mode is the special startup method where the system limits the loading of programs at the Boot and it can be an ideal diagnostic process to fix Could not connect to Steam network error in Windows 10. The process actually narrows down the number of programs to be launched at the startup. Safe Mode with Networking allows internet services to load at the time of booting so that you can use online help. To carry out the task, use the below instructions –
- Fire up Start menu, click the Power icon, and select Restart while holding down the Shift key.
- After Windows completes the reboot process, you will find some options.
- Choose Troubleshoot => Advanced Options => Startup Settings.
- From here, click Restart option.
- Upon reboot, click Safe Mode with Networking and press Enter key. You can also press F5 directly to get access to the same.
- Finally, launch Steam and try connecting to the internet.
11] Resolve Could not connect to Steam network Error by Disabling all Proxy settings
An active proxy server on the computer can restrict Steam from connecting to the internet. Proxy usually induces a channel through which data from the internet gets the flow. This is why disabling proxy settings may help to fix the Steam connection error in Windows 10. Here is how to accomplish this task –
- Access Run dialog and type inetcpl.cpl in the box.
- Click OK button to open the Internet Properties popup.
- Move into the Connections tab. Click LAN settings button.
- From the succeeding popup, uncheck the box that reads Automatically detect settings.
- Move ahead and remove the checkmark from the box set for Use a proxy server for your LAN.
- Hit Apply and OK buttons.
- Exit the Network Properties and try launching Steam.
12] Clear up Download Cache
Many times simple tricks like clearing off download cache can overcome the Could not connect to Steam network error in Windows 10. This will not affect the game progress for sure but you just need to re-login. Pre-requisite measures are to keep the account credentials beforehand so that you can get them whenever necessary. In order to remove the download cache, follow the below guidelines –
- Launch the Steam app and click Steam option from the top left corner.
- Select Settings and then choose Downloads in the panel.
- Click the Clear Download Cache option followed by hitting OK once prompted.
- Steam will ask for your login credentials perhaps, insert accordingly.
- Once Login is successful, you can hopefully be able to run the program without trouble.
13] Tweak Registry Setting
Registry settings play a prominent role in causing the Could not connect to Steam network error in Windows 10 if the offline DWORD value is set to 1. No matter how many times you try connecting to the internet, it will show error message unless you manually set the value to 0.
Note – Before proceeding, ensure to Export Registry Editor in order to avoid any misconfiguration in the system.
- Type regedit on taskbar search and hit Enter. Click Yes to the UAC prompt and grant permission.
- After you access Registry Editor, navigate to below path –
HKEY_CURRENT_USER\Software\Valve\Steam
- Upon reaching to Steam, move ahead to the corresponding right. Double click the DWORD offline and put the Value data to 0. Click OK.
- Try re-launching Steam and check if the error has resolved.
14] Rectify the network connection problems
Steam connection error 2020 may arise if the computer is having some network issues beforehand. In that scenario, you have to troubleshoot the Network connections using specific commands in elevated Command Prompt. For that, follow the below instructions –
- Open the Taskbar Search and type cmd in it.
- Right-click Command Prompt and select “Run as Administrator“.
- Click Yes when the UAC prompts up.
- In the black window, insert below lines one after another and execute them by pressing Enter after each –
ipconfig/release
ipconfig/all
ipconfig/flushdns
ipconfig/renew
netsh winsock reset
- Once done, try running Steam once again.
15] Ensure the Firewall is not blocking the Steam
Windows Firewall sometimes can block the Steam from connecting to internet assuming the network is a suspicious one. Thereby you might be stuck into Could not connect to Steam network error in Windows 10 unless you disable Windows Firewall. In order to disable this, follow the below guidelines –
- Open Start menu and approach alphabetically in installed app list.
- Click Windows Security.
- On the left pane of this UI, click Firewall & network protection.
- Jump to the adjacent right side and click the link that says Allow an app through the firewall.
- From the upcoming pop-up window, make sure the box set for Steam is checked.
- Click the OK button and then launch Steam to check if the error is fixed.
16] Restart the Router manually to Fix Could not connect to Steam network Error
Sometimes invalid configuration in the router can be a good reason for which you are facing Could not connect to Steam network in Windows 10. You may have set the wrong configuration recently and the recent setting is blocking Steam from connecting to internet. For any network issues, it’s a good practice to check the router first and try resetting it manually. Hard reset to the router may often act very helpful to resolve the error and the guidelines are as follows –
- Position the router in such a way that, you can see all the ports and buttons.
- Locate the Reset button and push it.
- Once done, try to connect the Wi-Fi network.
- Launch Steam and check if the issue has got fixed.
17] Flush Steam configuration files and DNS
Most of the operating systems cache the DNS records in order to let the applications for processing data at a very faster rate. In situations where DNS changes frequently, we need to flush it since the system can retrieve the new DNS and you can resume data transfer as before. The process removes local cache from the system and receives the latest ones from your Internet Service Provider. Flushing the Steam Configuration files can also help in overcoming the Could not connect to Steam network error 2020. Here are steps you need to follow –
- Access Run and type
steam://flushconfigin the empty text box. - Click OK to confirm the action.
- Enter the login credentials when asked.
- Now, launch an Elevated Command Prompt, type the below text at the base of blinking cursor and hit Enter –
ipconfig /flushdns
- Once done, Restart the computer.
- Launch Steam when the system is ready and check if the error is fixed.
18] Update network drivers
Updating the Network drivers is one of the most useful workarounds to mitigate any internet connectivity issues in Windows 10. Outdated drivers cause instability in the system as well as you may also encounter the Steam connection error Issues 2020. Here is how to update the network driver –
- Right-click Start icon, select Device Manager from the list.
- Reach out and expand Network adapters in the console.
- Make a right-click the outdated device from the list. Choose the Update Driver option.
- From the pop window appearing next, click Search automatically for drivers.
- Upon finishing the downloading, the installation will take place automatically.
- Finally, restart the computer for bringing these changes into effect.
- When the device is up and running, launch Steam and check for the error.
19] Update Windows 10 to fix Could not connect to Steam network Error
The outdated Operating System causes many abnormalities in the system and Could not connect to Steam network error is one of them. It may also happen that, Steam is not compatible with an old version of Windows 10 and you are facing the issue. So check and install the latest patches manually using below guidelines –
- Press Win key and click the small gear icon.
- From the Settings app UI, click the Update & Security tile.
- Move to the corresponding right side and click on Check for updates button.
- Upon searching, once all the patches are available, click the Download button.
- The system will start installing the downloaded files automatically.
- You might attend a couple of restarts to complete the process.
20] Refresh the Steam file
The final resolution is to refresh the Steam files in case all of the workarounds above fails to fix the Could not connect to Steam network error 2020. The process will install Steam in the system again and you may get rid of the error permanently. It will delete some of the configuration folders so that system can renew them all while installing Steam. Follow the below guidelines carefully ensuring the computer will not crash accidentally during the process –
- First of all, navigate to the Steam directory as follows –
C:/Program Files (x86)/Steam
- In the Steam folder, find the below contents (Sub-folders, application file) –
Userdata (folder)
Steam.exe (Application)
Steamapps (folder- only preserve the files of other games in it)
Note – Here, The userdata folder carries entire data required for running the games and we need to keep it in the system. Inside the Steamapps folder, delete the folder of the game that is suspicious or creating problems truly. If you find it doubtful, skip deleting the Steamapps folder for safety reasons.
- Select all contents in the Steam folder and unselect the above-mentioned contents.
- Delete the selected ones.
- Restart the computer to make these changes effective.
- Check if the problem is fixed.
Methods:
1] Delete all files except Steam apps and .exe
2] Stop all services related to Steam
3] Delete clientregistry.blob
4] Reinstall Steam
5] Add a Launch option (-tcp) in Steam
6] Allow Administrative Authorities to Steam
7] Run the Steam in compatibility mode
8] Change the language of Steam client in Windows 10
9] Disable Beta Programs
10] Start Steam in Safe Mode with Networking
11] Disable all Proxy settings
12] Clear up download cache
13] Tweak Registry Setting
14] Rectify the network connection problems
15] Ensure the Firewall is not blocking the Steam
16] Restart the Router manually
17] Flush Steam configuration files and DNS
18] Update network drivers
19] Update Windows 10
20] Refresh the Steam file
That’s all!!