Are you getting a blue screen error when running Windows Driver Verifier? If BSOD is covpnv64.sys then you are on the correct page. This blue screen occurs while the Driver Verifier is running and you try to establish a VPN connection using BIG-IP Edge Client components. Interaction with the covpnv64.sys VPN driver in the process causes system to crash with bug checking.
What failed: covpnv64.sys BSOD may appear with the stop codes System_Service_Exception, Driver_Irql_Not_Less_or_Equal, Kernel Data Inpage Error, Page_Fault_In_Nonpaged_Area, Kmode_Exception_Not_Handled. Once this bug check error occurs you must reboot the Windows device to restore functionality.
covpnv64.sys blue screen error
Here is How to Fix covpnv64.sys blue screen Error BSOD in Windows 11 or 10 –
Way-1: Avoid using Driver Verifier when running BIG-IP Edge Client
If you have made up your mind to set up a VPN connection anyhow, remember to not run driver verifier. You should know that if your company requires F5-based VPN connections when working from a remote environment, this problem will even prevent you from testing drivers, moreover, debugging during development without extra considerations. Furthermore, avoid trying to establish a VPN connection using a web browser or BIG-IP Edge Client software. 8f testing is pretty necessary, you can use your driver debug and test on a VM image running Driver Verifier while the host machine, where Driver Verifier is not active, connects to the corporate VPN.
Way-2: If essential running driver verifier, deselect covpnv64.sys
In case running driver verifier is essential when connected to the VPN you can use the Driver Verifier GUI to exclude covpnv64.sys during the processing. This method will enable you to debug and test the driver you are developing without encountering the Windows blue screen error. Follow the steps –
- Click on – Start.
- Type – cmd.
- Select – Run as administrator.
- Choose Yes on the UAC dialog.
- When you are on command prompt, type verifier.
- Hit – Enter.
- Once Driver Verifier Manager appears on the screen click on Next.
- Check the option Select driver names from a list and again click on ‘Next’.
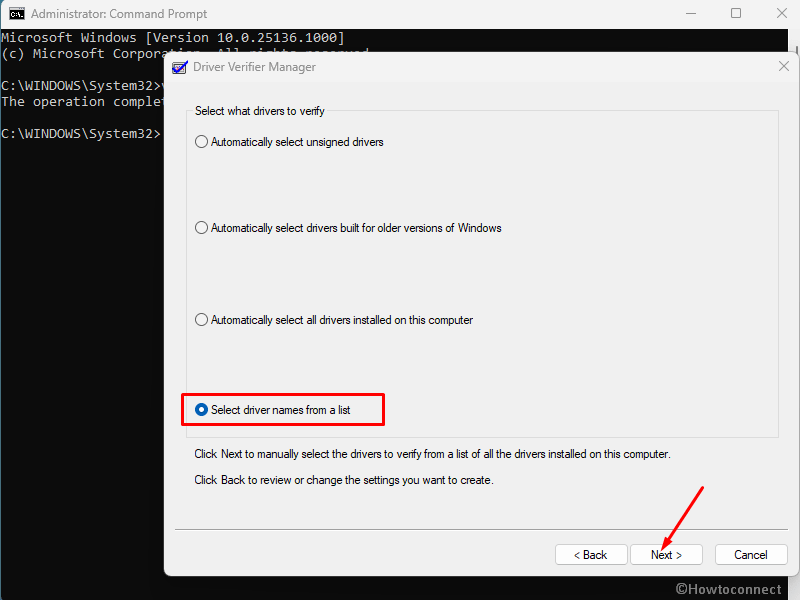
- You can see a list of drivers now. Click on Select all.
- Now uncheck covpnv64.sys.
- Click on Finish.
- A pop-up will say that You must restart this computer for the changes to take effect. Click OK.
This way you can run driver verifier without getting a blue screen error in Windows 10 or 11. See – Driver Verifier Command Syntax for Windows 11, 10, 8, 7 (Updated).
Way-3: Uninstall Windows Update
Windows updates are aimed to improve the OS performance and protection but sometimes they behave oppositely. In spite of adding changes, they cause bugs and issues that may result in blue screen error. Therefore, when covpnv64.sys BSOD error appears, check whether you have or haven’t installed a Windows update recently. If yes then you will have to uninstall the same. The removal can be performed easily if you follow the steps –
- Press the Windows key and I
- Select – Update & security.
- From the next page of the Settings application, click on – View update history.
- On the next window click on Uninstall updates.
- A Window from Control panel will prompt up; find the recently installed update there.
- Right-click on that and select – Uninstall.
- Click Yes on the confirmation prompt.
- The computer will restart a couple of times and complete installation.
- Reboot the device and check whether the BSOD is solved.
Way-4: Update driver
covpnv64.sys blue screen error occurs due to driver-related problems updating the same may work perfectly. Sometimes, when a company knows that a certain version is creating an error it fixes the bug and deliver a new version. So update the driver beforehand using the below guidelines –
- Navigate to https://www.f5.com/.
- Find BIG-IP® Edge Client™.
- If a new version of this driver is available download and install it.
Way-5: Run System file checker
Mostly a stop error starts because of corruption in system files and the system becomes unable to recognize a driver, exe. or sys, dll. In this process, when Windows calls up covpnv64.sys it fails to identify this file due to the malfunction and falls into bug checking and further blue screen. Luckily, System File Checker stands in this situation to help out from the BSOD. The command line tool methodically examines all the files and folders whether which one triggers malfunction. Once found the utility takes the same copy from the cached folder and substitutes it with the corrupted components. So, you need to run the SFC tool by following the method –
- Press – Win + S.
- Type – cmd.
- Click – Run as administrator.
- Select Yes from User account control.
- Once on the command prompt, type
SFC /Scannow.
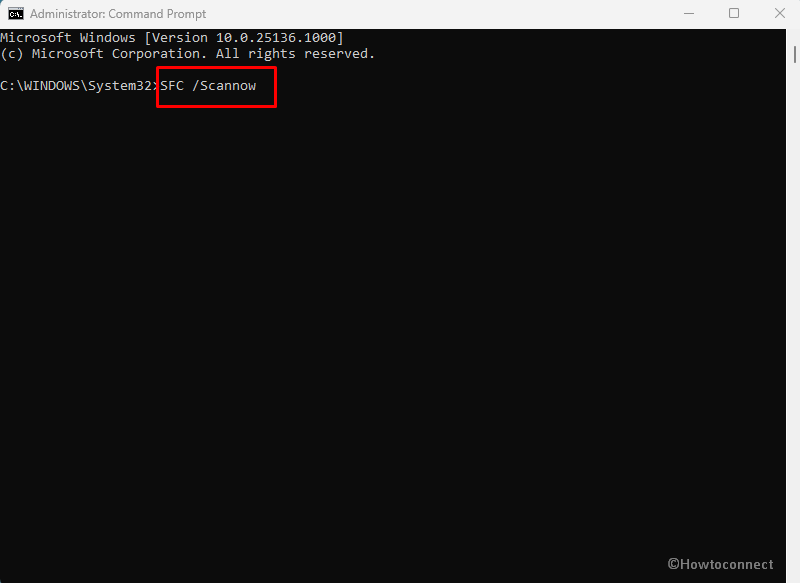
- Hit – Enter.
- You will see – “Beginning system scan. This process will take some time”. After verification phase, the process will be completed.
- Restart your computer and check if the stop error is fixed.
Way-6: Use DISM tool
Deployment Image Servicing and Management aka DISM is a helpful utility when the .wim, VHD, or FFU file doesn’t work normally and causes any error like BSOD. Broken Windows Image is one of the root causes for this covpnv64.sys blue screen error that can be repaired by the DISM tool. Therefore move forward with the steps below –
- Open Command prompt as administrator as you have done in the previous method.
- Type the command –
DISM.exe /Online /Cleanup-Image /Restorehealth.

- Hit the Enter key and allow the DISM to complete its work.
- Once finished reboot the computer and check if the blue screen still persists.
Way-7: Check every driver and update if found obsolete
Any obsolete driver is like a bug in the operating system which can collide with other elements of Windows. The whole scenario is sufficient to throw a blue screen error in Windows 11 or 10. On one side the outdated driver is itself harmful to its parent adapter whereas on another side it affects the whole system. Fortunately, a robust administrative tool Device Manager is available on Windows that helps to update a driver including rolling back, uninstalling, and disabling the same. So, follow the instructions below –
- Right-click on Start from the taskbar.
- Select Device manager.
- Once the tool is on the screen click on View from the top menu bar.
- Select – Show hidden devices.
- Now go to the list of devices below. Double click on each device in order to expand them.
- Check if any driver is showing yellow warning mark.
- If anyone is showing, right-click on that. Select Update driver.
- Choose Search automatically for drivers.
- Restart the PC.
- If the error still occurs, then again go to the Device Manager and select Update driver for the outdated one.
- This time, select – Browse my computer for drivers.
- On the coming window, choose – Let me pick from list of available drivers on my computer.
- The default one will be automatically selected, so click on Next.
- Now, after finishing, reboot the PC.
Way-8: Install Windows updates
Microsoft sends patches to repair existing known issues on many occasions or even regularly. Suppose covpnv64.sys BSOD has been occurring for a long and a cumulative update is delivered to resolve the error you should install it. However, if the updates are automatic in nature this would be installed itself. To manually install follow the guidelines –
- Click on Search from the taskbar
- Type updates
- Hit – Enter
- Click on Check for updates when the settings app appears.
- The system will consume some time to complete downloading the update and show you a pop-up. When you see this click on Restart now.
Way-9: Scan for malware
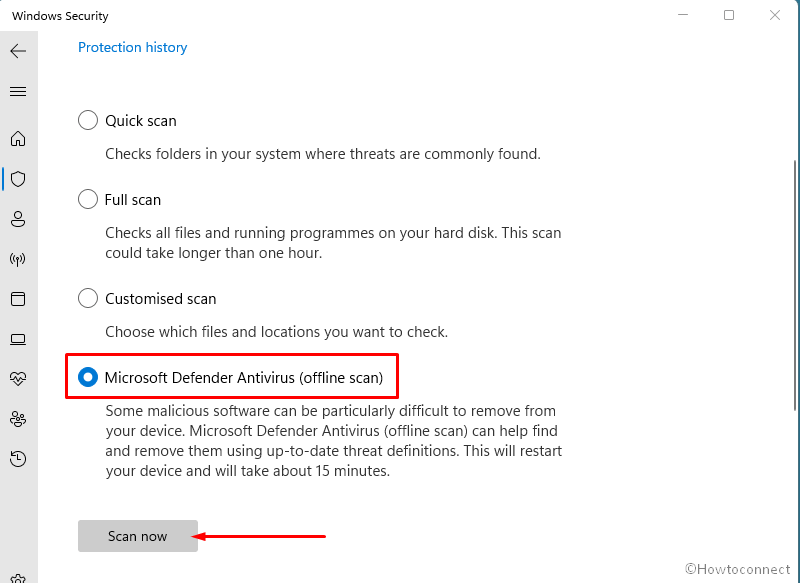
covpnv64.sys may also be generated due to vicious malware. Threats and viruses are everywhere so a device may be easily infected if you access low trustworthy apps or external programs. Once the threats enter, they can ruin the whole file structure, registry, policies, and files and folders. However, several threats are known to sneak data these days; they can trigger blue screen error too. So whenever you encounter this BSOD, remember to think about viruses first. But don’t worry at the same time, because Windows Defender, a powerful antimalware tool is always there with you to deal with such situations. Only running a full scan using the Windows security app –
- Click on Search
- Type Windows security
- Select Virus & threat protection
- On the Windows security app, click on Scan options
- On the next page of the Windows Security app, check – Full scan
- Click on Scan now
- Allow the scanning to complete it will take a bit more duration. Once done check for the error.
- If still appears, then you need to run an Offline scan. So go to Windows Security > Virus & threat protection > Scan options > Microsoft Defender Antivirus (offline scan) > Scan now.
Way-10: Use Bluescreenview
Bluescreenview is a useful Nirsoft tool that read the Minidump file stored on your PC after the covpnv64.sys BSOD occurred. It will show the additional files involved in creating bug check. This is the best way, you can find out the files except for covpnv64.sys VPN driver responsible for this issue. Once found you can download the latest version of the file or update the driver through Device Manager. Download Bluescreenview and use it.
Way-11: Clean boot Windows 10
When you encounter covpnv64.sys BSOD in Windows 10 or 11 there is an option to cut short the number of services and drivers that load to run the system. Only built-in and essential components are active when using clean boot. This will minimize the chance of conflicts which is the primary cause of a bug checking problem. So follow the instructions to boot in this environment –
- Click Start.
- Type – msconfig.
- Hit Enter.
- On the System Configuration Window, click on the Services menu.
- Check the box for Hide all Windows services.
- Click on Disable all.
- Now go to the Startup menu.
- Select Open Task Manager.
- On the Task Manager, right click on each program and select Disable.
- Close Task Manager, and return back to the System Configuration window.
- Click on Apply and OK.
- Select Restart.
Way-12: Boot in safe mode
If clean boot method does not work to fix this blue screen error then Safe mode is another better option. Booting in safe mode starts your computer with a minimum number of programs, services, and drivers. Being here you can trace out what is the real cause of this BSOD. This is a recovery tool that helps you so much to get rid of the BSOD error. Here are the steps to boot into safe mode –
- Press Windows
- Type MSconfig
- Go to the Boot tab on system configuration
- Select Safe boot followed by Minimal
- Click on Apply and then on OK
- You will come across a pop up asking you to restart or not. Click on Restart.
Way-13: Clean install Windows 10 or 11
If the stop error is still annoying despite following all methods the last option is clean install. This is a process in which you need to install the operating system using a bootable ISO image. After this, there will be a fresh Windows 10 or 11 without having any problem.
Methods list:
Way-1: Avoid using Driver Verifier when running BIG-IP Edge Client
Way-2: If essential running driver verifier, deselect covpnv64.sys
Way-3: Uninstall Windows Update
Way-4: Update driver
Way-5: Run System file checker
Way-6: Use DISM tool
Way-7: Check every driver and update if found obsolete
Way-8: Install Windows updates
Way-9: Scan for malware
Way-10: Use Bluescreenview
Way-11: Clean boot Windows 10
Way-12: Boot in safe mode
Way-13: Clean install Windows 10 or 11
That’s all!!