Driver Verifier is a built-in Windows tool responsible for controlling the integrity of drivers. In simple words, the utility detects the nature of the software program in case anything goes unusual. While running Windows 10 or 11, if a device driver acts abnormal or shows up cynical behavior, it will stop the ongoing task and meanwhile trigger DRIVER VERIFIER DMA VIOLATION BSOD error. The hitch holds bug check code 0x000000E6 represents any type of DMA Verification violation.
From the self-explanatory title, it’s quite clear that the blue screen of death is triggered when drivers in the device fall into some trouble. The issue may continue to run in outdated conditions whereas a few other basic reasons for BSOD error may too exist. Since the Blue Screen of Death has a wide range of causes, the resolutions will vary depending upon the situation. For your ease of access, quick links to workarounds are provided below –
DRIVER VERIFIER DMA VIOLATION Solutions
Here is how to fix DRIVER VERIFIER DMA VIOLATION BSOD Error in Windows 10 or 11 –
When triggered, DRIVER_VERIFIER_DMA_VIOLATION blue screen error forcefully makes the Windows 10 or 11 reboot frequently. The display may hang on time and again making the working complicated to a greater extent.
The issue has got some effective fixes and it will resolve quite easily when you deploy them perfectly. Execution of workaround may not be possible with Windows going on Automatic Rebooting, hence you have to first disable this inbuilt feature by going through the below guidelines –
- Save all the running processes and close the tabs as well to prevent unexpected data loss.
- Thereafter, press the Windows key and D at once to head over to the desktop area.
- Right-click on This PC followed by choosing Properties from the context menu.
- When the System window turns out, click Advanced system settings from the left pane.
- Once the subsequent System Properties window becomes visible, enter into the Advanced tab.
- Click the Settings button located beneath the Startup and Recovery section.
- Hover the mouse pointer to the System failure area and then unmark the box set for Automatically restart.
- Finally, hit the OK button from the bottom to proceed ahead.
Once these changes are saved, Windows will no more go for automatic restarting and you can now try deploying the following Workarounds and fix bug check code 0x000000E6.
1] Disable the Driver Verifier to fix DRIVER VERIFIER DMA VIOLATION
DRIVER VERIFIER DMA VIOLATION Windows 10 blue screen error happens when the driver verifier encounters unexpected troubles. Therefore, the best way to fix this stop code is to disable this tool since a lot of people expressed their relief by doing the same. You need to follow the below guidelines to accomplish the task –
- Click the search icon from the taskbar and type in verifier.exe.
- Hit the Enter key when the search result shows up on the display.
- If a UAC prompts, click Yes to give your consent.
- From the next pop-up, opt for the radio button set alongside Delete Existing Settings and click the Finish button.
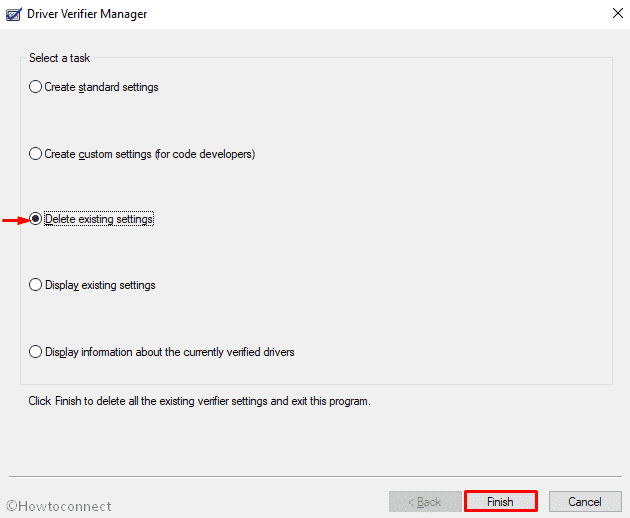
- Now, reboot the device and after powering up check if DRIVER_VERIFIER_DMA_VIOLATION still exists.
Unfortunately, if the blue screen error doesn’t disappear, you will have to reset the Verifier. To do so –
- Press Win+S at once and type cmd.exe in the empty text bar.
- When Command Prompt turns up in the result, chose Run as Administrator from the left overlay.
- Hit Yes for the User Account Control to get access to elevated Command Prompt.
- In the black window, insert the below command line and then hit Enter key –
Verifier /reset
- Once the system executes the command successfully, restart Windows 10.
2] Update all the drivers using Device manager platform
Drivers maintain software interference with the connected Hardware and the computer bus and help in regulating the communication between them. They must be maintained in updated condition always to keep associated issues far apart.
Once the drivers are continued to run in outdated conditions, bug check code 0x000000E6 may show up as well. Therefore you need to update all drivers that are suspicious and for that, Device Manager comes handy to accomplish the task without an issue. The guidelines are as follows –
- Press Windows and type devmgmt.msc.
- Hit Enter key and call Device Manager in a pop-out window.
- In the wizard, look for the console having a mark of exclamation and expand the same by double-clicking.
- Now, do right-click on the driver having a yellow indication and select Update driver.
- Continue following the provided guidelines available to accomplish the task.
- If you have more devices with the mark of exclamation, do the same as above for all.
- Once done, perform a reboot to Windows; hope there will be no more BSoD error coming up next.
3] Disable problematic drivers and rollback if necessary to default
While updating the driver automatically with Windows 10 or 11 in the presence of an active internet connection, some issues may evolve and few drivers may install automatically in dreadful conditions. In the process, they cause severe damage in the system and your Windows 10 device encounters bug check code 0x000000E6. In such cases, you have to disable those faulty drivers or roll back them using the below instructions –
- Open Device Manager using any convenient way you prefer.
- In the wizard, look closely in the console to find out the device whose driver you opt to disable or roll back.
- When located, double-click on it to stretch the driver list.
- Right-click on the driver that was modified earlier followed by clicking Properties.
- In the next window upon appearing, shift to its Driver tab and click either Disable or Roll Back Driver.
4] Install available update patches and make Windows 10 and 11 up to date
Windows 10 or 11 stays healthy when it is maintained in updated condition and for that, Microsoft releases cumulative updates frequently. Though the process is an autonomous one, you can perform it manually to avoid unwanted issues relating to bad internet loop. The guidelines are as follows –
- Launch the Windows Settings app by pressing Win+I keys at once.
- From the appearing App UI, head to Update & Security and click on it.
- Once the next page unrolls, select Windows Update from the left pane.
- Jump to the adjacent right and click on the button saying Check for updates directly.

- Once the available patches show up, hit the Download option.
- The installation will take place automatically prior to finishing the downloading.
- Windows will ask for your authorization to perform Reboot once the process ends, follow as said.
5] Allow Windows Blue Screen Troubleshooter to fix DRIVER VERIFIER DMA VIOLATION BSOD error
With the BSOD error being a devastating one for Windows 10 and 11, Microsoft introduces a default tool with Fall Creators Update Edition. The tool is named Blue Screen Troubleshooter which was previously introduced in the Windows Settings app and later on shifted to Control Panel coming to the latest edition. This may be one of the top-notch tools to fix DRIVER VERIFIER DMA VIOLATION BSOD error and you can deploy it using the below instructions –
- Bring forth taskbar search by pressing Win+S keys together.
- In the blank text area, type bluescreen.
- When results start appearing, choose Find and fix bluescreen problems option.
- In the forthcoming window, the Troubleshooting Wizard will be active.
- After troubleshooting, the tool will suggest steps to fix DRIVER VERIFIER DMA VIOLATION BSOD.
- Follow those to wipe out the blue screen error from your device.
6] Run DISM tool in elevated Command Prompt
Windows Images are important components in the ISO files released before any major update. Such core elements when gets corrupted may also bring blue screen error with bug check code 0x000000E6. To fix them, we have a handy default utility called DISM tool that is accessible only through the Elevated Command Prompt going through the following way –
- Click the search icon from the taskbar and type cmd.exe in the open text area.
- When Command Prompt is available in results, select Run as Administrator.
- UAC will prompt for permission, select Yes to continue.
- When reached to the black window, enter the following command and hit Enter key –
DISM.exe /Online /Cleanup-image /Restorehealth
- The utility will be activated and search for dreadful Windows image files in the system moreover fixing will be carried out as well automatically. The process might be a little longer, therefore, wait patiently until the process ends.
- Once finished, restart the device and in the next startup, check for the BSOD error in the system.
One more handy way to deploy the DISM tool is through using a Windows Installation media like the following –
- First of all, insert the Windows installation media into the device.
- Get access to the elevated Command Prompt.
- Now, run the following commands when the black window arrives –
dism /online /cleanup-image /scanhealth
dism /online /cleanup-image /restorehealth
- Later on, insert the below command and press Enter key –
DISM /Online /Cleanup-Image /RestoreHealth /source:WIM:X:SourcesInstall.wim:1 /LimitAccess
Note- Don’t forget to replace the X in the above command with your installation media drive letter which you have inserted before.
- Once the process ends normally, reboot Windows 10 or 11.
7] Check for faulty Hardware items and deport them momentarily
Sometimes, blue screen errors like DRIVER VERIFIER DMA VIOLATION can be triggered from a faulty Hardware accessory like RAM or Motherboard as well. Hard Disk itself can have bad areas formed inside due to maintaining it in poor condition. In such cases, you may have to go for a complete replacement to fix the error.
Some people have also recently discovered blue Screen error when connecting hardware accessories like mouse or printer. Such issues have got fixed very easily when you disconnect them for a temporary period of time. So, if you have a blue screen error after connecting those hardware items, deport momentarily and then reboot Windows 10 or 11 eventually. Hope the error code will not show up in the next startup.
8] Keep BIOS of the device updated always to fix DRIVER VERIFIER DMA VIOLATION
BIOS is the firmware that comes in Windows as a pre-installed program and when you start the computer for the first time, it will run ahead of everything. Many of the time, blue screen error can also show up in the device when BIOS gets outdated. Hence, you have to update the same going through the below process –
- Press Win+R keys together and launch Run dialog on display.
- Type msinfo32 in the text box of the wizard and eventually hit Enter key.
- When the System Information page comes in, type BIOS version in its search bar.
- Click the Find button to see the information about BIOS.
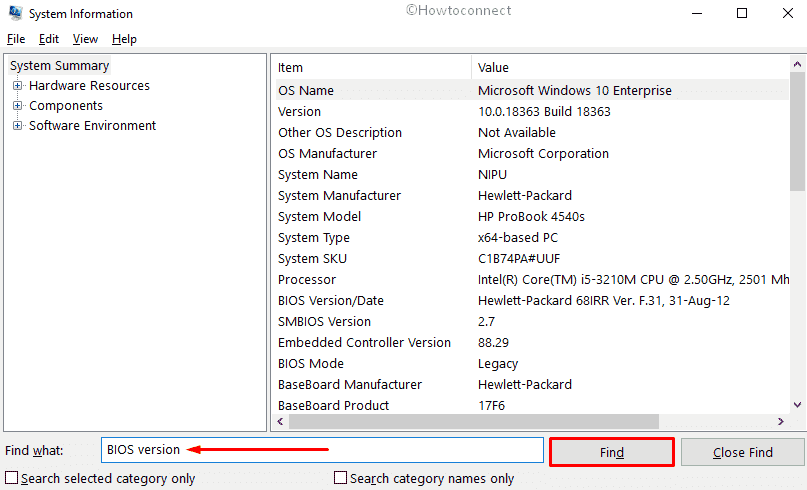
- Note down this information and save it for next.
- After that, open a web browser and visit the manufacturer’s website for your BIOS using the previous info.
- Finally, download compatible files and obviously install them on the device.
9] Run System File Checker Tool and recover Windows Core components
If you have two similar programs or security solutions in the system, they will cause software collision in it causing some of the very important elements to go missing. Again, when malware gets into the system by sneaking through the weak defense, it will deteriorate the system files. Both these reasons will damage the quality of Windows system components and hence DRIVER VERIFIER DMA VIOLATION BSOD error will emerge in the device.
To recover the missing components once again, you need an effective tool and System File Checker will be the best at your service. The utility will be activated in Elevated Command Prompt when guided through these below instructions –
- Manage access to Command Prompt as administrator first.
- When reached to the black window, enter the following command-line tool –
Sfc/ scannow
- Now, hit the Enter key and System File Checker will start looking for corrupted components.
- Upon finishing the searching, the utility will fix those files as well, so the process might be lengthy and you need to wait until it finishes off.
- Once it ends, finally, reboot the desktop to save changes, hopefully, the DRIVER VERIFIER DMA VIOLATION BSoD will not appear in the next startup.
10] Update your SSD Firmware and fix DRIVER VERIFIER DMA VIOLATION
If the Windows 10 or 11 is installed on SSD of your device, it must be maintained in updated always. Very often the blue screen error with bug check code 0x000000E6 appears only from an outdated SSD Firmware. To be honest, updating the SSD has a little bit of risk involved and the process may damage your full SSD completely leading to losing a great amount of necessary data. Therefore, the task must be completed with the utmost care and following proper instructions provided by the manufacturer.
11] Load back previous state of Windows by performing System Restore
Bug check code 0x000000E6 can show up on a device when Windows Registry is tweaked in the wrong way. Such changes usually happen after installing a new program or removing one. If you have the same problem, you can easily recover the device by simply performing a System Restore which leads the OS to its previous point where there was no drawback. To perform the workaround, the following guidelines will help –
- Press Win+Q hotkeys at once to launch Taskbar Search.
- When arrives, type rstrui in the text field and eventually press Enter key.
- Once the System Restore Wizard hits on display, choose Next from its bottom to follow through.
- From the forthcoming page, select the last Restore point and click on Next once again.
- When the consequent page unrolls, hit on Finish button from the bottom part to start the restoring process.
12] Boot Windows 10 or 11 into Safe Mode
Safe Boot is a special Startup process where Windows powers up loading only default programs leaving all third-party ones. This is a very popular workaround being prevalent for a long time in all types of critical issues happening in Windows 11 or 10.
If the DRIVER VERIFIER DMA VIOLATION BSOD Error doesn’t resolve even after booting Windows 10 Safe mode, you can be sure any third party is responsible for the problem and deploy resolutions accordingly. For now, let’s boot the OS into Safe Mode using the below guidelines –
- Open Run dialog box and type msconfig in its open text area.
- Press Enter key and System Configuration will show up immediately.
- Transfer to its Boot tab and then scroll down to the lower half precisely in the boot options.
- Moving ahead, check the box against Safe Boot.
- When all the grayed-out options become active, click on Minimal.
- Now, hit the Apply button first and then OK to save the changes.
- Close the Window and open the Start menu by pressing Windows key.
- Click on the Power cog. and select Restart to reboot the Windows 10 or 11.
- On the next Startup, keep pressing F8 key until the Advanced Boot menu is visible.
- From here, select Safe boot to enter into it.
13] Reset Windows 10 as last resort
When the above resolutions will fail to fix DRIVER VERIFIER DMA VIOLATION BSOD error means to say, a third-party issue is responsible and you need to reset the Windows 10. The process attempts to remove all of your files from the device where you can choose to keep them as well. In order to have optimum benefit, you can save a backup of the necessary items and go for the workaround following below guidelines –
- Press Windows and click on the Power cog.
- Select Restart pressing down the Shift key at the same time to reboot Windows initially.
- On the next startup, when the device is booting, you will be guided to Automatic Repair.
- From here, click on Troubleshoot => Reset this PC => Remove everything.
- You may have to insert the Bootable Media here, so keep it standby.
- Moving ahead, select Only the drive where Windows is installed => Just remove my files and finally click the Reset.
- Keep following the on-screen guidelines to complete the reset.
See – 3 ways to Reset Windows 11 PC to Factory settings
Methods:
1] Disable the Driver Verifier
2] Update all the drivers
3] Disable problematic drivers and rollback
4] Install available update patches
5] Use Windows Blue Screen Troubleshooter
6] Run DISM tool
7] Check for faulty Hardware
8] Keep BIOS of the device updated
9] Run System File Checker Tool
10] Update your SSD Firmware
11] Load back previous state of Windows
12] Boot Windows 10 Safe Mode
13] Reset Windows 10
That’s all!!