Windows 10 sometimes shows weird errors and 0x800710FE is one that appears when you delete a file or folder. Basically, it is a native Office File Synchronization issue that occurs in Win 10, though not enabled by default. This error restricts users from deleting a file or folder and shows that the component is unavailable in the system. Usually the offline files cache resides in CSC (Client-Side Caching) or in a database that actually helps OS to maintain synchronization with external server and internal components. When the database has some corruption, it will restart automatically but in case of a severe drawback, this issue pops up.
Error 0x800710FE in Windows 10 is generally caused by a sudden malfunction in the CSC database or from misconfigured system files. Sometimes, a logical error in the disk drive may also take part to cause this same problem. The setback mostly becomes evident with the folders generated by third party security programs like antivirus, folder locker, or encryption software. For resolving the error, we will discuss some effective workarounds in the below segment, let’s start –
Error 0x800710fe: The file is currently not available for use on this computer
Here is How to Repair Error 0x800710FE in Windows 10 –
1] Format CSC Database using Registry Editor
Formatting the CSC Database resets any cluster of data if available which may trigger Error 0x800710FE for permission conflicts. To accomplish this task, you have to create a DWORD in the Windows Registry in the name of FormatDatabase. Tweaking the Registry is critical and tough as well, so it is better to Export Registry Editor on Windows 10. Therefore, follow the below instructions carefully –
- Invoke Run dialog pressing Win+R hotkey at once.
- Type regedit and click OK button from this dialog.
- Click Yes when UAC prompt permission to access Registry Editor.
- In the succeeding window, navigate to below path –
HKEY_LOCAL_MACHINE\System\CurrentControlSet\Services\CSC
- On the right pane of CSC, do a right-click on any empty area, and choose New => Dword (32-bit) value.

- Give the new name to this DWORD FormatDatabase.
- Double click the newly created DWORD and click the radio button before Hexadecimal from the Base area.
- Enter the Value Data to 1 and lastly, click OK.
- Leave Registry Editor and reboot Windows.
- After the changes are put to effect, you should not experience Error 0x800710FE in the display again.
2] Disable Sync Center to resolve Error 0x800710FE
Sync Center is the prime source of Error 0x800710FE according to many of the users who have come across the issue recently. Even though the feature is not a built-in one, it may come to the system as a part of a previously established synced partnership. In case any file from the shared partnership causes this issue, disabling Sync Center driver as well as associated services must resolve it. In this regard, clearing the client-side cache, restricting sync center from opening at startup, and disabling scheduled tasks will be of great help. Go through the below guidelines to complete it with ease –
- Type cmd.exe in the taskbar search box. When Command Prompt arrives in the result, put a right-click on this.
- Select Run as Administrator option.
- Click Yes when UAC asks permission.
- Once the black window unfolds, insert the below command and press Enter to disable the driver as well as all services related to Sync Center –
for %G in ("CSC","CscService") do sc config "%~G" start= disabled- Next, insert these commands and press Enter after each for clearing Client-Side Cache (CSC) –
takeown /f "%windir%\CSC" /a /ricacls "%windir%\CSC" /grant:r *S-1-5-32-544:F /t /c /qicacls "%windir%\CSC" /grant:r *S-1-5-18:F /t /c /qfor /d %G in ("%windir%\CSC\v2.0.6\namespace\*") do rd /s /q "%~G"- In the final step, type these commands and press Enter key after each of them and restrict Sync Center to start at every startup –
reg add "HKCU\Software\Classes\Local Settings\Software\Microsoft\Windows\CurrentVersion\SyncMgr" /v "StartAtLogin" /t REG_DWORD /d 0 /freg add "HKCU\Software\Classes\Local Settings\Software\Microsoft\Windows\CurrentVersion\SyncMgr\HandlerInstances\{750FDF10-2A26-11D1-A3EA-080036587F03}" /v "Active" /t REG_DWORD /d 0 /freg delete "HKCU\Software\Microsoft\Windows\CurrentVersion\SyncMgr" /freg delete "HKCU\Software\Classes\Local Settings\Software\Microsoft\Windows\CurrentVersion\NetCache" /freg delete "HKCU\Software\Classes\Local Settings\Software\Microsoft\Windows\CurrentVersion\SyncMgr\HandlerInstances\{750FDF10-2A26-11D1-A3EA-080036587F03}\SyncItems" /f- Now, leave the Elevated Command Prompt, reboot the device and upon startup, the Error 0x800710FE will not appear on your computer.
3] Fix the Bad Hard Disk sectors
Hard Disk bad areas are usually of two types namely hard or physical and soft or logical. Logical bard areas in the Hard Disk are software-oriented unlike the physical one caused by an external source. Sometimes, logical bad areas are responsible for Error 0x800710FE in Windows 10 which can be fixed using the Disk Checking tool.
Disk Checking Tool is a great firmware utility that detects as well as fix bad sectors in the disk. To accomplish this workaround, follow the below steps –
- Do a right-click on Start icon and choose Run from the Win+X menu.
- Type cmd and jointly hit “Ctrl+Shift+Enter” to open Command Prompt as Admin from Run dialog.
- Upon the prompt of UAC, click Yes.
- In the following black window, enter below command at the base of blinking cursor –
chkdsk C: /f /r /x
- Activate the Disk Checking tool pressing Enter key.
- When finished fixing, restart Windows 10 PC to make these changes effective.
4] Disable Offline File Synchronization
Error 0x800710FE might rule out in Windows 10 due to particular reasons associated with Offline File Synchronization. The problem has got a hotfix by using the Classic Control Panel interface to access the Sync Settings. You can also try disabling the Offline files from the Manager Offline files context. Here are the guidelines –
- Fire up taskbar search pressing Win+Q hotkey.
- Type in Control Panel and press Enter key to open up the app.
- On the top right side of this window, you will find a search box, type sync, and press Enter key.
- Double click the Sync Center icon available here.
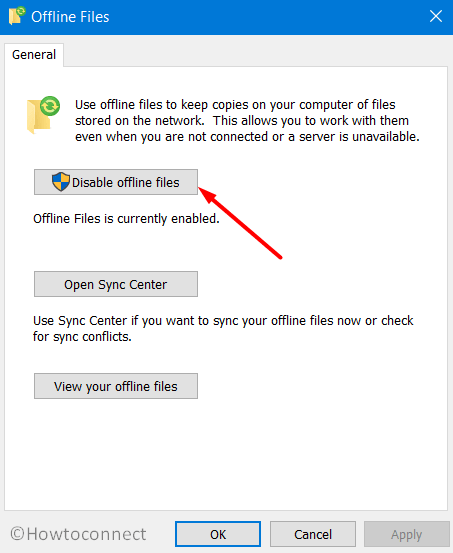
- From the next page, click Manage offline files link located at the left pane.
- When a new popup opens, click the Disable offline files button.
- When User Account Control floats up for persimmon, click Yes to pass ahead.
- Once the changes are saved, the error should resolve from your operating system.
5] Fix the Corrupted System Files
Corruption in the system files is one of the reasons that leads to Error 0x800710FE. Affected users came out with good results after deploying System File Checker in order to repair the damaged components. Here are the steps to carry out this workaround –
- Open up Power user menu pressing Win+X hotkey together.
- Choose Run from the list and invoke wizard.
- Type “cmd.exe” in the provided text box.
- Now press Ctrl + Shift + Enter keys together.
- Click Yes when the User Account Control prompts for permission.
- After moving to the black window, type in or copy-paste below command and press Enter.
sfc/ scannow
- With this, the tool will start looking for corrupted and missing system components in the system and will replace them shortly.
- It will also resolve the dreadful system files automatically and the process might be a little lengthy.
- Once finished, reboot the system to resolve the issues.
Methods:
1] Format CSC Database using Registry Editor.
2] Disable Sync Center
3] Fix the bad Hard Disk sectors
4] Disable Offline File Synchronization
5] Fix the Corrupted System Files
That’s all!!