To show better performance, you can often find Microsoft distributing updates for windows. In the form of patches and builds they generally contain modern features, bugfixes, and significant improvements but sometimes, for the users, it is not that easy to install them. Due to specific reasons, it probably happens that the system cannot finish the downloading of the patches, or it might get stuck at a particular percentage. Even if the downloading has ended successfully, some issues will come over in the installation timeline and cause unexpected error 0x80072F8F-0x20000. Also, this error code appears when upgrading Windows 10 whether you are using Media creation tool or update assistant.
Thus, Error 0x80072F8F-0x20000 in Windows 10 and 11 is one major issue that we will talk about this in this guide. This error prevents your system from receiving the updates, installing or upgrading even if you try hard. 0x80072F8F-0x20000 in Windows 10 and 11 can occur due to corrupted update or system components. Furthermore, this error can often happen due to the faulty agent’s updates or software conflicts.
0x80072F8F-0x20000 error code in Windows 11 and 10
Here is How to Fix Error 0x80072F8F-0x20000 in Windows 10 or 11 –
Way-1: Mount ISO file
If you are upgrading to Windows 10 or 11 using Media creation tool and encounter this error code then you should install the version using ISO file. In case, you don’t have CD/DVD/USB the installation can proceed with mounting the ISO using below method –
- Right-click on the ISO file.
- Select – Properties.
- Under the General tab, click Change… where it says Opens with.
- Select Windows Explorer for the program you would like to use to open ISO files.
- Now, select – Apply.
- Right-click the ISO file and select – Mount. This will create a virtual bootable disc.
- Double-click on it to view the files within.
- Next, double-click setup.exe to start the Windows 11 setup process.
Way-2: Reset Windows update components
Most of the users have successfully solved this error by only resetting the Windows update component and nothing else is required when the error occurs during Windows update. Therefore, follow the steps carefully –
- Click on Search.
- Type – cmd.
- Select – Run as administrator.
- Choose Yes on UAC prompt.
- Once Command prompt appears, copy the following line and paste. After pasting each one press Enter.
net stop wuauserv
net stop cryptSvc
net stop bits
net stop msiserver
Ren C:\Windows\SoftwareDistribution SoftwareDistribution.old
Ren C:\Windows\System32\catroot2 Catroot2.old
net start wuauserv
net start cryptSvc
net start bits
net start msiserver
- Reboot the computer and try to install the update.
See – How to Reset Windows Update to Default in Windows 10.
Way-3: Check system requirements
In addition, another primary reason for this error can often be when the PC’s specs do not match the requirements of the patch. Apart from that, multiple hard drives can often bring the emergence of error 0x80072F8F-0x20000 in Windows 10 and 11. So, as soon as you confront an error in your windows system, you have to ensure that the system requirements are accurate for the machine. This problem will happen more often just because the PC is unable to meet the needs of the system.
Before you launch yourself into the windows, Microsoft has always advised the users to make sure that they match the system’s minimum requirements.
The machine is unable to run on Windows 10 or 11 that does not match the least requirements and if this happens, you should directly approach the following method.
Way-4: Make sure internet connection is stable
When you download any content or the system software, the only thing you require is the fastest internet connection. Not having a stable and perfect internet connection, you won’t be able to download the updates or installers in your system.
One significant sign of the unstable internet is that it won’t be able to download your files no matter how many multiple times you are trying for it. Furthermore, a bad connection will also stop the process of downloading or installing the Windows update at a specific percentage. In both situations, the window error of 0x80072F8F-0x20000 comes your way.
Before you step ahead to receive the windows update, you must check that your internet connection is free from malfunction or slow speed. If still, the unstable connection issue persists, you should restart the router or can also unplug the Ethernet cable.
Contact the service provider and reset all the router settings to fix a bit of your problem. Otherwise, the particular network you have been using might set the Metered. The installation won’t start because the system has a default setting to prevent Windows update during metered connection. In this concern, we have already written a post – Set Metered Connection Without Obstructing Update in Windows 10.
- Right-click on Start.
- Select Run
- Type – ms-settings:network-wifi
- Press Enter.
- From the right pane, go to your Wifi connection.
- The toggle button under the set as specified as Metered connection should be disabled.
Way-5: Disconnect peripherals for the time being
Operation of the Windows update will generally be unable to proceed when trying to finish the task with peripheral accessories that are not compatible. For fast navigation and performing the rest of the functions in the windows, there are different USB devices that you can use.
Nevertheless, the USB hub, hard drive, speaker, and printer have become the central part of any device. But if any of these devices is not supportive, you will experience the Windows update error 0x80072F8F-0x20000.
To deal with the issue, you can remove less necessary peripherals and try updating with some basic ones. In case, the issue continues to occur, you can disconnect all the essential accessories and perform the windows update.
Way-6: Run Windows Update troubleshooter
Update error is commonly experienced in windows 10 and 1l when the company rolls out patches. One apparent reason for the error occurrence is the fluctuating internet connection.
If this mishap takes place and users cannot deal with this issue and experience modern features. But Microsoft has just newly introduced the solution of Windows Update Troubleshooter to the OS.
When it comes to resolving the windows error of 0x80072F8F-0x20000, running a troubleshooter can help you. This works as the built-in troubleshooter and does not influence the operating system’s default settings. Follow the steps below to deal with the error:
Windows 11
- Click Windows+I hotkeys.
- Choose Troubleshoot from the right pane of Settings.
- Now select “Other troubleshooters.”
- Hit the option Run, which is located parallel to the Windows update.
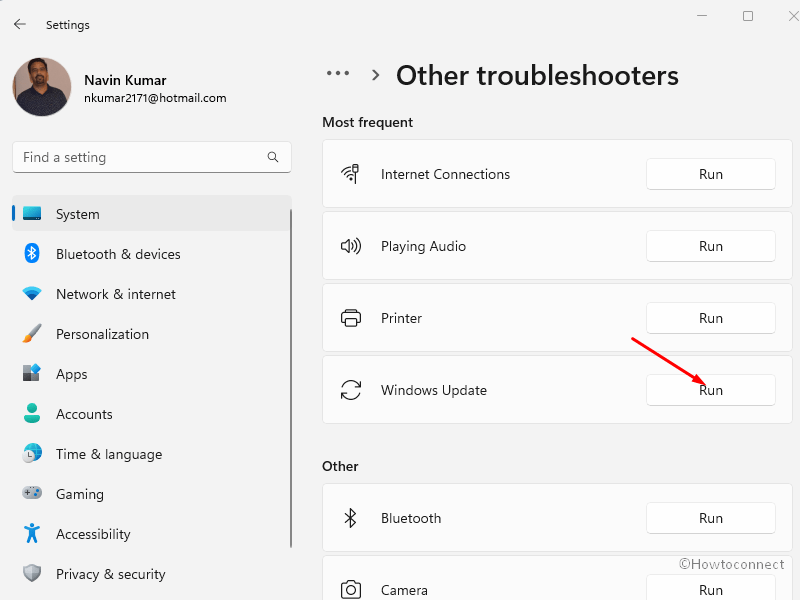
- Once the utility has fixed the detected problem, click “Apply this fix.”
- Close the troubleshooter and reboot the Windows.
Windows 10
- Launch Settings (Winkey+I).
- Select – Update & Security.
- From the left sidebar, click the option Troubleshoot.
- Click on the link mentioning Additional troubleshooters.
- Choose Windows update.
- Finally, click, Run the troubleshooter.
Way-7: Remove third-party antivirus
Getting the antivirus app is always the best solution because threats have always been looking for loophole in security. But, Windows 10 and further Windows 11 are equipped with robust windows security with sturdy construction and based on real-time protection features. This will keep the system and device free from the attack of any foreign or distrustful threats.
However, Installation of a third-party antivirus program is not always welcomed.
Several times, third-party antivirus tools misinterpret the installer file as malicious and will block the process of downloading updates! This is the time when you will start experiencing the Windows 10 error 0x80072F8F-0x20000. Moreover, two programs having similar nature to one another will cause a particular software collision to that slows down operating system. Fortunately, you can uninstall the anti-virus programs by following the below guidelines:
- Press Windows and R.
- Type – appwiz.cpl.
- Click – OK.
- Find the third-party programs you want to get rid of and click on it to select
- Now select Uninstall.
- Follow the on-screen instructions carefully for the removal of the application.
- You have to follow the same steps for uninstalling the rest of the third-party anti-virus programs.
Way-8: Wipe out junk
Windows automatically generates a copy of all the tasks you use to perform on your computer and piles up in your hard drive. Some of them are Delivery optimization files, temporary internet files, and DirectX shader cache, Windows upgrade log files that take up a huge amount of storage space.
Windows.old as well as remnants of uninstalled programs cover a few of the gigabytes in the disk space. Until and unless you perform System restore, it would be useless to contain installer files.
Junk files will eat the disk space, and the routine work is also affected furthermore they will crash the PC abnormally and will hang it frequently. Once you start checking the new updates, the windows error of 0x80072F8F-0x20000 will often occur.
Disk Cleanup tool is the best option for cleaning away the junk files you no longer want to use.
- Press Windows+S.
- Type – cleanmgr.
- Click Enter.
- Once the pop-up appears, select system drive.
- Choose– OK.
- Once the new wizard appears, click “Clean up system files.”
- For the prompt of drive selection, click “OK.”
- Once the disk cleanup has taken place, click “OK.”
- For the final confirmation, click the option of “Delete files.”
Way-9: Use clean boot
This method works as the diagnostic process with which you can easily track which of the programs can cause specific vulnerability in systems that may affect the Windows update process.
Once the device has started to boot up with the default resources, you can get the possibility of having a windows update, which is errorless. During this scenario, you will experience the third-party program causing this problem. Follow the steps below –
- Press the Windows key.
- Type –msconfig.
- Hit – enter.
- On the System Configuration wizard, check Selective startup.
- Deselect – Load Startup items.
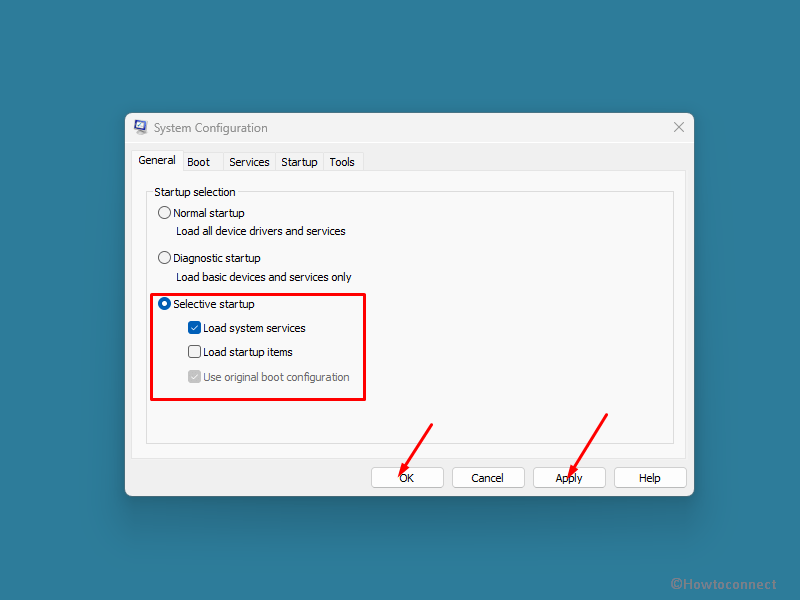
- Go to the Services tab.
- Click at the box which is located at the Hide all Microsoft services.
- Select – Disable all.
- Move yourself to the tab of the Startup.
- Click – “Open Task Manager.”
- Likewise, you have to disable all the startup programs.
- CloseTask Manager and make your way back to the window of System Configuration.
- Click Apply and then click OK.
- Once you are inside the clean boot, you have to retry installing the update.
Way-10: Disable Fast Boot
Talking about the fast startup process, it is a method of collecting necessary data for making the starting or shutting down a bit faster. When you are shutting down your device, you will be entering into a hibernation state besides shutting down regularly.
Most of the users have a complaint that the windows update error of 0x80072F8F-0x20000 will occur if the Fast boot has been enabled. Disabling the mode of a fast startup will undoubtedly resolve this error issue.
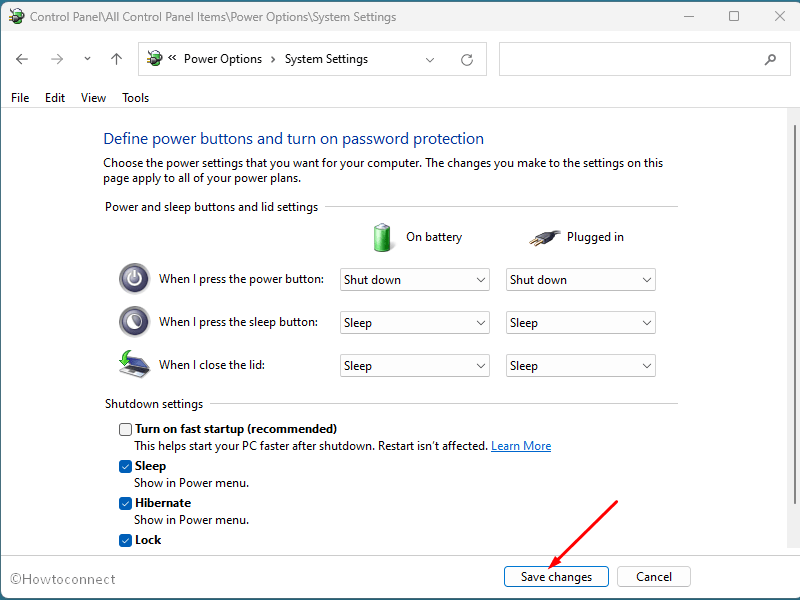
- Open Control Panel.
- Choose the option of “Power Options.”
- Click “Choose what the power buttons do.”
- Click on the link to “Change settings that are currently unavailable.”
- Uncheck – Turn on fast startup (recommended).
- Once it is done, click “Save changes.”
Way-11:Create a local user account
If your system is based on two different disk types, this is the primary cause that your windows update will experience an error of 0x80072F8F-0x20000. You can resolve this issue by creating your local user account. Follow the steps below:
- Press – Windows+I.
- Now visit – Accounts
- Click Family & other users.
- Select – Add account.
- For creating the new account, include essential information which the system requires.
- Once the account process ends, your account will be listed under the rest of the users.
- Choose the account which you want to add.
- Through the expanded pane, choose “change account type.”
- From the drop-down list under “account type”, select “Administrator.”
- Click – OK.
- Reboot the PC.
- On the account photo, right-click and select “Sign out.”
- Once the system powers up, you can log in again with your newly created admin account.
Methods list:
Way-1: Reset Windows update components
Way-2: Check system requirements
Way-3: Make sure internet connection is stable
Way-4: Disconnect peripherals for the time being
Way-5: Run Windows Update troubleshooter
Way-6: Remove third-party antivirus
Way-7: Wipe out junk
Way-8: Use clean boot
Way-9: Disable Fast Boot
Way-10:Create a local user account
That’s all!!