Deployment Image Servicing and Management aka DISM.exe is a useful command-line tool to repair Windows images and Windows RE. When sfc /scannow does not perform the job, DISM can solve the issue. But sometimes, you might come across a message “Error: 0x800f0954 DISM failed. no operation was performed” when running this tool in Windows 11 and 10.
This issue commonly occurs when a third-party antivirus program interferes with the command line tool during execution. Furthermore, corrupted Windows update components and registry may cause DISM error 0x800f0954.
DISM failed. No operation was performed. Error: 0x800f0954
Here is how to Fix Error: 0x800f0954 DISM failed. No operation was performed in Windows 10/11 –
Way-1: Uninstall third-party antivirus program
Most of the cases indicate that this DISM error is triggered by conflict between third party programs and system files. Therefore, the very first method you need to follow is to check whether any antivirus or other programs are installed on your computer.
Windows 10 and 11 include a stalwart and efficient built-in utility to protect the system called Windows Security. You don’t need outsider antivirus tool for the same purpose (this way you can also avoid the risk of errors because some of them are not trustworthy). But by chance, If any program of this kind is installed and DISM failed occurs then remove it using the following guidelines –
- Press – Windows+R.
- Type – appwiz.cpl.
- Hit – Enter.
- Once the Programs and features window opens up, find the app.
- Right click on the program.
- Select – Uninstall.
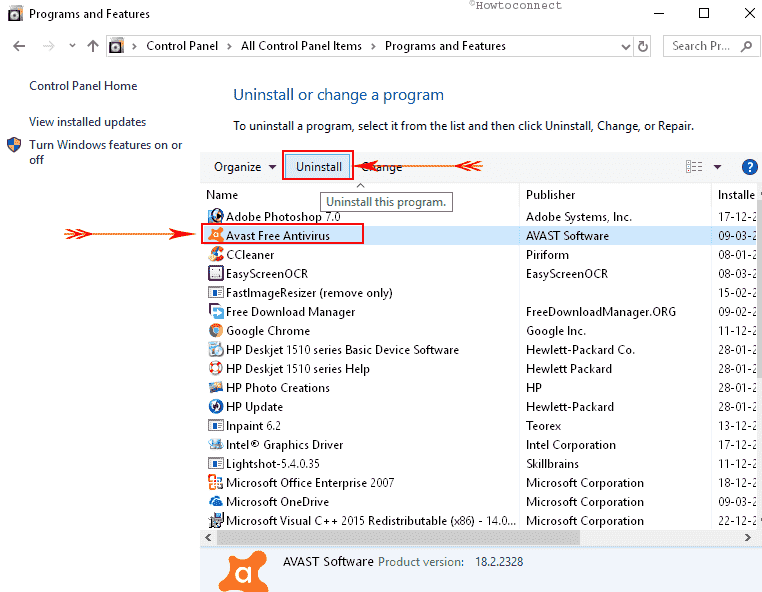
- Follow if any prompt appears.
- Repeat the same process if more programs are installed to solve the DISM issue.
See – How to Uninstall Software From Windows 10 After Creators Update.
Way-2: Reset the services related to Windows update
DISM failed, no operation was performed error 0x800f0954 is generated when the services associated with Windows update are not correctly configured. Services like Windows Update (wuauserv), Background Intelligent Transfer Service (BITS) Cryptographic Services (CryptSvc) are in supportive roles to complete the process. To perform the successful automatic Windows update these services must be having Automatic Startup type and Start Status.
When an update is started downloading, the services don’t support and finally disturb the normal operations of the system resulting in DISM error. So simply resetting the services might fix the problem –
- Click – Start.
- Type – cmd.
- Press – Ctrl + Shift + Enter.
- Click Yes on User account control pop up.
- Once the command prompt appears, type one of the following lines at a time and press enter –
net stop wuauserv
cd %systemroot%SoftwareDistribution
ren Download Download.old
net start wuauserv
net stop bits
net start bits
net stop cryptsvc
cd %systemroot%system32
ren catroot2 catroot2.old
net start cryptsvc- Restart the computer.
- See if 0x800f0954 DISM does still persists and if it is, follow the next method.
Way-3: Specify the correct location of Install.wim file
Oftentimes, the DISM fails and shows a message “Source files couldn’t be found” when this error code appears. This glitch indicates that you will have to mount the ISO file of Windows 10 and set forth the location of the Install.wim file. For this follow the guidelines –
- Open command prompt as administrator.
- Copy-paste
DISM /Online /Cleanup-Image /RestoreHealth /source:WIM:S:SourcesInstall.wim:1 /LimitAccess
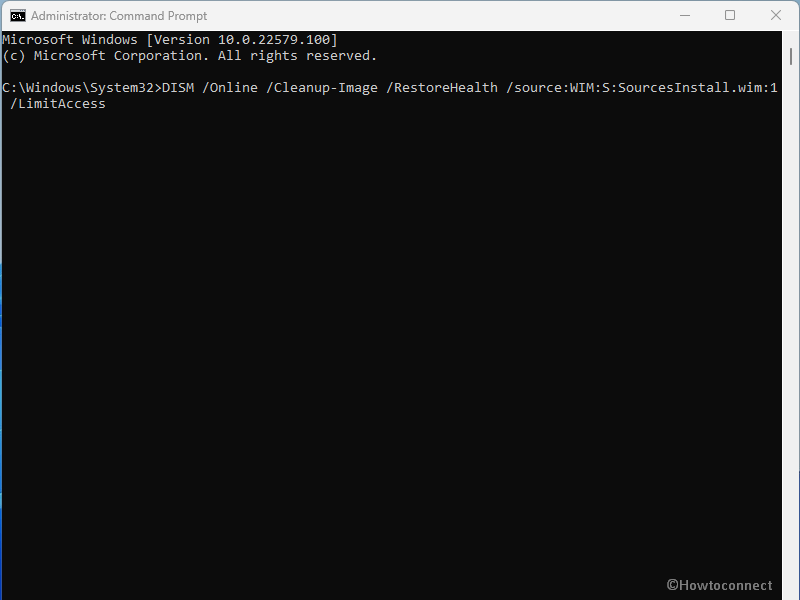
- Remember to replace S with a drive where Windows 10 ISO file is mounted.
- Copy the Install.wim file and paste it to your hard drive.
- You can also try to copy Install.wim to the root directory of your hard drive.
- If you need to Install.wim file, simply download Windows 10 ISO, mount it, and determine the location of the Install.wim file.
- Now copy Install.wim and enter it accurately in the DISM command-line tool.
A few things to have in mind are you should not mistake between uppercase and lowercase because the commands are case sensitive and avoid putting space between the syntax.
Way-4: Clean up image components to solve 0x800f0954 DISM failed
“Error 0x800f0954 dism failed. no operation was performed.” occurs generally when Windows images are required to be cleaned. Windows 10 and 11 provide specific command line repair tools to clean the images –
- Launch the Command prompt with administrative privileges as in the previous method.
- Enter the below commands one after another –
Dism.exe /online /Cleanup-Image /StartComponentCleanup
DISM /Online /Cleanup-Image /StartComponentCleanup
DISM /Online /Cleanup-Image /AnalyzeComponentStore
Dism.exe /online /Cleanup-Image /StartComponentCleanup
Dism.exe /online /Cleanup-Image /StartComponentCleanup /ResetBase
Way-5: Use Windows Update troubleshooter
This seems weird but true that the DISM failed error occurs because of Windows update problems. Multiple users confirm that troubleshooting the update solved error code 0x800f0954 in Windows 10 or 11. Unlike Blue Screen errors Windows 10, as well as 11, provide a default tool within your system to troubleshoot Windows Update. This will detect problems, check for pending restart, missing or corrupt files, service registration, status, configurations, etc and repair them.
So, use Windows update troubleshooter and fix the problems to ultimately solve the DISM error by following the guidelines –
- Click on Search from the taskbar.
- Type troubleshoot.
- Press Enter.
- When Settings app opens up, click on Additional troubleshooters.
- In the list, find and click on Windows update.
- Select Run the troubleshooter.
- After a while, you may see some suggestions on the tool, follow that.
Way-6: Turn off proxy to fix 0x800f0954 DISM failed
When DISM can not run and generate any error code then Proxy is probably a reason. You may be using proxy to keep your privacy intact which prevents Deployment Image Servicing and Management command-line tools from completing their work. Therefore turn off the proxy and check once if DISM is working fine –
- Click Windows and I keys simultaneously.
- Select – Network & internet.
- On the next Settings page, click on – Proxy.
- From the right pane, turn off the Proxy using the toggle there.
Way-7: Uncheck Read-only for install.wim
Several people copy install.wim file from Windows 10 installation ISO to run the DISM scan offline. Furthermore, many instances suggest that DISM failed error occurs due to the install.wim file that is set as a read-only. Windows allows you to set 2 attributes for a file Read-only and Hidden. The first one prevents the system from editing a file as a result when you try to run the DISM command it fails. To solve follow the instructions –
- Right-click on install.wim file.
- Select – Properties.
- Uncheck the Read-only box.
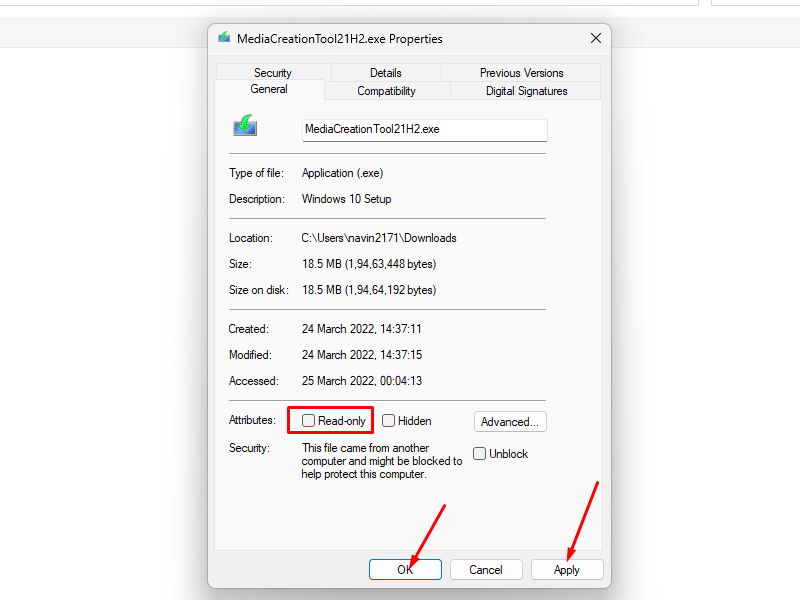
- Finally, click Apply and OK.
- After making these changes, try to run DISM command again.
Way-8: Complete an in-place upgrade
In-place upgrade is a method that will not only reinstall the Operating system but simultaneously update it to the most recent version. When DISM failed with error code 0x800f0954 this is one of the best options to fix the issue. Most of all, this will conserve the files and apps and don’t affect or lose your personal data so follow the steps and perform the upgrade –
- Click on Media Creation Tool.
- From the navigated pages, click on Download tool now button from Create Windows installation media section.
- Double click on MediaCreationTool.exe.
- Select – Upgrade this PC now.
- Wait for a while.
- Click on – Download and install updates (recommended).
- Click – Next.
- Again wait until the updates are completely downloaded.
- Now follow the steps on the Setup.
- On Ready to install screen, select – Change what to keep.
- Check the option – Keep personal files and apps.
- Click Next.
- Follow the remaining guidelines on the screen to perform the in-place upgrade.
Read the solutions to same error code that occurred for .Net Framework – How to Fix Error Code 0x800f0954 in Windows 10 (.Net Framework).
Methods list:
Way-1: Uninstall third-party antivirus program
Way-2: Reset the services related to Windows update
Way-3: Specify the correct location of Install.wim file
Way-4: Clean up image components
Way-5: Use Windows Update troubleshooter
Way-6: Turn off proxy
Way-7: Uncheck Read-only for install.wim
Way-8: Complete an in-place upgrade
That’s all!!