0x80073701 is one of the major concerns for yet another Windows 10 update error, that’s been bothering users for a while now. Basically, you experience this code when any corrupted or missing file interferes with patch installation, as well as if the update components are faulty.
Additionally, error code 0x80073701 could be accompanied by other issues like system crashes and the Blue screen of death. In this article, we have listed out some workaround for error, therefore, try them out one by one.
Error Code 0x80073701 Windows 10 Update Solutions
Here is how to Fix: Error Code 0x80073701 Windows 10 Update –
1] Basic workarounds
In some cases, resolving the update errors aren’t as complicated as with others. This is because a minor or basic glitch causing error code 0x80073701 can easily be fixed by simply restarting the device. Furthermore, sometimes, poor internet or disturbed network could prevent smooth update installation. If you find a network warning (exclamation sign-on network sign), or a ‘no internet’ message, try changing switching. Moreover, wired connections are relatively more stable in comparison to Wireless ones.
So, here are the steps you need to follow –
- Unplug all external devices or hardware like disk or flash drives or mics etc.
- Hit the Power button in the start menu.
- Select Restart from the options
- Log on normally with your password.
- Ensure a stable internet connection.
- Go to Settings > Update & Security > Windows update and click on Check for updates.
2] Run Windows Update Troubleshooter
Troubleshooting is certainly one of the handiest and immensely helpful tools on Windows when it comes to dealing with errors. Particularly, now that the operating system has a specific tool for update issues, it should be your go-to for dealing with those. It is not complicated either, check out the steps for yourself and follow them –
- Press Win+I hotkey and let the Windows Settings appear.
- Open Update & Security and then select the Troubleshoot from the left pane.
- Locate the Windows Update option in the main panel in the right and then click on it.
- Click the ‘Run the troubleshooter’ button.
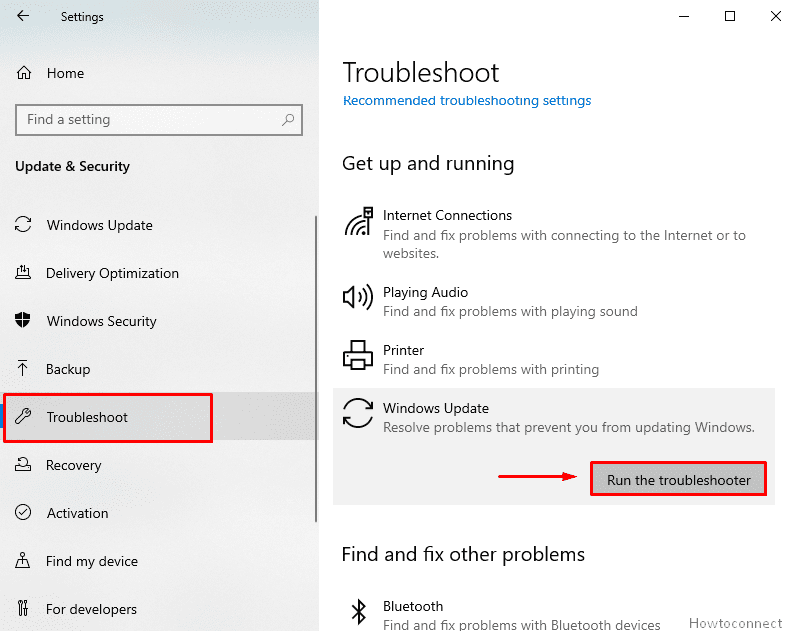
- Restart your device after the process completes and try installing the update.
3] Check for any troublesome patches
We had read in the introductory description of the error that missing system file or corruption is the lead cause of error code 0x80073701. Therefore, ensure that all files are in place and no corrupted system component is available there so that you can avoid unwanted update issues. For this purpose, you can use the System File checker that comes as an inbuilt utility in Windows. Here is how you can utilize the function –
- In the Windows search box, type command prompt.
- Right-click on the results and select Run as administrator.
- When UAC dialog prompts up on the screen, click on the Yes button.
- Once the Command prompt opens, type the following syntax –
SFC / Scannow.
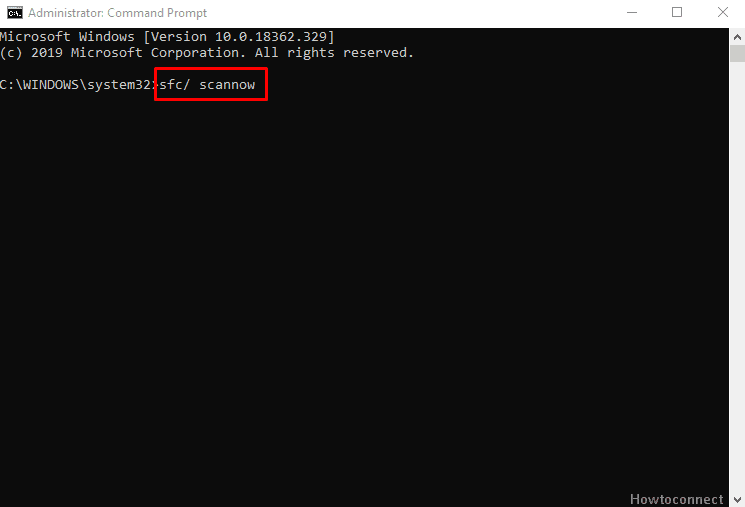
- Press the Enter key on your keyboard to initiate the process.
- This will take some time as it goes through all critical files and folders.
- Restart and attempt updating again.
- Now again open CMD and type –
dism /online /cleanup-image /startcomponentcleanupand press Enter. - Reboot and Error Code 0x80073701 will no longer occur.
4] Checking for any troublesome patches
There have been reports that certain buggy or problematic patches are interfering with the system processes. This could be likely if you started facing all these issues like 0x80073701 errors after getting an update. Uninstalling the same would straighten things up in this case. To do that, here are the steps that you need to follow –
- Press Win+S hotkey and let Windows search appear.
- Type ‘Control panel’ in the search box and hit the Enter key.
- On the following screen, go to the top right corner and type ‘installed’ in the search box.
- Under Programs and Features, click on the link View installed updates.
- By checking the corresponding dates, you can figure out the last patches you installed.
- Locate and hit the Uninstall button on the top bar.
- Click on the Yes button to confirm when prompted.
- Restart to apply changes and try getting the latest update.
5] Disable the Third-party security apps
It isn’t a new thing for the security applications to suspect files that you get from the internet, including the updates from Microsoft itself. This could happen if the program detects some incompatibilities or suspicious factor (even when they are secure). To prevent any potential interruption, try disabling the third part anti-malware software you have on your computer. You can do this by following the steps –
- Open control panel by using the steps we discussed earlier.
- Locate and open the Program and Features.
- On the following screen, find out the third-party security program available there.
- Once you locate, right-click on the same and select the Uninstall button.
- Finally, restart and attempt updating
6] A clean boot of the Computer
Giving your computer a clean boot means having no program active during the start-up except the core ones itself. No apps or programs will conflict with the process that would be used during the initialization. Follow the steps to have a clean boot –
- Type ‘System’ in the search box.
- Select System Configuration from the list.
- Right-click on the same and select Run as administrator.
- On the following page, switch to the Services tab.
- Check the box in front of the text “Hide all Microsoft services” and hit Disable all button.
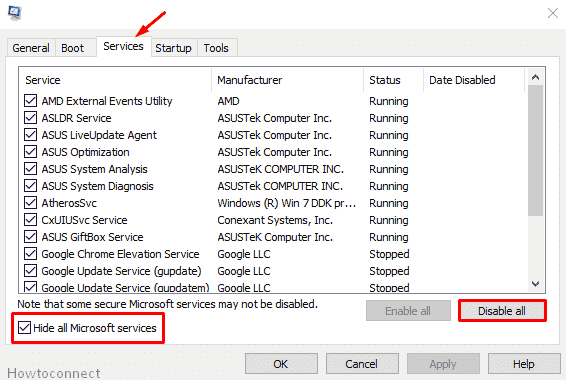
- Thereafter, head to the ‘Startup’ tab and click the link saying Open Task Manager.
- On the Startup tab of the subsequent page, right-click on the items, and hit Disable option.
- Close the Task Manager and when prompted, click OK.
- Thereafter, do a reboot after which you should try installing the update once again.
7] Attempt System Restore so as to undo any unknown recent changes causing 0x80073701 error
Sometime, it would become difficult to detect whether some recent changes you made are giving way to various errors. In this circumstance, resetting the system could help out, as the tool will revert the device where you were not experiencing any issues in installing updates. Follow the steps below to do a system restore –
- Make sure you are logged in with administrative privileges. If not, switch the account and log on as an admin.
- In the Windows search bar, type ‘system restore’.
- From the appeared result, select Create a restore point.
- On the System Protection tab of the respective page, select System Restore.
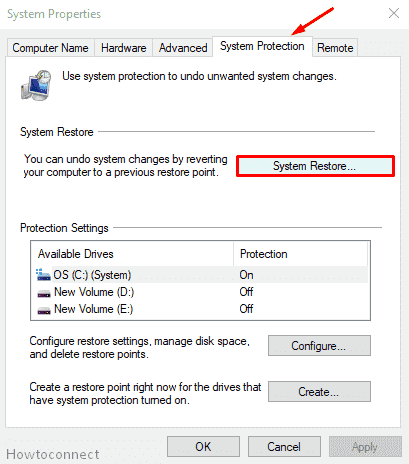
- This will take a while and then click Next.
- Thereafter, choose the most recent system restore point.
- You can do it after hitting “On this list, click a restore point”. After selecting, click Next.
- When a confirmation window comes up, hit Next again.
- Now, when the restoration is finished, restart the computer normally and attempt updating again.
8] Rename Windows Update Components
Rename of the various folders is an integral task in the update process that will sort reset them thereby eliminating any corrupted files available there. Therefore, if something related to those components was causing error code 0x80073701, this method will surely work as a fix. Here is what you need to do –
- Open an elevated command prompt as we discussed earlier.
- Now, when the black window comes up, pass the following entries one by one –
net stop wuauserv
net stop cryptSvc
net stop bits
net stop msiserver
(These stop various update components for the time being)
ren C:\Windows\SoftwareDistribution SoftwareDistribution.old
ren C:\Windows\System32\catroot2 Catroot2.old
(This renames the SoftwareDistribution folder and the Catroot2 folders so that Windows get a fresh on the next time you attempt updating.)
net start wuauserv
net start cryptSvc
net start bits
net start msiserver
(This is to restart the services you stopped.)
- Now, exit the command prompt and reboot your device. See if updating is working now.
9] Checking the Time & Date related settings
In a few cases, conflict or inconsistency between the system date and time and update time or date may cause error code 0x80073701. Fixing it is easy, so do attempt this as well.
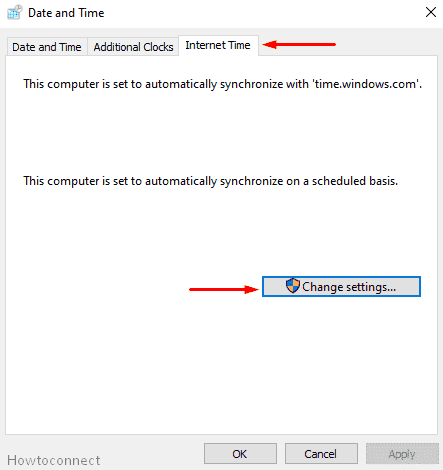
- Open Control Panel as we discussed above.
- Locate and open the Date and Time section.
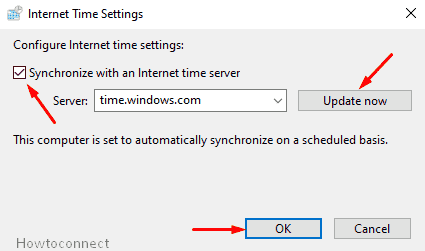
- Switch to the Internet Time tab and click on the Change settings button.
- Now, you need to mark ‘Synchronize with an Internet time server’
- Thereafter, click Update now.
- Lastly hit OK and reboot the system.
Methods:
1] Basic Workarounds
2] Run Windows Update Troubleshooter
3] Use the System File checker
4] Check for any troublesome patches
5] Disable the Third-party security apps
6] Clean boot of the Computer
7] Attempt System Restore
8] Rename Windows Update Components
9] Check the Time & Date
That’s all!!