Several trustworthy online platforms are available which lets you bring and install digital versions of PC games. One established by Valve Corporation is Steam, quite famous for game management also allows you to purchase and play video games. However, users are continuously reporting that when they attempt to open the store or Library, they receive an error note. Error Code 118 Steam in Windows 10 is an unavoidable issue and the affected users are requesting for solutions.
So, in this article, we will discuss all the effective workarounds that would help you to mitigate this annoying problem.
Error Code 118 Steam in Windows 10 Solutions
Here is How to Fix Error Code 118 Steam in Windows 10 –
1] Check and Restart Router Connectivity
One of the probable causes for the Steam Error Code 118 can be poor internet connectivity which fails to provide a solid connection between Steam Client and its database. When such a situation occurs, you may encounter several such error codes.
The standard action that usually resolves the issue is to restart the router which will reinitialize its configuration. Simply plug out the cord of the router, wait for a couple of seconds and then plug it again.
Moreover, you can also try to disable certain features of the router because they might be the areas where the conflict is occurring. For example, they can be QoS, status checking, dynamic packet filtering, or UPnP.
Once you carry out the above action, get access to the Internet, launch Steam and see for the error.
2] Disable Background Applications to Fix Error Code 118 Steam
Certain applications that operate in the background often create conflicts with the Steam platform. They generally limit this Digital Distribution platform to the network which eventually throws various issues. Programs like 3rd party antivirus tools interfere with the normal loading, P2P clients like BitTorrent can mitigate the bandwidth, apps that hide IP, a VPN software, Download Managers, Windows Theme Editors, and more such applications lead to the aforementioned error. Hence, just disable all of them from the startup as each one of them has a different level of impact on the system and Steam as well.
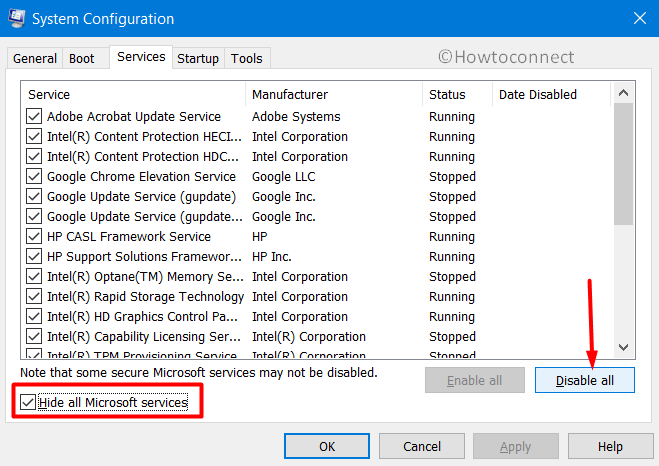
- Open Run dialog box by pressing the key combination ‘Win + R’. Once into the wizard, insert the command msconfig and click OK.
- On the System Configuration window, switch to the Services tab. Here, check the option namely “Hide all Microsoft Services“. Now, click on Disable All button (see snapshot).
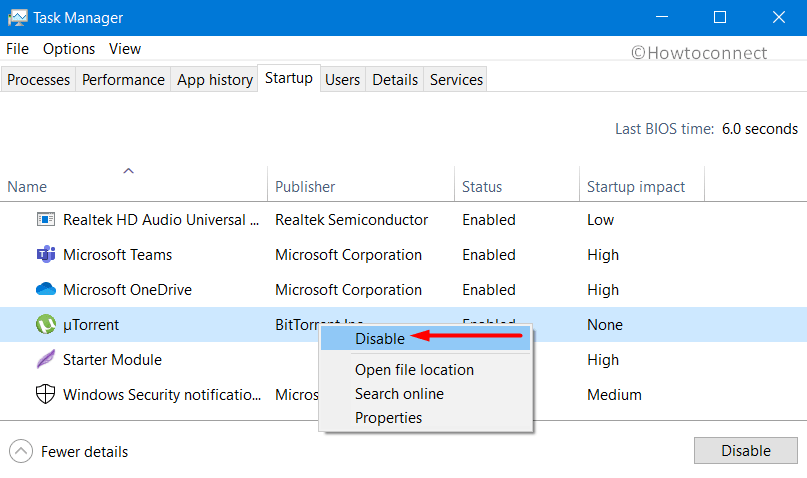
- Now, shift to the Startup tab and click Open Task Manager link.
- Do a right-click on each and every item in the list and choose the Disable button. This would not let those programs from functioning once the PC starts up.
Note – Visit the Steam Technical Support web page and you can see the list of all incompatible programs. To have a flawless experience, it is very important to close all the programs before you run Steam.
3] Configure Firewall Settings
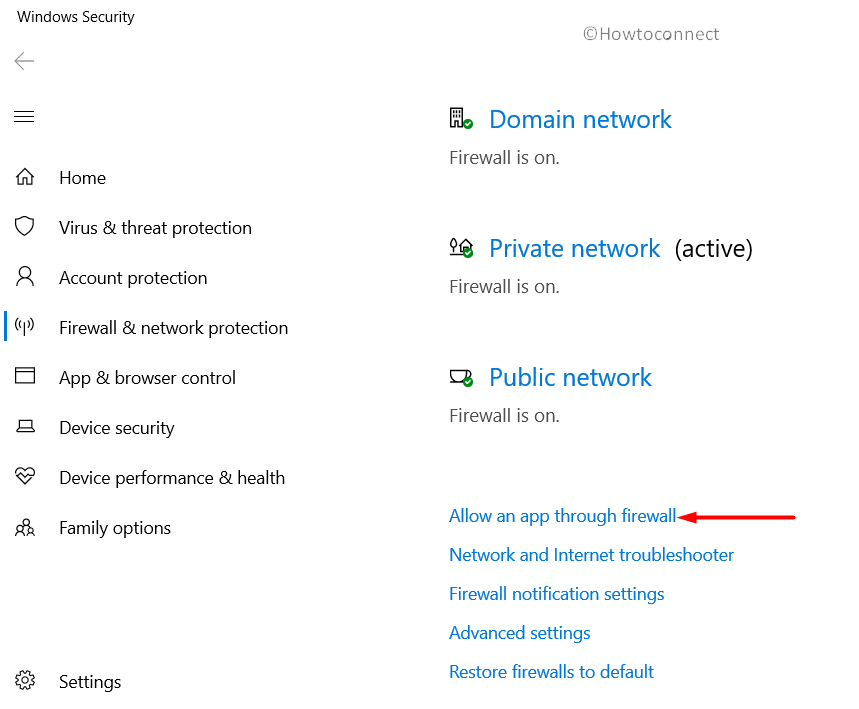
The wrong configuration of Firewall Settings might also be responsible for the prevention of Steam from making contact with its server. This is one of the main culprit behind the Steam Error Code 118 in Windows 10. When you update Steam, there are chances where the Firewall blocks internet connection, even if everything was working perfectly prior to the update. So, as the workaround, you need to allow the Steam application through Firewall by going through these series of steps –
- Press Win + Q hotkeys to launch taskbar search, type firewall and hit Enter.
- On the window that shows up, click on the link saying “Allow an app through firewall” as shown in the below picture.
- Click the Change settings button.
- Checkmark both the Public and Private options corresponding to the Steam Client. Click Apply and then check for the error code.
4] Run Windows Security
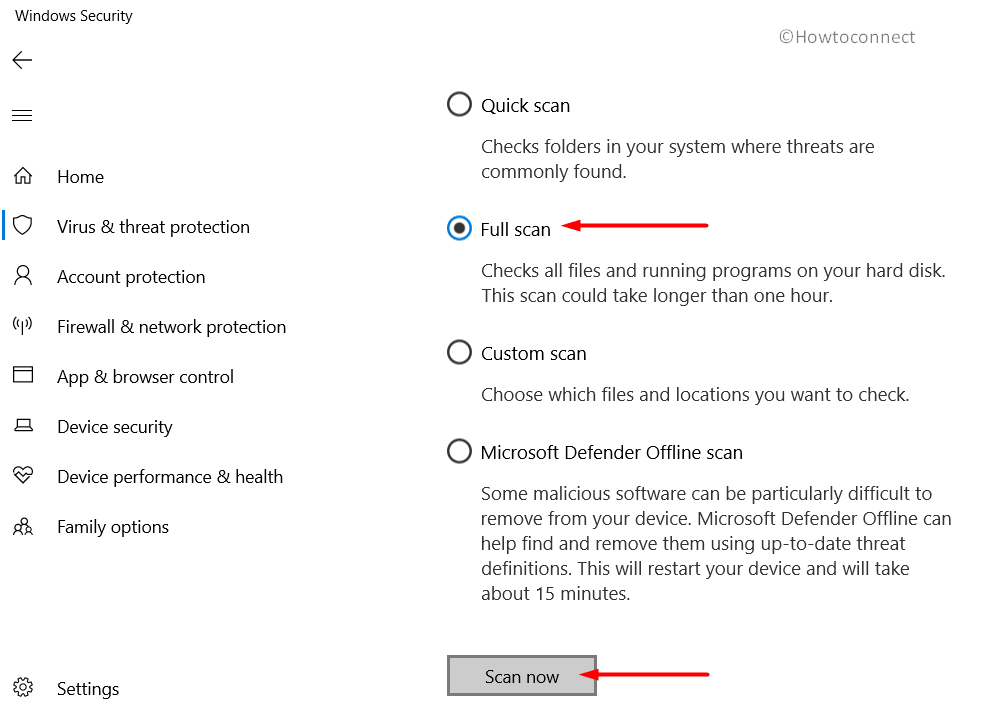
When there are malware and virus attacks on the computer, it can interfere with certain components of Steam software. This eventually triggers several issues while trying to connect to the servers including Steam Error Code 118. So, it is advisable to use the built-in Windows Security app which would detect, scan and also fix the potential threats on the PC.
- Go to the system tray and click the shield icon.
- Select the Virus & threat protection category.
- Click Scan options link on the right-hand side of the page.
- From the list, choose Full scan and then make a hit on the Scan now button (see snapshot).
- Wait for the tool to detect and display the list of detected threats. Depending on the severity of the malware, take necessary actions.
- Once you successfully remove the virus, Restart Windows 10 PC and try to launch the Steam Client.
5] Modify hosts file to resolve Steam Error Code 118
For many users, modifying the hosts’ file in Windows 10 resolved the issue of Error Code 118 Steam. So, go through the below steps and edit the hosts file –
- Open File Explorer and navigate to this path –
C:\Windows\System32\drivers\etc - Once into it, locate and launch the hosts file.
- Delete every item from it except 127.0.0.1 localhost.
- Lastly, try to the access Steam application and check if you receive any issues or not.
These are all the simple and effective solutions that would help you to prevent the Error Code 118 Steam in Windows 10. If you resolved this issue by any other means, please do write them to us.
That’s all!!!