Do you face a bizarre problem on your Windows computer that occurs suddenly without any hint and crash the operating system? If that is fsulgk.sys BSOD then you will get some working solutions in this post. The system unexpectedly restarts and shows the Stop error System Service Exception when this Blue Screen takes place on the PC.
Let’s see what is fsulgk.sys first. fsulgk.sys is a driver and an integral part of F-Secure Software Products, a third-party tool for Windows. This Blue Screen error appears due to the outdated driver of this software which mainly comes to provide protection to make online privacy safe and secure. However, some more reasons may also affect the system in this way we will discuss in the coming part of this article.
fsulgk.sys Blue Screen error
Here is how to fix fsulgk.sys Blue Screen Error BSOD in Windows 10 and 11 –
Way-1: Uninstall F-Secure Software program
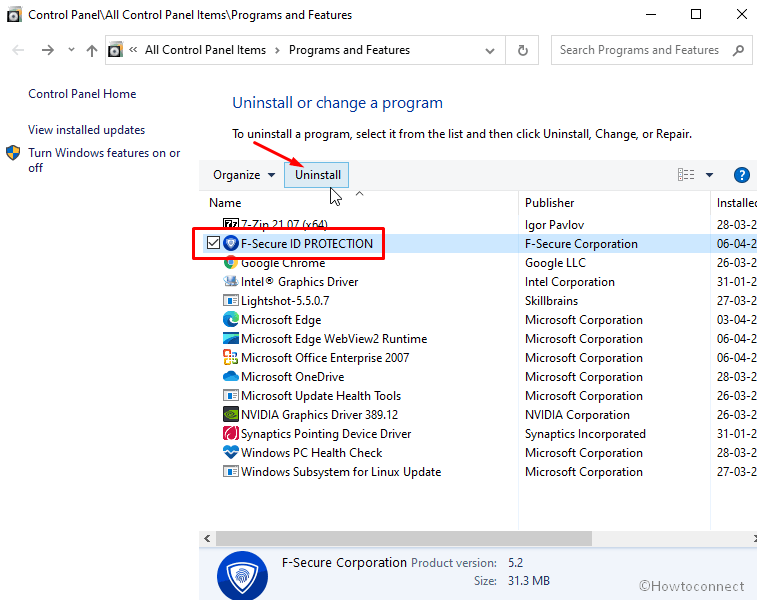
Main reason behind this BSOD error is the driver of F-Secure Software. This company provides multiple products to safeguard such as Anti-virus, Internet Security, Freedome, Key, Total, ID Protection and if any one of them is installed on your computer you may get this Blue Screen. You may dig out the root cause of this issue using Bluescreenview. So check if one is installed and remove it from the machine using the following guidelines –
For Windows 10/8/7
- Press Windows and R.
- Type – appwiz.cpl.
- Hit Enter to open the Programs and Features window.
- Find F-Secure Software and select it.
- Click on – Uninstall.
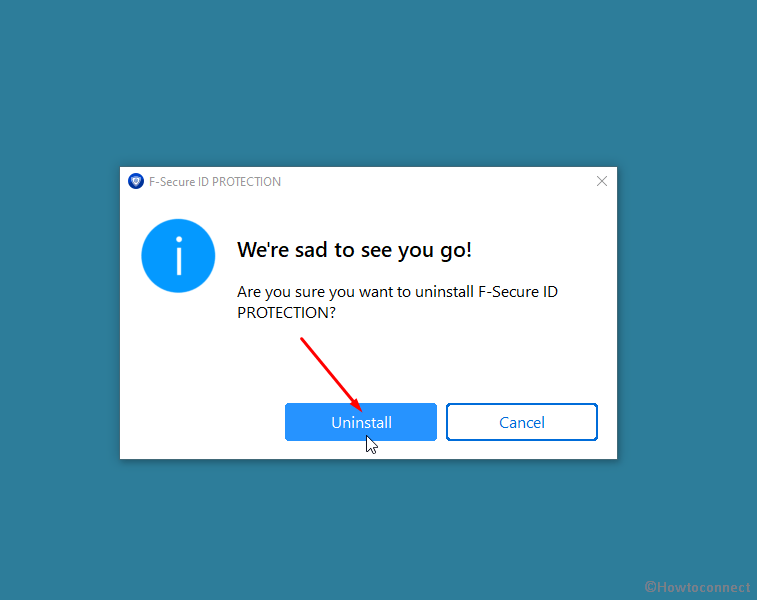
- Select Yes on the confirmation prompt.
- On the Uninstaller wizard, click on Uninstall and follow the further guidelines.
- Restart the computer and you should get rid of this blue screen now.
For Windows 11
- Click on the Start.
- Select – Settings.
- When the app opens, click – Apps.
- From the right, select – ‘Installed apps’.
- On the next page, click on the hamburger menu (3 dots menu)
- Select Uninstall.
- Again click on the same from the tiny pop-up.
- Follow the instructions on the screen.
Way-2: install the most recent version of F-Secure Software
Sometimes you might not want to uninstall the F-Secure security tool because of your dependence on it this method will help you in this condition. In this, case you will need to install the up-to-date version of the tool instead of removing it.
Since the old version of the F-Secure Software is the key reason for this Blue screen error updating it is the obvious solution. Several users also complain about the occurrence of fsulgk.sys BSOD on Windows 7, this method is also helpful for them to solve the issue.
- Go to this webpage.
- Find the most recent version of the tool and download it.
- Double click on the Setup file.
- Follow the on-screen instructions to complete the installation.
Way-3: Update NVIDIA to fix fsulgk.sys blue screen error
Some users explicate that installing the up-to-date version of NVIDIA driver solves the fsulgk.sys blue screen with System_Service_Exception in Windows. Therefore try getting the display or GPU adapter using the below instructions –
- Press Winkey + I.
- Select – Apps.
- Go to the right side and reach NVIDIA.
- Click on this and select Uninstall from the expanded pane.
- Confirm by again clicking ‘Uninstall’.
- Follow the instructions showing up on the screen and perfectly remove the app.
- Click this link to navigate to NVIDIA driver webpage.
- Download the current version of the adapter.
- Double click on the installer and install the adapter.
In the case of Windows 11, go to Settings > Apps > Installed apps.
Way-4: Use SFC /SCANNOW
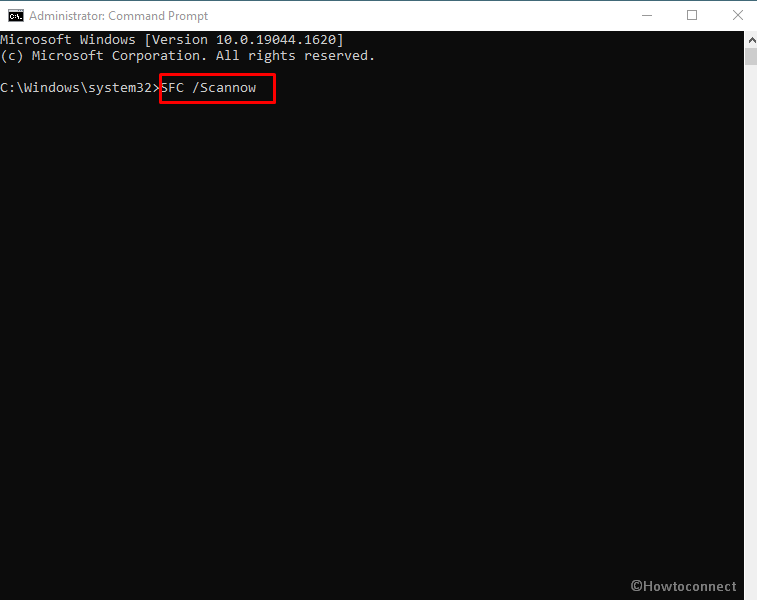
Blue screen error mostly occurs with system crash just like during fsulgk.sys BSOD. This crash might start because of conflict between system files like .DLL, .sys, and .exe files and the components of the outdated software and corrupt them. Further, due to this corruption, the problem might occur repeatedly when you power on your PC or work on it. Fortunately, you are able to deal with this malfunction simply using a built-in command-line utility. This is SFC or System File Checker that will detect all the broken files and if found replace the same files by taking from the cache folder. Follow the steps to do this –
- Click on Search.
- Type – cmd.
- Press – Ctrl + Shift + Enter.
- Click Yes on the verification prompt.
- Once the command prompt appears, type
SFC /Scannow. - Hit – Enter.
- After the command completes the task, reboot your computer.
- Check if the BSOD still persists.
Way-5: Run DISM tool
DISM is the only default repair utility to address Windows Image .wim file which might be the primary cause of this fsulgk.sys failed error. You can run this through the administrative command prompt using the following steps very easily –
- Open command prompt as administrator as given in the previous method Way-3.
- Type –
DISM /Online /Cleanup-Image /RestoreHealth - Press Enter.
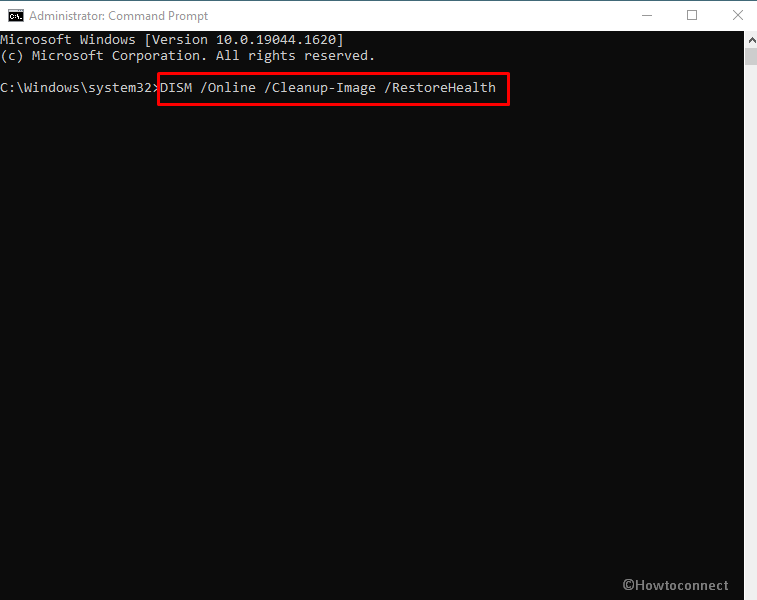
- Allow the tool to finish the execution of the command in some time.
- Restart the device and hopefully fsulgk.sys crash error will be fixed.
Methods list:
Way-1: Uninstall F-Secure Software
Way-2: install the most recent version of software F-Secure Software
Way-3: Update NVIDIA
Way-4: Use SFC /SCANNOW
Way-5: Run DISM tool
That’s all!!