Windows 10 or 11 receives different types of updates to maintain the health of operating system, add improvements, and fix bugs. These are Security updates, out-of-band updates, cumulative updates which arrive regularly and keep Windows up-to-date. One such is Definition update that comes to Windows Defender and increases the strength of this security app to fight new mischievous threats. 0x80248007 is an annoying error that commonly appears when you try to install the Definition update. However, this code may also show up while getting other updates on Windows 10 or 11.
Update error 0x80248007 generally occurs because of broken update cache, corrupted or missing system files, fluctuating internet connection, and more. Sometimes the same may also appear when the configuration of Windows Installer service is incorrect and doesn’t support the update process. The complete error message is – “There were problems installing some updates, but we’ll try again later. If you keep seeing this and want to search the web or contact support for information, this may help: Definition Update for Windows Defender –KB2267602 (Version 1.361.1116.0) – Error 0x80248007”. It may also happen when the update cannot find the Microsoft Software License Terms.
Update Error 0x80248007 in Windows 10 and 11
Here is how to fix update error 0x80248007 in Windows 10 or 11 –
Way-1: Run System File Checker
The most likely reason for this issue is the malfunction of system files that disrupt the Windows update process and cause to fail the installation. Fortunately, you can rescue from 0x80248007 error using System Files Checker aka SFC by running it through command prompt with administrative privilege. However, for Windows update error, System files are not responsible in normal scenarios but this is a rare case. Follow the steps –
- Click on – Start.
- Type – CMD.
- Press – Ctrl + Shift + Enter.
- Once a User Account Control confirmation dialog appears, click – Yes.
- On the Command prompt, type –
SFC /Scannow.
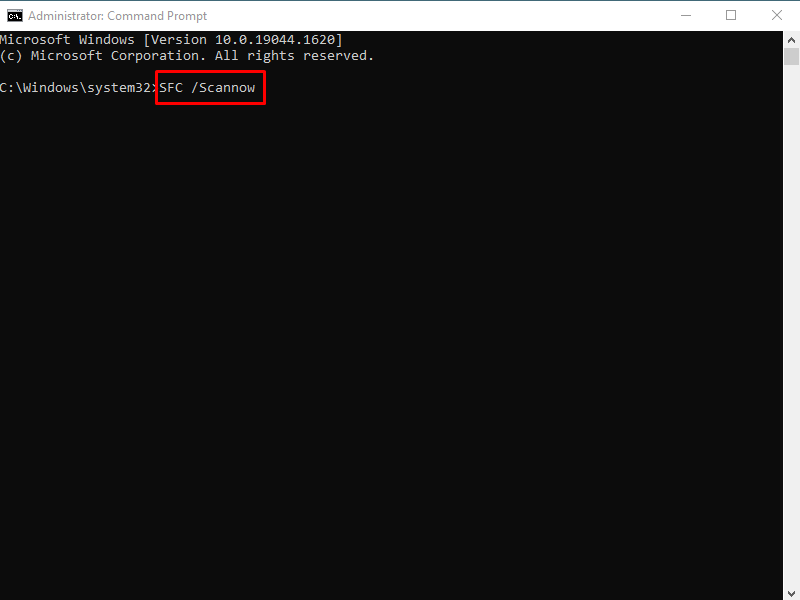
- Press – ‘Enter’.
- You will come across a message –
Beginning system scan. This process will take some time.
Beginning verification phase of system scan.
Verification x% complete.
- Allow this to reach 100% and then restart your PC.
Way-2: Check Internet Connection
Consistent and spontaneous internet access is a precondition for a Windows update to perform in any version of Windows. Error code 0x80248007 indicates some faults with internet connection, so, you need to check the network and fix it. These posts will help you deal with them How To Fix Unable to Access Internet In Windows 10, How to Run Network Adapter Troubleshooter in Windows 10, How to Fix Network Connection Problems in Windows 10 All in One. Generally, you can go ahead with the steps to solve the common issues –
- Power off the Router for at least 10 seconds.
- Switch on the router.
- Connect to the internet.
- Now go to Settings > Update & Security > Windows update.
- Click on – Check for updates.
- If you are able to download and install the update then good otherwise follow this article – How to Reset Network Settings to Default in Windows 10.
Way-3: Bring Windows Update troubleshooter into action
To repair the issues such as update error 0x80248007 in Windows 10 or 11 the Operating Systems comprise a built-in tool that can detect, check for pending reboot, restart Windows update and bits services. Windows update troubleshooter is the utility that is able to fix the errors with minimum effort and maximum productivity. So, follow the guideline –
- Press the Windows key.
- Type troubleshoot.
- Hit Enter.
- When Troubleshoot Settings opens up, click on Additional troubleshooters.
- From the next page, select – Windows update.
- Click – Run the troubleshooter.
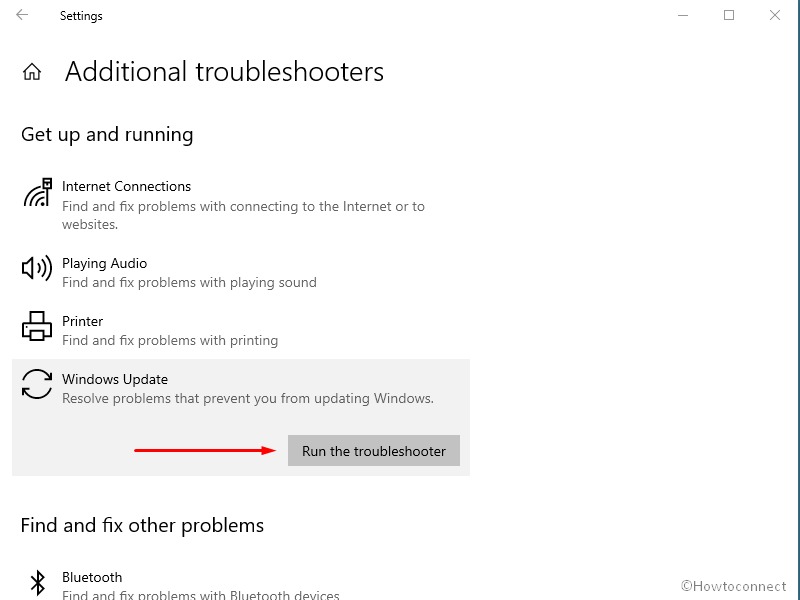
- The tool will quickly start recognizing the cause of the issue and give you suggestions to follow in order to fix it.
Way-4: Reset Windows update components
Windows update is a requisite component of Windows that brings new drivers for the hardware devices installed in the computer, security patches, Known bugs fixed, Major updates, and upgrades. However, due to some problems, usually associated with certain corruption in system files, Windows update may not work properly. Luckily, Windows allows resetting the component which is pretty helpful when you encounter an error with failing to install update. Generally, you run multiple cmd commands to reset which is quite bothering, therefore, we are putting forward a script. This is the easiest way to reset Windows update component, so, move forward with the guidelines to reset the component –
- Download Wureset_ Windows 10
- Right-click on this file and select Extract.
- From the extracted folder, double click on WuReset.bat.
- Press any key when you are asked to continue the command.
- You may be asked to press the key a few more times on the command prompt so follow it.
- Restart the computer and check if 0x80248007 still persists.
See – How to Reset Windows Update to Default in Windows 10.
Way-5: Start Windows Installer service
Windows Installer service is to help Windows with the deployment of an app and fix the conflicts that occur between shared DLLs. Oftentimes, incorrectly configured Windows Installer service can generate 0x80248007 error code. The service also contributes to uninstalling and installing an app in Windows, so, follow the instructions and set the service correctly –
- Open Command prompt as administrator. You may also follow the steps from Way-1 to open the prompt.
- Type –
net start msiserver.
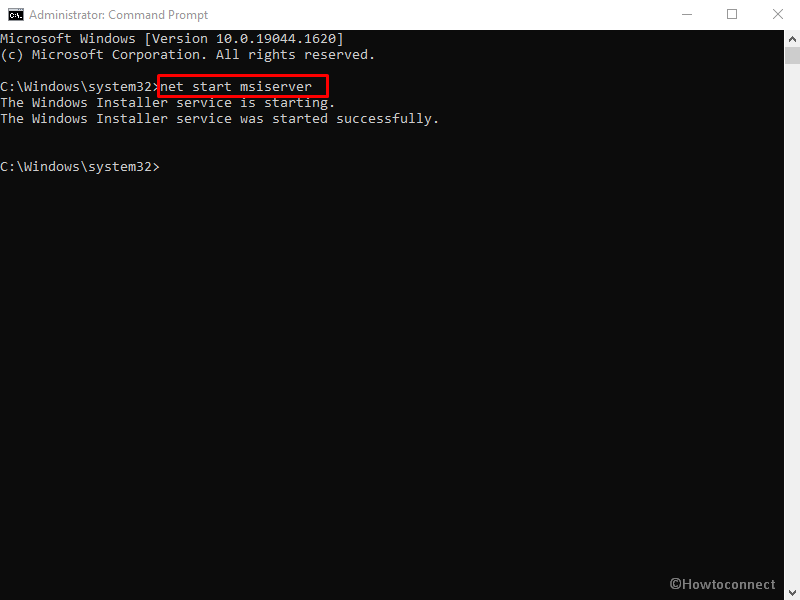
- Press – Enter.
- You will see a message – The Windows Installer service was started successfully.
- Close the command prompt and reboot the device.
- Hopefully, the update error should be solved now.
Way-6: Use the DISM tool
Deployment Image Servicing and Management aka DISM, is a built-in utility offered from Windows to deal with errors related to Windows images. Sometimes the update error 0x80248007 might also be triggered because of malfunction in the Windows image file therefore run the command line tool using the below guidelines –
- Press – Winkey+R.
- Type – cmd.exe.
- Right-click on Command prompt showing in the result section.
- Select – Run as administrator.
- Once a UAC pop app rolls in click on Yes.
- Type –
DISM.exe /Online /Cleanup-Image /Restorehealth.
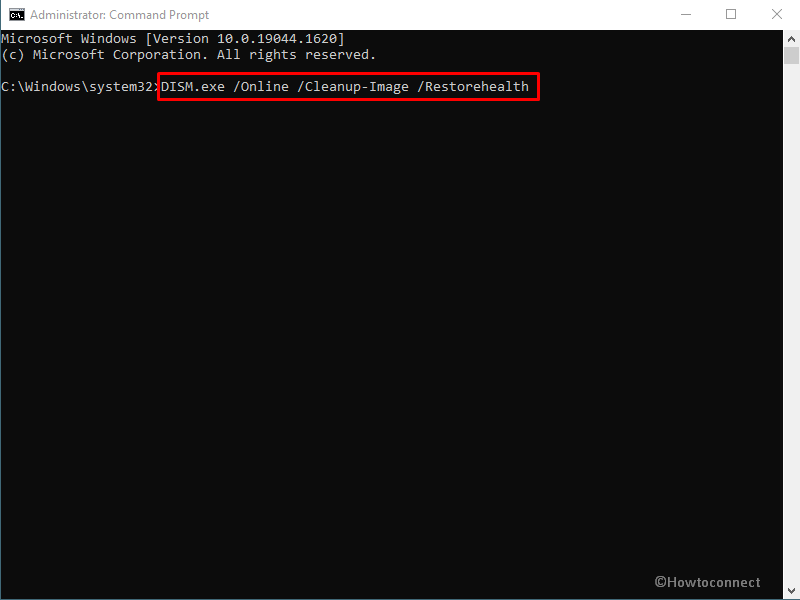
- Press Enter.
- The command will perform the task in a few minutes so stay still and then restart the computer.
Way-7: Perform System Restore
In case, the methods above fail to fix the Windows update error code 0x80248007 then system restore is a usable tool. This will reinstate the operating system to the time and date of your choice when there was not any problem occurring, most of all, without affecting your apps and personal files. Advance with the steps to fix it –
- Click on – Search.
- Type – rstrui.
- Press Enter.
- System Restore wizard will appear; click on “Next”.
- Select one date and time when the error was not in existence on your device.
- Click on Next.
- Now click on Finish.
- A pop-up will ask you, “Once started System Restore cannot be interrupted. Do you want to continue?”; select “Yes”.
- This will take a long, possibly 1 or 2 hours so allow the restoration to complete patiently.
Way-8: Take help of in-place upgrade
In-place upgrade is an installation method for Windows 10 that directly deploys the operating system to the latest edition. It means you don’t need to check for updates and you bypass the manual or automatic update process to reach the most recent version of Windows. Performing an in-place upgrade will fix error 0x80248007 on Windows 10 or 11 therefore go with the following steps –
- Go to Software Download.
- Select the version of Windows you want to install.
- Scroll a bit down and click Download tool now.
- After the downloading is completed, double click on the setup file.
- on UAC pop up, select – Yes.
- Next, on the license terms page, click – Accept.
- Select – Upgrade this PC now.
- Click – Next.
Methods list:
Way-1: Run System File Checker
Way-2: Check Internet Connection
Way-3: Bring Windows Update troubleshooter into action
Way-4: Reset Windows update components
Way-5: Start Windows Installer service
Way-6: Use the DISM tool
Way-7: Perform System Restore
Way-8: Take help of in-place upgrade
That’s all!!