While settings up Hello PIN in Windows 10 or 11, error 0x80090011 may evolve that prevents the system from creating the passkey. The same fatal code may also arise when you try to sign in after waking up from Sleep or Hibernate. Such situations generally occur after a successful Windows update or during the installation process. This specific issue points out that the container or key you are trying to use was not found.
According to Microsoft, disconnecting the device from Azure AD and reconnecting the same will fix Hello PIN Error 0x80090011 in Windows 10 or 11. However, you might need to try out other workarounds too since there is no exact cause found that triggers the issue. In most cases, faulty Windows update, administrator login issue, TPM fault, and non-functioning IPsec Policy Agent found to cause Hello PIN error. Oftentimes, the error goes away with a simple restart but it’s a temporary fix and the system may throw the sign-in problem again. See one more issue – Fix Pin not available Error code 0x8009002d in Windows 10.
Hello PIN Error 0x80090011
Here is how to Fix Hello PIN Error 0x80090011 in Windows 10 or 11 –
Way-1: Disable your PIN login
The most convenient method during this problem is to not use a PIN for login to Windows 10 or 11. Modification in a registry entry might help you disable the Hello PIN using the following steps –
- Press – Windows + R.
- In the Run command, type – regedit.
- Hit – Enter key.
- When User Account Control shows up, click – Yes.
- Once on the Registry Editor window, navigate to the following directory –
Computer\HKEY_LOCAL_MACHINE\SOFTWARE\Microsoft\PolicyManager\default\Settings\AllowSignInOptions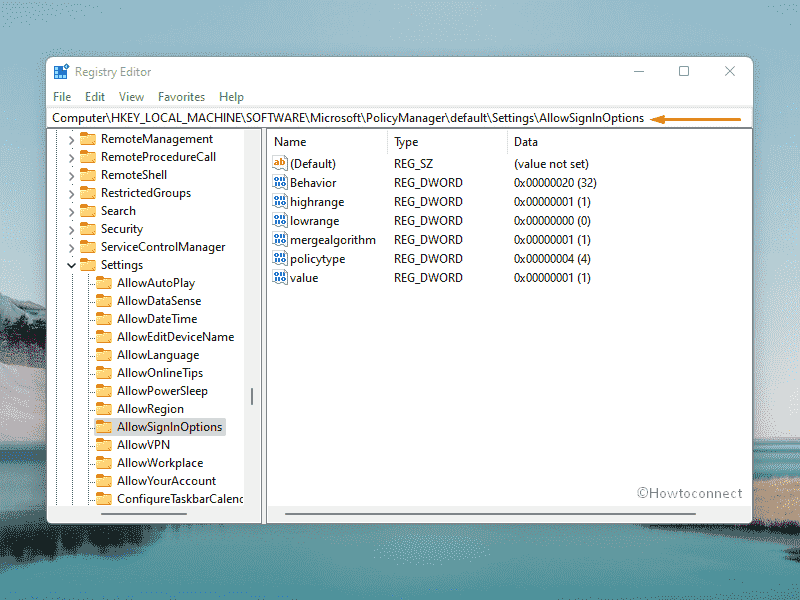
- From the right pane, double-click the DWORD key named Value.
- Set the Value data to 0.
- Click – OK.

- Close Registry Editor and reboot the PC.
Way-2: Uninstall recently installed update
Sometimes, a buggy Windows update might also affect the sign in process when using Hello PIN and cause the error 0x80090011 to occur. You can uninstall the rollout temporarily until the bug is officially fixed using the below guidelines –
- Right-click on Start icon and choose – Run.
- In the command box, type – appwiz.cpl.
- Click – OK.
- From left sidebar of Programs and Features window, click – View installed updates.
- All installed updates will be shown under Microsoft Windows section.
- Right-click on the most recently received KB version.
- Select – Uninstall.
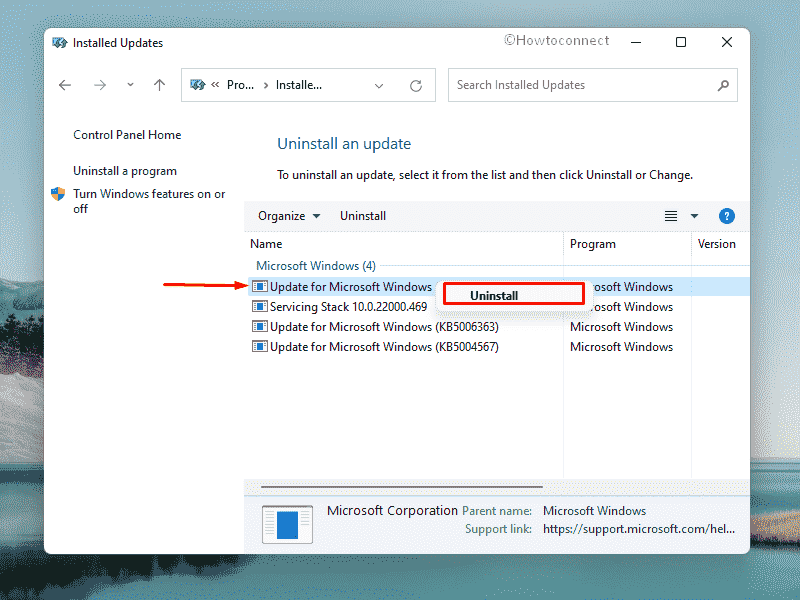
- To confirm the action, once again click – Uninstall.
- Keep following further instructions to remove the patch completely.
Way-3: Sign out of the current Microsoft Account
Several times, only signing out and signing in using a Microsoft account works like a wonder to fix the error code 0x80090011 Something went wrong and your PIN isn’t available.
- Press – Windows key.
- Right-click on your account picture.
- Choose – Sign out.
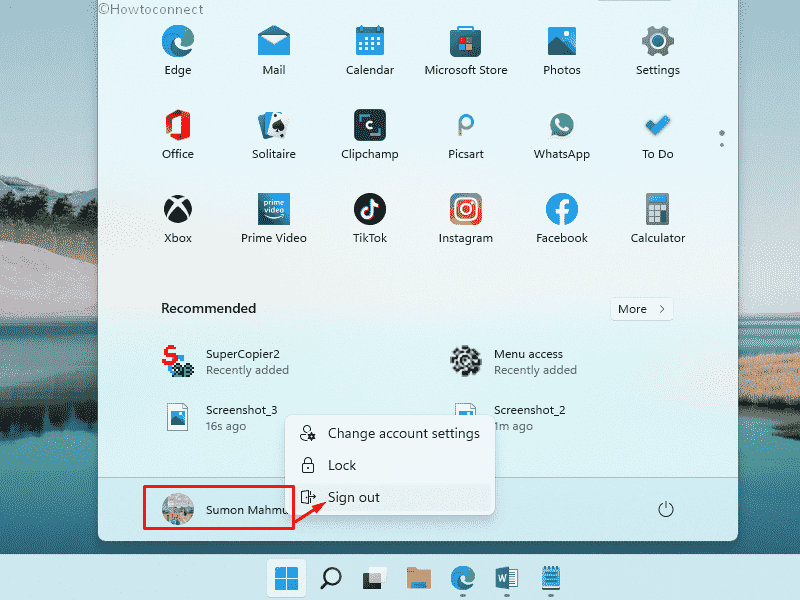
- After signing out, the system will come up with the lock screen.
- Choose your Microsoft account and provide the password to sign in again.
Way-4: Re-join the Azure AD
When you encounter the issue when creating the work PIN then disconnecting the account may help –
- Open Settings app.
- Go to – Accounts => Access work or school.
- Click – Disconnect button present beside your work or school account.
Way-5: Clear NGC folder to fix 0x80090011 error code
NGC folder stores all the information pertaining to PIN in Windows and allows to handle them but once it gets broken you may encounter problems during logging in. The directory works as a cache folder related to PIN, so, deleting the information accumulated in this will help to fix the Hello PIN error. Furthermore, insufficient permission and ownership of the NGC folder are also responsible for this sign-in issue.
- Press – Windows + E.
- When File Explorer opens up, navigate to –
C:\Windows\ServiceProfiles\LocalService\AppData\Local\Microsoft\If you don’t get the above-mentioned directory, probably the folder is hidden or you don’t have permission to access them. In such a case –
- From File Explorer, visit the following directory –
C:\Windows\ServiceProfiles\LocalService\AppData- Click View from the menu bar.
- Make sure the checkbox present before Hidden items is ticked.
- When all hidden folders show up, double-click – Local.
- To give your consent, click – Continue.
- Open Microsoft folder as well.
- Right-click the Ngc folder and choose – Delete.
If you don’t have the ownership of Ngc folder, the system won’t be able to delete the same. In that case, follow the way –
- Right-click Ngc folder.
- Select – Properties.
- Shift to Security tab.
- Click – Advanced.
- Hit the link – Change.
- Click – Advanced.
- When a new pop-up appears, hit – Find now.
- Opt the account name of the administrator user from the appearing search result.
- Click – OK.
- Select the checkbox present before Replace owner on subcontainers and objects.
- Click Apply followed by OK.
- After taking ownership, delete the Ngc folder as we described above.
Way-6: Set up a new PIN
- Press – Windows + S.
- In the search bar, type in – sign in options.
- Hit – Enter.
- After redirecting to the dedicated settings page, shift to the right-hand side.
- Select the option for Windows Hello PIN.
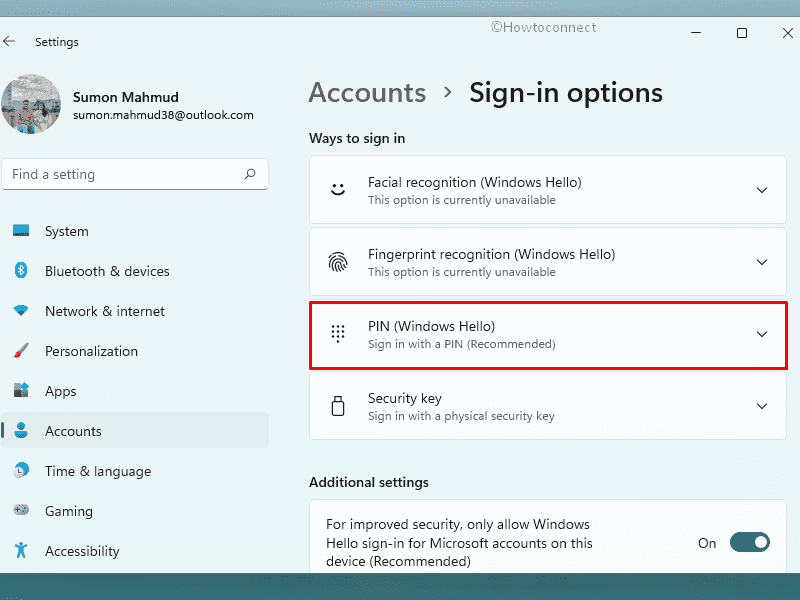
- From the expanded pane, click – I forgot my PIN.
- Provide your Microsoft accounts credentials.
- If two-factor authentication is enabled for your account, provide the verify code.
- Click – Continue on the verification message.
- Enter new PIN twice to set it.
Way-7: Modify TPM settings
- Click the search bar from the taskbar.
- Type – tpm.msc.
- Select – Run as administrator from the right flyout.
- When the app opens up, click – Actions from the menu bar.
- Choose – Prepare the TPM.
- Restart your PC.
Way-8: Remove the battery if using a laptop
This may sound weird but some of the users fixed Hello PIN Error 0x80090011 in Windows 10 or 11 by disconnecting the battery from the laptop. Even if it’s an unusual workaround, give it a try and see if it helps. Turn off your laptop first and then remove the battery carefully. Disconnect the laptop from the power adapter as well. Wait for at least one minute. Put the battery back in and power on the laptop.
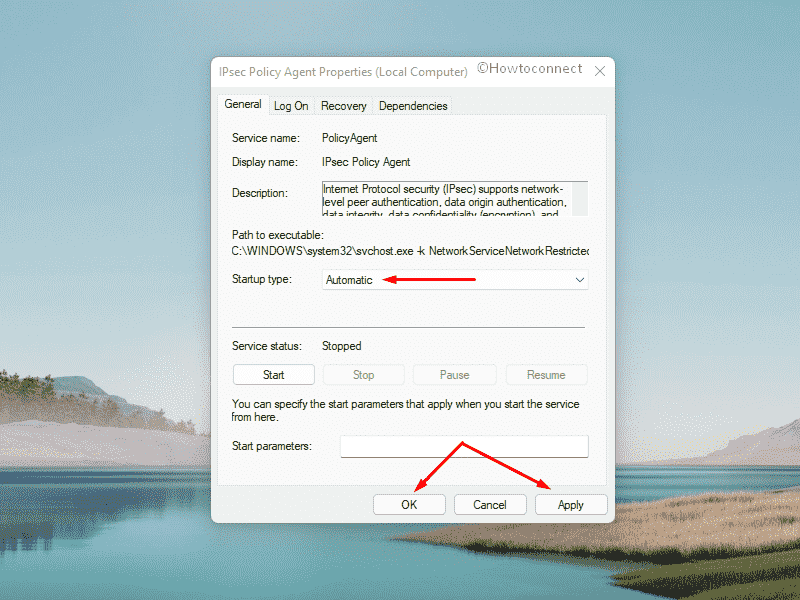
Way-9: Alter IPsec Policy Agent service
- Right-click on Start button and choose – Run.
- In the command field, type – services.msc.
- Click – OK.
- Find – IPsec Policy Agent service.
- Once found, double-click the same.
- Set the startup type to Automatic.
- Click – Apply and then OK.
Way-10: Make changes in Group Policy settings
- Press – Windows + R.
- In the Run command, type – gpedit.msc.
- Click – OK.
- From left sidebar of Group Policy Editor, go to – Computer Configuration => Administrative Templates => System => Logon.
- Shift to the right pane.
- Double-click – Turn on convenience PIN sign-in.
- Select the radio button of Enabled.
- Click Apply and then OK.
Methods list:
Way-1: Disable your PIN login
Way-2: Uninstall recently installed update
Way-3: Sign out of the current Microsoft Account
Way-4: Re-join the Azure AD
Way-5: Clear NGC folder
Way-6: Set up a new PIN
Way-7: Modify TPM settings
Way-8: Remove the battery if using a laptop
Way-9: Alter IPsec Policy Agent service
Way-10: Make changes in Group Policy settings
That’s all!!