According to some users’ feedback, 28/02/2023 Windows 11 update for 22H2 can not be received. When trying to install KB5022913 the preview patch fails with error code 0x800f081f or another. Furthermore, you might encounter a screen showing Undoing changes made to your computer reverting back Windows 11 to the previous build. So, here you will find solutions to the LCU KB5022913 failed to install issue.
Commonly, KB5022913 stuck because of misconfiguration of services, corrupt Windows update cache, problems with system files, malware, or third-party programs. Occasionally, interference with external antivirus suites and disruptive internet connection are also reasons behind this problem. See – Fix KB5022845 Failed to Install with Error in Windows 11 22H2.
Table of Contents
KB5022913 Failed to Install in Windows 11
Here is how to fix KB5022913 Failed to install with Error in Windows 11 22H2 –
Way-1: Use Windows Update Troubleshooter first
Perhaps you are acquainted with the benefits of a troubleshooter, particularly if you are grappling with hassles related to Windows updates. Through this built-in fix-it utility, you can quickly and easily scan your system for any faulty registry entries, settings, services, and pending updates.
- Press the – Winkey.
- Type – Troubleshoot.
- Hit the Enter key.
- Once Settings app is launched, click on – Other troubleshooters.
- Under the “Most frequent” heading look for Windows Update.
- Click – Run.
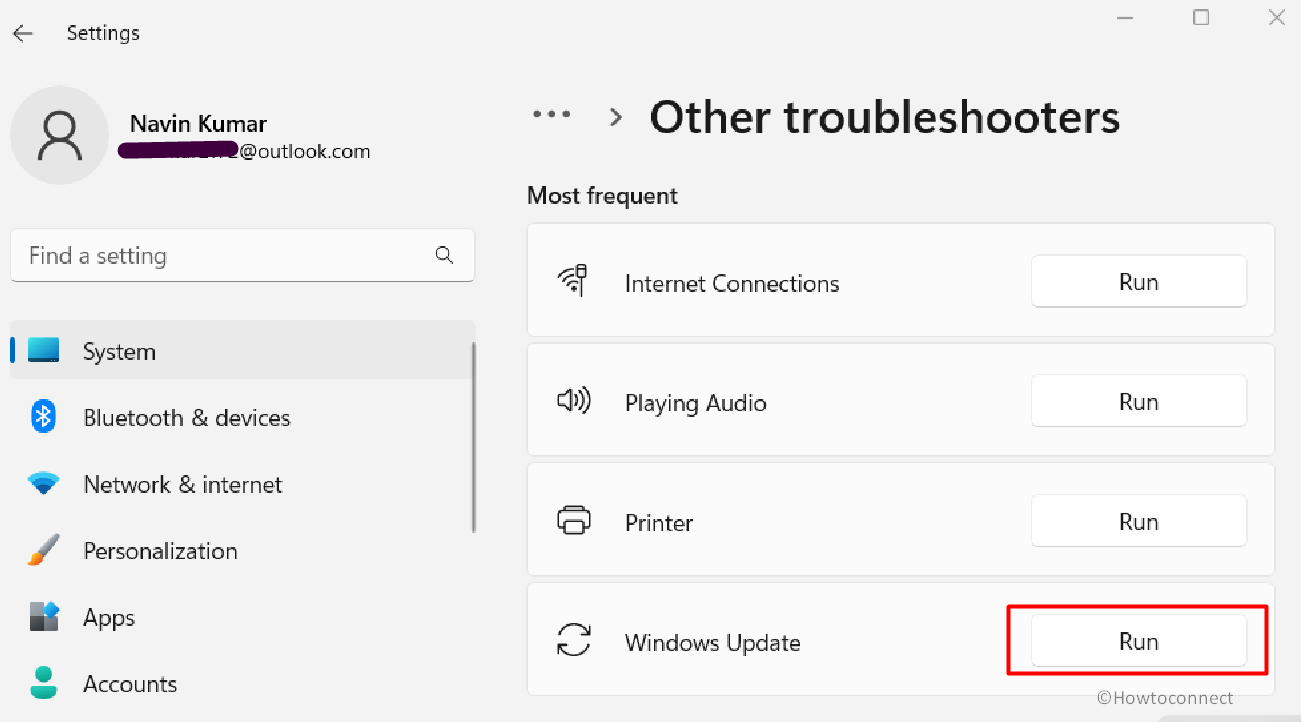
- The tool will detect problems, check for pending restarts, security settings, missing or corrupt files, missing or faulty Service registration, DynamicProtectionPlugin, BinaryHealthPlugin, and more, and then repair them.
- When the troubleshooting is completed, obey the recommended fixes and restart your device.
Way-2: Install the preview update using the Standalone package
In case, you encounter problems when trying to install KB5022913, the Microsoft update catalog may be a rescuer. Using this website, you will need to manually download standalone package of the Preview update (LCU) and install it on Windows 11 22H2.
To ensure the system runs seamlessly without any glitches, it’s important to receive patches hence, follow these steps:
- Navigate to the link – https://www.catalog.update.microsoft.com/Search.aspx?q=KB5022913.
- Type KB5022913 into the Search bar and hit Enter.
- Look for the proper version in the result list and click on Download.
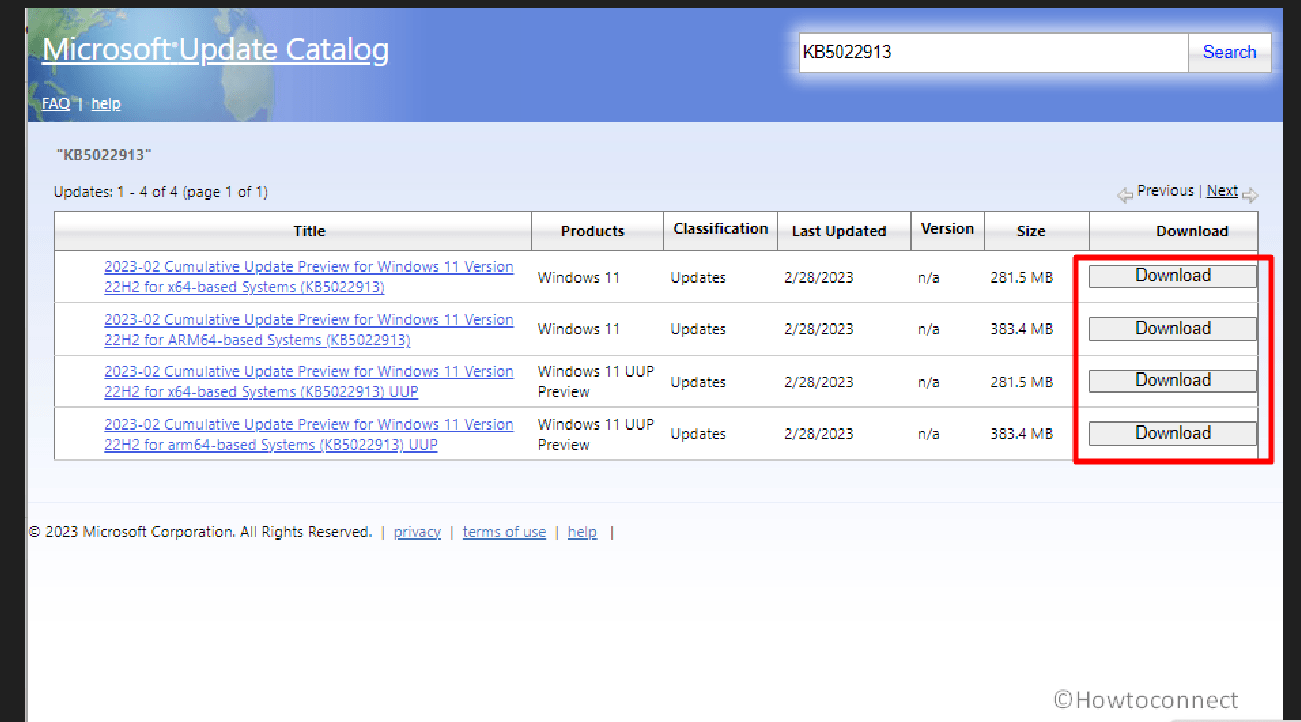
- Then click on the link showing on the pop-up window.
- Double click on the .MSU file (Standalone package) which you have downloaded –
windows11.0-kb5022913-x64_058db040fe0858ee045c9b7ceef197a0fd899e09.msu
or
windows11.0-kb5022913-arm64_5d829a49fecaf37d9cf8691dbd801f003c49e197.msu
- If the confirmation box prompts, click on Yes.
- The system will restart a couple of times and finish the installation.
Read – Windows 11 Build 22621.1343 KB5022913 update with mass of new features.
Way-3: Work on corrupted components with SFC and DISM
When you’re facing difficulties in installing a Windows Update, the root cause of the problem could be file corruption within the system files, and it’s advisable to troubleshoot the issue. Therefore, KB5022913 failed to install problem must be fixed as this may hamper the essential functions and trigger unnecessary lags.
The solution involves using System File Checker (SFC) and DISM, which are capable of identifying and repairing any corrupted system files and issues in the .wim format.
- Click on – Start.
- Type – cmd.exe.
- Select – Run as an administrator.
- On the UAC popup, please choose Yes.
- Type the cmd command –
sfc /scannowand hit enter. - After the tool has completed its function, kindly restart your computer and verify whether the update error has been resolved.
- In case, KB5022913 installation problem persists, run the commands sequentially:
dism /online /cleanup-image /checkhealth
dism /online /cleanup-image /scanhealth
dism /online /cleanup-image /restorehealth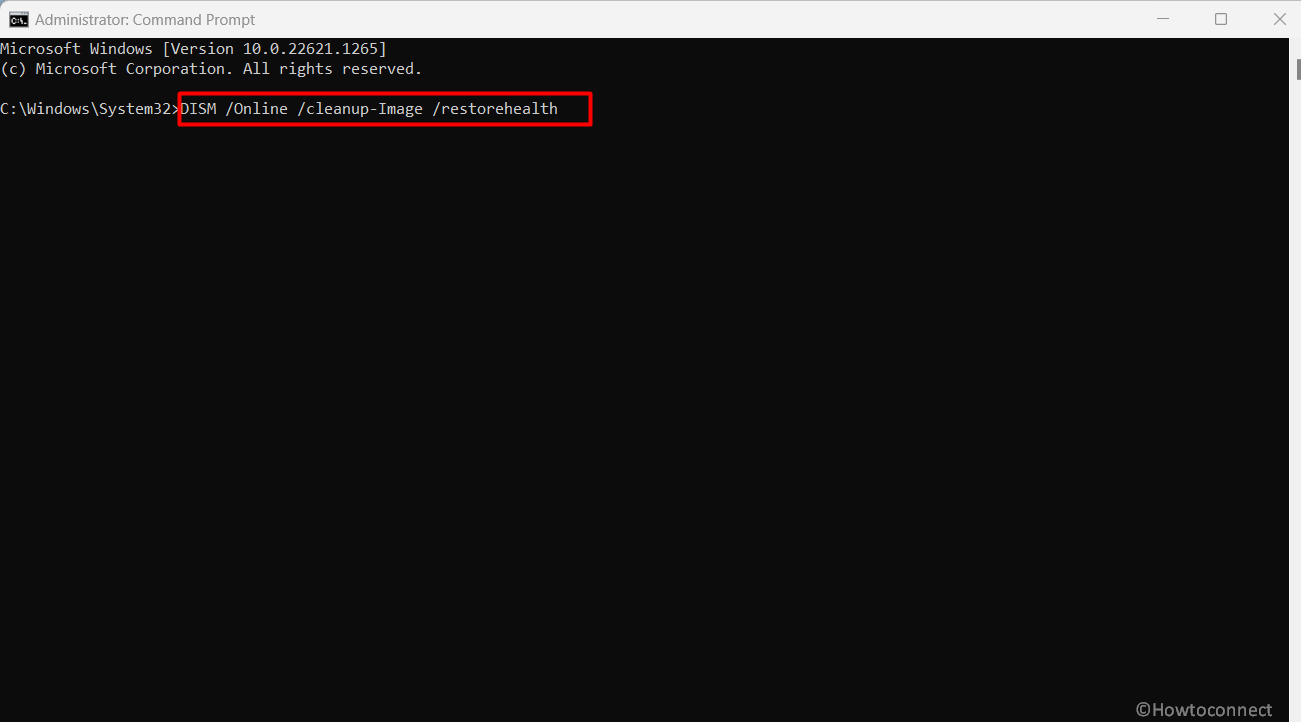
- In the end, restart your computer.
Read – SFC /Scannow, DISM.Exe, CHKDSK Windows 10.
Way-4: Uninstall Third-Party programs and antimalware as well
The main function of third-party antivirus software is to safeguard your PC from potential threats and remove harmful viruses but sometimes, it creates misperception of Windows updates as threats. As a result, KB5022913 failed to install with some error code occurs.
Apart from this, the installation of an antivirus or security software on a device could potentially impede the improved performance that the update provides. Deploying the update may become impossible if the system has overly stringent security measures that interfere with the server connection. Hence, use the following guide to fix the issue:
- Press Windows and R keys.
- Type – appwiz.cpl.
- Click on OK.
- Go through the list and search the antivirus or third-party software.
- Select the found program.
- Click on – Uninstall.
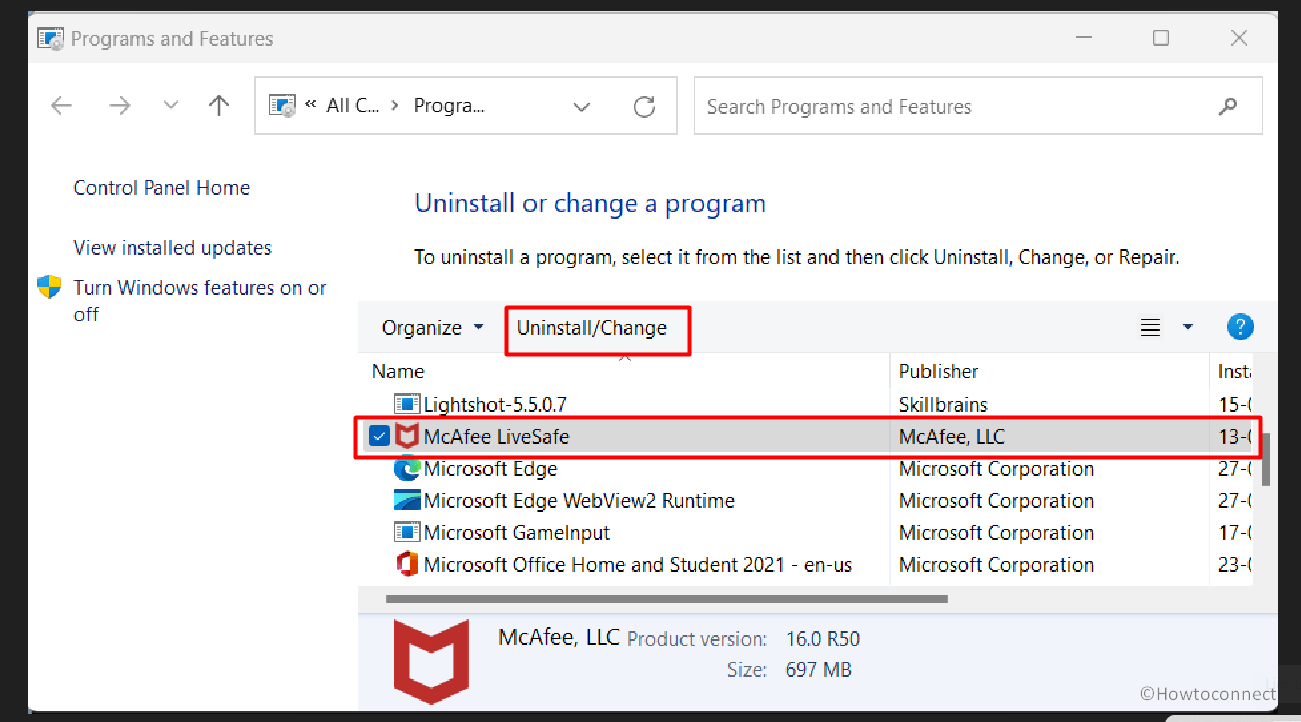
- Approve the process by selecting Yes.
- If any installation wizard opens, follow the instructions on that until completion of the process.
- Repeat the steps if more third party programs are available in the list.
- Reboot the computer and check if the problem no longer occurs.
Way-5: Reset the Windows Update cache to fix KB5022913 error
Windows Update database cache is the collection of files downloaded in the form of patches and builds so if you’re getting KB5022913 failed to install issue, so reset can be helpful as it removes the problematic data and replaces it with freshly downloaded files.
- Download Reset_Windows_11_update.zip.
- Right-click on the zip file and select – Extract all.
- Browse the unpacked file and reach WuReset.bat file.
- Then, right click on this and choose – Run as administrator.
- On UAC, click on Yes and when the Command Prompt asks to press any key to continue, hit on your favorite one.
- Stay some time with patience until the procedure is completed, and then reboot your computer.
- Now, go to Settings => Windows Update.
- Click – Check for updates.
Reference – How to Reset Windows Update to Default in Windows 10.
Way-6: Modify BITS, CryptSvc, and Windows Update Status and Startup type
Several services like BITS, CryptSvc, and wuauserv have the roles to assist Windows update files download, and install. In case, these services are not running or configured properly, restarting them could help to fix KB5022913 failed to install –
- Hold the Windows key down, then press S.
- Type – services and hit Enter.
- Locate Background Intelligent Transfer Service (BITS) in the Name column.
- Then, right click on this and choose – Restart.
- In case, the Status of this service is not showing “Running”, then double-click on it.
- Navigate to the “Startup type” dropdown and click on – Automatic.
- Under the Services status, click on – Start.
- Finally, select Apply and then OK.
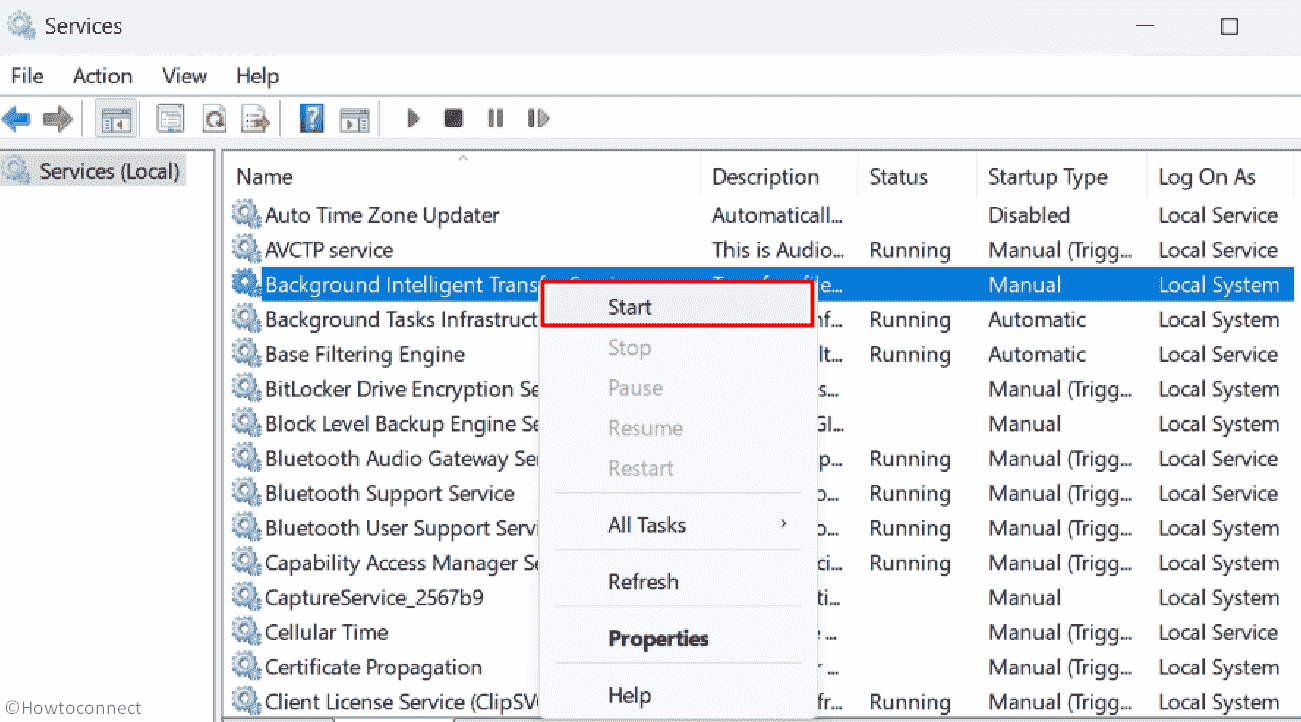
- Duplicate the same steps to Windows Update and Cryptographic Services.
Way-7: Use surefire In-Place Upgrade
In-Place Upgrade will fix KB5022913 failed to install with error, such as 0x800f081f for sure. The procedure will upgrade the existing version of Windows 11 to the most recent one without modifying server roles, data, and configurations.
Keep in memory to disconnect the peripheral devices like mouse, USB drive, printer, speaker, and so on from your computer or laptop before starting the upgrade.
- Head over to the official website – https://www.microsoft.com/en-in/software-download/windows11.
- Click on “Download Windows 11 Disk Image (ISO)” from the lower part of the page.
- Select the drop-down that reads – “Windows 11 (multi-edition ISO)”.
- Then click on – Download.
- Choose your suitable product language.
- Select – Confirm.
- Next, click on 64-bit Download.
- Right-click on “Win11_22H2_Language_x64v1.iso” and choose Mount.
- Double click on the setup.exe file.
- Then, select “Yes” on UAC for providing authorization.
- Once the “Install Windows 11” wizard appears; click – Next.
- On the license agreement window; select – Accept.
- The setup will scan for free space on the computer and show “Ready to install” window.
- Check the radio button for – Keep personal files and apps.
- In the end, click on – Install.
Methods:
Way-1: Use Windows Update Troubleshooter first
Way-2: Install the preview update using the Standalone package
Way-3: Work on corrupted components with SFC and DISM
Way-4: Uninstall Third-Party programs and antimalware as well
Way-5: Reset the Windows Update cache to fix KB5022913 error
Way-6: Modify BITS, CryptSvc, and Windows Update Status and Startup type
Way-7: Use surefire In-Place Upgrade
That’s All!
