Sometimes, when Windows 10 laptop starts throwing unexpected noise you should be clear that hardware is the main reason rather than software. But you can control the device’s issue with proper management of processes and programs. The weird sound may be rattling, buzzing, grinding or other and varies from a smaller scale to large depending upon device and brands. Usually, this problem occurs because of the overheating of the computer carrying out a bulk of processes.
Furthermore, a laptop becomes noisy due to a variety of reasons like outdated BIOS, unclear vents to pass the air or dirty fan for cooling the device. Such trouble on a PC can be serious in the long run and cause a wide range of harm if not fixed. Therefore today, we will show you some effective tips to resolve this issue in the below write up.
Laptop Making Rattling Noise
Here is how to fix laptop making rattling noise in Windows 10 –
1] Adjust the computer power settings
Excessive Power consumption can be harmful to computer load if not adjusted properly. Such an issue leads the device to overheat and at that time, any more additional load on the attached fan causes a rattling noise. In order to minimize the sound, you should reduce the power consumption and ensure that fan is keeping the internal temperature equal to or less than 86° F or 30° C. To accomplish the task, guidelines are as follows –
- Go to the right side of Taskbar and make a right-click on the battery icon.
- Choose Power Options.
- On the next window, click on the link Change plan settings located beside Balanced (recommended).
- From the consequent page, click Change advanced power settings link.
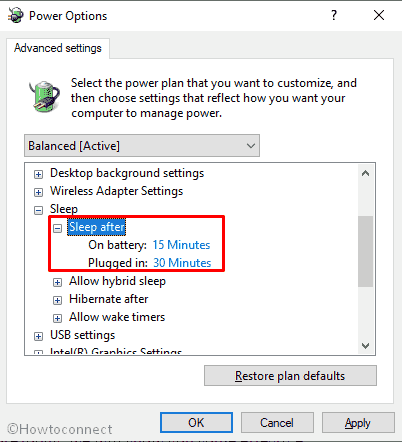
- When a new pop-up wizard appears, expand Sleep option.
- Do double-click on Sleep after to expand it and set the time to 15 Minutes beside On battery.
- In the same way, set the time 30 Minutes for Plugged in.
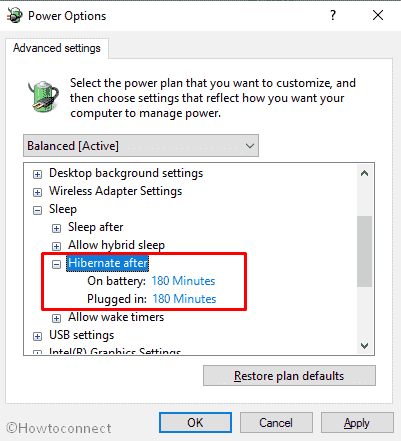
- Now expand Hibernate.
- Change “Hibernate after” time to 180 Minutes for both the On Battery and Plugged in options.
- Once done, click on the Apply button followed by OK.
- Close all the windows and restart Windows 10 to make these changes effective.
2] Clean up air vents to fix laptop making rattling noise in Windows 10
Dust particles and debris are more likely to get accumulated around air vents in computer and block the passage over time. This restricts the hot air to go out and to be circulated within the device around the fan. The result is again overheating and this time, even more as the passages are clogged and the air is hotter. Thus, laptop making rattling noise in Windows 10 can happen unless you clean up those vents using the below instructions –
- Shut Down the Windows 10 machine first.
- Remove any obstacle or object nearby the device.
- Make the laptop upside down and remove the dust from vents using a vacuum.
- Power On the laptop and place it on a hard surface such as a desk or table.
Important – Avoid keeping the laptop on a cloth surface, a couch or a bed cover as the fabrics can block the vents in the period of time and you will encounter overheating of the device. This may lead to potential damage to the laptop in the long run.
3] Reduce the source of heat by increasing efficiency
When multiple applications run in a system and it needs to work with additional loads, the laptop will generate more heat. The same thing can happen when a user plays a high spec game with intense graphics. To reduce the heat generation and increase efficiency, follow the below tips –
- Change the Startup application settings and allocate which program should run after windows finish booting. For that, get access to Task Manager first.
- Move to Startup tab and close all applications as soon as you are done with a task.
- Reduce the game resolution and reduce the Graphics settings while playing if you a gamer.
- Also, close the browser tabs after the requirement is fulfilled.
4] Use Task Manager to identify corrupt processes and end them
An unnecessary or partially corrupt program consumes a huge percentage of CPU and to some extent that will vary ranging from 15-100%. Overload of this kind causes the CPU fan to run faster as even 3-4% additional load generates a huge amount of heat inside. CPU will simultaneously produce heat after being overburdened by various processes including some malware and malfunctioning software. The fan will also run continuously to reduce the heat and laptop making rattling noise in Windows 10 will take place. In order to fix the issue, we need to detect the defective processes in Task Manager and close them eventually. The steps are as follows –
- Press the Windows key and X to bring Power user menu.
- Choose Task Manager from there to launch the app.
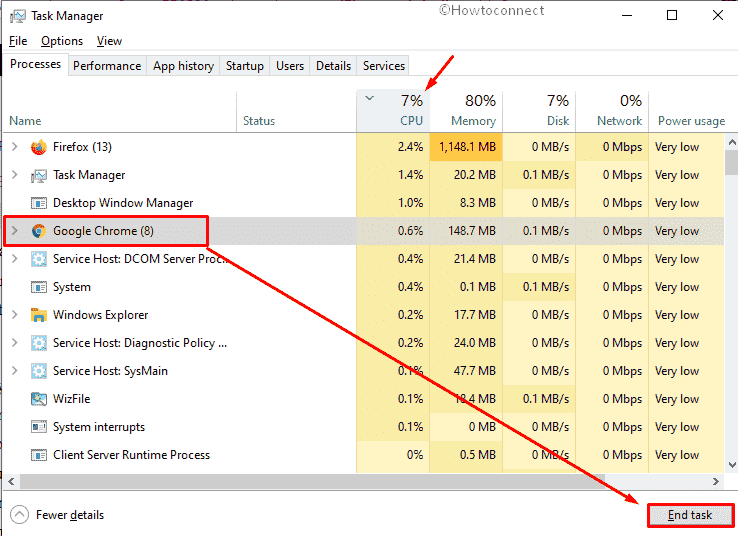
- When in the UI, click on More details if it shows fewer options.
- After the surface is readjusted, you will be in the Process tab.
- Click on the CPU column header to sort the processes by CPU load.
- If you see any suspicious process in the list, select the same and click End task button from bottom.
Important – Search on the internet to check if a program is corrupted when you think it as a suspicious one.
5] Update Graphics Card Driver to fix laptop making rattling noise in Windows 10
While playing a heavyweight game with relatively high intense graphics, the laptop will have to go through additional tasks. This extra load will overheat the device and laptop fan will continuously run in order to cool down. Often, the load becomes even higher of the graphics card driver is found to be outdated. You can easily eradicate this risk by updating the driver using the Windows Device Manager. Here are the guidelines you need to follow –
- Open the taskbar search by pressing Win+S hotkeys together.
- Type devmgmt.msc in the empty search box and eventually press Enter key.
- When the Device Manager will open up, head over to Display adapters in the console.
- Expand the same to view the driver list in the process.
- Right-click on the outdated one and choose Update driver option.
- Follow the stepwise guidelines to complete the process.
- Once finished, restart the windows to save the changes.
6] Make the BIOS updated for Windows
Sometimes outdated BIOS can be a good reason to cause laptop to make rattling noise in Windows 10. In order to fix the issue, updating the BIOS will be helpful. To accomplish this task, you need to follow the below guidelines –
- Make a combined press of Windows key and X and then select Run from the appearing Quick link menu.
- Type msinfo32 in its search box on this wizard and also press Enter key.
- When System Information window will be available on display, reach to BIOS Version/Date area.

- Note down the information shown here and close this window.
- Launch a web browser and visit the maker’s web page for your BIOS. Use the information you have collected previously.
- Once found the latest files, download the compatible ones and install them in windows.
7] Use a Laptop Cooler to reduce the load on attached fan
The laptop will produce a good amount of heat only when it will go through tremendous overload. These sorts of situations usually happen when the device is used for gaming especially and often for heavyweight tasks. Using a laptop cooler is recommended in such cases to minimize the additional heat generation. To choose a highly efficient cooler, users need to go for one having cooling base plates and are clipped on the laptop to directly suck out hot air bonkers. This will keep the device cool and reduce the load on the attached fan so that it will not make a rattling noise.
8] Clean up the Laptop fan to fix laptop making rattling noise in Windows 10
After you have tried all the resolutions above and could not fix the laptop making rattling noise in Windows 10, only cleaning the fan can be the last resort. You can do it alone obviously but it’s recommended to call a professional to avoid greater damage. In most cases, the reason can be some dust particles or hair clogged with the fan reducing airflow. Cleaning those foreign objects will definitely resolve the drawback.
In order to carry out the job alone, you may need a good screwdriver and a compressor to blow air. Take out the battery before going for cleaning to avoid static electricity and don’t forget to unplug the laptop from an AC source. After that, unscrew the access panel to uncover the laptop fan. Blow out the dust using compressed air, use a mask or cover mouth as well as nose area to avoid dust going into your body contact. Once the cleaning is over, put back all the dismantled parts with care and screw them all. Hope this will be a relief to your problem.
Methods:
1] Adjust the computer power settings
2] Clean up air vents
3] Reduce the source of heat by increasing efficiency
4] Use Task Manager to identify corrupt processes and end them
5] Update Graphics Card Driver
6] Make the BIOS updated for Windows
7] Use a laptop cooler to reduce the load on attached fan
8] Clean up the Laptop fan
That’s all!!