Here we discuss a fatal code for Windows 10, LIVE_SYSTEM_DUMP Error by name. The issue is represented by a bug check value of 0x00000161 and commonly arises as a BSOD error in the system. Primarily, LIVE SYSTEM DUMP is caused by incompatible device drivers and missing system resources. On a very important note, few more reasons like corrupted system resources due to malware infection, low disk space in HDD, outdated Windows OS, a bad ram with a bunch of memory issues in the machine and so on.
The aforementioned error message indicates that the affected system Admin requested the collection of a live system memory dump. Once affected, you may experience repeated restarting of the OS as it will feel a tendency to protect the device from damage. That’s why resolving the blue screen error will be a bit complex since the machine will hang periodically. However, simple tips and tricks can save you from the dangerous consequences.
LIVE_SYSTEM_DUMP
Here is how to fix LIVE_SYSTEM_DUMP Error in Windows 10 –
It’s not obvious but probability says, you might come across a forceful restarting of Windows when going for deploying a workaround. That might be accompanied by further loss of data and system corruption as well. Therefore, being on the safe side, you will have to disable the auto-shutdown of Windows first. The below steps will help –
- The first task is to save and close all the ongoing process as a caution to lose them unintentionally.
- Once done, press Win+D key and proceed to desktop directly.
- Right-click on This PC Icon and choose Properties option from the visible slide.
- This action will power up a System Window, select Advanced system settings lying on the left pane.
- Wait for a moment and you will be redirected to a System Properties Window, precisely in the Advanced tab.
- Move out to the bottom here in this tab and click on Settings located in the Startup and Recovery area.
- Upon opening another new window, move on to the System failure area.
- Uncheck the box beside Automatically restart.
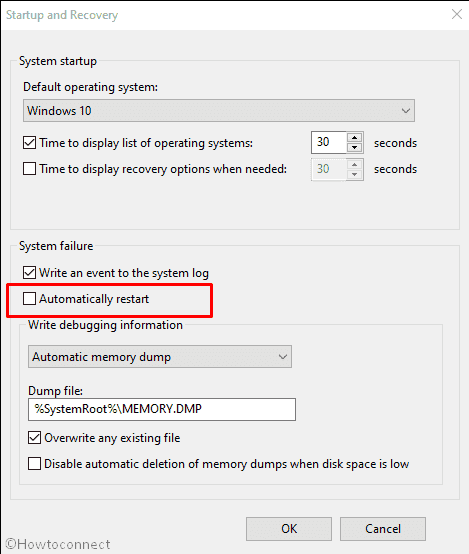
- Finally, select the OK button at the bottom end to save these changes.
Expected that, Windows will not restart automatically anymore as this tweak is effective. Therefore, you can work without any interruption to fix LIVE_SYSTEM_DUMP BSOD.
1] Install the Latest Version of Windows
Every now and then, you will have the latest patches and major updates from Microsoft carrying recent features and bug fixes. It’s actually necessary to keep the device updated installing those. Some of the patches contain powerful tools to fight with Windows 10 blue screen error like LIVE_SYSTEM_DUMP.
Microsoft has made Windows update procedure autonomous to make the process smooth. However, often this gets stuck as for poor internet connection and gets distracted. To avoid creating any more unwanted issues, it’s better to have a manual update by following below process –
- Press Windows and I keyboard shortcut, thereafter, select Update & Security.
- On the next page, pass to the right pane and hit Check for updates button even though the page shows You’re up to date.
- Click on Download if any patch is available.
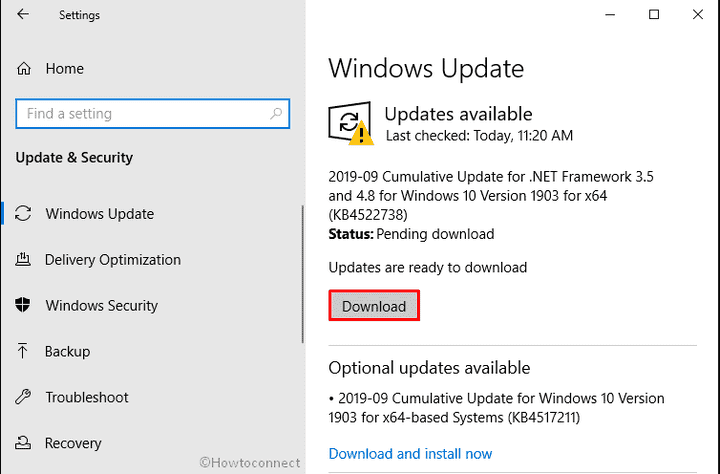
- Don’t terminate the process and stay with the device until the installation process finishes as the system may ask to restart Windows 10 several times.
2] Boot Windows 10 in Safe Mode to fix LIVE_SYSTEM_DUMP
No matter how dangerous an issue is, simple tweak such as booting in Safe Mode sometimes serves the best to eradicate major Windows 10 problems. This is a very old process where Windows loads only basic applications so that you know if any third-party service is causing bug check code 0x00000161. Here are the guidelines –
- Open Taskbar Search by pressing Windows and S keys together.
- In the visible search box, type msconfig in it.
- Choose System Configuration when showing up in the result.
- When the wizard comes in, transfer cursor to the Boot tab.
- Roll on to the lower half in the window where you will find Boot Options.
- Proceeding forward, mark the checkbox saying Safe Boot to activate grayed out options.
- On the proceedings, choose Minimal.
- Select the Apply button and then OK to save the changes.
- Leave this window and perform a reboot in a prevalent method.
- At the moment, when the device is booting at startup, keep pressing the F8 key continuously.
- When the Advanced boot menu appears, choose Safe boot option from here.
- Enter into the Safe Mode on the successive move.
3] Deploy Windows Blue Screen Troubleshooter
Blue screen error LIVE_SYSTEM_DUMP with bug check code 0x00000161 can be fatal once stays in the system for a prolonged period. Microsoft has discovered a new tool to eradicate this issue called Blue Screen Troubleshooter that has been released with Windows 10 Fall Creators update.
Previously this troubleshooter was available in the Windows setting app but for some uncertain reason, Microsoft shifted it to Control panel. Also, Microsoft has launched a web page from where you can access the tool directly. Here is how to run it –
- Navigate to Microsoft site which includes a troubleshooter for blue screen error.
- Scroll down to reach When did you get the error? segment.
- Call to mind when you get LIVE_SYSTEM_DUMP for the first time.
- Thereafter, either select the radio button of After an update was installed or While using my device.
- The system will now proceed with advance steps moreover offer helpful links to eradicate the blue screen of death.
4] Eliminate existing Malware to fix LIVE_SYSTEM_DUMP
Though with the advancement of internet-based development we have got a new era of communication, unfortunately, the security system is no longer a safe one. While surfing on the web, you become easy prey to viruses by clicking any link you are not supposed to.
In this way, bugs manage to enter into the system. Eventually, they deteriorate the system files and some go missing as well. The ultimate effect is LIVE_SYSTEM_DUMP in Windows 10. The only way to safeguard is to clean the threats and for that nothing can be better than Windows Security. Here is how to move on –
- Click on the arrow symbol from the right side of the taskbar and select the Shield icon.
- In a second, Windows Security will appear on display.
- From the visible app area, select Virus & threat protection from the left pane.
- Jump to the corresponding side and perform a click on the Scan options link.
- In the progress, hit the radio button before Full scan.
- Now, click Scan now option and let the process begin.
- After the detection gets over if the tool provides a list of malware, then choose the Clean threats option.
- From the consequent page, select Remove followed by Start actions.
- After the end of the method, all the malware will be deleted and the system will be safe.
5] Uninstall Applications engage in collision
When you have some sorts of similar applications in the machine, they have the same components inside, hence, they often engage in collision with one another. The results can be a little dreadful as so many important components go missing. To some extent, LIVE_SYSTEM_DUMP blue screen error prompt as well. As to eliminate the probability, you will have to uninstall a few of them if not necessary. The easier way to remove an application is as follows –
- Press the Windows key and click on the cog icon to access the Settings.
- Head to Apps category and select the same.
- Jump to the adjacent right of Apps & features page and find out applications colliding in the list.
- Select one and hit Uninstall from the extended pane.
- If UAC asks for permission, click on Yes to proceed.
- Follow the on-screen guidelines available next to remove the application completely.
- Now reboot the device and upon powering up, check for LIVE_SYSTEM_DUMP.
- If resolves, you can opt for downloading those programs if necessary.
6] Update drivers using Device Manager
To run the Hardware in good order, drivers play a top-notch role. When there is something wrong with the driver, Windows 10 eventually appears sluggish which slows the system and eventually crashes. Most of the time, we often ignore updating them and they continue running in outdated conditions.
Henceforth, there are various notorious issues that are upfront including the Blue screen of death with abnormal bug check code. To maintain them in healthy conditions, you need to update them and usually, the process in Windows 10 is autonomous. However, if the automatic process doesn’t help, you can directly proceed with the Windows Device Manager. The guidelines are as follows –
- Invoke Run dialog making a combined press of Windows+R keys.
- In the empty text area provided, type devmgmt.msc.
- Hit the OK button located beneath the box.
- Once the Device Manager becomes visible, look closely in the console.
- If you see any device having a mark of exclamation, expand the same by double-clicking.
- Thereafter, right-click on driver having Yellow sign and select Update driver option.
- Next, opt for Search automatically for drivers.
- In case of not getting any update available for this specific driver, you have an alternative method as well. Visit its manufacturer website and look if any newer version is available. When you find a compatible one, download and install the same.
- Perform the same for each driver listed under the device having a yellow warning sign not to mention update the items that seem suspicious to you.
- After completion, restart the Windows 10 desktop so that the changes can take effect.
7] Detect and resolve the Bad RAM issues including Memory problems
A Windows with dreadful RAM and suffering from memory issues will have plausibly LIVE_SYSTEM_DUMP with bug check code of 0x00000161. Windows had dedicated moreover useful utility to handle these issues with the Memory Diagnostic Tool. You can easily detect the problems in memory and get them fixed using the below instructions –
- Press Win+R hotkey and when the Run dialog arrives, insert mdsched.exe in its text box.
- Next, click on “Restart now and check for problems (recommended)“.
- Windows will now restart itself and after completing the 1st cycle of rebooting, a blue screen will appear detecting memory issues.
- When the progress hits 100%, Windows 10 will reboot once again.
- When the system powers up, check the result of diagnosis in the System tray- notification area.
8] Recover DLL files and fix corrupted system resources
Windows System components are core elements and they maintain the OS in a healthy condition, thus the system stays free from any hitch. Apparently, there is no way these files can go missing or get corrupted. But there is always an exception like a virus attack or collision between similar programs. In absence of these elements, the system feels a tendency to get affected with LIVE_SYSTEM_DUMP Error in Windows 10.
To recover corrupted system components, dll files, missing core elements, Microsoft has delivered a top-notch utility namely System File Checker. With the use of a command tool “sfc /scannow” in an elevated command prompt, you will get direct access to this handy tool. Here is how you may proceed to deploy the tool –
- Type cmd.exe in empty Windows search bar.
- When the results appear, right-click on Command Prompt.
- Select Run as Administrator option from the menu.
- Hit Yes once a UAC prompt for permission.
- Insert following command and press Enter key –
Sfc /scannow
9] Remove faulty Windows Update Files
We may have cumulative updates, preview builds, Tuesday patches quite regularly but all of them might not be useful. Some appear buggy and faulty while abnormal termination of an Update process can forcibly cause them to be corrupted as well. These files finally incur BSOD errors like LIVE_SYSTEM_DUMP.
Usually, Microsoft releases fixes for bugs and issues but the improper installation of them might harm the system. The process being a little lengthy, we urge you to delete downloaded Windows update right away rather than waiting for the new patch.
- Right-click on the Start button and choose Settings.
- Click on Update & Security.
- Shift to right surface of appearing page and hit the option View Update history.
- Click Uninstall updates link.
- Opt for the most recent received patch and right-click on the same followed by choosing Uninstall.
10] Check for Hard Disk error to fix LIVE_SYSTEM_DUMP
Poor system maintenance, corrupted software as well as a failure of hardware accessories can cause faulty area in HDD. This issue eventually becomes risky when a BSOD error shows up in the system. To fix these areas, Utility named Disk error Checking Tool comes super handy and you can easily execute it in Elevated Command Prompt. The process is as below –
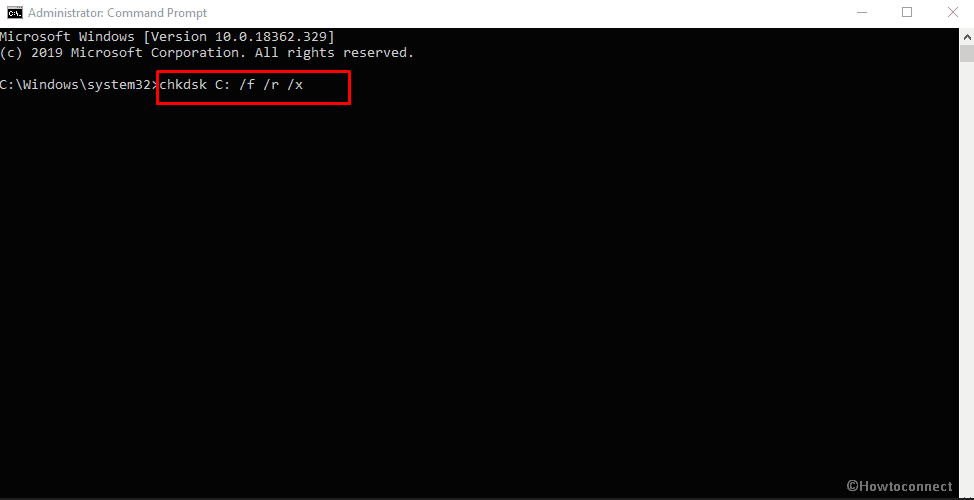
- Click on Start icon and type cmd.
- Press “Ctrl+Shift+Enter” simultaneously to open the Command Prompt with admin privilege.
- Click on Yes when a User Account Control asks for permission.
- Type the following command and then hit Enter key –
chkdsk C: /f /r /x
11] Clean up system junks to fix LIVE_SYSTEM_DUMP
The system is very much likely to form Temporary files when a program becomes unable to share out enough memory for the tasks it needs to perform. Despite serving necessary purposes, they sometimes, cause the machine to slow down. At the same time, cause BSOD error LIVE_SYSTEM_DUMP as well precisely when these junk files get larger in volume. To wipe them out and clear up disk, follow below steps –
- Open Run Dialog box.
- Insert or type in the command cleanmgr and hit Enter.
- Click on OK where C: drive is selected by default.
- Hit the button says Clean up system files from the bottom.
- Again, click the OK button for Drive selection pop up.
- Check all the options lying beneath Files to delete.
- If there is something important that exists in Downloads and Recycle Bin, leave them unchecked.
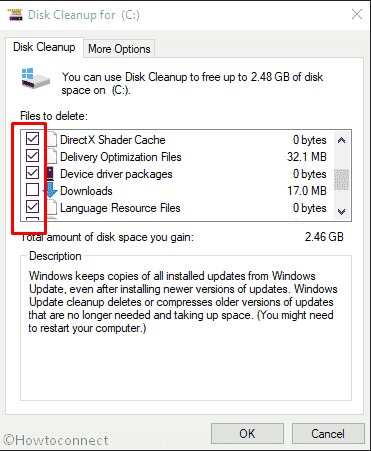
- Finally, click the OK button.
12] Rectify Defective Image files using the DISM tool
Defective Windows image files found to cause LIVE_SYSTEM_DUMP Error with bug check code 0x00000161. To fix these files, the Deployment Image tool will be useful thoroughly. You have to use a command-line tool in Elevated Command Prompt for accessing this utility. The guidelines are as follows –
- Right-click on Start menu and select Run.
- On arrival of run command, type cmd in the empty text box.
- Make combined press of Ctrl+ Shift+ Enter keys to head for Elevated Command Prompt directly.
- Type the following command after winking cursor –
DISM.exe /Online /Cleanup-image /Restorehealth
- Hit Enter to execute the Deployment Image Servicing and Management (DISM) tool to rectify all the problematic windows image files eventually.
- Don’t interrupt in between and let the process ends normally.
- Once it ends, restart the device and prior to signing back in, check if the bugcheck code 0x00000161 has resolved.
13] Repatriate external accessories connected to your device
These days, along with a computer, few accessories like printer, mouse, keyboard, extra hard drive, and scanner are very much necessary. Some people, unfortunately, have come across blue screen error LIVE_SYSTEM_DUMP just after connecting one of these. In that case, the simplest solution is to remove them momentarily and give a check for the error.
Once deported, you need to reboot the device and on being restarted, check if the error has resolved. If the accessory is culprit, the issue must negotiate with resolution and offer a smooth operation afterward.
14] Uninstall any third-party anti-malware tool from the system
Countless malware is roaming around in Web and we are no longer safe from them. As a remedy, we often use Antivirus tools offering free deals. These third-party apps are not trusted always, instead they can cause serious harm to the system including giving birth to BSOD LIVE_SYSTEM_DUMP error as well.
As we said, Windows 10 has the best anti-malware tool in it called Windows Security and you hardly need third party software here. So, you can call them end and uninstall them right way using the below guidelines –
- Press Win+X and choose Run.
- Type appwiz.cpl in the dialog box and hit Enter.
- Locate installed third-party antivirus program and click the same.
- Hit the Uninstall button that appears on the top ribbon and follow the guidelines to finish the process.
15] Run Windows System Restore to undo recent changes
Sometimes, we make changes in device knowingly and unknowingly quite a lot, thus many things are tweaked. After such changes, Windows may act differently and show up LIVE_SYSTEM_DUMP Error. One simple solution to get rid of the notorious issue is to revert those changes and get back to the previous point using System Restore.
- Press Win+S together to call up taskbar search.
- Type rstrui and hit Enter key to let the System Restore Wizard appear.
- After displaying all the available points, select only the latest one.
- Hit the Next button to continue.
- Lastly, choose Finish to start the restoring process.
Methods:
1] Install the Latest Version of Windows
2] Boot Windows 10 in Safe Mode
3] Deploy Windows Blue Screen Troubleshooter
4] Eliminate existing Malware
5] Uninstall Applications engage in collision
6] Update drivers using Device Manager
7] Detect and resolve the Bad RAM issues including Memory problems
8] Recover DLL files and fix corrupted system resources
9] Remove faulty Windows Update Files
10] Check for Hard Disk error
11] Clean up system junks
12] Rectify Defective Image files using DISM tool
13] Repatriate external accessories connected to your device
14] Uninstall any third-party anti-malware tool from the system
15] Run Windows System Restore to undo recent changes
That’s all!!