BSOD is a critical drawback in Windows 11 or 10 that mainly appears when the Operating System is booting. When NETWORK_BOOT_DUPLICATE_ADDRESS occurs a critical process fails and the computer fails to start. Similar to all other Blue Screen errors, the setback has an identifying bug check code of 0x000000BC representing a duplicate IP address assigned to this machine while booting off a network. This bugcheck specifies that when TCP or IP sent out an ARP for its IP address, it received a response from another machine indicating a duplicate IP address. Generally, these sorts of problems are prominent due to software problems mostly, where hardware issues can be found guilty as well. From the software aspect, invalid driver issues, memory flaws, and missing system components are quite common when you go for diagnosing the causes.
NETWORK BOOT DUPLICATE ADDRESS blue screen error shouts its presence in the system by showing uncommon warning messages in the beginning. Because of lack of work around on that, the system will freeze for time being making the desktop area inaccessible, moreover, the Windows will reboot suddenly confirming that you are already affected by the hitch. The issue is a hazardous one and damnification can go beyond imagination. That’s why the mess up requires a quick repair for the successful recovery of the system.
NETWORK_BOOT_DUPLICATE_ADDRESS
Here is how to fix NETWORK_BOOT_DUPLICATE_ADDRESS blue screen error in Windows 11 or 10 –
Way-1: Install Windows updates
Windows and other supporting Operating Systems receive different types of updates following a routine from Microsoft. Furthermore, some urgent patches are being rolled out to deal with accidental issues. These Windows updates not only help to keep the OS healthy but also add features. Several people claim that the blue screen error with bug check code 0x000000BC is very protruding in an outdated Windows 10 computer. Therefore, it’s been so essential to make Windows up-to-date. Sometimes, the automatic process might end up creating troublesome issues instead. It’s recommended to accomplish the task manually following below steps –
- Press Windows and I.
- Click on Update & Security.
- From the next page, select – Check for updates.
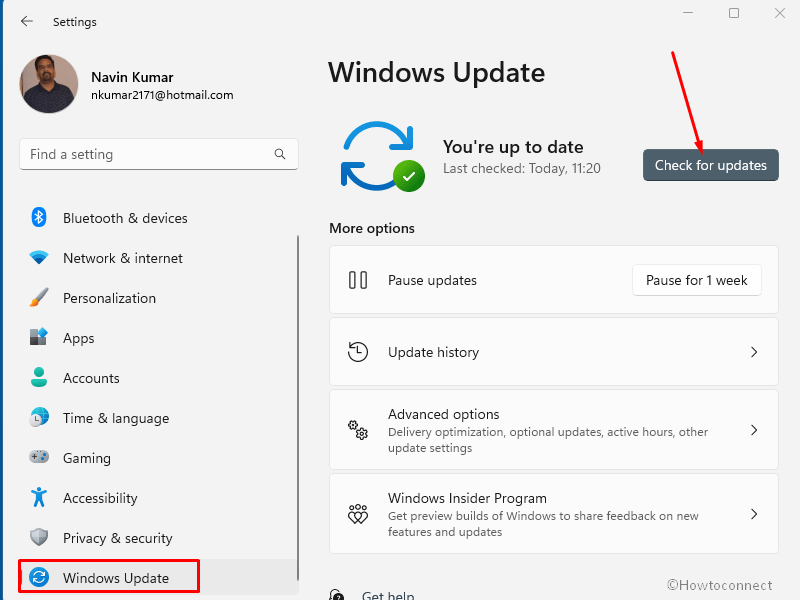
- Click on Download if any updates are found.
- When the installation is completed, select Restart now.
- The entire process may require consecutive restarting of Windows, therefore, be present in front of the machine to finish the task.
See – How to Use BlueScreenView to Detect the Cause of Blue Screen.
Way-2: Kill malware
Programs that have the attributes of replicating themselves into another one, in the process encrypt data from a system are usually treated as malware. These types of bugs are nowadays floating around the web with an intention to reave sensitive as well as precious data. These threats are very much powerful compared to before and sneak through any type of defense you use.
After they penetrate the defense line, they not only steal private data but also damage the core components and trigger blue screen error. One of the best ways to protect you is to identify the intimidation using Windows Security and kill them eventually. The default app comes with concrete features which function as malware eliminator both online and offline. Go ahead using the below process to discard existing threats –
- Click on Start.
- Type – Security.
- Press – Enter
- When the Windows Security app opens, select – Virus & threat protection.
- Click – Scan options.
- Check – Full scan.
- Select – Scan now.
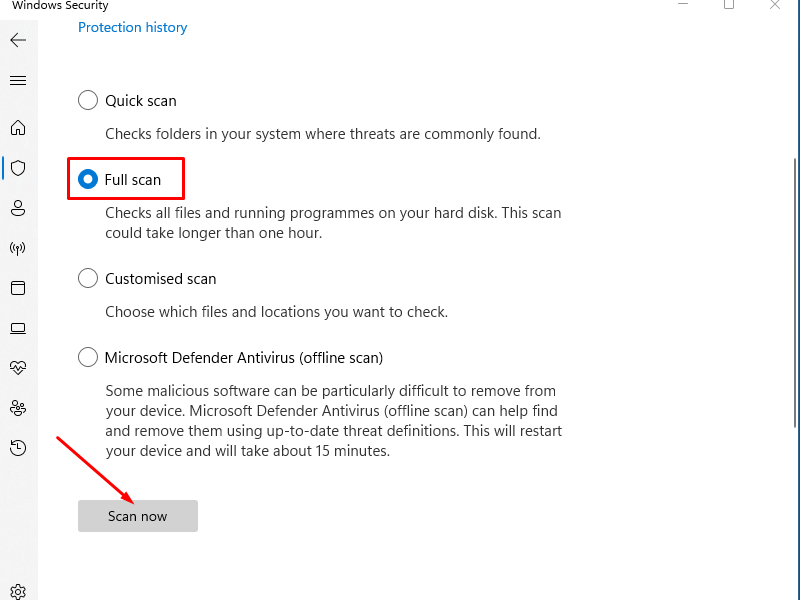
- After the detection is completed and threats are found, click – Clean Threat.
- Select Remove.
- Click – Start actions.
Way-3: Repair corrupted system components
When a well-running system experiences the absence of some essential components from the directories, it will usually feel the outbreak of blue screen error with abnormal bug check code 0x000000BC in it. There are a few reasons for which these elements can go missing such as software conflict that occurs because of the presence of threats or arbitrary codes.
When such deform occurs, you have to give try to recover them and System File Checker or SFC will be prime tool here. The utility is the best creation to refresh those core components when activated via the elevated Command Prompt. To run it, follow the steps
- Press Win+R.
- Type cmd.
- Press Ctrl+Shift+Enter.
- When the User Account Control will prompt up, click – Yes.
- Type the command line tool – SFC /Scannow.
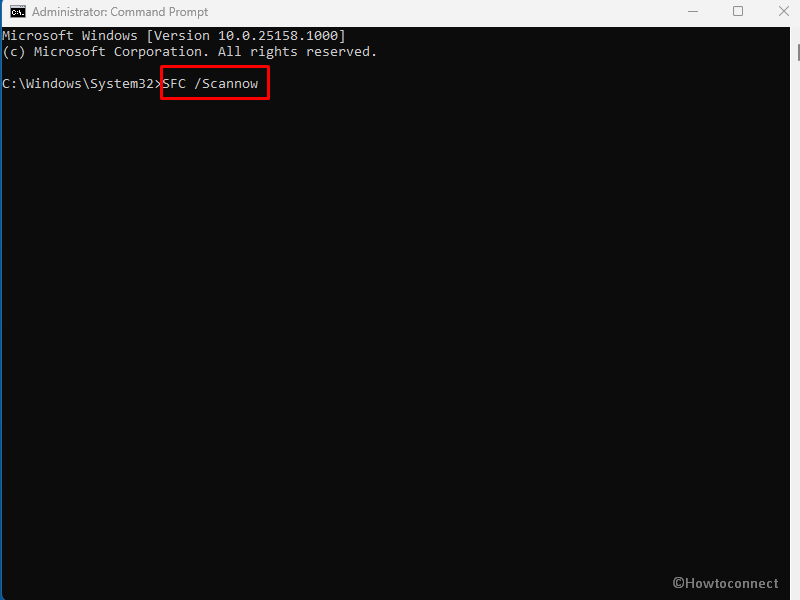
- Press Enter.
- After the action, System file checker tool will instantly start scanning to find corrupted and missing system components in the device.
- Wait until it is completed and at the end restart Windows 10.
Way-4: Disable faulty drivers
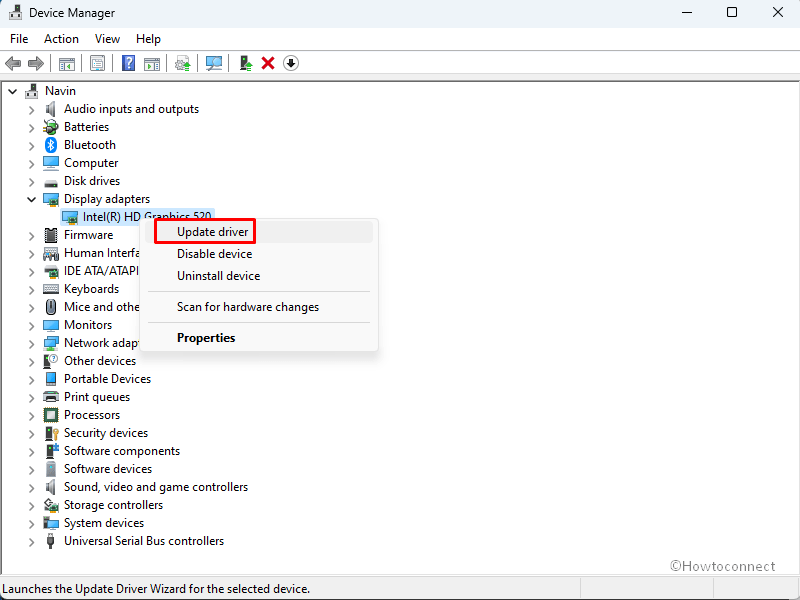
Most of the blue screen errors including NETWORK_BOOT_DUPLICATE_ADDRESS have links with the drivers. Oftentimes, a few drivers can be detrimental so badly whereas some could be installed in an invalid format. In such situations, you need to deactivate them if it doesn’t become essential. Alternatively, bringing them back to their default state is also another useful option as well. Follow the guide –
- Right-click on – Start.
- Select – Run.
- Type – devmgmt.msc.
- Hit – Enter.
- On the Device Manager that appears, go to the devices list.
- Double click on each one and find if anyone is found showing warning sign.
- Right-click on that driver.
- Select – Properties.
- On the newly opened window, click on Driver tab
- In the end, click Disable or Roll Back Driver.
- Do the same for all defective drivers that are showing warning symbols.
- Reboot the Windows 10 or 11 machine.
Take help from – Dump File Location Windows 10
Way-5: Update drivers
Various case studies are found to prove that outdated device drivers are responsible for blue screen error with bug check code 0x000000BC. In fact, these items are very much essential parts as they maintain communication between the computer bus and specific hardware accessories. Once they are found in outdated conditions, a variety of vulnerabilities show up.
Though the updating process is autonomous with Windows itself, you can proceed to accomplish the task manually to avoid related errors. The process is as follows –
- Press – Windows.
- Type – device manager.
- Press – Enter.
- Locate the outdated devices by checking the mark of exclamation on it.
- If found, double-clicking the device.
- Right-click on the outdated driver followed by selecting the Update Driver.
- Select – Search automatically for drivers.
- Repeat the same process for all the outdated drivers.
- Finally, restart the computer and let all the changes be
Way-6: Perform Clean Boot
The method of loading Windows 11 or 10 with minimal processes and settings is called Clean Boot. It generally helps in detecting setbacks like BSOD error with bug check code 0x000000BC and also enhances the device’s overall performance. Furthermore, it will also minimize the chance of software conflicts and therefore Windows 11 or 10 blue screen error can be fixed as well. The steps to perform Clean Boot in Windows 11 or 10 is as follows –
- Press – Win+Q.
- Type – MSconfig.
- Hit – Enter.
- From the System configuration window, check the radio button before – Selective startup.
- Uncheck – Load startup items.
- Now, click Services tab
- Select – Hide all Microsoft services.
- Click on Disable all.
- Go to Startup.
- Click the link located there to load Task Manager.
- On Task Manager, right-click on each program one by one and choose Disable for everyone.
- Move back to the System Configuration
- Click on Apply and OK.
Way-7: Uninstall unnecessary apps
Unnecessary programs cause several problems, including taking up a large amount of space in the disk. These apps serve a series of purposes and people generally believe in them so keep installing more. We Often find some applications in the system leading to a software collision.
The consequences of this action are too awful to afford as several Windows core components missing miss out. For a reason like earlier, NETWORK_BOOT_DUPLICATE_ADDRESS blue screen error takes place in Windows 11 or 10. To prevent, you can simply move forward with the below steps and uninstall the similar applications –
- Right-click on the Start.
- Choose Run.
- Type appwiz.cpl.
- Hit – Enter.
- On the Program and Features window, reach out to the application that you need to remove and click on the same.
- Select Uninstall.
- Click Yes on the verification prompt.
- Follow the guidelines on the screen until the program is uninstalled completely.
- Restart the device to make these changes effective in Windows.
Way-8: Clear temporary files
Temporary files such as garbage and caches are generated in a good number daily in the system as a result of common working. However, they are meaningless after serving the purpose, occupying some space in the disk as usual one. This way, a lot of area in the drive is occupied and Windows 11 or 10 runs in lack of space.
The final result is a slower operation and NETWORK_BOOT_DUPLICATE_ADDRESS error in Windows 11 and 10. Therefore when this error occurs, run your mind to Clean them as this will keep your disk healthy and free from any unwanted bugs. Disk Cleanup is popular as a top-notch tool to perform this task and you can use this by going through the guidelines –
- Click on Search from the taskbar.
- Type cleanmgr.
- Press Enter.
- Make sure C: drive is selected in the small pop-up showing.
- Click on the OK.
- On the next wizard, click Clean up system files.
- When asked to choose the drive once more, select C: again and hit Enter key as well.
- In Disk Cleanup for (C:), window, check all the options.
- Finally, click OK
- On the confirmation dialog, click on Delete.
Way-9: Update BIOS
Basic Input/Output System aka BIOS is a Firmware that, in fact, is a part of the hardware initiation at the time of booting. In addition, it has a great responsibility of providing runtime services for Windows 11 or 10 Operating System and installed programs.
BIOS is the first application to run when you boot a computer for the first time. Once this integral part of computer stays outdated, the consequence can be deadly and often cause NETWORK_BOOT_DUPLICATE_ADDRESS blue screen of death in Windows 10. To update BIOS, follow the steps –
- Press – Win+S.
- Type – System information.
- Press – Enter.
- Look for BIOS Version/Date on the System information window.
- Note down the version and date.
- Open a browser and visit the manufacturer’s website for the BIOS of your computer.
- Go to the webpage where software for your computer is stored.
- Match the version and download the BIOS.
- Double click on the fil3 install it.
Way-10: Remove buggy Windows Update files
Microsoft, as to, add improvement and fix prevailing bugs, roll out cumulative updates and patches quite regularly. All you need is to install them to Windows in time as a part of maintaining the Operating System in healthy condition.
The updating process is quite automatic and with a working internet connection, downloading and installation of the update starts immediately. However, this process sometimes gets stuck in a loop of problems and the files become dreadful. In the continuation, they are installed in the system and trigger bug check code 0x000000BC. Uninstall them using the following steps –
- Right-click on the – Start.
- Select – Update & Security.
- Click – View Update history.
- Next, click on – Uninstall updates.
- A window from the Control panel will appear, find the Windows update
- Right-click on the same and select – Uninstall.
- Click Yes on the prompt
Way-11: Detach hardware accessories
While working with a PC, have you ever imagined how it would be if there were no peripheral accessory! Life would be horrible if we had no external keyboard, wired or wireless mouse, speakers, or printers. Some people complain that they find the blue screen error in Windows 11 or 10 after using such peripherals.
The solution is really easier as only removing these hardware items will rescue the error. Therefore, remove them one by one and then reboot Windows. After booting, ensure that there is no blue screen. Update driver of the peripheral which was causing the issue.
Way-12: Fix Memory problems
Memory issues commonly occur due to bad RAM whereas some additional reasons can be attributed as well. Flaws in Memory might be the root cause of blue screen error with bug check code 0x000000BC in the system. When such setback is generated after device has fallen on the ground and RAM has bad areas in it, you may need to replace it fully. But before that, you should try out the Windows Memory Diagnostic tool to fix the problem. Steps are as follows –
- Click the Start.
- When Windows Memory Diagnostic shows up in the result, select it.
- Click on – Restart now and check for problems (recommended).
- The system will reboot and after that, a new session starts. You will notice a blue screen detecting memory issues in the system.
- Now Windows will restart itself for the second time.
- Analyze the result of Diagnosis taking from the system tray of the Notification area.
Way-13: Disable Fast Boot
Fast Boot is the combination of Hibernate and shutdown processes improving the startup time of a computer. After the Fast boot activates, it actually brings over every single process in a device to the next session. If you encounter NETWORK_BOOT_DUPLICATE_ADDRESS in Windows 11 or 10 and try to fix it after deploying a workaround, disabling Fast Boot can be included. For this, you should follow –
- Press – Win+X.
- Choose – Power Options.
- From the new window, click – What the power buttons do.
- On the next page, click on – Change settings that are currently unavailable.
- Uncheck the box set for – Turn on fast startup (recommended).
- Finally, click – Save Changes.
Way-14: Use Blue Screen Troubleshooter
What is BSOD is a pinching question that haunts users time and again. Specifically, a large number of users encounter Blue screen errors so Microsoft has made an arrangement to reduce the effect using their own technologies and as a part of this plan, Windows Blue Screen Troubleshooter is introduced.
Currently, this tool is available on a webpage which you can use in the following way –
- Click on this link and go to the Troubleshooter page.
- Once you reach it, go to Step-1: When did you get the error?
- Check the correct option and follow the upcoming instructions.
Way-15: Keep only one Anti-malware program in the System
Antimalware programs keep the system safe from potential threats and also kill them if detected after real-time scanning. Because the virus programs are nowadays quite powerfully coded, we need a trusted security program. To serve this big deal, Microsoft provides Windows Security and this is undoubtedly the best one for Windows 11 or 10.
Yet several people show interest in third-party antivirus sidewise with Windows Security. In this case, there is always a chance of software conflict leading to NETWORK_BOOT_DUPLICATE_ADDRESS blue screen error in Windows 11 or 10. To lessen this risk, you need to continue with only one security program and remove another –
- Press the Windows
- Select Apps on Settings.
- On the next page, locate the third-party antimalware tool.
- Click on it to expand the same.
- Select – Uninstall.
- Choose Yes on User account control.
- Follow the further steps as shown on the screen until the uninstallation is completed.
- Restart the Windows 10 PC upon ending the process.
Way-16: Perform System Restore
System Restore is a method to bring the current state of Windows to a previous one just like upside down when everything was fine. Generally, when a user makes some modifications on Windows such as installing a new program or removing another, the registry is tweaked.
Usually, Registry is a super-sensitive integral part of Windows and any incorrect entry may mislead the whole system to have BSOD with bug check code 0x000000BC. To avoid this problem, the best remedy is to load back to the previous state of Windows where there was no BSOD.
- Hold down Windows key and hit R.
- Type rstrui
- Press – Enter.
- System Restore will open up on display immediately; check Show more restore points.
- Click – Next.
- Select the latest point
- Again click Next.
- Finally, select Finish.
- from the next page and start restoring process.
Way-17: Boot System to Safe Mode
Windows from the beginning is accustomed to being affected by bugs and threats from time to time. Some problems are easy to resolve while few were headstrong and hard to fix. Thankfully, in every case, one solution which acts as savior is Booting in Safe Mode. The method starts with a new session of Windows running only essential processes. Here are the steps to enter into Safe mode –
- Press Win+Q.
- Type MSConfig.
- Press Enter to launch System Configuration.
- Click on Boot tab.
- Check Safe boot followed by Minimal.
- Click on Apply and then OK.
- On the warning dialog, select Restart.
Way-18: Check the hard disk’s bad areas
Hard Disk is an essential part of a computer that needs to be maintained in healthy conditions all the time even after using it for quite a long period. If you leave it neglected, some bad sections might be formed inside that cause blue screen error.
To keep the hard disk in good condition, there are several methods while only one tool can fix the bad areas in it. The utility is named Disk Checking tool and it will only work on the system when run in elevated Command Prompt.
- Click the taskbar search.
- Type cmd.
- Right-click on Command Prompt.
- Select – Run as Administrator
- Click ”Yes” when UAC prompts.
- Type the following command tool – chkdsk C: /f /r /x.
- Press Enter key
- The Disk Checking tool will now locate bad areas present in HDD or SSD and eventually fix them automatically.
- Once completed the task, reboot the Windows 10 PC, and hopefully, you will not come across the error from the next session.
Way-19: Fix the corrupted Windows image files
Windows image files are part of ISO and they are delivered before a major update is released. When these files are corrupted, there is a chance of having NETWORK_BOOT_DUPLICATE_ADDRESS blue screen error in Windows 11 or 10. A very super handy way to repair these files is to use the DISM tool.
- Open Command prompt as administrator.
- Copy-paste the command – DISM.exe /Online /Cleanup-image /Restorehealth
- Press Enter.
- The utility will start detecting corrupted Windows image in the system and repair them accordingly.
- Once the process ends, reboot the device.
Way-20: Use the Windows Automatic Repair tool
Whenever a problem like blue screen of death is generated in the system, Automatic Repair becomes active by Windows in the third boot. Subsequently, several troubleshooting programs start working to detect the actual problem. Because a lot of tests are running; this process may be complex and time-consuming where you have already known the issue. So, you can try Automatic Repair manually using below steps –
- Open Windows Settings app.
- Select the – Update & Security.
- Choose – Recovery.
- Move to Advanced startup section and click – Restart now.
- After Windows finishes rebooting, navigate to – Troubleshoot => Advanced options => Startup Repair.
- When the Automatic Repair page comes into the view, provide your Microsoft account credentials.
- Lastly, click Continue.
Bonus tips
In most cases, the above repairing processes are effective when you deploy them perfectly. But the administration can be hampered as Windows go for consecutively rebooting when affected. If the same occurs with you, try making the system stable by disabling this Automatic Restart feature. Follow the steps –
- Right-click on This PC icon.
- Select – Properties.
- When the Settings app opens up, click on – Advanced system settings.
- On the System Properties wizard, click on Settings from Startup and Recovery area.
- Move on to the System failure area.
- Uncheck the box against Automatically restart.
- Lastly, click OK.
Methods list:
Way-1: Install Windows update
Way-2: Kill malware
Way-3: Repair corrupted system components
Way-4: Disable faulty drivers
Way-5: Update driver
Way-6: Perform Clean Boot
Way-7: Uninstall unnecessary apps
Way-8: Clear temporary files
Way-9: Update BIOS
Way-10: Remove buggy Windows Update
Way-11: Detach hardware accessories
Way-12: Fix Memory problems
Way-13: Disable Fast Boot option
Way-14: Use Blue Screen Troubleshooter
Way-15: Keep only one Anti-malware program in the System
Way-16: Perform System Restore and load the previous state of Windows
Way-17: Boot the System to Safe Mode
Way-18: Check the hard disk’s bad areas
Way-19: Fix the corrupted Windows image files
Way-20: Use the Windows Automatic Repair tool
That’s all!!