Even though we are living in the digital era, it is impossible to deny the significance of printers. For the same reason, we know how frustrating it is to see a message like the operation failed with error 0x0000011b when trying to print something or add a shared network printer.
Full message that shows up during the issue is, “Windows cannot connect to the printer operation failed with an error 0x0000011b”. If you want to know what is 0x0000011b then this is an error code that appears when you try to add a printer to your computer or run a print job and it fails. The causes of this shared network printer problem are Windows updates such as KB5005627, Printer Spooler service, and Dynamic IP Address. You know the problem appears when you try to connect to a printer over the internet. That means the issue may be associated with either the host (to which the printer is directly attached) or the client (from where you want to access the printer over the web). We will give you nine solutions. Do not rush into one or two to declare the problem is unsolvable. Just go through each one and follow the steps in the given manner.
Shared Network Printer Error 0x0000011b
Here is How to Fix Printer Error 0x0000011b in Windows 11 or 10 –
Way-1: Uninstall Recent Updates
You may not care about the updates getting installed in the background because they generally strengthen the security and enhances the features on the computer. However, many people have confirmed that patches like KB5007189, KB5006738, KB5006670, KB5005565, KB5005573, and KB5005568 (vary according to your Windows version) harm network printers. In case, you have installed any of these Windows updates you will undergo the printer error 0x0000011b. Therefore, uninstall them using the below steps –
For Windows 10 –
- Press Windows and I.
- Select – Update & Security.
- On the next Settings page, click on Update history from the right pane.
- Select – Uninstall updates.
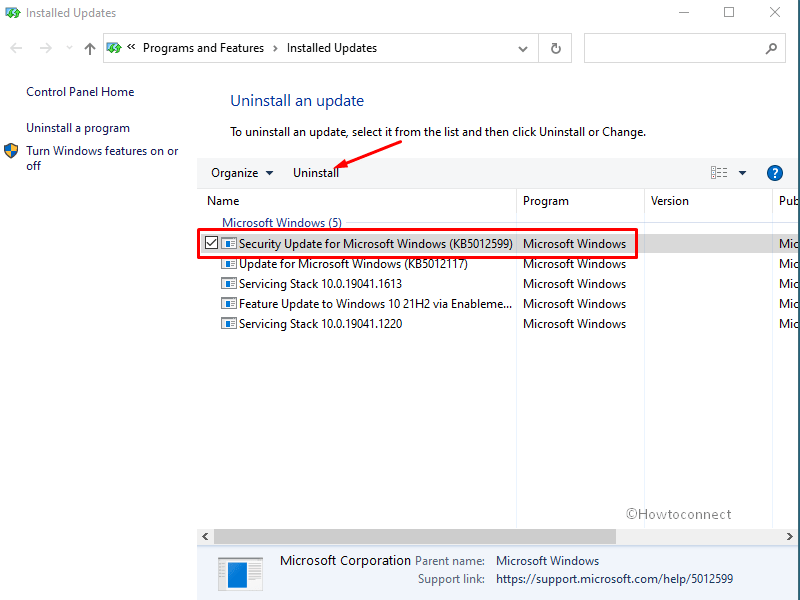
- A window opens from Control panel; find and right-click on the Installed update (Showing as KB123456)
- Click on – Uninstall.
- Choose Yes on the confirmation dialog.
For Windows 11 –
- Press – Win+I.
- Select – Windows update.
- Go to the right and click on – Update history.
- Scroll down to the bottom and click – ‘Uninstall updates’.
- Locate the update and select – Uninstall.
- Click on Yes on the confirmation dialog box.
You can uninstall the update using command prompt in both Windows 10 and 11 –
- Click – Search from the taskbar.
- Type – CMD.
- Select – Run as an administrator.
- On the UAC dialog, click on OK.
- On Administrator: Command Prompt, type
wusa /uninstall /KB:123456(Replace 12345 with your update KB number) - Press Enter.
- When you are asked to confirm; click on Yes.
Further, you should pause or block the update for the time being – Windows 10 Update Disable Tool [Download]
Way-2: Restart Printer Spooler Service
Oops, did the previous fix not work for you? Don’t worry, restarting the spooler service may do the trick to solve Windows cannot connect to the printer 0x0000011b error.
We have already given you a small introduction about the printer spooler (when talking about the causes). If the issue pertains to the same, following the steps mentioned below is the best thing you can do –
- Press Windows key+R to get the run dialog box.
- Enter services.msc into the text field.
- You will get a list of services on the main panel. Just locate Printer Spooler.
- Right-click on it and select Restart.
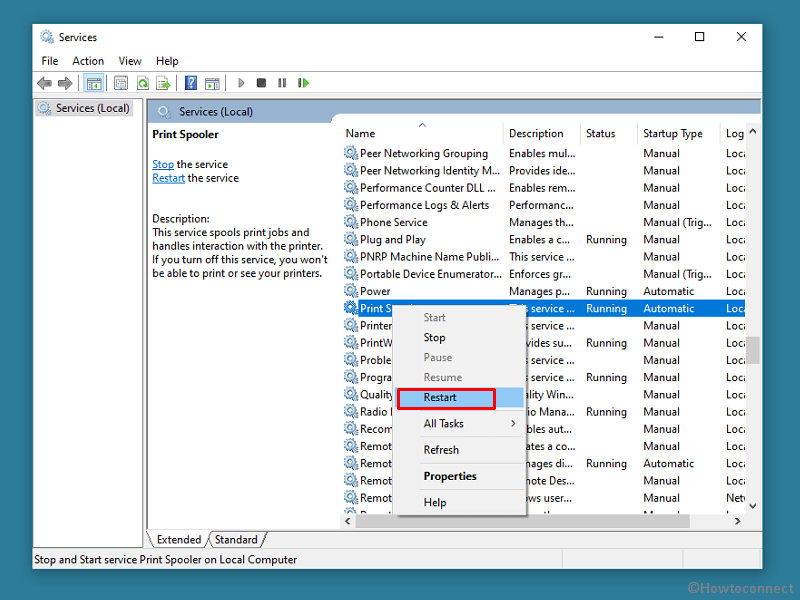
- Wait for a minute to finish the stopping procedure.
- Restart the computer to be on the safe shore.
Way-3: Add Printer Manually Using its IP Address or hostname
If the 2 solutions didn’t work, you must try adding the printer through the manual method. We hope it will solve the Printer operation failed with error 0x0000011b on Windows 11 or 10. For this method to work, you must know the IP address of the printer. See – How to Find Printer’s IP and MAC Address in Windows 10. Now follow the steps –
For Windows 10 –
- Open Windows Settings (Winkey+I).
- Select – Devices.
- From the left pane on the next page, click on – Printers & Scanners.
- Click on Add a printer or scanner from the right.
- After a while, select – The printer that I want isn’t listed.
- A window named Add Printer will appear.
- Here, you will see half a dozen options, of which the third one (Add a printer using a TCP/IP or hostname) should be your pick. Click on Next.

- Go with the prompts on the screen. You need to enter the IP address on a given field along the way.
- Hit Next and try printing the test page.
For Windows 11 –
- Click on Start and select Settings.
- Select Bluetooth & devices on the Settings window.
- Go to the right pane and click – Printers & Scanners
- Now click the button for – Add device.
- After a while, beside ‘The printer that I want isn’t listed’, select – Add manually.
- Follow from Step 6 to 9 as for Windows 10.
Way-4: Deactivate Print Spooler RPC Encryption
Having print spooler RPC encryption enabled may be a caveat on some computers. So, we are going to disable the same on both the host and the client.
- Click – Start.
- Type – regedit.
- Press – Enter.
- Select Yes on User account control.
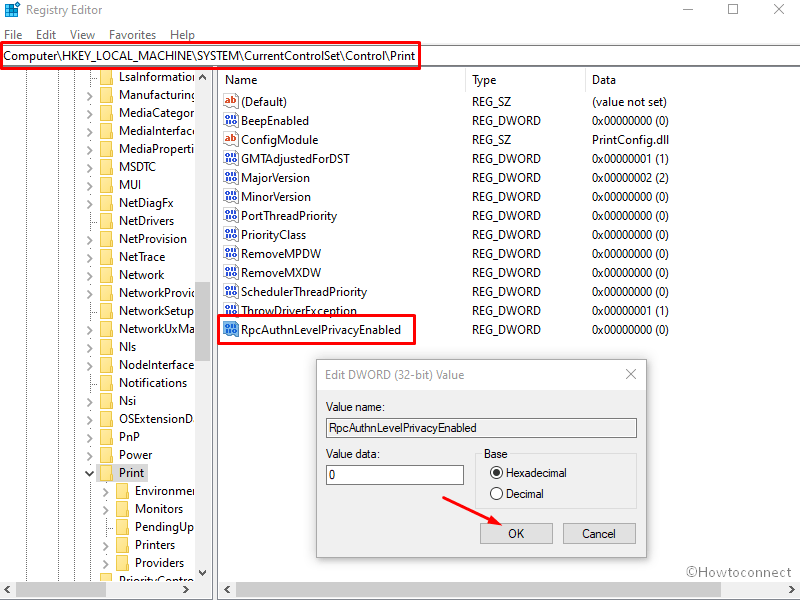
- Once Registry Editor opens, navigate to –
HKEY_LOCAL_MACHINE\System\CurrentControlSet\Control\Print
- Right-click on the Print folder and follow New >> DWORD (32-bit) Value.
- Name it RpcAuthnLevelPrivacyEnabled.
- Give the Value data as 0 (zero).
- Click on OK.
- Don’t forget to restart the system for the recent changes to take effect.
Source – Microsoft support.
Way-5: Modify Registry
This method is a Microsoft recommended solution to deal with printnightmare problem and the company suggests adding a new value to Registry. Printnightmare bug has been one of the reasons of 0x0000011b Windows cannot connect to printer error in Windows 11 or 10. However, this method will involve Registry Editor to repair the bug but you can perform the same task using command prompt more easily –
- Press Windows+R.
- Type – cmd.exe.
- Hit – Ctrl + Shift +Enter.
- Click Yes on the verification dialog.
- Copy the following command and paste it into command prompt –
reg add "HKEY_LOCAL_MACHINE\Software\Policies\Microsoft\Windows NT\Printers\PointAndPrint" /v RestrictDriverInstallationToAdministrators /t REG_DWORD /d 1 /f- Now, press Enter.
- Reboot the system and check if 0x0000011b still persists.
Way-6: Update printer driver
Operation failed with error 0x0000011b might also befall because of obsolete printer driver. Once after getting outdated the driver software becomes buggy and incompatible with the current Windows version and instead of assisting the hardware it starts fighting the system files. Result is Windows cannot connect to the printer error in Windows 11 or 10 that can be only fixed by updating the driver. So, follow the steps to do this –
- Right click on ‘Start’ located on the taskbar.
- Select – Device Manager.
- Once the Windows tool loads on the screen, look for Printer in the list.
- If not found click on View from the top menu bar.
- Choose – Show hidden devices.
- Now go to Printer and double click on it.
- Right-click on the problematic device and select Update driver.
- Select – Search automatically for drivers.
- There may be a chance where the printer is not getting updated by this method. In this case, go to the manufacturer’s website.
- Match the model number of your printer there to reach the software download page.
- Download the correct and most recent driver.
- From the download location double click on the Setup.
- Follow the onscreen instructions and complete the installation.
- Restart the PC to solve the Windows cannot connect to the printer error.
Way-7: Uninstall and Reinstall printer driver
Sometimes, mere updating the printer driver is not enough to rescue shared network printer error 0x0000011b in Windows 11 or 10 but you need to uninstall and reinstall it. Despite everything being fine with the driver, system might not support it to be perfectly installed. Reason may be power surges, glitches in system files, buggy updates, etc. Therefore, uninstall and reinstall the printer driver using the below guidelines –
- Press Winkey and R.
- Type devmgmt.msc.
- Hit ‘Enter’.
- On the Device Manager, expand Printer by double-clicking on it.
- Right-click on the culprit driver and select – Uninstall device.
- On the warning pop-up, click on “Uninstall”.
- Reboot the machine and check the status of the error.
See – How to Reinstall Printer Driver in Windows 11 or 10.
Way-8: Reset print spooler
Corrupted or incorrectly configured Print spooler services on of the root causes of error code 0x0000011b. This is the main component to control the printing jobs on WIndows which oftentimes causes issues. Luckily, you have the ability to repair the spooler by resetting it –
- Press – Windows and R.
- Copy the path for the following folder location without quotes – “%WINDIR%\system32\spool\printers”.
- Now paste it into the Run dialog box.
- Hit – Enter.
- Once a folder opens, select all the items there (Ctrl+A).
- Press – “Delete”.
- Reboot and see if the error code no longer occurs.
Read the method in detail – How to Reset the Print Spooler in Windows 11 or 10.
Way-9: Run Printer Troubleshooter
In case, the issue still persists, you must try opening up the printer troubleshooter which automatically finds issues and repairs them in a few clicks. This is a default Fixit tool and you can solve the error using the below steps –
For Windows 10 –
- Press Windows+S.
- Type – troubleshooter.
- Press – Enter.
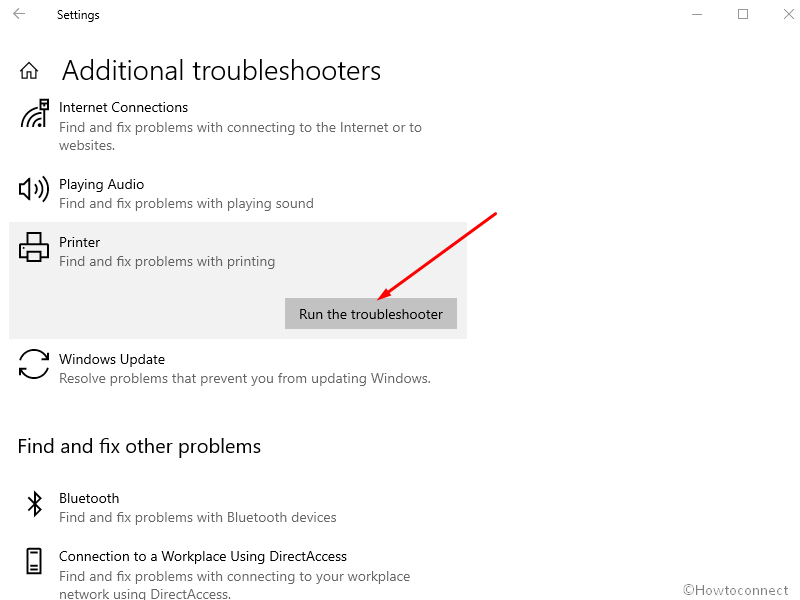
- On the Settings page that appears, click on – Additional troubleshooters.
- Click on Printer.
- Select – Run the troubleshooter.
For Windows 11 –
- Press Win+I.
- Select Troubleshoot from the right side.
- Click on – Other troubleshooters.
- In the Printer section, click on – Run.
- Finally, the tool will start detecting problems and print spooler then repair them if needed.
See – Download Printing Troubleshooter Windows 10.
Methods list:
Way-1: Uninstall Recent Updates
Way-2: Restart Printer Spooler Service
Way-3: Add Printer Manually Using its IP Address
Way-4: Deactivate Print Spooler RPC Encryption
Way-5: Modify Registry
Way-6: Update printer driver
Way-7: Uninstall and Reinstall printer driver
Way-8: Reset print spooler
Way-9: Run Printer Troubleshooter
That’s all!!