Blue Screen error is completely destructive to the windows 10 system and almost irrecoverable in most cases. PROCESS1_INITIALIZATION_FAILED is one such issue that appears and leads the computer to start bug checking. Just after that Windows 10 restart and then again repeat the same process. Bug check value for this BSOD is 0x0000006B. The problem occurs mainly due to corrupted Bootcat.cache file or often when this file is resized at the time of booting.
The initial problem you may encounter after being affected by stop error PROCESS1_INITIALIZATION_FAILED is a frequent restart and bug checking. There might be irregular flashing on the screen and freezing of the desktop area temporarily. Things will get complicated much when the Windows will start rebooting frequently leaving no option to take any action. You know well stop error or BSOD is a critical system crash leading the system resources to go missing. However, Microsoft indicated Bootcat.cache file related issues are the main reason behind this BSOD error, you have got more common causes. Driver problems mostly outdated ones, missing dll files; bad areas in hard disk, using an old edition of OS can also cause the same issue. Before the error causes much noxiousness in your Windows 10 system, let’s resolve it from today’s discussion. Starting with the Method list –
PROCESS1_INITIALIZATION_FAILED
Here is how to fix PROCESS1_INITIALIZATION_FAILED BSOD error in Windows 10 –
1] Disable Automatic Restarting feature
PROCESS1_INITIALIZATION_FAILED blue screen error forces Windows to a very critical system crash. Necessary resources tend to go missing and the Windows shuts down immediately in order to minimize the extent of the loss. Therefore, the error message will appear on display with bug code 0x0000006B and you cannot take any action to save an ongoing task. The entire system will be unstable and definitely, no can detect the cause of the issue as well as apply fix accordingly.
Automatic Restarting is a built-in feature in Windows computer and it can be disabled tweaking Startup settings. Once disabled, you can approach for deploying the workarounds and get fixed BSOD error. Here is how to disable the feature –
- Click on Start, type System properties and then press Enter.
- Select “System info” from the right pane.
- Choose Advanced system settings from the left column of the next Window.
- When the System Properties will open, jump into the Advanced tab.
- On the Startup and Recovery area, perform a hit on the Settings button.
- In the next pop up, move out for the System failure field.
- Uncheck the box that is set for “Automatically restart”.
- Finally, click the OK button at the bottom and save these changes.
2] Delete the Bootcat.Cache to fix PROCESS1_INITIALIZATION_FAILED BSOD
Windows 10 encounters PROCESS1_INITIALIZATION_FAILED BSOD once the Bootcat.Cache file becomes corrupted or resized at the startup. This is a component of CodeIntegrity and its location in Windows is “C:\Windows\System32\Codeintegrity”. In order to fix the drawback, we have to delete this file and boot the system to fully functional OS.
Here are the steps you have to follow –
- Press Windows logo key and I.
- Click Update & Security.
- From the next page, select Recovery located at the left pane.
- Move on to adjacent right side pane and reach to Advanced startup.
- Click Restart now.
- When the blue screen shows up next, choose to Troubleshoot => Advanced options => Command Prompt.
- In the Elevated Command Prompt window, insert below text –
C:
cd windows/system32/codeintegrity
del bootcat.cache
- Press Enter.
- Once deleting is done, exit Command Prompt and Restart Windows 10.
- The system will recreate the Bootcat.cache file again automatically and PROCESS1_INITIALIZATION_FAILED error will be fixed.
See if you need – Fix: bootrec /fixboot access denied in Windows 10.
3] Copy Bootcat.cache files from another computer
In case deleting the Bootcat.cache file from your computer doesn’t resolve the PROCESS1_INITIALIZATION_FAILED BSOD error, you can apply another hotfix. The idea is to copy this file from a full function and error-free computer running the identical version of Windows 10.
- Copy C:\Windows\System32\Codeintegrity, Press WIN+R, and paste the same.
- Hit Enter.
- Copy all the items from this location and place in a USB drive by pasting.
- Insert the device through a port in the system getting the error and copy all the items in the same location.
4] Disable Secure Boot
Secure Boot in Windows 10 keeps the system protected from virus attack and this is another advanced technology support working on top of the Unified Extensible Firmware Interface (UEFI). The utility is intended for ensuring the computer boot up using only trusted firmware supplied by the manufacturer.
Some users have come up with a fact that having Secured Boot enabled in Windows 10 can be dangerous as it often causes PROCESS1_INITIALIZATION_FAILED BSOD error. Usually, that might happen due to some hardware misconfiguration and in that case, you have to disable it. The guidelines are as following –
- Boot Windows 10 to Automatic Repair using guidelines from the 2nd method above.
- When the blue screen floats up, select Troubleshoot > Advanced Options.
- From the next screen, select UEFI Firmware Settings to enter into BIOS.
- Though Every OEM has its own way of showing options, Secure Boot is usually residing under Security / Boot / Authentication Tab.
- Set the Secure Boot to Disabled.
- Press F10 in order to Save and Exit.
- Restart Windows and changes will be effective immediately.
5] Install the latest patches
Outdated Windows 10 is very much likely to be affected by PROCESS1_INITIALIZATION_FAILED BSOD error especially if a released package is left uninstalled for long time. The update patches released by Microsoft always come with something new, advanced technologies, security modification, and moreover the big fixes. You might have missed out some important change and end up encountering blue screen error.
Updating the latest patches in Windows 10 is one easy task and automatic when the device is connected with an active unmetered internet connection. But often the system is out to install automatically and you need to check for updates time and again manually. Here are the steps to install latest patches to update OS –
- Press Windows key to open the Start menu and click Gear icon from there.
- From the UI opening next, select the Update & Security tile.
- After additional setting page unrolls, select Windows Update from the left pane.
- Jump to the adjacent right side and click on Check for updates link.
- After all, patches being available, click Download button.
- Installation will begins automatically upon accomplishing the downloading.
- Attend Restarting as guided to complete the updating process successfully.
6] Run a full system scan for malware
Malware is strongly coded programs staying in disguise like a usual file in the system. As the computes nowadays are always connected to the internet, the chances to get affected by spyware are a lot more. These bugs are always on the move through links in webpages, spam mails, and often via USB drives too. Though the Primary intention of a virus is to steal sensitive data and cause harm to the owner, they are responsible for corrupt system files too. Some DLL files will also go missing leading the system to undergo PROCESS1_INITIALIZATION_FAILED BSOD error.
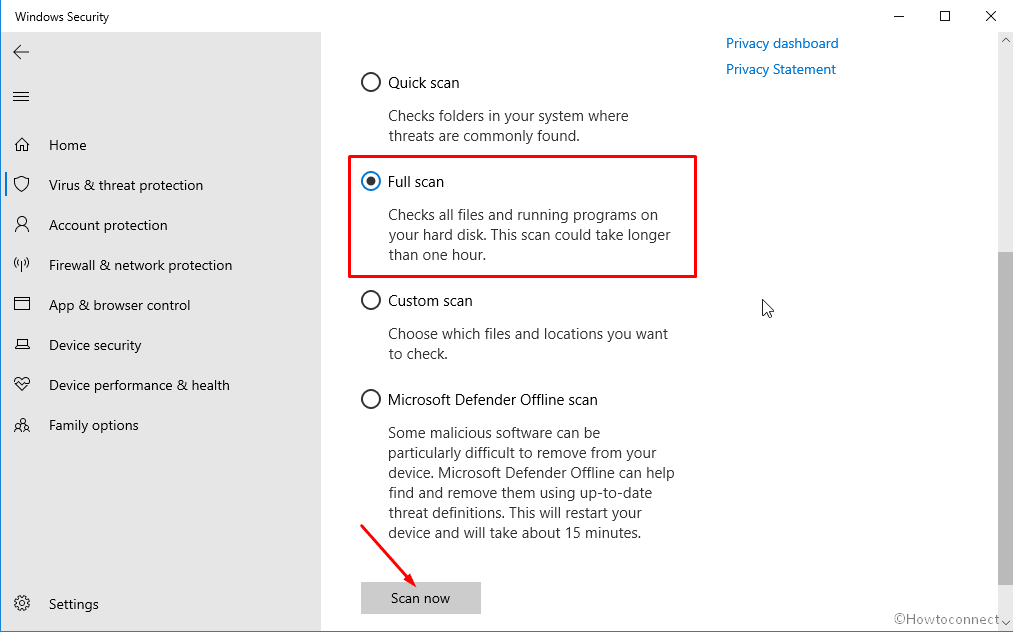
While surfing the internet, you need to be more cautious about worms, Trojans, spyware and must not click any suspicious links. Anti-virus programs keep the system secured by eliminating malware and strengthening the shield. Windows Security is the latest inclusion by Microsoft with robust architecture to provide maximum security to the system. A full system scan with this tool will help you stay out of malicious programs both online and offline. Here are the steps to run a full system scan in Windows Security –
- Open the Start menu and scroll down in the app list alphabetically.
- Click Windows Security to launch it.
- From the following window, select “Virus & threat protection” located at the left pane.
- Click on Scan options link from the right side pane.
- Choose the radio button set for Full scan and click Scan now button.
- If the tool detects some vulnerability, click Clean Threat option to get rid of them.
- On the following page, click Remove followed by clicking Start actions to clean up all the threats.
- When the process ends, Restart Windows 10 to make changes effective.
7] Copy and register ntdll.dll file
Not only Bootcat.cache file, missing some DLL files such as ntdll.dll is equally responsible for the PROCESS1_INITIALIZATION_FAILED BSOD. In order to fix the error, we can copy the same file from a secured computer and paste it to the System32 folder of affected computer.
The process is almost similar to copying the Bootcat.cache file as discussed before but you need to register after pasting it. The prerequisite is safe to use USB drive and the computer from which you will be copying must have the same edition of Windows 10. Follow the below instructions to accomplish the task –
- Insert the USB drive to the identical and healthy computer from where you choose to copy the DLL files.
- Go to C:\Windows\System32 and copy all the files having .dll extension.
- Paste the items to the USB drive.
- Take out the drive and insert to the affected computer.
- Copy and Paste all the .dll files to C:\Windows\System32.
- Now, launch the elevated Command Prompt and enter below commands –
regsvr32 (name of DLL file)
Note – Replace name of DLL file with ntdll.dll, wintrust.dll, vbscript.dll, oleaut32.dll, cryptdlg.dll, softpub.dll, jscript.dll, initpki.dll, msxml.dll successively.
- Press Enter key after each.
- Finally, Restart.
- Hopefully, the PROCESS1_INITIALIZATION_FAILED BSOD error will resolve once this change is effective.
8] Run Startup repair
Startup Repair is an advanced recovery tool in Windows that fixes issues restricting Windows 10 from starting at all. The tool will run a few diagnostics and try to fix the problem so that you can boot up Windows 10. PROCESS1_INITIALIZATION_FAILED BSOD leads the windows to a very critical system crash and that may affect the startup of it. Therefore, carrying out the repair might be a good option to fix the error and many users have got successful results.
The guidelines are as follows –
- Insert the Installation media drive like CD/DVD/USB to the Windows 10 computer.
- Restart the Windows and press any key while booting.
- Select Language Preference.
- Hit the Next button there.
- Do a click on Repair your Computer.
- Choose the OS edition that you opt to.
- Hit the Next button.
- Choose “Startup Repair” option from the next display. Now the system will carry out some scans and fix if the device has some booting related issues automatically.
- In order to check, click on the ‘View Diagnostic & Repair Details.’
- Hit the Finish button from here to restart Windows 10.
- Once it starts again, check if the PROCESS1_INITIALIZATION_FAILED BSOD error is fixed.
9] Run System File Checker
System files have fixed components and structure that make it executable when necessary to run the Windows. These files can be corrupted due to power surge, malware infection, and updating issues as well. Corrupted system file appears unreadable after losing the components and structure from them. The last result of this problem is PROCESS1_INITIALIZATION_FAILED Blue Screen error too.
You have the ability to solve these broken system files and recover some missing DLL components using System File Checker utility. Follow the below guidelines –
- Hold down Winkey and press R.
- In the empty text box of Run, type cmd.
- Press Ctrl+Shift+Enter keys together at once.
- Click Yes when UAC floats up to open Elevated Command Prompt.
- In the succeeding black window, type below command and press Enter –.
sfc /scannow
- Now, System File Checker will detect and resolve unsettled components and rectify them furthermore missing DLL files will be recovered accordingly.
- Once done, Restart Windows 10 and make all the changes effective.
10] Update the drivers to re-gain stability
Drivers provide stability in the system as well as maintain interaction between computer bus and the hardware accessories. They are key components and every function needs minimum one “driver” to perform its function and establish the relationship. When they remain outdated, the system will lose the integrity, functionality, and will be unstable as well. In order to make the system up and running, there is no alternative to updating these components. The easiest way to update all the drivers simultaneously is Windows upgrade but you often customize this setting as of saving time.
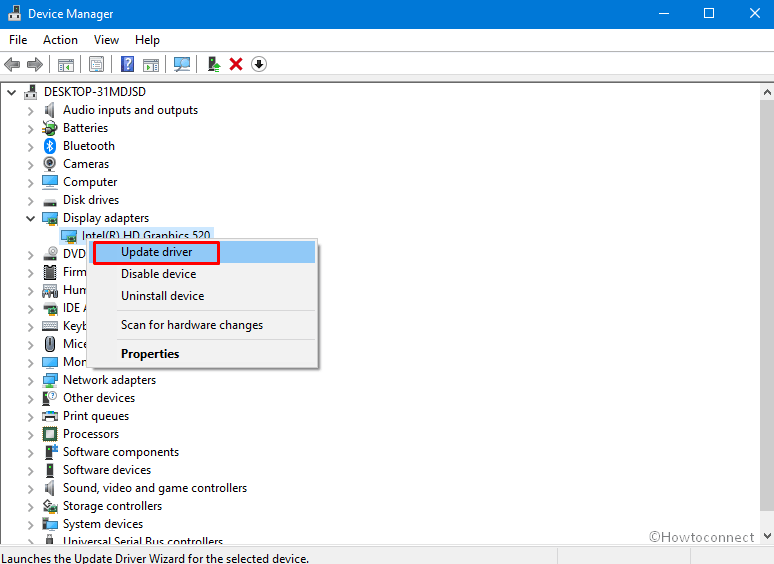
Most of the Blue Screen errors like PROCESS1_INITIALIZATION_FAILED are the upshot of Driver related issues. You may get such trouble occurs because of outdated or a defective update is installed in the system. Windows Device Manager is a complete utility to update the drivers and more driver related upper hands like Uninstalling and rolling back them to default. Moreover, you can easily detect and outdated one as they will be shown with identifying sign. Here are the steps to update a driver using Windows Device Manager –
- Invoke Run dialog and type devmgmt.msc in the text box.
- Click Ok button on the box to open up Windows Device Manager.
- When the console loads completely, look closely for any mark of exclamation.
- Split the driver list of that device by double-clicking.
- Make a right-click on the outdated driver having a yellow indication on it.
- Select Update Driver option from context.
- From the appearing popup, click “Search automatically for updated driver software” option.
- In the end, restart and make all these changes working.
11] Uninstall or disable third party anti-malware program
Anti-malware programs strengthen the security layer in a system and keep it protected from potential threats. We have told earlier how Windows Security maintains the utmost protection to Windows and of course, it’s a default tool. Using a third-party anti-virus application may often be a little unsafe as not all can be trustworthy. PROCESS1_INITIALIZATION_FAILED error might be a consequence of this reason.
Since Windows Security is the best ever utility to eliminate malware, you can rely on it completely. It is legit to uninstall all third party anti-malware programs to keep the system out of additional trouble. You can uninstall them using the below steps –
- Press Windows key and X and select Apps and Features option from the list.
- Move to the right pane, locate a third-party anti-malware program, and do a click on it.
- Hit Uninstall option from expanded pane.
- If any confirmation message shows up, click “Uninstall”.
- Follow the next guidelines to complete this task.
- Finally, restart Windows and check if the error appears again.
12] Perform System Restore and undo recent changes
Recent changes in Windows might have a contradiction with Windows Registry resulting in PROCESS1_INITIALIZATION_FAILED error. You often install new programs from various unknown sources where some of this may seem buggy. Forcibly canceling any task like uninstalling programs can also be risky to have negative changes in the system.
In order to fix the Blue Screen error evolved after any such changes; you can simply undo it by loading back previous state. One of the easiest ways to bypass any critical issues and process is System Restore. The tool will reverse Windows to an earlier saved Point of time in Windows 10 where you were not experiencing an error. To run the utility, follow the below guidelines –
- Press Windows key and type recovery in the text area.
- Select the same “Recovery” under Best match.
- When a new window opens from Control Panel, select Open System Restore link.
- From the wizard coming up, click Next from the bottom end.
- From the succeeding page, put a checkmark to the box says Show more restore points.
- After the system shows all the points, choose the most recent where you prefer to revert Windows.
- Select Next to proceed ahead.
- After the following page unrolls, click the Finish button.
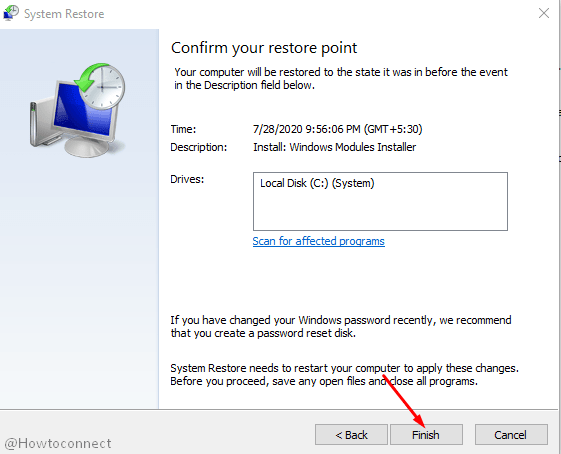
- Click Yes from the warning message popup to continue restoring.
13] Repair Windows image file using DISM tool
Windows image file can cause PROCESS1_INITIALIZATION_FAILED BSOD error got corrupted. These are the components of a major upgrade of Windows that come in ISO- format. The usual task with these snapshots is to make identical CD-R or DVD-R drive for upgrading Windows.
The installation image, after getting corrupted by third-party tools, malware attacks, causes BSOD or blue screen error in Windows 10. Running Deployment Image Servicing and Management tool is the best way to fix the defective image files. Here are the instructions to run this tool –
- Open the Start menu pressing Windows key once.
- Click Power icon and select Restart option keep holding Shift button down at the same time.
- Window, after completing Rebooting, will boot to Automatic Repair.
- From the subsequent blue screen, select Troubleshoot > Advanced options > Command Prompt.
- When the black screen will show up, type following command at blinking cursor –.
DISM /Online /Cleanup-Image /RestoreHealth
- Press the Enter key to activate DISM tool.
- Upon finishing the task, Restart the computer.
- Check if the BSOD error has resolved already.
14] Try booting Windows 10 in Safe Mode
Booting in the Safe Mode is a startup method allowing the least number of programs and tools to be loaded for running the system. The target is to cut off third-party applications and unnecessary programs so that system runs with minimum resources. This will make troubleshooting for PROCESS1_INITIALIZATION_FAILED BSOD error a lot easier. If any third party application causes this mess up, it will then resolve as no such application is available in Safe Mode on Windows 10. In case the error stays, you can then go for necessary troubleshooting using tools accordingly.
Safe Mode has been a great utility to resolve most of the critical issues that are evolved in Windows over the years. Follow the below guidelines to accomplish this task –
- Invoke Run dialog pressing Win+R.
- Type msconfig in the search box and press Enter.
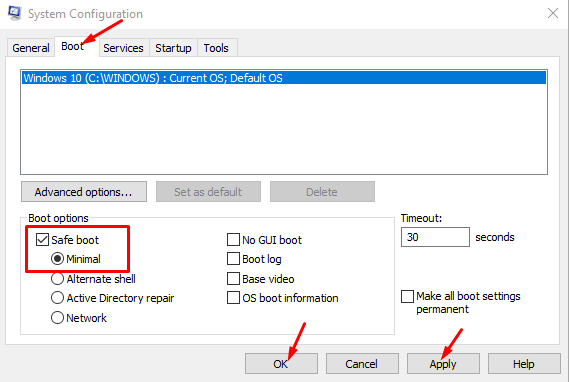
- Enter the Boot tab when System Configuration window opens.
- Scroll down to the second half and reach to “Boot options” area.
- Check the box that reads Safe boot followed by selecting radio button set for Minimal.
- Click Apply button and then Ok.
- Open Start menu and click Power icon.
- Select Restart and System Will Boot to Safe Mode once power On.
- If you want to disable Safe Mode, uncheck the box set for Safe Mode in the System Configuration like before.
15] Fix bad sectors in Hard Disk in Elevated Command Prompt
Bad sectors in the hard disk can be formed due to forcibly pulling cables from CPU, external damage to the CPU, and undetermined power outage issues. Hard Disk is the soul of a device but usually, we don’t maintain it properly.
Bad areas in the disk are very much likely to cause PROCESS1_INITIALIZATION_FAILED BSOD error in Windows 10. Well, there is an ingenious utility to fix these areas formed namely disk checking tool. It will activate after executinG CHKDSK command in the Elevated CMD.EXE. The instructions to run this tool are as following –
- Open the Taskbar Search pressing Win and S together.
- Type cmd.exe and right-click Command Prompt when shows up in the result.
- Select Run as Administrator followed by clicking Yes when UAC prompts.
- When in the Elevated Command Prompt window, enter below command –.
chkdsk /f /r C:
- Execute the entered command by pressing Enter key.
- Subsequent to the Disk checking tool finishes detecting bad areas, fixing will commence automatically.
- After the task ends, restart Windows 10 and check if PROCESS1_INITIALIZATION_FAILED BSOD error is resolved.
Methods:
1] Disable Automatic Restarting feature
2] Delete the Bootcat.Cache
3] Copy Bootcat.cache files
4] Disable Secure Boot
5] Install the latest patches
6] Run a full system scan for malware
7] Copy and register ntdll.dll file
8] Run Startup repair
9] Run System File Checker
10] Update the drivers to re-gain stability
11] Uninstall or disable third party anti-virus program
12] Perform System Restore
13] Repair Windows image file
15] Fix bad sectors in Hard Disk
That’s all!!