System freezing for 5-30 seconds when occurs at Windows 10 device startup up leads to a blue screen. SECURE_KERNEL_ERROR is also of this kind that causes a sudden restart of PC. This particular BSOD is rare and mainly rises up all of a sudden due to hardware or software conflict. With Stop code 0x0000018B, the error indicates that there is something unusual that happened with the secure kernel.
Blue Screen is a haunting issue in Windows 10 that often troubles users with stop code and crashing of the system. Missing system files, software conflicts, Malware attacks, and obsolete drivers are common reasons for the BSOD. Let’s see the workarounds in the case of SECURE KERNEL ERROR –
SECURE_KERNEL_ERROR
Here is how to fix SECURE_KERNEL_ERROR blue screen Windows 10 –
When the system generates SECURE KERNEL ERROR in Windows 10, the OS restarts itself time and again to avoid data loss along with other damages. In lieu of being helpful, this makes things more complicated as there will not be enough scope to find the root cause behind or apply resolutions.
Therefore, you will have to disable automatic restart before jumping into the workarounds. This way, the system will not restart itself in between and you will be able to work on resolutions without a hitch. Here is the process to follow –
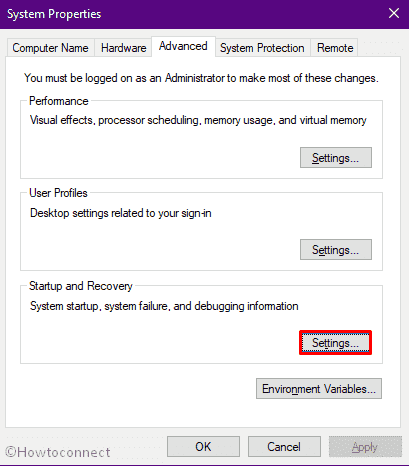
- Press Win+D to head over the desktop screen.
- Right-click on This PC and choose Properties.
- Click Advanced system settings link from the left sidebar.
- Click Settings button located under Startup and Recovery.
- Uncheck the box set aside Automatically restart.
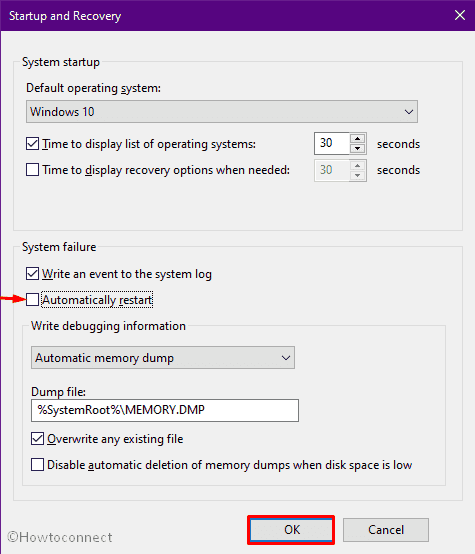
- Click OK button to save the changes.
As of now you have turned off automatic restart option, Windows will not reboot without your command and you will get enough time to deploy the rest of the workarounds.
1] Run System File Checker
Some necessary components missing from its core generates several bugs and problems along with blue screen error. Generally, these elements can’t go missing or become corrupted automatically. Software collisions due to malware or virus attack are mainly responsible for such an occurrence.
Such damages cause SECURE_KERNEL_ERROR, you have no way left rather than using System File Checker to recover the missing components. Once you execute the command-line properly, the utility will refresh the core elements and most probably take away bug check code 0x0000018B. To run SFC, proceed with below guidelines –
- Click on the taskbar search icon and type in cmd.exe.
- Press Ctrl + Shift + Enter keys altogether.
- Click Yes button when a User Account Control prompts for permission.
- Insert the below command and press Enter key –
Sfc /scannow
- Upon completion of the scanning process, restart Windows 10.
2] Update Windows 10
An outdated system is more likely to generate blue screen error and other stop codes as well. Besides giving rise to error codes, the backdated operating system makes the device slower moreover sluggish. Also, the performance deteriorates drastically. Therefore, updating the PC regularly is really important to keep the system healthy.
Microsoft releases cumulative updates on a regular basis and provides them automatically to ensure the best user experience. Since these patches contain resolutions for bugs and issues, never wander there might be a quick fix that will eradicate SECURE_KERNEL_ERROR. To check for update, go through the below steps –
- Press Win+I keyboard shortcut and continue with Update & Security.
- From the right surface, click Check for updates button.
- If any new patch is available, click Download.
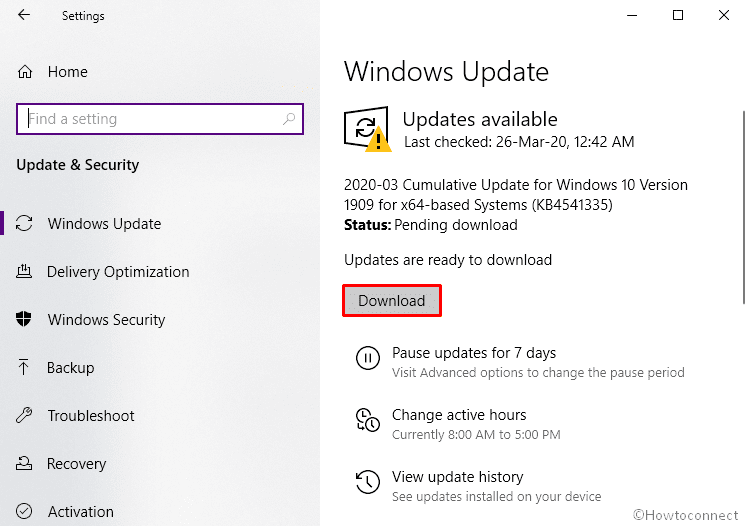
- When the installation will take place, be present in front of the PC as the system may ask to restart the machine to complete the process.
Important – There might be an instance when the downloading process gets stuck in between or doesn’t begin. In such a case, ensure an active internet connection preferably a high-speed Ethernet or Wi-Fi one. If you are using mobile data, either make sure there is no data limitation or set metered connection without obstructing update.
3] Get the latest Device Drivers
There should not be old, corrupted and outdated device drivers in the system in any condition. Such vulnerable drivers not only hamper PC performance badly but also give rise to blue screen errors. Generally, when you update Windows 10 the system downloads the most recent versions of device drivers automatically if you didn’t exclude drivers from updates already.
However, Windows lets you manually update backdated drivers anytime with the help of Device Manager. The utility makes the whole process much easier as it shows problematic drivers with a yellow indication mark. This way, you will get an idea of which driver you need to update.
- Right-click on the Start icon and choose Run.
- Type devmgmt.msc in the command box and click the OK button.
- Look in the Device Manager console and find out which one has an exclamation mark beside it.
- If you get any, double-click on the same.
- Right-click on the driver having a yellow sign beside it and select Update driver.
- Opt for Search automatically for drivers.
- When the installation process ends, update all drivers listed under the device having a yellow warning sign.
- Upon completion, reboot Windows 10.
Note – If your system doesn’t get any update version for the faulty device driver, there is an alternative method as well. All you need to do is visiting the manufacturer website of the specific device you want to update and look if any newer version is available. When you find a compatible one, download and install the same.
4] Scan for viruses and diminish them with Windows Security
Malware threats and invade stand as a big cause of Blue screen error in Windows 10. Where malware doesn’t harm or mischief with the system components directly, some stay in disguise and you hardly sense the real trouble. Mainly, the malware represents itself as a genuine core component and keeps replicating itself until the full system gets affected.
Meanwhile, if you take steps to remove the virus, the replicating process stops right away and also the existing threats sheer off. To do virus scan, follow the steps given below –
- Click the Start button and select Windows Security from the application list approaching alphabetically.
- Choose Virus & threat protection from the left column
- Click the Scan options link you will get in the right pane.
- Hit the radio button of Full scan option followed by clicking Scan now.
- Click Clean Threat if the system traces any danger.
- Thereafter, select Remove first and then Start actions to complete the procedure.
5] Check for bad sectors in RAM
Any damage in the RAM hinders the smooth functioning of Windows moreover makes the system unresponsive for a while. Besides, the same memory issue ends up causing blue screen error like SECURE_KERNEL_ERROR. There might be various reasons to cause memory damage but in most cases, power surges and excessive heat found to be guilty.
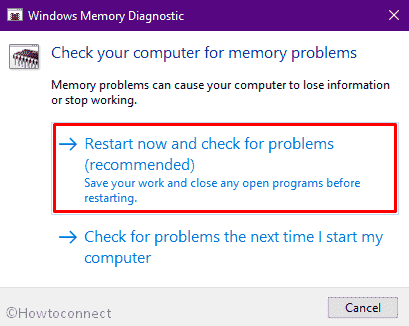
To find out if your RAM has a bad sector in it, Windows Memory Diagnostic tool comes handy. The utility scans the whole physical memory of Windows 10 and lets you identify possible issues. When you use the tool, it will ask to reboot the system. So, before proceeding forward save all the ongoing task first and then move ahead –
- Press Win+S together and type Windows memory diagnostic.
- Hit Enter key.
- Opt for Restart now and check for problems (recommended).
- Windows 10 machine will reboot itself immediately and when a new session starts, you will notice a blue screen detecting memory issues in the system.
- Once done, Windows will go for a reboot again.
- Upon powering up, navigate the system tray of the Notification area to check out the result of carried out Diagnosis.
6] Clean system junk to fix SECURE_KERNEL_ERROR
Windows produce temporary files every time you execute a task and after serving its purpose the items become useless. These junks occupy huge space in the disk and end up causing low storage issues. Furthermore, too much clutter on your hard drive results in the slower operation of the device.
Due to low disk space, different kind of stop codes may also rise up from which it’s hard to recover sometimes. Therefore, clearing junk files are very much necessary to eliminate any kind of drawback you get in Windows 10. To accomplish the task, follow the steps below –
- Press Windows and R hotkey together..
- Type cleanmgr in the command box and hit Enter.
- Click OK button for the driver selection pop-up.
- Hit Clean up system files from the bottom left of the newly appeared wizard.
- Again, click OK where C: drive is selected by default.
- Check all the options lying under Files to delete.
Note – Make sure the Downloads option and Recycle Bin is unchecked as important files may exist there.
- Finally, click the OK button to initiate the cleaning process.
7] Uninstall unwanted programs to avoid conflict
If your system is full of unnecessary apps, they may create unwanted problems like SECURE_KERNEL_ERROR. This mainly happens when two or more similar programs attempt to perform the same task and end up causing a collision. During the conflict, both programs lost their own component along with essential system elements that are necessary to run the Windows.
Though apps serve a series of purposes, having similar programs takes up extra space in hard disk moreover leads to software collision. As a result, blue screen error appears. To avoid such circumstances, check the apps installed on your system and uninstall the items that are unnecessary. Steps are as followed –
- Open Run Dialog box and put appwiz.cpl in the provided text space.
- Hit the Enter key.
- From the Program and Features window look for the apps that have similar compatibility.
- Select one and click Uninstall located at the top ribbon.
- If UAC asks for permission, select Yes to proceed.
- To uninstall the app completely, follow on-screen guidelines.
- Similarly, remove other apps that may conflict with another program.
- Lastly, restart the device and check if bug check code 0x0000018B still persists.
8] Rectify Windows Image Files with help of DISM
Once system images, including Windows PE, Windows RE, and Windows Setup becomes corrupted; issues like blue screen error arise. To repair such corruption, Windows offers powerful utility named Deployment Image Servicing and Management. When you run its command line in elevated Command Prompt, the tool scans the whole system including virtual hard disk and repair the problems related to Windows Image. Follow the below series of steps to execute this utility effectively –
- Press Win+Q hotkeys together and type cmd.exe.
- When Command Prompt is upfront in the result, choose Run as Administrator option.
- Click Yes when a UAC asks.
- Insert the below command followed by hitting Enter key –
DISM.exe /Online /Cleanup-image /Restorehealth
- The process may take time as the utility will scan the whole system to find out the dreadful Windows images, therefore, hold your patience till finishes.
- Once the process ends, reboot the device.
After powering up, if you still get SECURE_KERNEL_ERROR there is an alternative way to fix the related defective Windows image files. Running DISM command with the installation media often found to be more effective. Steps to do so are as followed –
- First of all, insert the Windows installation media.
- Get access to the Elevated Command Prompt.
- Put the following commands after blinking cursor and press Enter after each –
dism /online /cleanup-image /scanhealth
dism /online /cleanup-image /restorehealth
- After the execution, again insert the following command and press Enter –
DISM /Online /Cleanup-Image /RestoreHealth /source:WIM:X:SourcesInstall.wim:1 /LimitAccess
Note – Replace the value X with the drive of installation media you have inserted earlier.
- Once the procedure is over, reboot Windows 10.
9] Get rid of faulty Windows updates to fix SECURE_KERNEL_ERROR
When you install updates for your Windows 10 machine, often it gets stuck in between due to poor internet connectivity. Because of that reason, update files become faulty or sometimes Microsoft itself provides a broken one. As a result, the system behaves unusual and ends up causing various issues including abnormal bug check code and blue screen error.
Though we always talk about the necessity of updating Windows 10, assuring the smooth functioning is more important. So, if you have started getting SECURE_KERNEL_ERROR just after installing a new patch; delete that immediately. Here is the process you need to follow –
- Open Windows Settings app and select Update & Security.
- Click View update history option from the right pane.
- Hit the link Uninstall updates.
- From the appearing Installed Updates wizard, reach Microsoft Windows segment.
- Locate the latest received patch and select it.
- Hit Uninstall option from the top ribbon.
- Keep following the on-screen instructions to uninstall the faulty update completely.
10] Boot into Safe mode
For better user experience we install lots of programs in our system but not all third-party apps are trustworthy. If the software is incompatible or you download it from an unauthentic web page, the system elements may get corrupted. As a consequence, blue screen error may show up on Windows 10.
To find out if any third-party application is causing bug check code 0x0000018B, boot Windows 10 into Safe Mode. This startup lets your device start with the basic application and default setup. Hence, any problem regarding third-party applications may take leave. To execute the task, follow the below guidelines –
- Click the Start button and type msconfig.
- Once you see System Configuration at the top of search result, hit Enter.
- Shift to Boot tab.
- Take your mouse pointer to Boot Options and click the checkbox of Safe boot.
- Opt for the radio button before Minimal.
- Click Apply followed by OK.
- Close System Configuration console.
- Press Windows key, click the power icon and choose Restart.
- Now keep pressing F8 key until the system powers up.
- Opt for the Safe Mode option from the advanced boot menu.
Once you are in Safe mode, check for stop code SECURE_KERNEL_ERROR. If the error still exists, you can be assured that default programs are causing the fatal code.
11] Settle down hard disk error to fix SECURE_KERNEL_ERROR
When you use a hard disk for a long period of time, bad sectors are being formed. Furthermore, poor system maintenance, software, as well as hardware failure are equally responsible to make the hard disk corrupted. Such corruption gives rise to abnormal bug check code moreover blue screen error in Windows 10.
Generally, bad sectors on hard drive get recovered when you run chkdsk utility in elevated Command Prompt. This command-line works to find out damages as well as malfunction of hard drive and rectify the same. To run chkdsk, here are the steps –
- Open Command Prompt as Administrator.
- Put the following command after winking cursor and hit Enter –
chkdsk C: /f /r /x
- Without interrupting, let Disk Checking Tool point out corruption exists in HDD.
- Upon completion, check out the result carefully.
- If the utility fixed the existing issue, reboot the system.
12] Unplug external hardware accessories
Few people reported that they started getting blue screen error in Windows 10 a moment after connecting hardware accessories with the computer. We know using your device without a mouse, keyboard, or printer might be really tough but you should disconnect them for a while. As per reports, this little tweak often works to fix SECURE_KERNEL_ERROR.
While deporting the hardware accessories, be careful to avoid any damage. After unplugging all, restart the Windows so that the changes can take effect. When the next session starts, connect them one at a time and check if any specific accessory is causing bug check code 0x0000018B.
13] Take help of blue screen troubleshooter
After getting so much report about Windows 10 blue screen error, Microsoft came up with a troubleshooter that fix the BSOD problem automatically. This utility can be run in two ways either online or offline. Whichever method you use, a blue screen troubleshooter will detect the potential issues and fix them out. Furthermore, the tool will let you know from where SECURE_KERNEL_ERROR came.
In Windows 10 v1809 or higher, blue screen troubleshooter is not available in Settings app anymore. Therefore, you will have to troubleshoot blue screen errors online.
People who use the lower version of 1809, can access and use the Blue Screen Troubleshooter by following below steps –
- Press Win+I and opt for Update & Security.
- Choose Troubleshoot from the left sidebar.
- Shift to the right pane and locate Blue screen.
- Select the same and click Run the troubleshooter button.
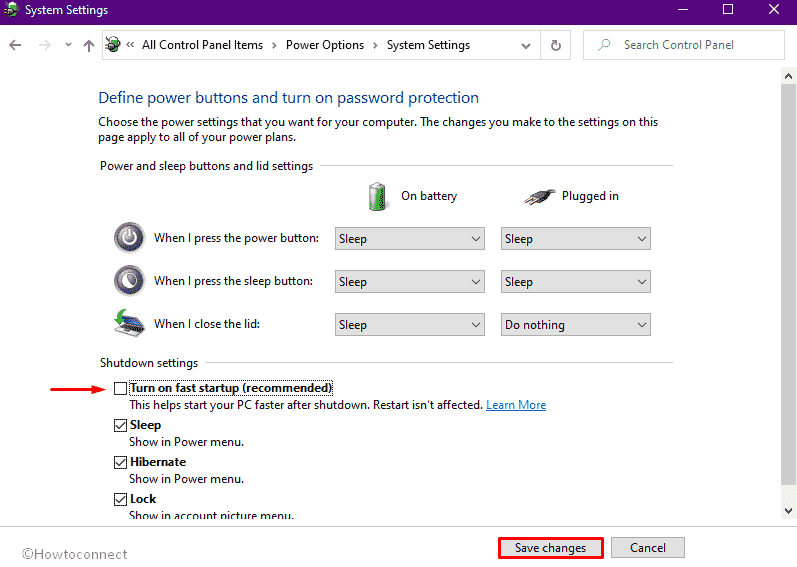
14] Disable fast startup to fix SECURE_KERNEL_ERROR
When you shut down Windows 10, all running programs get closed and on the next startup, a totally fresh session starts. On the other hand, hibernate at first saves all on ongoing tasks to disk and let you resume the next session from where you left off. Fast startup is a combination of both power options.
If Fast Startup is turned on, Windows closes down all the open tasks but also saves the state of system kernel to disk when you shut down the system. Due to that reason, blue screen error comes time and again even after trying out so many workarounds. Therefore, disable fast boot so that Windows doesn’t save anything regarding SECURE_KERNEL_ERROR when you start it up next time. Here are the steps you need to follow –
- Press Win+S hotkey to invoke taskbar search.
- Type control panel and hit Enter key.
- Set the View by option to Large icons.
- Opt for Power Options.
- Click on What the power buttons do link from the left column.
- Hit the link Change settings that are currently unavailable.
- Uncheck the box set for Turn on fast startup (recommended).
- Click the Save Changes button and close the window.
15] Find BIOS version and update if needed
BIOS is an integral part of your computer and it runs ahead of any programs when you start the device for the first time. Besides, this firmware maintains data stream between the OS and inherent devices connected to it such as keyboard, graphics adapter, mouse and printer.
When the BIOS becomes outdated, various issues rise up including blue screen errors. Hence, keeping it updated is necessary to keep Windows 10 error-free. Let’s proceed to the steps –
- Click Start icon and write in msinfo32.
- Select System Information from the visible search result.
- Find out BIOS Version/Date from the right pane.
- By using the info you got, open a web browser and navigate the maker’s webpage.
- Download as well as install the compatible file to make your BIOS updated.
16] Use clean boot to fix SECURE_KERNEL_ERROR
Often the system generates bug check code 0x0000018B due to corrupted programs and services. Therefore, start Windows 10 with a minimum set of apps by performing clean boot. Here is the process to do so –
- Open Control Panel.
- Set its View by option to small icons.
- Click Administrative Tools.
- When a separate window appears, double-click System Configuration.
- Opt for the radio button against Selective startup and uncheck the box set for Load startup items.
- Shift to Services tab.
- Click the checkbox located beside Hide all Microsoft services.
- Hit Disable all button.
- Jump to Startup tab and click the link Open Task Manager.
- Right-click on each app listed in Task Manager here and choose Disable.
- Return to System Configuration window and click on Apply followed by OK.
17] Undo recent changes to revert back error-free state
Making changes like tweaking the registry, changing system settings can enhance your user experience only if it is done correctly. So, call to mind when exactly you started getting SECURE_KERNEL_ERROR. If any recent changes are causing the issue, System Restore will work as a time machine here as it takes you back to a previous state when the Windows was error-free. To revert back the system –
- Press Win+R and type rstrui in the dialog box.
- Click OK button open System Restore wizard.
- Hit the Next button from the bottom.
- Pick the last restore point and click on Next.
- Follow the on-screen instruction if any and lastly, click on Finish.
Methods:
1] Run System File Checker
2] Update Windows 10
3] Get the latest Device Drivers
4] Scan for viruses and diminish them with Windows Security
5] Check for bad sectors in RAM
6] Clean system junk
7] Uninstall unwanted programs to avoid conflict
8] Rectify Windows Image Files with help of DISM
9] Get rid of faulty Windows updates
10] Boot into Safe mode
11] Settle down hard disk error
12] Unplug external hardware accessories
13] Take help of blue screen troubleshooter
14] Disable fast startup
15] Find BIOS version and update if needed
16] Use clean boot to fix SECURE_KERNEL_ERROR
17] Undo recent changes to revert back error-free state
That’s all!!