SPUVCbv64.sys is a Windows 10 error that usually appears with Blue Screen System Service Exception while using webcam. The BSOD is a similar issue you may see as green screen of death in Insider Preview build. You might encounter the setback while using the camera mostly. The problem is really annoying because most people need to attend meetings, classes, social gatherings online using the built-in Camera application.
When the error occurs your PC starts bugchecking and after a while, you can see the message Stop code: SYSTEM SERVICE EXCEPTION and What failed: SPUVCbv64.sys on Blue screen. The issue is commonly driver-oriented, fixing the incompatibilities will resolve it easily. We will show you some simple solutions in order to fix this error in the following section.
SPUVCbv64.sys Blue Screen Error in Windows 10
Here is how to fix System Service Exception SPUVCbv64.sys Error in Windows 10 –
1] Update the Camera driver
In most cases, the main reason behind a blue screen error in Windows 10 is an outdated device driver. Since the SPUVCbv64.sys error usually occurs while using the camera, updating webcam driver will be a key method to fix the issue.
Windows 10 is equipped with Device Manager, a very helpful utility to update the drivers automatically from appropriate vendors. However, the best way to update this driver is to download the most modern software update from the Microsoft Catalog and install it. Here is how to accomplish the task –
- Look for the most recent webcam driver in the Microsoft Update Catalog.
- From the list, find the compatible one, and click the Download.
- Now, Press the Win+X.
- Select the Device Manager.
- Head over to Imaging devices or Camera (whichever is available in the list) and double click the same.
- Right click the integrated camera device and select Update driver.
- Select “Browse my computer for drivers” from the popup next.
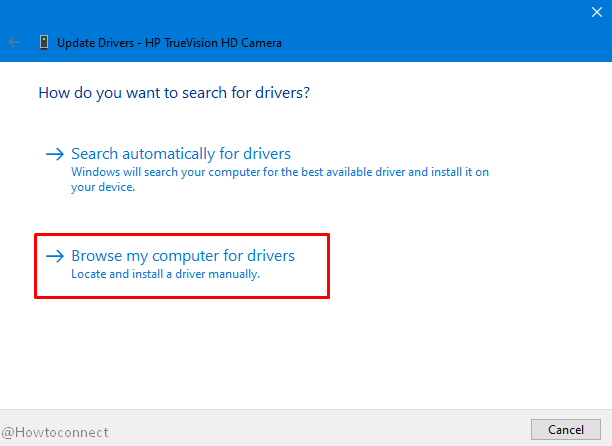
- Click Browse button and locate the newly downloaded driver.
- Select the folder by double clicking it.
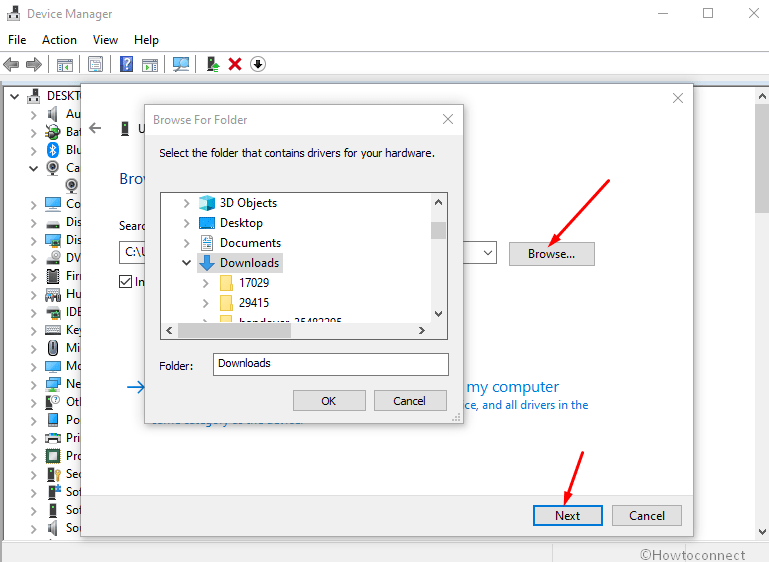
- Check the box that reads “Include subfolders”
- Click “Next”.
- Once the driver is installed, close this window and check if SPUVCbv64.sys error is resolved.
2] Reinstall the integrated Camera driver
Sometimes, updating the integrated camera driver mightn’t help while fixing the System Service Exception SPUVCbv64.sys error. The cause is some of the updates that bring potential bugs or are partially corrupted. In that case, you have to uninstall webcam driver in order to fix the error and then reinstall again after the device is recovered. Follow the instructions ahead –
- Open the Device Manager using steps from the above method.
- Locate the “Imaging devices” and double click it.
- Right-click the integrated webcam device.
- Select the Properties.
- Enter the Driver tab.
- Click the “Uninstall device”.
- Check the box that says “Delete the driver software for this device”.
- Select the “Uninstall”.
- Once the process ends, click Computer icon on the top of device manager (Scan computer for hardware changes).
- This will ensure there is a driver installed to replace it.
- Finally, check Camera driver has been changed and now included in the Cameras section instead of Imaging device.
See – How to Reinstall Webcam Driver in Windows 10.
3] Replace Integrated Camera driver with USB Video Device driver
Changing the integrated camera driver might fix SPUVCbv64.sys Error. Many systems have two camera drivers often and Windows will choose the integrated one by default. As a result, Windows 10 Camera app may crash repeatedly and end up generating the blue screen error.
In order to fix the setback, try switching to a USB Camera device driver from the Integrated Camera driver. The steps are as follows –
- Press the Windows key and R at once.
- Type in devmgmt.msc and click the OK.
- Scroll down to Imaging devices section.
- Expand the driver list (by double-clicking).
- Right-click the Integrated Camera driver.
- Select ‘Update driver’ option.
- When a pop up appears on display, choose “Browse my computer for drivers” option.
- Further, choose “Let me pick from a list of available drivers on my computer”.
- Two drivers will come into view, select the “USB Video Device” from here.
- Head to the bottom end and click the Next.
- After the process ends, close the Device Manager window.
Restart your PC and hopefully SPUVCbv64.sys Error will be fixed.
4] Use DISM and System File Checker to fix SPUVCbv64.sys error
Users running Windows 10 2004 are mostly getting SPUVCbv64.sys error and they fixed the issue by running System Files Checker tools. Obviously the resolution may work for you to fix the Blue screen caused by webcam. Here are the steps –
- Press Win+S and type in cmd.
- Hit Ctrl+Shift+Enter.
- Choose Yes when a user account dialog prompts up.
- Type in
SFC /Scannowin command prompt and press the Enter.
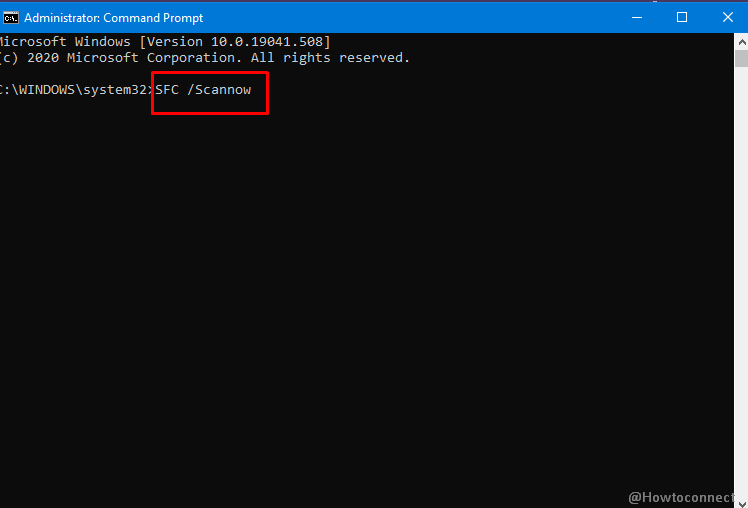
- Once completed, reboot your PC and check if the camera issue is fixed.
- Next, again launch the elevated cmd.
- Now copy-paste
DISM /Online /Cleanup-Image /RestoreHealthand hit enter. - Once again reboot the computer and the issue will be solved.
Methods:
1] Update the Camera driver
2] Reinstall the integrated Camera driver
3] Replace Integrated Camera driver with USB Video Device driver
4] Use DISM and System File Checker
That’s all!!