TELEMETRY_ASSERTS_LIVEDUMP is a blue screen error that occurs when your operating system comes up against serious problems moreover fails to recover the same. This BSOD holds bug check code 0x000001D1 which points out that A Telemetry Assert verification failed while identifying live dumps.
Generally, such errors show up when a low-level software crashes in between or drivers and hardware becomes faulty.
TELEMETRY ASSERTS LIVEDUMP
Here is how to fix TELEMETRY ASSERTS LIVEDUMP Error in Windows 10 –
Blue screen of death error forces the PC to restart automatically that too without any preceding information. Consequently, the situation becomes hard, especially while attempting to deploy a workaround. Therefore, disable auto shutdown option immediately after you start getting Windows 10 blue screen error TELEMETRY_ASSERTS_LIVEDUMP. By doing so, you will get adequate scopeS to work on the solutions. Steps are as followed –
- Head over to Desktop area using Win+D keyboard shortcut.
- Right-click on This PC and choose Properties.
- Click Advanced system settings lying in the left pane.
- Next, move down to Startup and Recovery segment and hit Settings button.
- Hover the cursor to System failure and untick the box against Automatically restart.
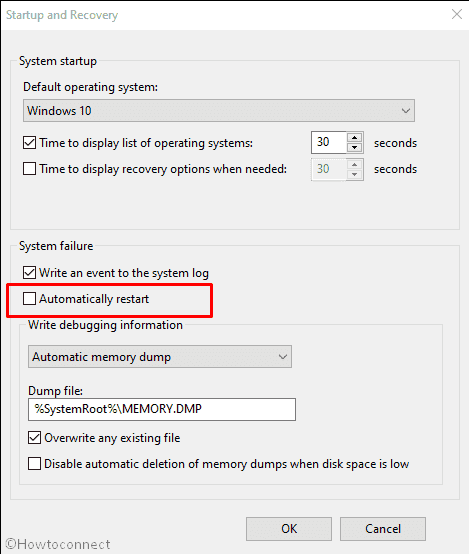
- Lastly, click on OK button.
As of now, you have turned off automatic restart, go through the solutions listed below one by one and apply them as well.
1] Run system file checker to fix corrupted system files
Most of the Windows 10 errors show up due to corrupt files and traceless essential elements that are crucial to run the operating system. Reasons behind TELEMETRY_ASSERTS_LIVEDUMP are nothing but same. Once affected, the system becomes unusable and inoperable thus making you incapable to access data moreover other important files. Generally, power failure, bad sectors in storage device, virus infection and unexpected shutdown makes system component corrupted. However, using system file checker, your PC can restore the missing files and corrupted ones as well. Here is how to execute the command line –
- Click on Taskbar search and type cmd.
- Select Run as administrator option after viewing Command Prompt as result.
- Click Yes button for appearing UAC.
- Insert
Sfc /scannowcommand after blinking cursor and hit Enter.
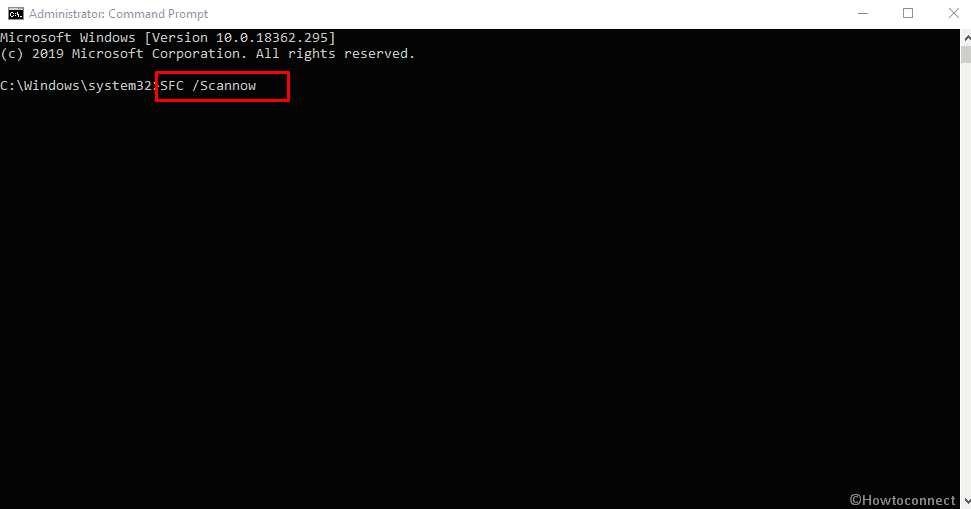
- Don’t interrupt before the procedure hits 100%. After completion, see the report and then work accordingly to fix TELEMETRY ASSERTS LIVEDUMP.
2] Take help of Windows security to scan file for virus
Once your PC gets affected with computer virus, the operating system becomes slower than ever furthermore generates anomalous issues such as TELEMETRY_ASSERTS_LIVEDUMP. Though not all the viruses are dangerous enough to inflict damage or steal personal information on their own, still you shouldn’t take them lightly. Instead of being harmless as a single unit often they work as a via to help hazardous malware makes an entrance thereby build a strong team. Those risky viruses spread malicious code into other programs of the host computer and force them too to behave like a threat. The whole process continues to attack every single component of your system unless you perform something for removing the virus. Doing so is not hard as a rock, all you need to do is following the below steps –
- Press Win+I keyboard shortcut and select Update & Security.
- Choose Windows Security from the left column and shift yourself to the right.
- Click on Virus & threat protection.
- Hit Scan options link from the right pane of Windows security page.
- Opt for the radio button of Full scan followed by clicking Scan now button.
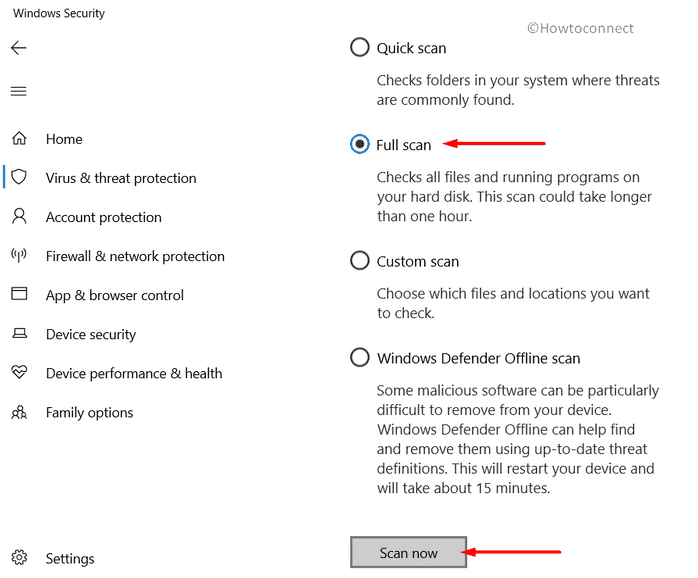
Now, the system will start scanning every segment including drivers, memories, and external devices if connected. In case of getting any virus, follow on-screen guidelines to clean threats.
3] Download Windows update to fix TELEMETRY ASSERTS LIVEDUMP
Imagining Windows 10 error-free is like a daydream that never can be fulfilled. When a desktop conflicts a virus attack or other problems, there is some vulnerability every issue leaves behind. Thankfully, Microsoft team releases new patches on a regular basis and you can’t conjecture how useful they can be. Updates are intended to assure great user experience by installing all software that exists on your device, taking steps to keep Windows 10 safe from trojan horses and most importantly resolving general bugs and issues. Hence, update Windows 10 before you move on harder solutions in order to fix TELEMETRY ASSERTS LIVEDUM. Here is the procedure –
- Right-click on Start icon and choose Settings.
- Click on Update & Security.
- Pass to the right pane and hit Check for updates button even though the page shows You’re up to date.
- Hit Download button if any patch is available.
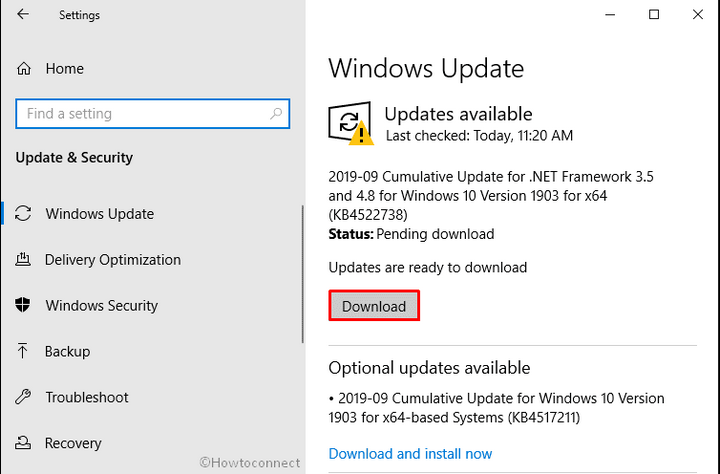
- Be present in front of PC to follow on-screen guidelines so that the installation process doesn’t get stopped in between.
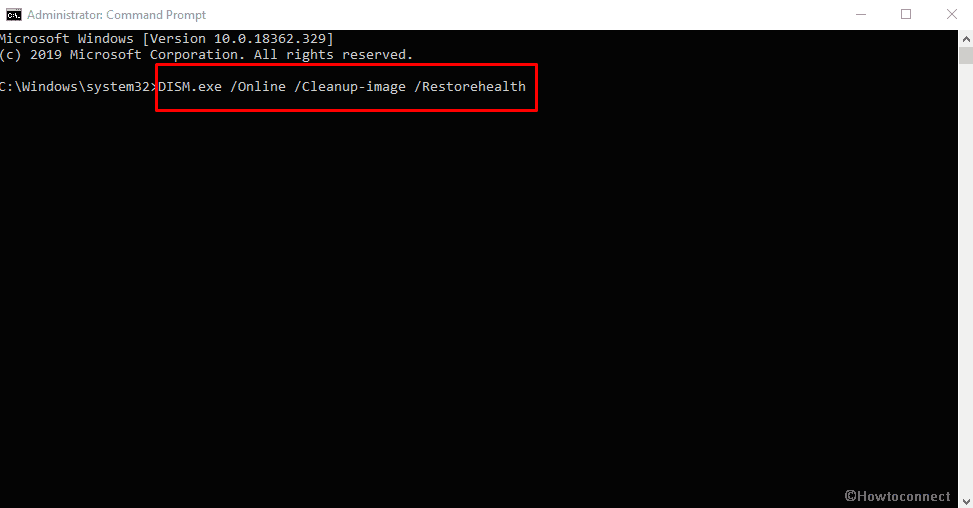
4] Use DISM to restore Windows image files
Faulty and missing system images of Windows Recovery Environment, Windows Setup, and Windows PE are responsible to generate TELEMETRY_ASSERTS_LIVEDUMP to a great extent. DISM command is designed to prepare, modify and repair such problems by replacing corrupted files with the default one. Here is how to run DISM –
- Press Win+R to bring forward Run command.
- Type cmd.exe in the dialog box followed by pressing Ctrl+Shift+Enter altogether.
- Hit Yes if a UAC comes up for consent.
- Type following command and after winking C:\Windows\system32> and hit Enter –
DISM.exe /Online /Cleanup-image /Restorehealth
5] Update Device drivers to get latest version
Mostly, device drivers get updated while upgrading Windows but there might be an instance when you missed it. If you don’t know already, drivers are very much essential part of Windows that help different hardware to work according to plan. Anything wrong with the same makes your computer running slow and sluggish moreover generates unexpected stop code along with blue screen error TELEMETRY ASSERTS LIVEDUMP. On that account, update latest version of device drivers by imitating below steps –
- Press Win+X and choose Device Manager.
- Expand the device by double-clicking whose driver you want to update.
- Right-click on an item and select Update driver.
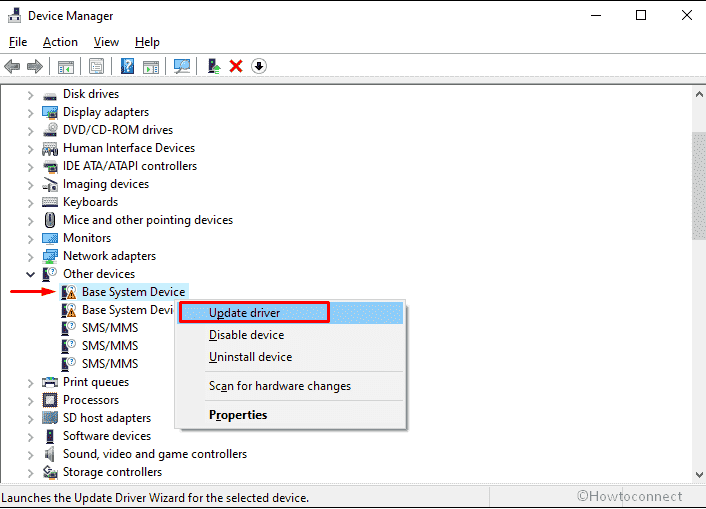
- Opt for Search automatically for updated driver software.
- Follow on-screen instruction to complete the process fully.
- Repeat same process for all drivers that seem outdated to you.
We know its difficult to locate which one you should update as many of you asked already how to check for outdated drivers windows 10. To be very honest, none of the built-in utility can do so still there is a command that helps to an extent. For that, open basic command prompt and run driverquery. Though the command line doesn’t provide information for all drivers, you will definitely get to know when some of installed drivers were published. It’s not guaranteed that Windows 10 blue screen error will vanish after updating the one which has an old date. That’s because Link Date refers only when your driver was published not the time it was last updated. As this tool doesn’t show version number, you can’t rely on it fully, even so, you will have a little idea just by viewing the date.
6] Read minidump files to know why TELEMETRY ASSERTS LIVEDUMP error occurred
Minidumps are nothing but small files that are saved in your system every time Windows shutdown unexpectedly. Such situation mostly rises up when Windows 10 is affected with blue screen error. Procedure to analyze minidump seems frightening at first glance still you need to go through the same to troubleshoot TELEMETRY_ASSERTS_LIVEDUMP. Steps are right below –
- Press Win+D and right-click on This PC followed by choosing Properties.
- Click Advanced system settings from the left column.
- Hit Settings button located beneath Startup and Recovery segment.
- Put tickmark on the checkboxes of Write an event to the system log and Automatic restart.
- Opt for Small memory dump (256KB) for Write debugging information option.
- Either insert D:\Minidump into the box of System Dump Directory or put any preferred location.
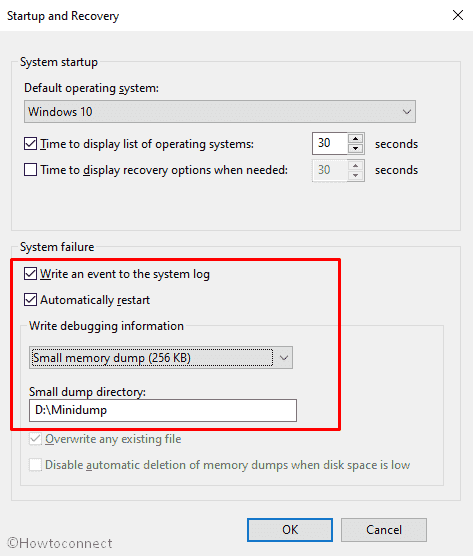
- Click OK button to implement the changes.
- Visit official page of the Windows Driver Kit and download the tool for your version.
- After completion, navigate the folder where downloaded files are saved.
- Open the file and install the same as well by following on-screen direction.
- Next, and execute the below command to the Debugging Tools for Windows folder –
cd c:\program files\debugging tools for windows
- To load the dump file into a debugger, run any of the following commands in the same Command Prompt –
windbg -y SymbolPath -i ImagePath -z DumpFilePath
or,
kd -y SymbolPath -i ImagePath -z DumpFilePath
- Subsequently, insert below command and hit Enter to save the file in C:\windows\minidump\minidump.dmp –
windbg -y srv*c:\symbols*http://msdl.microsoft.com/download/symbols -i c:\windows\i386 -z c:\windows\minidump\minidump.dmp
- Finally, check the file to get the error information of bug check code 0x000001D1 and explore the bugs in Google to resolve the same Windows 10 blue screen error.
7] Check for errors in hard disk
Symptoms you come across after getting affected by TELEMETRY ASSERTS LIVEDUMP such as sudden system shutdown, slow operational speed, and freezing desktop mostly occur due to hard disk corruption. Poor system maintenance, software as well as hardware failures, are mainly accountable for that. To settle down such an issue, Chkdsk will be a good choice as it checks the specified disk and repair or recovers data on the drive if necessary. Moreover, the command line utility points out damaged or malfunctioning sectors on the hard drive as bad in addition recovers any information still intact. To run chkdsk, go through the below process –
- Click on Start icon and type cmd.
- Press Ctrl+Shift+Enter simultaneously to bring forth Command prompt with admin privilege.
- Click on Yes when a User Account Control asks for permission.
- Type the following command and then hit Enter key –
chkdsk C: /f /r /x
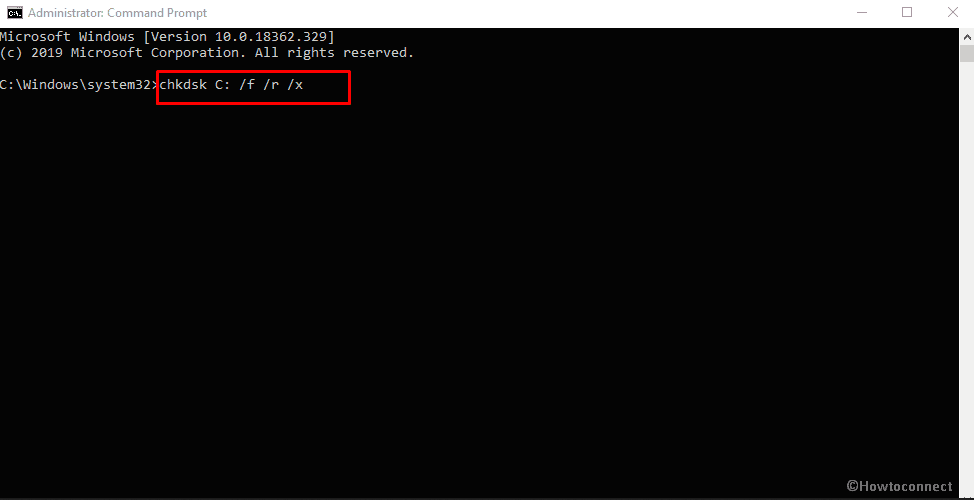
Here,
- C: refers to the drive where the Windows 10 is installed.
- f is designed to tell the command line utility to fix any error it finds.
- r allude to detect process of finding out bad area inside the Disk volume.
- x is designate for dividing up the resources to facilitate the detection process.
8] Delete temporary files along with junks
Temporary files or Junk not only grab disk space but also decelerate the perfection of Windows. The more files you have on your hard drive, the more time it takes to access. With continuous use, hard disk becomes cluttered with tons of old logs, temp files, and leftovers timbered after a new install. Once the volume of these useless junk files begins to be big, system may lock up, crash or even fail to start-up. Also Windows 10 blue screen error TELEMETRY_ASSERTS_LIVEDUMP can be formed. In such a situation, take help of Disk cleanup to delete junks as the tool finds out stored garbage and let you delete them with just a click. Here is the step-by-step procedure –
- Press Win key and S at once to invoke Windows Taskbar search.
- Write down, cleanmgr and hit Enter to launch Disk Cleanup.
- Click on OK where C: driver is selected by default.
- Hit the option named Clean up system files.
- Again, click the OK button for small pop up.
- Click all the checkboxes located beneath Files to delete.
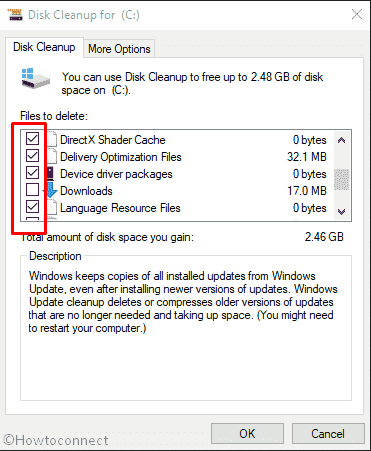
Note – Be careful with Downloads and Recycle Bin moreover make sure there are no important files exist there. In case of having any, leave the options unchecked.
- Lastly, click OK button to initiate the cleaning process.
9] Get rid of third-party antivirus
Built-in anti-malware program Windows security is designed to protect us from vulnerable threat so do third-party antiviruses. While performing the same task of making safeguards, both software conflict with each other and lose important components of own along with systems. As a result, Windows fails to start correctly and generates bug check code 0x000001D1. Only way to eradicate such an issue is uninstalling third-party antimalware programs at least for a short period of time. Once the Windows 10 blue screen error goes away, you can re-install the same.
- Press Win+X and choose Run.
- Type appwiz.cpl in the dialog box and click the OK button.
- .Locate installed third-party antivirus program and select the same.
- Hit Uninstall option from the top ribbon thereafter, follow on-screen commands.
10] Clean boot Windows 10 to fix TELEMETRY ASSERTS LIVEDUMP
The Clean boot is a process of troubleshooting that permits your Windows to start with only basic files and services required to run. This booting procedure works to identify and resolve blue screen errors such as TELEMETRY_ASSERTS_LIVEDUMP along with other performance issues, software conflicts and more. When you perform a clean boot, usual functions and other optional features will become limited so that the system can diagnose the problem easily. Once the issue you are trying to troubleshoot, Windows 10 will get back to normal environment by restoring all functionality and features.
- Open Run dialog box.
- Type msconfig and hit Enter.
- Next, click the radio button set for Selective startup and uncheck the box of Load startup items.
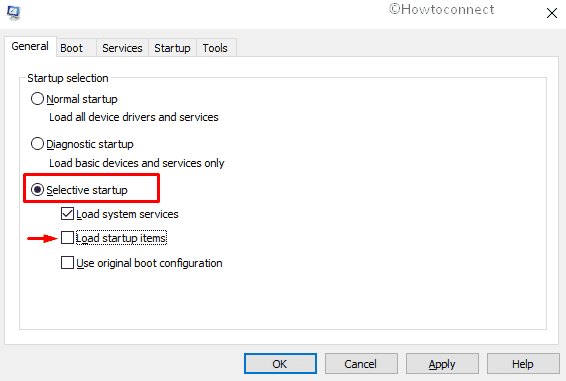
- Shift to Services tab and click the checkbox against Hide all Microsoft services.
- Hit Disable all button.
- Jump into the Startup tab and click on the link Open Task Manager.
- Right-click on each program listed here gradually and choose Disable.
- Reintegrate System Configuration window and click on Apply followed by OK.
11] Diagnose bad RAM
RAM is generally used to store temporary files that the machine uses when needed and with each reboot, these temp files get wiped out. Because of overuse and power surges, bad sectors might form in Random Access Memory which often generates performance issues moreover Windows 10 blue screen error. However, in such a case, it’s not mandatory to replace your memory stick right away. Rather than pulling out the same, try to diagnose it to know what is the problem and if it can be repaired.
- Press Windows key and type memory in the search bar.
- Hit Enter when you see Windows memory diagnostic in appearing result.
- Opt for the option entitled Restart now and check for the problems (recommended).
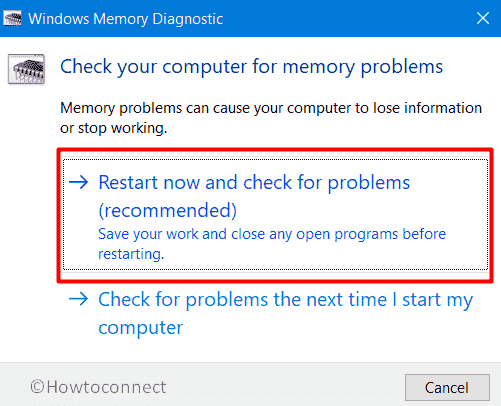
- Once the system completes 1st cycle of rebooting, you will see a blue screen detecting memory issues.
- After completion of 100 percent, the device will reboot once again.
- When it powers up, check diagnostic report from the System tray of the notification area.
12] Prepare Windows for automatic repair
While Windows generates startup errors like TELEMETRY_ASSERTS_LIVEDUMP, automatic repair by default gets launched at the third boot to fix the problem. Once prepared, the tool will run multiple diagnostic tests to detect and repair bug check code 0x000001D1. Though it runs automatically, there might be an instance when you turned it off because of some unexpected loop. Therefore, you need to set it up manually so that the tool starts working again –
- Open Windows Settings and opt for Update & Security.
- Select Recovery option from the left column.
- Head over to the right and click Restart now button located under Advanced startup.
- Once the device powers up, select Troubleshoot =>Advanced options => Startup Repair each in turn.
- After viewing Automatic Repair page, provide credentials of your account.
- Click Continue to initiate the repairing process.
13] Eject external hardware to fix TELEMETRY ASSERTS LIVEDUMP Error
Hardware like printer, mouse, keyboard, extra hard drive, and scanner are pretty much needed for users’ convenience. Sad but true, these external accessories often brings forward TELEMETRY_ASSERTS_LIVEDUMP and prevent Windows to function properly. All you can do to get rid of such issue is unplugging all items singly and then put it back in the same way meanwhile check which hardware is causing issue.
- Disconnect every hardware attached to your device externally.
- Keep them aside in a safe place and then Restart Windows 10 PC.
- After powering up, check if bug check code 0x000001D1 still persists.
- If not, put back all the accessories gradually.
- Later on, open a web browser and visit the manufacturer’s website to install latest drivers of connected devices.
14] Uninstall similar apps along with suspicious one
In case of having multiple apps that try to perform almost same functions are prone to conflict with each other. As a result, apps become corrupted as they delete their own componenet during the collision also wipes out important system essentials. To avoid such situation, it’s pretty much necessary to uninstall unwanted apps you hardly use –
- Press Win+X hotkey and then select Apps and Features.
- Pass to the right side and look for the suspicious applications along with the apps having similar congruence.
- Once found, click on the same and hit Uninstall from the extended pane.
- If a UAC prompts, select Yes.
- Keep following the on-screen guidelines to remove application completely.
- Perform the same for each app that may create TELEMETRY_ASSERTS_LIVEDUMP.
- Lastly, Reboot the PC.
15] Boot Windows 10 in Safe Mode
You may doubt the efficacy of safe mode as we performed clean boot a while back and that most probably didn’t work for you. Though both boot methods are used to troubleshoot advanced problems, Safe boot is worth to try once as the functions they perform are little bit different. Safe mode limits Windows operation with core driver and networking support thus you get a scope to find out if any third-party service is generating TELEMETRY ASSERTS LIVEDUMP.
- Click taskbar search, type control panel and hit Enter.
- Set its View by option to small icons.
- Click Administrative Tools from the available links.
- Double-click on System Configuration in order to open the same.
- Shift into the Boot tab.
- Hover the mouse pointer to Boot options segment and check the box against Safe boot.
- Click the radio button set for Minimal.
- Hit Apply button first and then OK to save these changes.
- Next, restart the PC using any convenient way.
- Once it powers up, continuously press F8 key until the next page shows up.
- Thereafter, select the Safe Mode option.
- Boot into Safe Mode on the subsequent move.
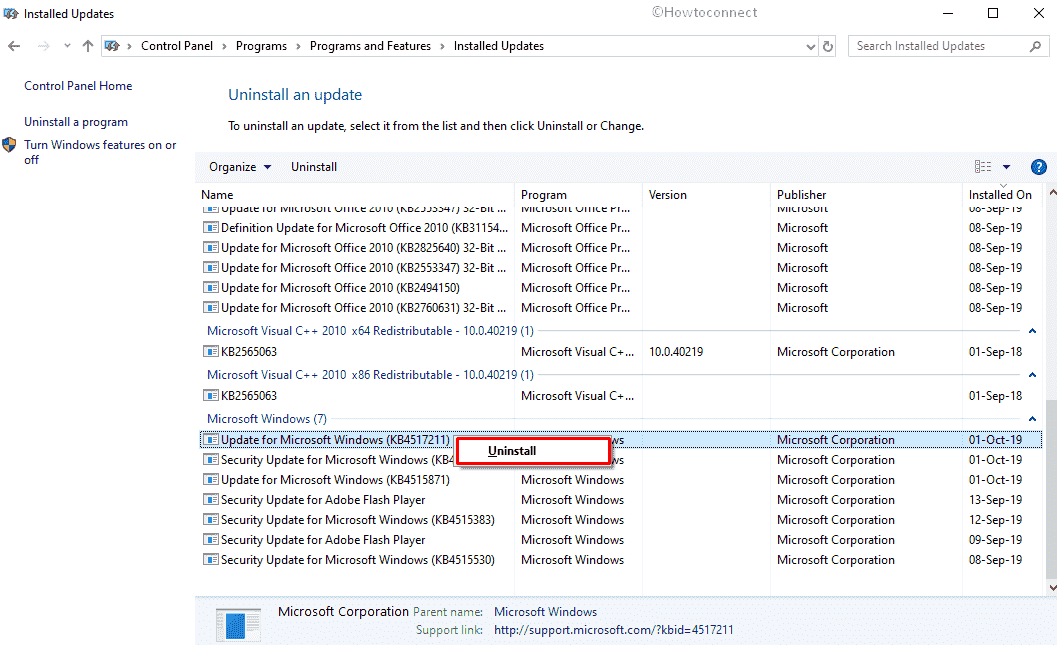
16] Remove faulty Windows Update Files
Microsoft provides faulty updates time and again which later spreads different types of error into the system. Bug check code 0x000001D1 can be a result of those corrupted patches too. Usually, after getting reports about the same, Microsoft immediately start working to settle upon the issue and after completion, they release a fresh update as soon as possible. As the procedure takes time, delete the faulty one to fix Windows 10 blue screen error right away rather than waiting for the new patch.
- Right-click on Start button and choose Settings.
- Click on Update & Security.
- Pass to right surface and hit the option View Update history.
- Click Uninstall updates link.
- Select the most recent received patch and right click on the same followed by choosing Uninstall.
17] Try out online Blue Screen Troubleshooter to fix TELEMETRY ASSERTS LIVEDUMP
Previously, Blue screen troubleshooter was included in Control panel and you were able to run the same directly from there. But in a recent update, Microsoft moved that tool to Settings application which is easier to find out. Follow the below steps to run the utility easily –
- Press Win+Q and write in bluescreen.
- Choose Find and fix bluescreen problems option once the result shows up.
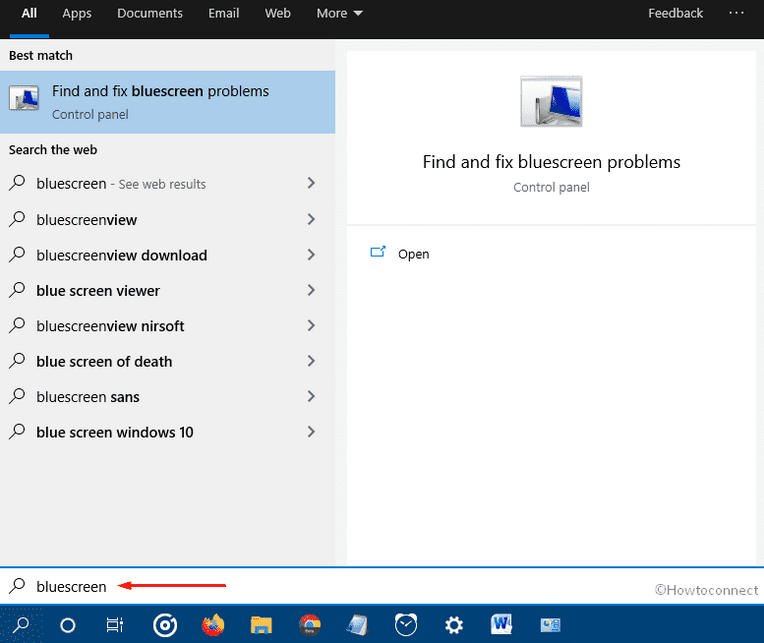
- Troubleshooting wizard will start detecting the issue related to TELEMETRY ASSERTS LIVEDUMP.
- After completion, take necessary steps suggested by the tool to solve Windows 10 blue screen.
18] Get up to date version of BIOS
BIOS is a fundamental part of your computer as it helps to run the system when you turn it on also assist the hardware to initialize during the booting process. Moreover, the same provides runtime services for Windows and programs, in addition, it manages data flow with attached devices. Once the BIOS becomes outdated, generates several startup errors and TELEMETRY_ASSERTS_LIVEDUMP is one of the among.
- Invoke Run command by pressing Win+R.
- Type msinfo32 in the blank text box and hit Enter.
- Write BIOS version in the search bar of System Information window and click the Find button.
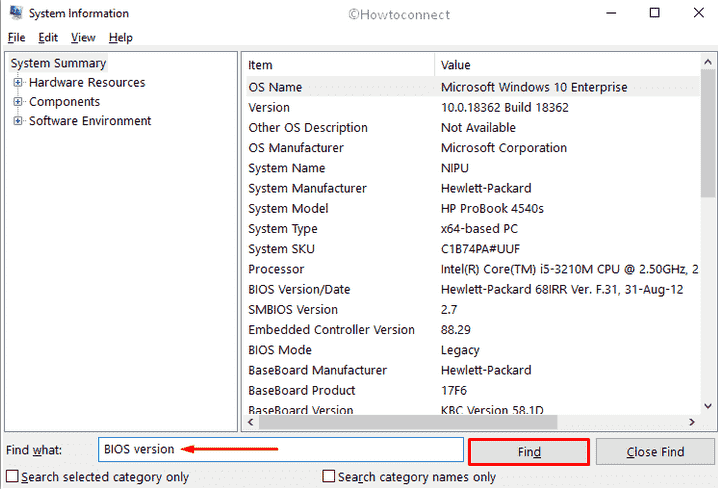
- Note down the information you get here.
- Now, open a web browser and visit the manufacturer website for your BIOS version.
- Finally, download the file and install them as well.
19] Disable fast boot to fix TELEMETRY ASSERTS LIVEDUMP
Fast Startup is a merger of normal shutdown and hibernate feature that stores the internal information of your system in its memory when you turn it off. The setting is saved inside story and helps Windows 10 to load faster when you power it up next time. So, when you start getting bug check code 0x000001D1 continuously, we can assume that the info about this specific Windows 10 blue screen error is saved in the memory which is making a loop of the same issue. Hence, disable fast startup without wasting time –
- Open Control Panel and set the View by option to Small icons.
- Search for Power Options eventually click on the same.
- Hit Choose what the power buttons do link from the left-hand side.
- Click Change settings that are currently unavailable.
- Move down and uncheck the box assigned for Turn on fast startup (recommended).
- In the end, click Save Changes button.
20] Go back to the error-free state using System Restore
Making changes in software is a regular procedure but if it is done wrongly, bug check code 0x000001D1 may arrive. To recover from such malfunction, use System Restore to revert the earlier point of Windows when the PC was working fine without any hassle.
- Type rstrui in the Windows serach and hit Enter.
- Click Next button when System Restore wizard rolls out.
- Opt for the last restore point and again hit Next.
- Lastly, click Finish button to commence the procedure of restoring Windows.
Methods:
1] Run system file checker
2] Take help of Windows security
3] Download Windows update
4] Use DISM to restore Windows image files
5] Update Device drivers
6] Read minidump files
7] Check for errors in hard disk
8] Delete temporary files
9] Get rid of third-party antivirus
10] Clean boot Windows 10
11] Diagnose bad RAM
12] Prepare Windows for automatic repair
13] Eject external hardware
14] Uninstall apps having similar congruence
15] Boot Windows 10 in Safe Mode
16] Remove faulty Windows Update Files
17] Try out online Blue Screen Troubleshooter
18] Get up to date version of BIOS
19] Disable fast boot
20] Go back to the error-free state using System Restore
That’s all!!