You are here means you are struggling with an error that occurs when trying to install a patch or build on Windows 10/11. 0x80071160 might be the error code that commonly appears when you install an update using automatic mode or via Windows 10 update assistant. When this issue occurs the update process fails at a certain percentage of installation of the update. So, this context describes how to fix update error 0x80071160 in Windows 10 or 11.
Usually, an update error arises in Windows when the system tries to get security or optional patches. Some of the issues emerge after downloading a certain percentage of the update where some show up during the installation process. Like others, error 0x80071160 generally turns up due to corrupted or missing system components. It may also arrive if the installed files have a higher file version or just because of a glitch.
Update Error 0x80071160 in Windows 10 or 11
Here is how to fix update error 0x80071160 in Windows 10 or 11 –
Way-1: Reboot Windows
Before trying out advanced workarounds, simply reboot the PC and try to re-install the build that is causing issues. This often works like a tweak and fixes any glitches system is conflicting.
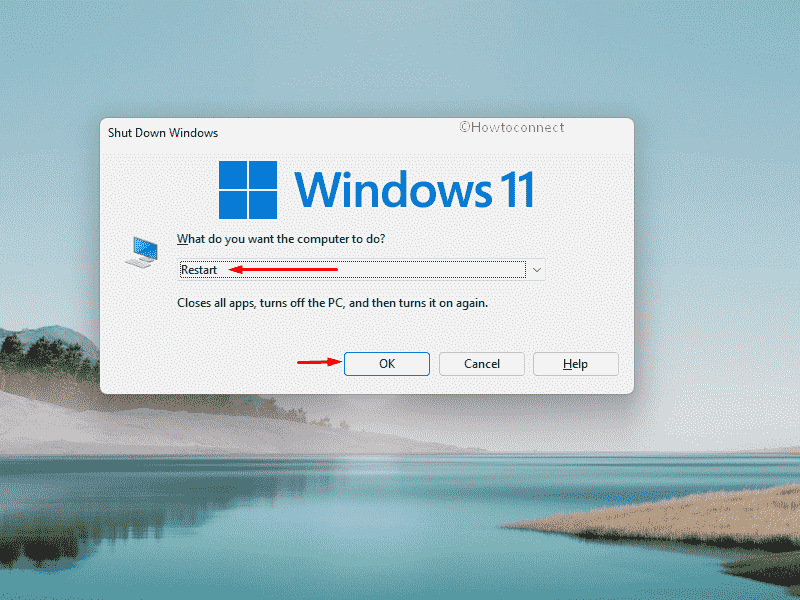
- Save all ongoing tasks.
- Press – Alt + f4.
- Click the drop-down list and choose – Restart.
- Next, click – OK.
Way-2: Try manual update
Though Windows receives updates automatically with default settings, the process oftentimes gets hindered due to poor internet connection or unexpected power surges. Due to such interruptions, the system may obtain broken or incomplete setup files which result in update Error 0x80071160 later. In this case, a manual update can help so follow the guidelines -.
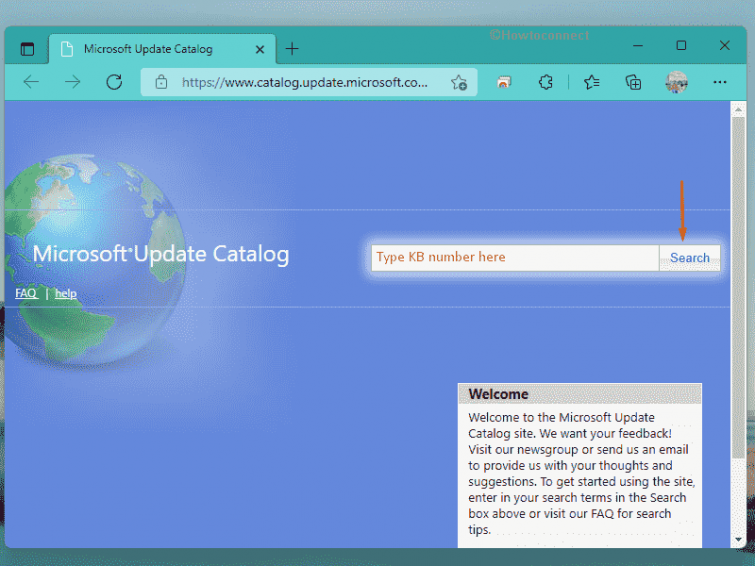
- Visit the webpage of Microsoft Update Catalog.
- Click the search bar of the website.
- Type the KB version that is giving error 0x80071160.
- Click – Search.
- From the appearing result, look for the version that matches your PC specs.
- Click – Download.
- From the pop up page, click the link available there.
- If asked, choose Save File and then click – OK.
- Go to the directory where the system saves downloaded items.
- Double-click the MSU file you got.
- Click – Yes.
- Comply with on-screen instructions to finish the process.
Way-3: Run Windows Update Troubleshooter
If you are having update Error 0x80071160 in Windows 10 or 11, can run this troubleshooter which works as a Windows update error fixer –
For Windows 11
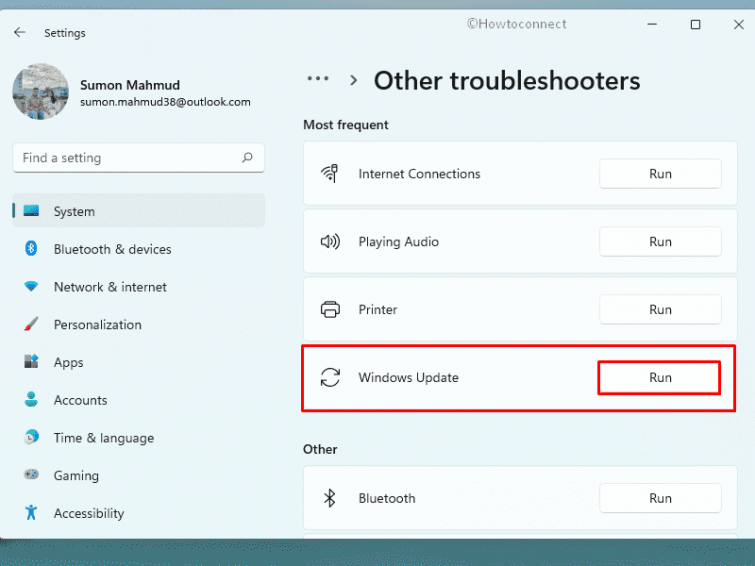
- Press – Windows + I.
- Choose – Troubleshoot.
- From the next page, click – Other troubleshooters.
- Click – Run present next to Windows update.
- Keep following on-screen instructions.
- When the utility comes with a resolution after scanning the system, click – Apply this fix.
Windows 10
- Open Windows Settings.
- Click – Update & Security.
- Select – Troubleshoot.
- Move to right-pane.
- Click – Additional troubleshooters.
- Select – Windows update.
- From the expanded tray, click – Run the troubleshooter.
Way-4: Clear SoftwareDistribution Folder
“SoftwareDistribution” folder holds the files that are needed to carry out Windows updates. However, sometimes the components inside or the folder themselves become corrupted and cause the error 0x80071160 in Windows 10 or 11. To eradicate the issue, you will have to clear the folder straightway. Don’t be doubtful to do this step as it is completely safe to delete as Windows will re-download and re-create all the necessary components once removed. To clear SoftwareDistribution folder, follow the below steps –
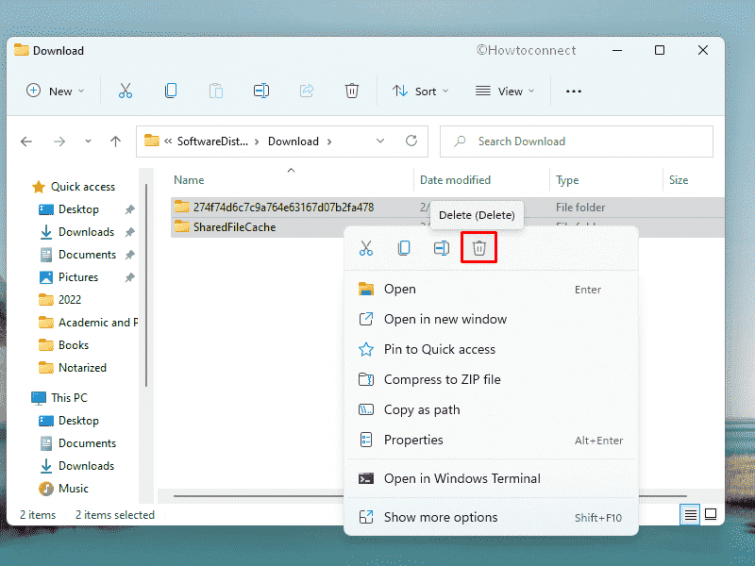
- Press – Windows + E.
- From File Explorer, navigate to – C:\Windows\SoftwareDistribution\Downloads.
- Press – Ctrl + A.
- Right-click on any selected item and choose – Delete.
- After removing the files successfully, restart the machine and try to update Windows.
Way-5: Reset Windows Update component
Broken or corrupted update components are often found to generate fatal codes like error 0x80071160 in Windows 10 or 11 while installing a new patch or major rollout. Resetting those components to default is the key to restart the installation process. After execution, “Softwaredistribution” and “Catroot2” folders in Windows will be replaced with new ones.
At the same time, all the temporary files, folders associated with that update will be also deleted. The network driver will be re-registered making the task a lot easier as system corruption and network issues will be fixed immediately. In order to reset the Windows Update components, follow the below guidelines –
- Press – Windows + R.
- In the Run command, type – cmd.exe.
- Hit – Ctrl + Shift + Enter.
- To allow User Account Control, click – Yes.
- Copy the following lines in turn and paste them into the Command Prompt. Also, hit Enter key after each one –
net stop wuauserv

net stop cryptSvc

net stop bits

net stop msiserver

ren C:\Windows\SoftwareDistribution SoftwareDistribution.old

ren C:\Windows\System32\catroot2 Catroot2.old

net start wuauserv

net start cryptSvc

net start bits

net start msiserver
- Close the Command Prompt.
- Restart the PC.
- After signing back in, check whether the Windows update is working properly.
Way-6: Run SFC scan
System File Checker is a powerful utility to bring back the missing or misplaced components from Windows core and also fix the corrupt ones. SFC scan runs in Elevated Command Prompt by executing a specific command-line tool. Update Error 0x80071160 in Windows 10 or 11 is often triggered from the system file corruption as well. To fix the glitch with the System File Checker tool, follow the below guidelines –
- Press – Windows key.
- Type – cmd.
- Press – Ctrl + Shift + Enter.
- When User Account Control appears, click – Yes.
- Type – Sfc /scannow.
- Hit – Enter.
- Let the scanning progress hit 100%.
- If the utility fixes existing corruption, restart the machine and check for Windows update.
- In case of getting update Error 0x80071160 again, you will have to run DISM scan.
- For that, open Command Prompt as admin as above.
- type – DISM /Online /Cleanup-Image /RestoreHealth and hit – Enter.
- When the process ends, reboot the device.
- Once the system powers up, run SFC scan in the elevated command prompt once again.
Way-7: Disable antimalware program
Anti-malware programs are built with a strong interface to detect and demise the virus components from any source. On frequent occasions, they also misjudge the update files as suspicious. Eventually, the program won’t allow OS to download and install those update patches and that could be the reason for error 0x80071160 in Windows 10 or 11.
To overcome this issue, you have to disable the anti-virus program for some time and retry updating Windows. Don’t forget to enable them once the updating task is finished successfully to ensure the security of the device.
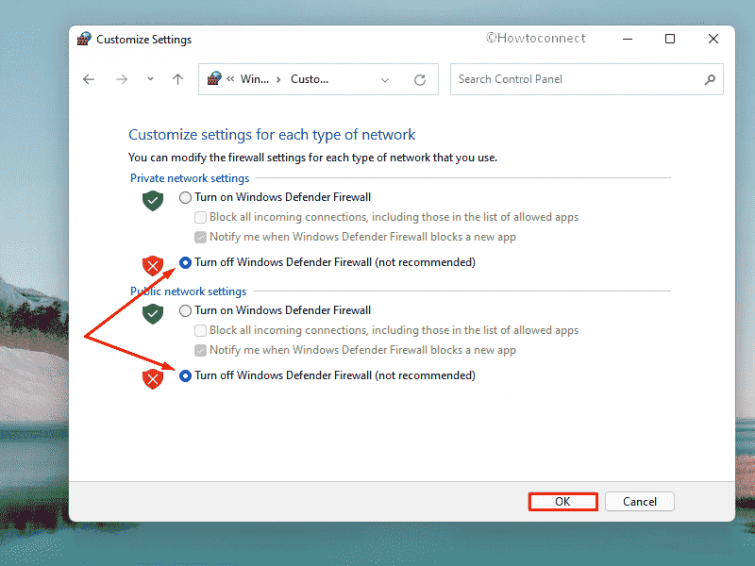
Turn Windows Defender Firewall off
- Press – Windows + S.
- Type in – control panel.
- Hit – Enter.
- Set the View by option to Large icons.
- Click – Windows Defender Firewall.
- From the left column, click – Turn Windows Defender Firewall on or off.
- Select – Turn off Windows Defender Firewall (not recommended) for both Private network settings and Public network settings.
- Click – OK.
Disable third-party antivirus program
- Click the up arrow icon from the notification bar.
- Right-click on the icon of your antivirus software.
- Choose – Disable.
- Choose a time period for how long you want to keep this disabled.
Way-8: Perform a Clean Boot
When you install a large number of third-party programs and services in Windows, they cause various issues if they are not trustworthy. Yet you continue installing more often and similar programs get into conflicts that are known as software collisions. However, the effect of this is a massive one and forces to erase necessary data from Windows and give away fatal codes.
Update Error 0x80071160 in Windows 10 or 11 might also be a result of the software collision. As a fix, you can consider performing Clean Boot in Windows, this will allow the system to start with basic programs and services only. This will also help you to know if there is any third-party program causing this trouble. To perform a Clean Boot in OS, follow the below guidelines –
- Click – Start icon.
- Type in – Msconfig.
- Hit – Enter.
- Select the radio button set for Selective startup.
- Uncheck – Load startup items.
- Shift to – Services tab
- Check the box present next to Hide all Microsoft services.
- Click – Disable all.
- Go to the Startup tab.
- Click the link – Open Task Manager.
- Right-click on each program that exists there and select – Disable.
- Close Task Manager and go back to the System Configuration window.
- Click Apply and then OK.
- Restart the PC.
- After signing back in, open Windows settings and check for update.
Methods list:
Way-1: Reboot Windows
Way-2: Try manual update
Way-3: Run Windows Update Troubleshooter
Way-4: Clear SoftwareDistribution Folder
Way-5: Reset Windows Update component
Way-6: Run SFC scan
Way-7: Disable antimalware program
Way-8: Perform a Clean Boot
That’s all!!