Do you encounter 0x800f0922 error while installing a patch or in Windows 10 or 11? Commonly this issue causes to fail the installation of the KB cumulative update repeatedly. However, the problem may also occur with feature update or build but every time you will face the incomplete install.
More often the Error 0x800f0922 appears due to insufficient free space in the System reserve partition or lack of a stable connection with Windows Update Server due to a VPN conflicting with network. Furthermore, during installation, the request for .NET framework has been failed as it is not enabled in time is also a determinant. Though less likely but sometimes a corrupted update file may also trigger this issue off and on in comparatively older windows upgrades. But don’t worry, you will find here easy working ways to fix fail to Windows update install error 0x800f0922.
Windows 11 and 10 Update Error 0x800f0922 Failed to install
Here is How to Fix Update Error 0x800f0922 Failed to install on Windows 11/10 PC –
1] Purge Windows Update components
If 0x800f0922 keeps on coming frequently, there might be some issues with the Windows Update components. To resolve, you have to remove all the contents from the Download folder in SfotwareDistribution. This action will purge the components and the installation will take place smoothly.
To Reset follow the below instructions –
- Click the Start, type in “services” and then hit – Enter.
- Locate – Windows Update service.
- Right-click on the same and select Stop.
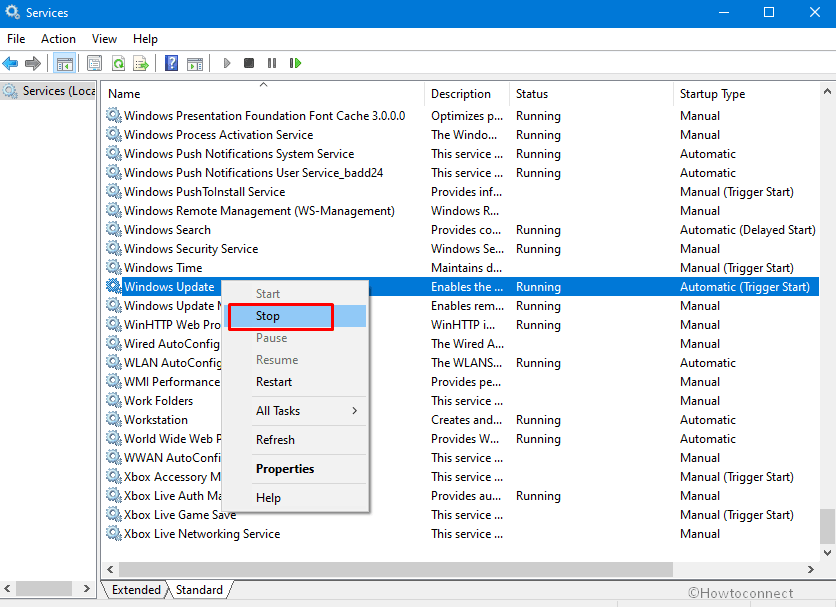
- Similarly, stop the BITS and Superfetch services as well.
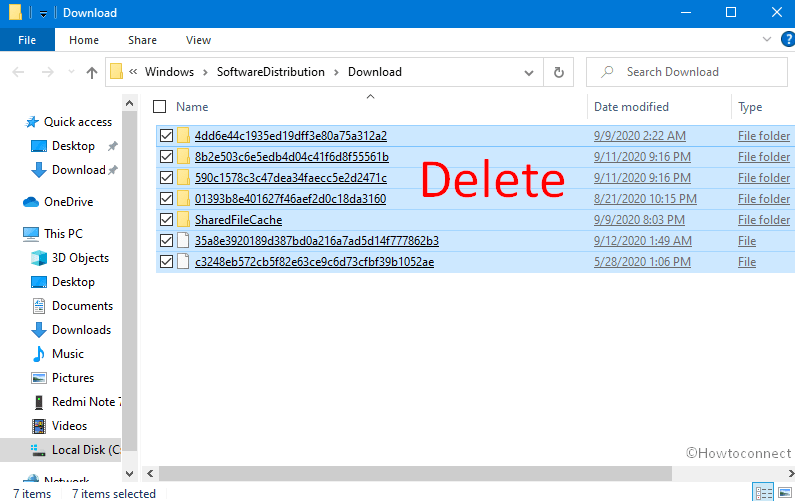
- Now, hold down the Win key + E.
- Navigate to the path – C:\Windows\SoftwareDistribution\Download
- Select all the contents in the folder by pressing Ctrl+A keys at once.
- Hit Delete.
- Return back to the Services window again and locate Window Update, BITS, and Superfetch services.
- Right click each one and select Start.
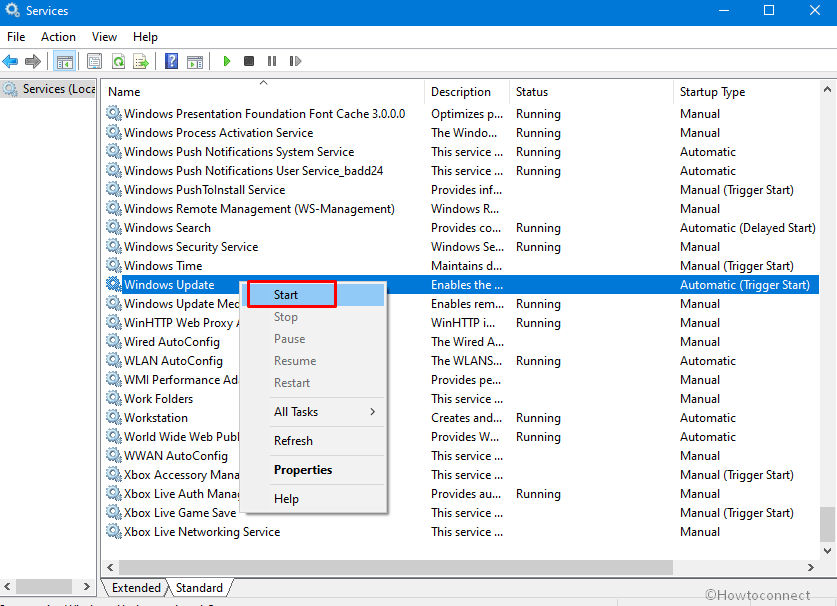
- Once done, close all the windows and restart the computer.
- Try updating the patch again after coming back to operation.
See – How to Reset Windows Update to Default in Windows 10
2] Ensure good stability of Internet Connection and turn off VPN
Just after you come across error 0x800f0922 while installing cumulative update or feature update, the first you have to check is the stability of your internet connection. There might be internet service provider having some maintenance on the line. The most expected cause for this issue is failure in establishing connection with Windows Update Server, Virtual Proxy Network, or conflict with the Home or Office Network. In addition, a VPN network leads to updating error issues off and on.
Therefore, the best way to fix the problem is to disable such network if it’s not a mandatory thing. To fix the above shortcomings, you need to follow the below steps –
- Click on the – Network icon – from the Taskbar.
- If you are using Windows 11, click rightward arrow icon present beside your network.
- Click Disconnect if internet access is active.
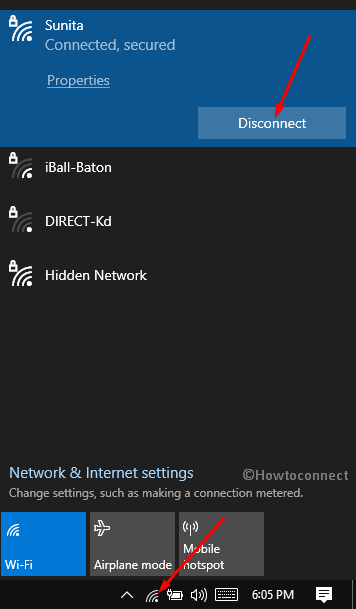
- In case, there is any VPN software enabled in the system, disable it right away.
- Once completed, Restart the Windows.
- After the desktop area loads back, connect to the Home or Office Network.
- Now, run the Microsoft Windows Upgrade again.
- If the updating is successful, you can again Enable the VPN software in case necessary.
3] Install .NET Framework to fix 0x800f0922
Some sources indicate that error “0x800f0922” occurs when the .NET Framework is disabled. In that condition, the Windows fails to enable it at the time of installing the patch and the error shows up.
Therefore, before proceeding to install the latest Windows Update patch, make sure to enable the .Net Framework using below instructions –
- Press – Win+Q.
- Type windows features and then hit the enter.
- Check the box set for “.Net framework” Note – if there are multiple versions check all.
- Click the OK.

- This will take some time so wait a while and try installing the updates again.
You can also follow this post to avoid such error in future – How to Automate .Net Framework 3.5 installation on Windows 10.
4] Free up System drive using disk cleaning tool
The main cause revealed for 0x800f0922 Failed to install issue is insufficient space in the system reserved partition. Oftentimes a lot of junk is accumulated in the drive which is unnecessary. These files can cover up some gigabytes of space and the required space for installing new patches becomes insufficient.
Disk cleaning tool is a super handy utility to wipe out all the unnecessary junk files from various sections. This is how you can make much free space in the disk and eliminate having the possibility of error while installing the new updates. Follow the below guidelines –
- Press Win+S, and type in cleanmgr.
- Hit – Enter.
- Select the C: Drive and then click – Ok.
- Next, click the Clean up system files.
- Choose C: Drive again
- Press – Enter.
- Check all boxes in the Files to delete section.
- Click OK and begin cleanup.
- Select Delete files from the confirmation popup.
- Reboot the Windows after completing the action.
- Once the desktop area loads back, error Windows update 0x800f0922 system reserved partition will no longer occur.
5] Configure trusted installer
Trusted Installer is a genuine Windows process that Microsoft includes starting from Vista version. This will relentlessly protect the system files (.exe, .dll, .sys) from all sorts of unauthorized accesses. The feature also has a good deal with Windows Updating process and you might encounter issues if it is not configured.
In order to get 0x800f0922 solved, you must try configuring the trusted installer. The instructions are as follows –
- Click the Start, type advanced startup, and hit enter.
- Select – Restart now.
- From the next screen, choose – Troubleshoot.
- Then, click – Advanced options.
- Choose – Command prompt.
- Enter your username and passkey to launch the command prompt.
- Copy-paste the following text and hit – Enter.
SC config trustedinstaller start=auto
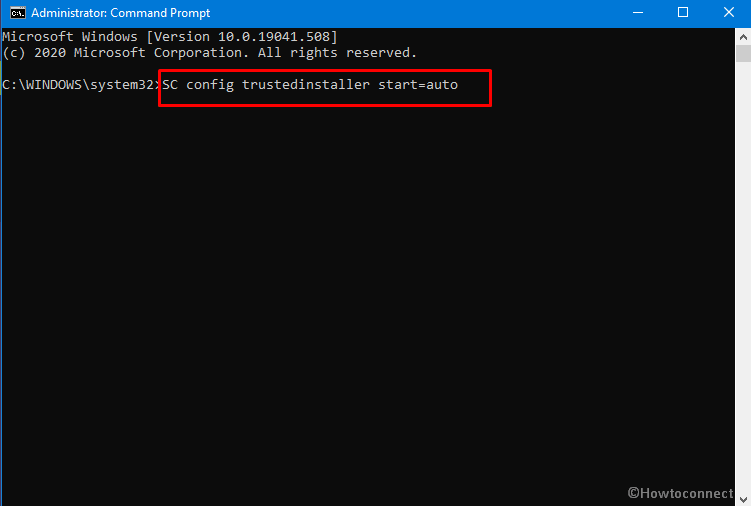
- After the process successfully ends, Restart Windows.
- Try carrying out the Windows update again.
6] Delete temp files to solve 0x800f0922
When the C: drive stores a bulk amount of temporary junk files and caches, there might be an interference in the Windows Update process. Error 0x800f0922 Failed to install might be a result of the snafu.
However, you can easily clean these junk not only to resolve the generated error but also to maintain the better functionality of the computer. Here is how to delete the temporary files –
- Press Win + S, type %temp%, and then hit Enter.
- Press Ctrl+A together to select All.
- Hit the Delete on your keyboard.
- Once removed, Restart the computer preferably.
- Try to run the Windows Update again and check if it is successful this time.
Follow this one – How to Delete Temp Files at Every Startup in Windows 10.
7] Tweak specific Registry entries
Oftentimes, some incorrect Windows Registry entries cause problems in the Windows Updating Process. If the same happens, you can encounter error 0x800f0922 in Windows 10 or 11.
In order to resolve the error due to the above reason, you have to tweak a specific key. To address, this is a very sensitive part of the system and can damage the computer permanently in case of any mistake. So carry out the below steps with care and at your own risk –
- Invoke Run dialog (Win+R) and type in Regedit.
- Select – OK.
- Click Yes when the User account control prompts.
- Navigate to the below path –
“HKEY_LOCAL_MACHINE -> SOFTWARE -> Microsoft -> Windows -> CurrentVersion > WINEVT -> Publishers”
- Right-click on Publishers and choose Export.
- Name the file and then click – Save.
- Find out for the below keys, then delete them –
HKEY_LOCAL_MACHINE\SOFTWARE\Microsoft\Windows\CurrentVersion\WINEVT\Publishers\{8c416c79-d49b-4f01-a467-e56d3aa8234c}HKEY_LOCAL_MACHINE\SOFTWARE\Microsoft\Windows\CurrentVersion\WINEVT\Publishers\{e7ef96be-969f-414f-97d7-3ddb7b558ccc}- Reboot and the error will be hopefully solved.
8] Disable Built-in Firewall
The Security tool Windows Firewall is available in Windows to block unauthorized entrances of suspicious elements from the web. Sometimes, it may also prevent a Windows Update file considering it as malicious. Consequently, you might see Windows Update Error 0x800f0922 Failed to install.
Nevertheless, you must not disable the firewall for any circumstances; you can temporarily turn it Off until the update process is running. To complete this task, follow the below instructions –
- Press Win+Q, type Control and then hit the Enter.
- Click the – Window Defender Firewall.
- Choose the – “Turn Windows Defender Firewall On or Off” option located at the left column.
- Click the radio button for Turn off Windows Firewall (not recommended) under both private as well as public sections.
- Hit the OK button to save the changes.
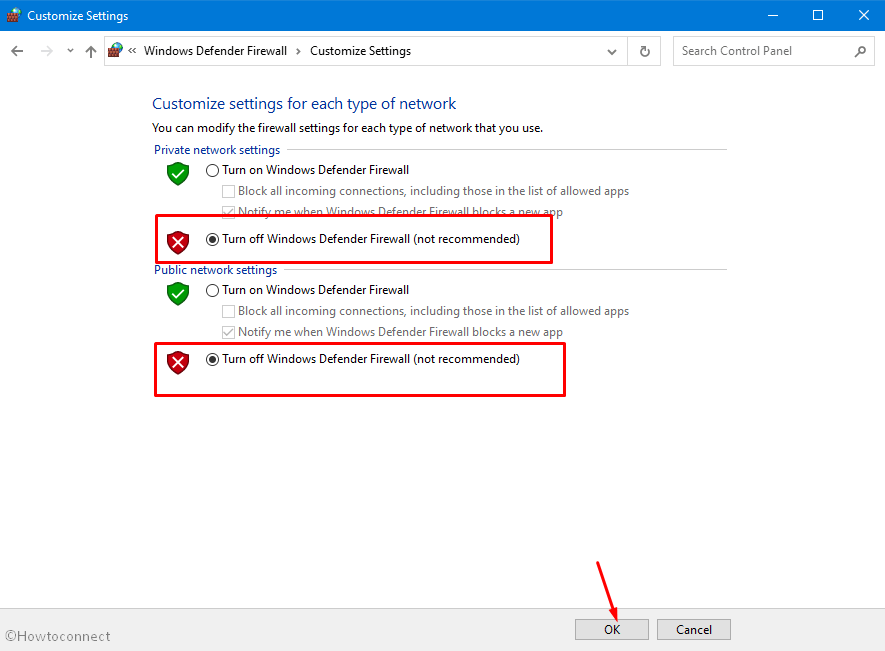
- Now, try installing the update and check if 0x800f0922 error still happens.
Alternatively, you can see here – How to Enable / Disable Windows Defender Firewall in Windows 10.
9] Fix defective Windows image files
Sometimes problematic windows image files are also responsible for the Windows Updating issues. Thereafter, you may encounter Error 0x800f0922 and deprived of experiencing latest features. Windows image files are the snapshots of ISO saved in the ISO-9660 format and can be corrupted easily by the effect of a third party tool or from malware attack.
However, the easiest way to repair these components is to run the DISM tool. The default utility is very much handy for the offline image files as well when activated in the Elevated Command Prompt. To run this, follow the below instructions –
- Click Start, type cmd, and then press Ctrl+Shift+Enter.
- When the User account control prompts up, click Yes.
- Once moved to the Elevated Command Prompt window, enter below command –
DISM /Online /Cleanup-Image /RestoreHealth
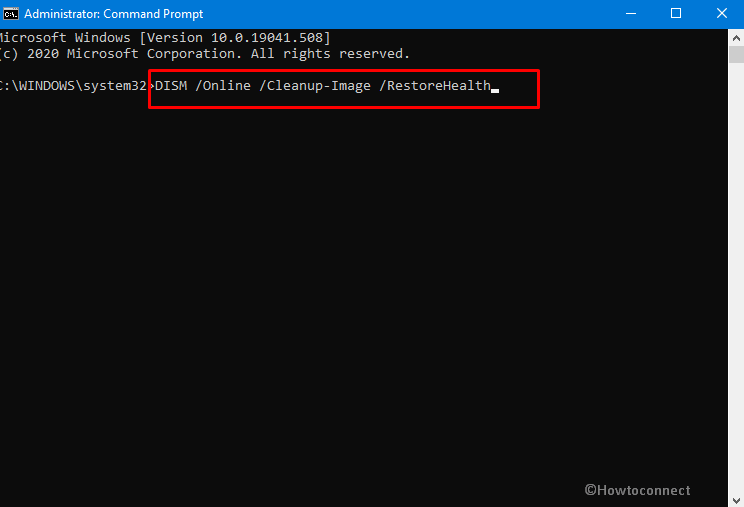
- Press the Enter.
- In the process, the DISM tool will try detecting the corrupted windows image files and fix them accordingly.
- Once completed, restart Windows and install the latest update patch.
10] Restart with Clean Boot to get rid of 0x800f0922 Fail to install error
Clean Boot is quite an advanced troubleshooting technique to detect which application or service is responsible for critical trouble. Commonly, this is used when a non-Microsoft application causes a software conflict. The process prompts the starting up of the Windows loading only the essential applications and settings.
Clean Boot can fix the probable issues responsible for Windows Update Error 0x800f0922 and initiate installing again. To perform this workaround, follow the below instructions –
- Press the – Windows key and type in – msconfig.
- Select the radio button set for Selective startup.
- Uncheck the box for – Load startup items.
- Click – Services tab
- Tick the box that reads – Hide all Microsoft services.
- Select the – Disable all.
- Next, click the – Startup tab.
- Select the link – Open Task Manager.
- Right-click on each program listed on Task manager and choose Disable.
- Return back to the System Configuration window and click Apply.
- Last, hit the Ok button to carry out Clean Boot.
11] Fix the corrupted system components
Sometimes corrupted system files may be another very strong cause to throw Windows Update Error 0x800f0922 failed to install issue. System Files are the critical components ensuring the OS to run properly having hidden attributes enabled in them. Commonly these files are subjected to corruption due to malware infection, sudden power surge, and update bugs.
Fixing the System files is must in order to resolve a generated Windows Update issue. And for that, System File Checker is the ultimate solution that activates in the Elevated Command Prompt. The steps to run this tool is as following –
- Access elevated command prompt.
- Enter the below command –
SFC /Scannow
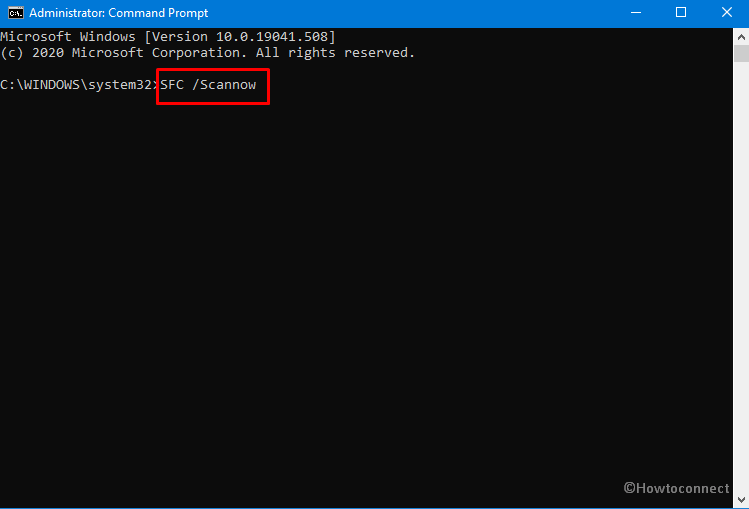
- The process may take a little longer, we recommend you to have patience and wait till it ends.
- Once done, Restart the computer check if 0x800f0922 windows update error is fixed.
12] Use the Windows Update Troubleshooter
In case of any problem related to Windows Update, Microsoft has been offering troubleshooter. This can easily detect where the issues are actually and fix them easily. This is one of the easiest ways to resolve Windows Update Error 0x800f0922. To Run the utility, follow the below steps –
For Windows 10
- Press the Windows key, type in troubleshoot and then hit Enter.
- Select Additional troubleshooter (Note – in older versions of Windows 10 you don’t need to do this).
- Click – Windows Update.
- Choose – Run the troubleshooter.
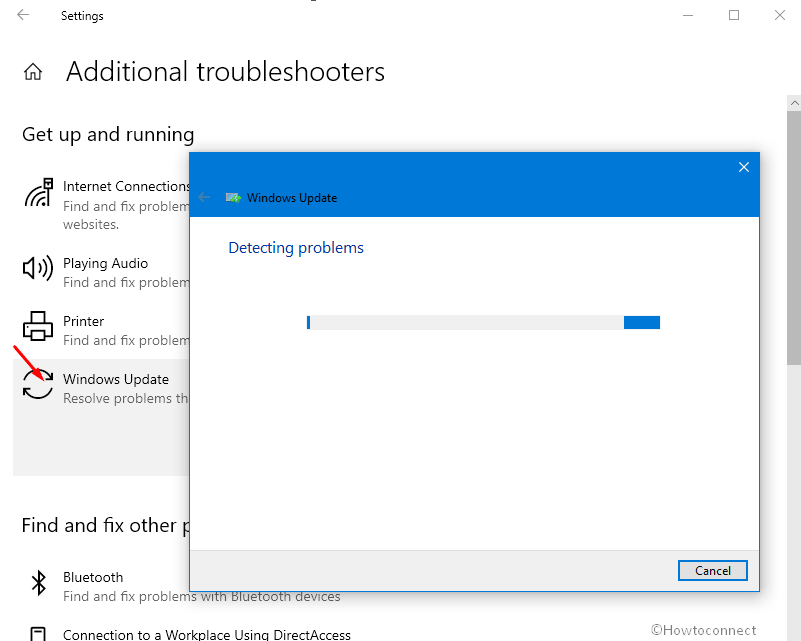
- Once the process ends successfully, Restart the computer.
- Install the latest Windows Update Patch now.
For Windows 11
- Press – Windows + I.
- From right pane, scroll down a bit and choose – Troubleshoot.
- Select – Other troubleshooters.
- Click Run present beside Windows update.
Methods:
1] Purge Windows Update components
2] Ensure good stability of Internet Connection and turn off VPN
3] Install .NET Framework
4] Free up System drive using disk cleaning tool
5] Configure trusted installer
6] Delete temp files
7] Tweak specific Registry entries
8] Disable Built-in Firewall
9] Fix defective Windows image files
10] Restart with Clean Boot
11] Fix the corrupted system components
12] Use the Windows Update Troubleshooter
That’s all!!