When users make an attempt to launch Valorant in Windows 10, some of them come across Vanguard not initialized error. Basically, Valorant is a first-person shooting (FPS) game developed by Riot Games which has brought tremendous craze among game lovers. Though being a popular game, it still comes with bugs and issues.
Vanguard is the anti-cheat program from Valorant game and initialization issues in Windows 10 are linked with the installation. Riot Games has come up with the latest version of Valorant game and you have to install the update before trying the workarounds. Then a simple reboot or driver update can be helpful until the manufacturer comes up with potential fixes. Now follow the workarounds that are effective and many users have resolved the error by deploying.
Vanguard not initialized
Here is How to Fix Vanguard not initialized Valorant in Windows 10 –
1] Close Valorant and Re-launch the game
Sometimes, Vanguard not initialized Valorant in Windows 10 issue comes up usually and doesn’t seem complicated. Just quit the game launcher and a reboot of Windows will fix the trouble. Follow the below instructions to accomplish this task –
- Close the Valorant Game and then exit the game launcher.
- Press the Windows key and click the Power icon from Start menu. Click Restart.
- On the next startup, try to launch the game again to check for the error.
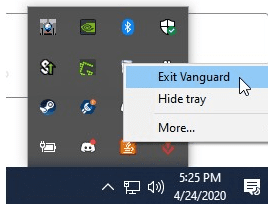
2] End the Vanguard Process from Task Manager
Another possible solution to fix Vanguard not initialized error is by ending the Riot Vanguard process. Make sure that the process is not functioning in the background and is forcibly closed. For that, follow the below steps –
- First of all, go to System Tray, click the icon of Vanguard and choose Exit Vanguard.
- Make a right-click on an empty area of Taskbar and select Task Manager.
- Once you open Task Manager, highlight the Processes tab. Locate and select Riot Vanguard.
- Choose End Task.
- Restart the computer and upon coming back to a new session, launch the game again.
- Hopefully, the Vanguard not initialized in Windows 10 will not come into view.
3] Update the Graphics Card driver
In many cases, updating Graphics card drivers found to recover the game from Vanguard not initialized in Windows 10. For the task, go through the below guidelines –
- Open Run dialog box and to do so press Win+R hotkey at once.
- Type devmgmt.msc.
- When the Device Manager arrives, move out to Display adapters and expand it.
- Right-click the dedicated graphics card driver. Choose Update driver option.
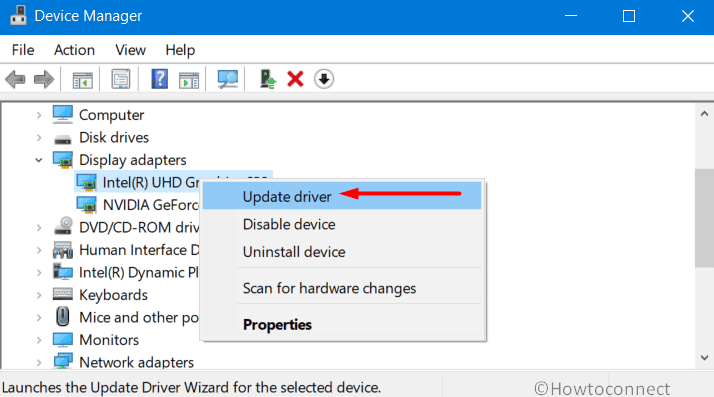
- Proceed ahead by selecting “Search automatically for updated driver software“.
- The installation will commence after the download gets over.
- Once the process finishes, restart Windows 10 PC.
Important – Ensure the device is connected to an internet connection to initiate downloading automatically.
4] Keep Windows 10 up to date
In an outdated Windows, all the games show abnormalities, and Valorant is not an exception. Therefore, updating Windows 10 will be a good attempt to fix the Vanguard not initialized error. Usually installing the latest patches take place automatically in Win 10 when the computer is under an active internet connection. Even though, you can approach manually to complete the task. Here is how to do it –
- Fire up Start menu pressing Windows key and clicking the tiny cog icon.
- Click Update & Security.
- On the next page, by default, Windows Update located at the left pane gets highlighted.
- Shift to the right pane and click Check for updates button.
- Once the search ends, download the files and install them in the system.
- Reboot Windows 10 to make changes effective and then try running the Valorant game once again.
5] Disable and Uninstall the Valorant in Windows 10
As aforementioned, uninstalling the Valorant game doesn’t actually disable or uninstall the Riot Vanguard from your system. Therefore, you have to disable the same manually using below instructions –
Disable Vanguard
- Click on Show hidden icons from the right of the taskbar.
- Make a right-click on the Riot Vanguard icon.
- Choose Exit Vanguard from the appearing menu.
- Click Yes when a warning pop up dialog prompts.
Uninstall Vanguard
- Bring up the Power user menu pressing Win+X shortcut together.
- Choose Apps and Features option.
- When the Apps Settings opens, reach out to Riot Vanguard on the right-side list.
- Select the app and hit Uninstall from the extended pane.
- Hit Uninstall when prompts to confirm.
- When the UAC asks for permission, click Yes button.
- Lastly, Restart the device and upon startup run the Valorant game.
- It will re-install the Vanguard automatically.
6] Enable the VGC Service to fix Vanguard not initialized
Disabling the VGC service often found to cause Vanguard not initialized in Windows 10. Therefore, you may enable the service using the given below method –
- In Taskbar Search, type cmd.
- Right-click Command Prompt when available in results.
- Choose Run as Administrator and also click Yes when UAC prompts.
- In the black window, copy-paste below command line press Enter key to check if the Vanguard Service is correctly installed in the system.
sc query vgc
- If the command throws an existing service with the name vgc, type the following command to start Vanguard manually.
net start vgc
- Press Enter key to enable the service.
7] Resolve Vanguard not initialized issue using Command tool
Some experts suggest executing few commands in the elevated Command Prompt to resolve the Vanguard not initialized in Windows 10. For that, follow the below guidelines –
- Manage access to Elevated Command Prompt using guidelines mentioned before.
- Enter the below commands at the base of the blinking cursor –
bcdedit -set TESTSIGNING OFF
bcdedit -set NOINTEGRITYCHECKS OFF
- Press Enter key to execute the commands.
- Exit the Command Prompt window and try to run the game once again.
Methods:
1] Close Valorant and Re-launch the game
2] End Vanguard Process from Task Manager
3] Update the Graphics Card driver
4] Keep the Operating System Upto Date
5] Disable and Uninstall the Valorant in Windows 10
6] Enable the VGC Service
7] Run Command Tools
That’s all!!