Blue screen error sometimes behaves pretty rigidly and makes you unable to fix it even after trying different solutions. vgk.sys BSOD is such a type of issue i.e. almost irrevocable when occurs. When this error appears, the System will crash and suddenly reboot. vgk.sys is a Vanguard kernel-mode driver causing this BSOD in Windows 11 and 10. Here we are with some tricks to fix this Blue screen error.
What failed: vgk.sys indicates that the system fails to get or recognize this file when required. As a result, the system crash occurs that may further be stuck in the reboot loop. This Blue Screen mostly appears with IRQL_NOT_LESS_THAN_EQUAL, KMODE EXCEPTION NOT HANDLED, PAGE_FAULT_IN_NONPAGED_AREA, SYSTEM_THREAD_EXCEPTION_NOT_HANDLED bugcheck stop codes.
vgk.sys Blue Screen of Death or BSOD in Windows 10 and 11
Here is how to fix vgk.sys BSOD / Blue Screen Error in Windows 10 or 11 –
Way-1: Uninstall Valorant
This is confirmed that the problem occurs due to the anti-cheat solution Valorant of Riot games. Therefore, the best method to solve the BSOD is the removal of the utility. After uninstalling the solution, don’t forget to delete the files from your computer. Follow the guidelines –
- Press – Win+I.
- Select – Apps.
- On the coming Settings page, go to the right pane.
- Find and click on – Valorant.
- Click – Uninstall.
- Select – “Uninstall”.
- If any Setup wizard prompt appears follow the suggestions there until the removal is over.
- Restart the PC and check if vgk.sys error still occurs.
Way-2: Delete vgc.sys residue
Once you uninstalled the Vanguard Valorant, some files like vgc or vgk might remain as residual. Best thing is you can delete them using command prompt which are the real cause of vgk.sys BSOD problem.
- Press – Windows + R keys.
- Write – cmd.exe.
- Hit – Ctrl + Shift + Enter.
- You will come across a UAC prompt; click on – Yes.
- Type – sc delete vgc and press Enter.
- Now, type – sc delete vgk press Enter.
- Restart the system and check for the error.
Way-3: Run SFC and DISM tools
When the vgk.sys would trigger with blue screen there might be corrupted system files behind this. The files are commonly damaged because of malware threats or invasion, conflict with any third-party programs, buggy Windows update, etc. Once they’re broken your system crashes and throws blue screen error. Fortunately, you can easily fix the issue only using cmd command SFC /Scannow in the command prompt as administrator. Similarly, you can solve any problem with windows image using the DISM tool. Follow the steps to run both the utilities –
- Click the – Start.
- Type – cmd.
- Right click on the – Command prompt.
- Select – Run as administrator.
- Type –
SFC /Scannow.
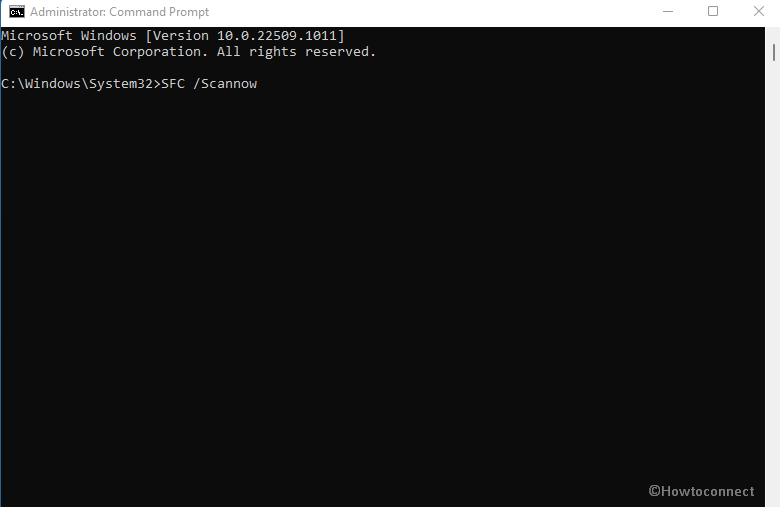
- Press – Enter.
- The tool will soon begin scanning and repairing the corruption.
- Once it reaches 100 percent, reboot your PC.
- Again open Command prompt as administrator.
- Now, type –
DISM /Online /Cleanup-Image /RestoreHealth. - This will repair.wim. Once completed, restart the device.
- Check if the blue screen still persists.
Way-4: Uninstall third-party app
Similar to other BSODs, vgk.sys might occur because of third-party utilities installed on Windows 10 or 11 PC. In fact, the app commonly engages in conflict with system elements. Consequently, system crash takes place with unexpected restart of the computer. The solution is quite easy as you need to uninstall the utility using the below instructions –
- Press – Win+R.
- Type –appwiz.cpl.
- Hit – Enter.
- Once Program & features window loads showing the apps installed on your machine. find the program.
- Right-click on it and select the – Uninstall.
- A very small confirmation pop-up prompts; select ‘Uninstall’ on it.
- Follow the guidelines further for complete eradication.
- Reboot the system and see if the BSOD flaw no longer occurs.
Way-5: Use the Full scan setting of Windows security
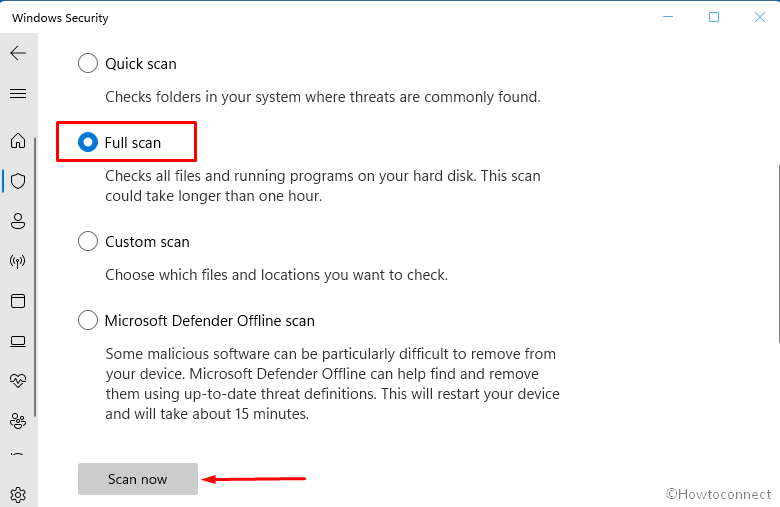
Malware, everyone knows, can raise any problems including BSOD in Windows operating system. The manipulatively developed codes enter the system through emails, less trustworthy software, and flash drive carrying viruses. They disrupt the structure of system files and windows components and, as a result, the Blue screen of death appears at once. Therefore, if you notice abnormal behavior of your computer before you have encountered the blue screen the always remember to take remedial measures for malware cleaning. When we are on Windows 10 or 11 you cannot imagine any app better than Windows security because this is the most powerful tool among its third-party rivals. Using its full scan you are able to clean malware in a few simple steps below –
- Click – Search.
- Type – security.
- Press – Enter.
- When Windows security app opens up, click on – Virus & threat protection.
- Click – Scan options.
- From the next page, check – Full scan.
- Click – Scan now.
- This process will take a large amount of time so allow it to finish completely and then follow the recommendations to clean threats.
- Finally, restart the PC and hopefully, the error will be solved.
Way-6: Install the Windows update awaiting action
When an error is generated on a mass basis in Windows 10 or other version it is noted as a bug and an official team starts working to find its resolution. vgk.sys BSOD is the issue that numerous game players are struggling with so there is the possibility that you get a Windows update addressing this.
Furthermore, this patch may work as an official fix for the blue screen generally caused by Valorant anti-cheat. So check for the Windows update and install them if pending –
- Press – Winkey+I.
- Click – Update & security.
- When the next settings page appears, click – Check for updates.
- Now the system will scan and download any updates if they are waiting for.
- Once completed, you will be asked to Restart now. Click on this and wait until the installation gets over.
- The error should be solved now.
- In case of Windows 11, when the Settings app opens up, click on Windows update.
- Go to the right pane and then click on – Check for updates.
Way-7: Update driver
Blue screen vgk.sys might occur due to obsolete drivers present on your system. So you need to thoroughly check the list in Device Manager for the outdated drivers and update them if found. Follow the steps –
- Press – Winkey+R.
- Type – msc.
- Hit – Enter.
- When the Device Manager opens up, go through the list of devices.
- Expand the drivers by clicking on Devices one by one..
- Once you find yellow exclamation mark against any, do right-click on that.
- Select – Update driver.
- You will notice a wizard; select – Search automatically for drivers.
- Repeat the same for the drivers showing caution and reboot the system at last.
Way-8: Uninstall other third-party apps
When built-in applications don’t help you achieve your goal the third-party utilities are options during working on Windows. But sometimes these tools might become a cause of disaster if they create conflict with certain system files like .DLL or .exe files. Even the situation might generate bug check and BSOD in the worst instances. So if you have installed third-party apps remove them on first priority in case of getting BSOD error. Below method will help you to fix it by uninstallation of apps –
- Right-click on – Start.
- Select – App and features.
- When the Settings app appears, allow the installed programs to load.
- Scroll down and find the third-party program.
- Click on this to expand the pane.
- Select – Uninstall.
- Again click on “Uninstall” from a tiny confirmation pop up.
- Follow the instructions if shown on the screen in order to execute uninstallation.
- Restart the PC and check if the error still occurs.
Way-9: Uninstall the recently installed Windows update
When using this method you need to confirm first of all the error started immediately after installing a Windows update. Fulfilling this condition indicates that the update has bugs or it is not compatible with the Valorant anti-cheat solution. But the positive side is you can easily fix the error by uninstalling the update. You only need to follow the procedure –
- Click – Start.
- Select – Settings.
- Now click on – Update & security.
- From the right pane of the next settings page, click on View updates history.
- Select – Uninstall updates.
- A window from Control panel will prompt; go to the Microsoft Windows section.
- Right-click on the update (Showing KB…).
- Select – Uninstall.
- Confirm by clicking on – Yes.
Way-10: Use System Restore
If the above fixes don’t work then System Restore is the last piece of equipment for you. This method will send your system back to the date and time when the vgk.sys blue screen was not appearing. But one thing to care for, save your important docs and other data otherwise system restore may wipe them out. Then follow –
- Click on – Search.
- Type – rstrui.
- Hit – Enter.
- System restore wizard will prompt up; click on – Next.
- From the coming window, highlight the date and time when the error started.
- Click on – Next.
- Then click on – Finish.
- This is also a big time-consuming process so you need to sit back until system restore ends up.
Way-11: Clean install
Suppose you haven’t got success fixing vgk.sys BSOD blue screen error and even restore point isn’t created then the last resort is clean install. In this method, all the data will be abolished so remember to have a backup in a Pendrive or a separate local disk other than C:.
- Then go to this page .
- Click Download tool now from the Create Windows 10 installation media section.
- Once the download is finished, double click on the Setup.
- Insert a pen drive make it bootable using the options there.
- Once the device is ready, reboot your laptop. Follow the steps depending on Device to clean install.
Methods list:
Way-1: Uninstall Valorant
Way-2: Delete vgc.sys residue
Way-3: Run SFC and DISM tools
Way-4: Uninstall third-party app
Way-5: Use the Full scan setting of Windows security
Way-6: Install the Windows update awaiting action
Way-7: Update driver
Way-8: Uninstall other third-party apps
Way-9: Uninstall the recently installed Windows update
Way-10: Use System Restore
Way-11: Clean install
That’s all!!