Blue Screen error is never less than a nightmare because it crashes the system and is hard to recover. Vsapint.sys BSOD is such a problem that causes system crash on Windows and Windows 11. The error might appear as a prefix of IRQL_NOT_LESS_OR_EQUAL, DRIVER_IRQL_NOT_LESS_OR_EQUAL, KMODE_EXCEPTION_NOT_HANDLED, PAGE_FAULT_IN_NONPAGED_AREA, or other.
When the BSOD occurs you may see What failed: Vsapint.sys. This Blue Screen of Death is the result of corrupted system files, Malware, Defective Windows image (.wim), obsolete driver, buggy Windows update, and several other reasons. Vsapint.sys is an integral part of the software Bookkeeper 2008 and it isn’t a Windows file.
Table of Contents
Blue Screen Error Vsapint.sys in Windows 10 or 11
Here is How to Fix Vsapint.sys Blue Screen Error Windows 10 or 11 –
Way-1: Uninstall Bookkeeper 2008 and then reinstall
Since Vsapint.sys is a part of the third party accounting software Bookkeeper 2008 this may be the root cause of this BSOD. Once you uninstall this tool the file will be deleted and the error will be fixed. So remove it using the below guidelines –
- Press Winkey + R.
- Type – appwiz.cpl.
- Hit Enter to launch the Control Panel\All Control Panel Items\Programs and Features window.
- Find Bookkeeper 2008 in the list and right-click on it.
- Select – Uninstall.
- Click Yes on the confirmation prompt.
- Follow if onscreen instructions if appear.
- Restart the device and check if the BSOD still persists.
Way-2: Disconnect and reconnect External Hardware Devices
We have come across too many complaints that users suffer BSOD error only after connecting the additional drive to the computer. As a part of the resolution, you have to detach and reconnect it again following the correct procedure. So go ahead with the steps =
- Unplug all external devices. You can detach them by following the method in How to Eject External Hard Drive Windows 10.
- Restart Windows 10.
- Plug the devices back one by one and reboot to check which hardware device is causing this Blue Screen of Death issue.
- After detecting which one is creating the issue, download and install updated drivers for the hardware from the manufacturer’s website.
Way-3: Install Windows Updates
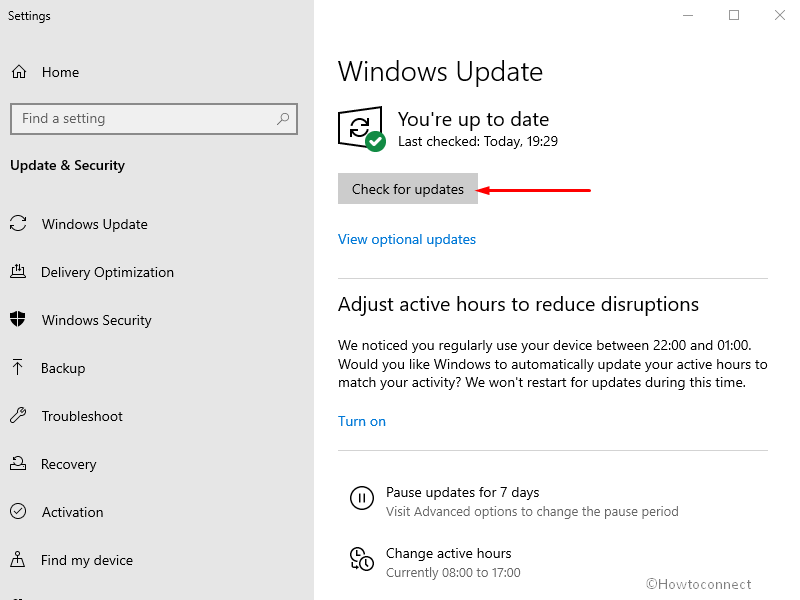
On certain occasions, Microsoft needs to do corrections after pushing a Windows update. This occurs if the update is buggy and creates some issues for a number of users. This may happen with Vsapint.sys BSOD Error if it occurs because of buggy Windows update. So, download and install all the possible updates using the following guidelines –
- Click on Search.
- Type updates.
- Press – Enter.
- On the appearing Settings page, click on Check for updates.

- Let all the updates download and install and click on Restart now after you are asked.
Way-4: Uninstall recently installed Windows update
The Windows developer company deals with Windows 10 with utmost care and rolls out cumulative updates according to schedule. These packages contain bug fixes for known issues and improvements and sometimes features if it is necessary. As per recommendation, users should download all the updates. Generally, the updates are obtainable through the Settings app and don’t show an issue while installing on the machine. However, sometimes, the process causes an error if it is terminated midway.
Apart from this, any bugs in the update may also cause mess up and conflict in the system. This is enough to show blue screen error Vsapint.sys in Windows 10 or 11. The sole method to fix the error, in this case, is removal of the buggy update using the below steps
- Press Windows and I.
- Select Update & Security.
- On the next page, click Windows Update from the left pane
- Go to the right and select View update history.
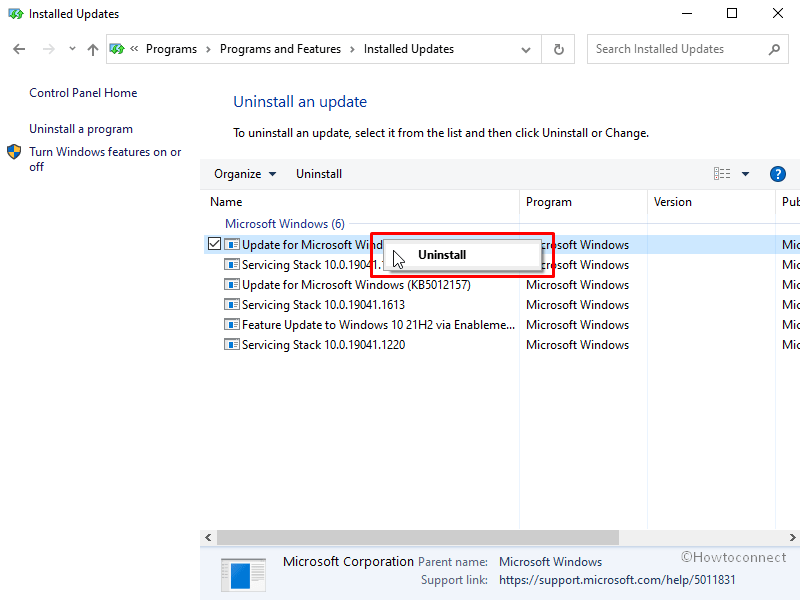
- Click on Uninstall updates.
- On the next window, right-click on an update that has been installed recently.
- Select Uninstall.

- Click Yes on the verification prompt.
Way-5: Update Drivers
We have mentioned early that outdated device drivers are accused of causing Vsapint.sys blue screen error in Windows 10 or 11. Soon after connecting a Hardware to your system, the problem can take place. The reason is that we have the propensity to install drivers from disk delivered with the package or often download the same from an unofficial website. Whereas, updating the driver via the Device Manager will rescue the problem. Here is how to do –
- Right-click on Start.
- Select – Device Manager.
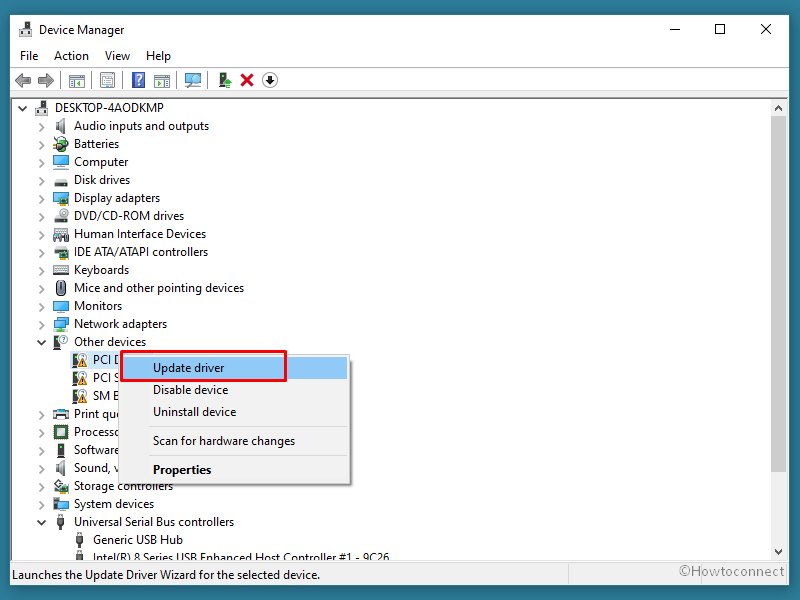
- Once the Windows tool loads, you can view a list of devices and drivers. Look for yellow exclamation marks for any devices.
- After you find it, expand the same by double-clicking on it.
- Right click on the driver.
- Select – Update driver.

- When a window appears, select the option – Search automatically for updated.
- Restart the Windows to make the changes effective.
- Repeat the procedure for each device in the list having the yellow warning sign.
Way-6: Uninstall third-party software
From the causes, it’s quite evident that conflict between two or more programs can also result in BSOD errors like Vsapint.sys BSOD in your computer. Hence, uninstalling the third-party software might be one of the potential fixes because it might cause conflict. Follow the steps –
- Press Win + R.
- Type control.
- Hit Enter.
- Right-click on the program from the Program and Features window.
- Select – Uninstall.
Related – How to Uninstall Unnecessary Apps from Windows 10
Way-7: Run System File Checker
System Files Corruption caused by the malware or the conflict between programs will result in causing Vsapint.sys Blue Screen Error in Windows 10 or 11. Windows contains the System File Checker tool, in brief, SFC, in this concern to repair the corruption in the files like .exe, .sys, .dll, and other. Its task is to identify the broken and missing files and replace them with the same taking from the cache folder. Follow the method –
- Press Windows and R keys simultaneously.
- Type cmd.exe.
- Hit – Ctrl+Shift+Enter.
- On the UAC prompt, click Yes.
- Type
sfc /scannowafter C:\Windows\System32>. - Press Enter.
- The command starts working and shows the status in real-time so here you need to wait patiently.
- In the end, reboot the system.
Way-8: Use DISM tool
Sometimes, malfunction in the Windows image is solely accountable for causing Blue Screen of death error or bug checking. DISM is the remedy to this issue and running its command will recover the image within Installation Media even in the Virtual HDD. Here is the workaround –
- Press Win+S .
- Type cmd.exe.
- Click on Run as administrator.
- Once a User Account Control prompts up, click on Yes.
- After the Command Prompt loads, type the following and hit Enter–
DISM.exe /Online /Cleanup-image /Restorehealth
- Once the DISM scan is over, Restart the Windows.
Way-9: Scan full system
Threats and vulnerabilities are one of the major concerns for a Windows PC as they are capable of destroying the whole security system. Because the Internet is becoming easily available everywhere, we cannot restrain surfing and often move into less trustworthy and even malicious websites and click spam emails.
Thus, malware enters your system and imposes maximum damage. Subsequently, district the system structure, Program files, and other Windows components. The files become missing and corrupted. These missing files call up Vsapint.sys BSOD error in Windows 10 or 11. Therefore, you need to be constantly alert while browsing and for extra protection, should follow regular checking for threats. Windows 10 or 11 has a built-in utility called Windows Security which is robust enough to deal with the threats. Run the tool using the steps –
- Right click on Start.
- Select – Settings.
- Click on Update & Security.
- On the following page, select Windows Security from the left pane.
- Click on Virus & threat protection from the right.
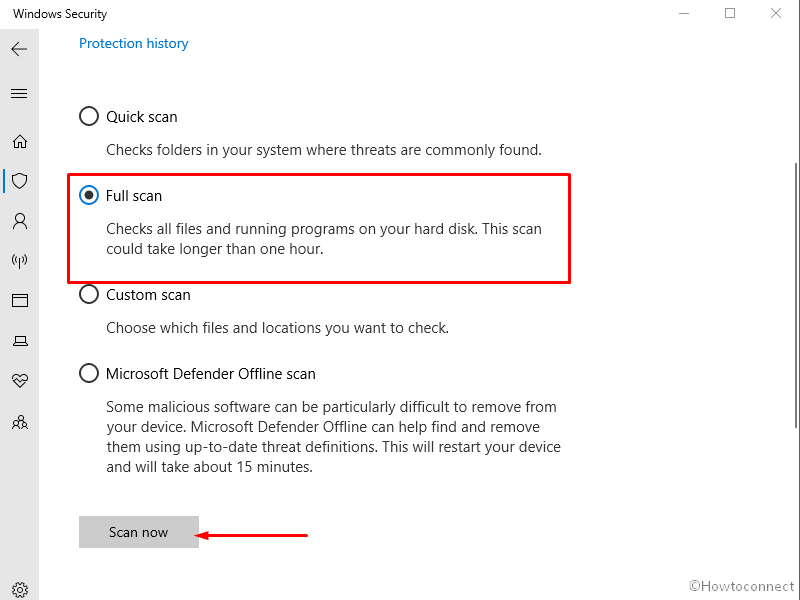
- An app prompts; select Scan options.
- Check – Full scan.
- Click on – Scan now.

- Once the scanning is completed, you will get a notification having suggestions.
- If the scan detects any threats, click Clean threats.
- If trying to have more information select See threat details
- On Windows Security, you can see three actions for the threat. Choose Remove and click Start actions.
Way-10: Boot into Safe Mode
The tech giant, after developing Windows as an Operating system, experienced that bugs and problems are inseparable parts of it. As a result, the company has added a Safe Boot tool. For any error like Vsapint.sys BSOD or Blue Screen error, Booting in Safe Mode comes at the top. In most cases, the error doesn’t persist when using DISM. So go ahead with the steps –
- Click on Search.
- Type MSConfig.
- Hit – Enter.
- On the System Configuration window, go to the Boot tab.
- Check the option – Safe boot > Minimal.
- Click on Apply and OK.
- Once a warning message appears, click on Restart.
See – 3 Ways to Boot Windows 10 Into Safe mode
Way-11: Fix RAM issues
Most often, Corruption in RAM can cause long-term damage and Vsapint.sys blue screen error as well. Therefore, you need to perform a cross-check on RAM with a Windows tool. The process of Scanning the memory will be marginally complex so you have to use the Memory Diagnostic tool. Move ahead with the steps –
- Press Win+S.
- Type – Windows Memory.
- Click on Windows Memory Diagnostic.
- Select – Restart now and check for problems (recommended).
- Soon blue screen window will prompt detecting memory issues. Once the testing reaches 100%, the computer will automatically restart.
- You can check the memory test result in the notification.
- Also, see the result through – “Right-click Start Menu > Event Viewer > Windows Log > System”.
Way-12: Restore the System to Previous time
The using this built-in setting, the system will kick off Windows to a previous time when no error was present. You will find several restore points having the option to choose one among them. After selecting the time and date the process will start and bring Windows to that. Follow the method –
- Right-click on the Start
- Choose Run.
- Type rstrui
- Click OK to let the System Restore wizard open up.
- Click on the Next.
- Select – Show more restore points.
- Choose one by highlighting.
- Click Next to proceed forward.
- Next, select Finish.
- On the confirmation dialog, click Yes.
Way-13: Perform a Clean Install
We have mentioned several solutions to Vsapint.sys Blue Screen Error Windows 10 or 11. We assume that you have already settled the issue successfully so far. In any case, unluckily you couldn’t make it, don’t be frustrated because we have one last shot left. The solution is to perform a clean installation of Windows 10. If you do this with perfection, Windows will have a new life where there will be no errors, no problems and you can work comfortably. Before starting finally, ensure you have saved a backup for all your important data, and files in a safe place. This will help you to rearrange the full system after retrieving the PC back from What failed: Vsapint.sys BSOD error.
Methods list:
Way-1: Uninstall Bookkeeper 2008 and then reinstall
Way-2: Disconnect and reconnect External Hardware Devices
Way-3: Install Windows Updates
Way-4: Uninstall recently installed Windows update
Way-5: Update Drivers
Way-6: Uninstall third-party software
Way-7: Run System File Checker
Way-8: Use DISM tool
Way-9: Scan full system
Way-10: Boot into Safe Mode
Way-11: Fix RAM issues
Way-12: Restore the System to Previous time
Way-13: Perform a Clean Install
That’s all!!
