Blue Screen of Deaths are very common in Windows 10 and are generally caused by reasons like obsolete drivers, poorly written disk, faulty hardware peripherals. Error messages of BSOD are difficult to interpret and one such is Win32k_callout_watchdog_livedump. PC reboots in continuous loops causing a system failure when the issue occurs.
So in this article, you will find the possible causes and applicable solutions as well to overcome this BSOD issue in Windows 10.
Win32k_callout_watchdog_livedump
Here is how to fix Win32k_callout_watchdog_livedump Blue Screen Error Windows 10 –
1] Update Drivers
One of the common reasons for any BSOD error to happen is outdated drivers. Device “drivers” play a very significant role in Windows you all know this fact. Each and every hardware depends on its respective application. Microsoft releases updates for quite regularly which includes updates for drivers as well. Missing to download and install them makes your computer prone to receive errors like Win32k_callout_watchdog_livedump.
Therefore the best applicable solution is to ensure that all the drivers on your device are running the latest version. Obsolete software is easy to be found out using Device Manager. Yellow warning sign next to an item there indicates that it requires update. Proceed with the below steps –
- Do a right-click on the Start icon on the taskbar and choose Device Manager.
- Once the console opens up, look for the devices with a yellow warning sign corresponding to it. Expand the same and do a right-click on the devices listed.
- Choose Update driver.
- Select Search automatically for the drivers.
- Wait for the system to scan, download, and install the updates.
- For effective results, reboot the device and check for the error.
Exercising with Windows device manager does not help means you need to visit the manufacturer’s website. Search for your model number and download the available recent version for the device. However, in this method, you will have to manually install the updates.
2] Remove Threats Using Windows Security
Computer easily becomes prey to suspicious activities through several virus or malware attacks. Visiting any website that contains malicious things, accidentally clicking on spam links, copying unsafe contents from external drives, etc are some of the common ways to get infected. Certain threats are there that get deeply stored in the system drive and are difficult to trace out.
So once your computer has a malware attack, it is very obvious for the BSOD to happen and Win32k_callout_watchdog_livedump is not an exception. Therefore, as a possible workaround to get rid of threats, you need to use the Windows Security app.
Previously called Windows Defender, this is the built-in protection tool that allows you to perform a deep scan of the system. Once you choose to conduct a full scan, the utility will investigate bad elements from the root folder or location of the system drive. Go ahead with the below sequence of steps to carry out this scan –
- Navigate to the system tray and click the upward arrow of Show hidden icons. Find out the shield shape icon and select it.
- This will open Windows Security on the PC screen.
- Select Virus & threat protection.
- Switch to the adjacent side and click Scan options.
- Select the Full scan option and hit the Scan Now button to initiate the process. This procedure will take a long time and once over, the app will display you the result.

- Choose appropriate action to remove the threats and for effective results, reboot the device.
3] Use the System File Checker Tool to Mitigate Win32k_callout_watchdog_livedump
Faulty, missing, corrupted, or broken system files in the computer are always harmful and are prone to various problems as well. But the question arises how such important data goes missing all of a sudden. Well, nothing in Windows 10 happens suddenly, there are certain reasons behind it.
Installation of third-party antivirus solution, modification in the registry entry and more are the possible causes. Hence, one more relevant solution to fix Win32k_callout_watchdog_livedump is to execute the System File Checker tool.
SFC, the short name, is the built-in command-line tool powered by Microsoft, specifically designed to locate and restore the system files from the cache folder. This is the most powerful utility that resolves the integrity in the system. So follow the given below steps and run this tool using an elevated Command Prompt –
- Type the command cmd.exe in the taskbar search. Hover over Command Prompt and click “Run as administrator” from the extended menu.
- Hit the Yes button on the prompt of UAC.
- Once you open Command Prompt as Administrator, insert the below-mentioned syntax and hit Enter.
sfc /scannow
- Let the system scan the entire system to detect and restore the missing files. This would take some good number of minutes to complete it.
- After it gets over, restart the PC and see for the BSOD error.
4] Uninstall 3rd Party Antivirus Programs
Third party antivirus solutions (not from Microsoft source) always carry a chance to cause conflict in the system. Installation of such applications always has its own set of settings that create a mess with the original settings of Windows 10. Such conflicts lead to various problems including Win32k_callout_watchdog_livedump BSOD is one of them.
Windows itself incorporates a protection app that provides you several scan options to deal with threats. Hence, eliminate 3rd party or outsider open source applications including their settings right away from the system. This is how you need to proceed further –
- First of all, perform a right-click on the Start icon and choose Apps and Features option.
- From the Apps Settings page, locate and select the 3rd party antivirus.
- Click Uninstall.
- Follow the guidelines of the uninstallation wizard to completely remove all the settings, files, and elements of the software from the system.
- After deleting the app, restart Windows 10 PC and then check for the occurrence of the BSOD error.
5] Unplug Non-essential External Hardware Accessories
External hardware accessories are always important as multiple tasks depend on them like printers, scanners, and projectors more. So when you connect any such devices to Windows 10 running PC, some ambivalence occurs. This leads to unwanted issues like Win32k_callout_watchdog_livedump. So if you are noticing the issue just after the connection of such a device, unplug them right away.
Once you’ve detached all the unnecessary peripherals, reboot the system and upon startup, check for the aforementioned BSOD error. Blue screen doesn’t occur anymore, then it indicates that the issue is with one of those hardware peripherals. Connect them again successively and determine the culprit device. After you get to know about it, search for its driver updates and install the same. I hope this would resolve your Blue Screen error problem.
6] Check and Install Windows Update
Microsoft releases updates quite frequently in the form of cumulative updates, Tuesday patches, preview builds, and more. Each update is important to be installed as they contain fixes for bugs and issues, new amazing features, driver updates, etc. So in any case, if you miss installing any of them, your system gets outdated which is further prone to several problems including BSOD error Win32k_callout_watchdog_livedump.
Therefore, experts always suggest you keep Windows 10 up to date and this is how you need to proceed further –
- Press the key combination Win logo+I to open Windows Settings.
- Find and select the Update & Security category.
- On the right pane, click the button namely Check for Updates.
- Wait for the system to scan and list down all the available updates. Click the Download button at the end of the list to grab them all.
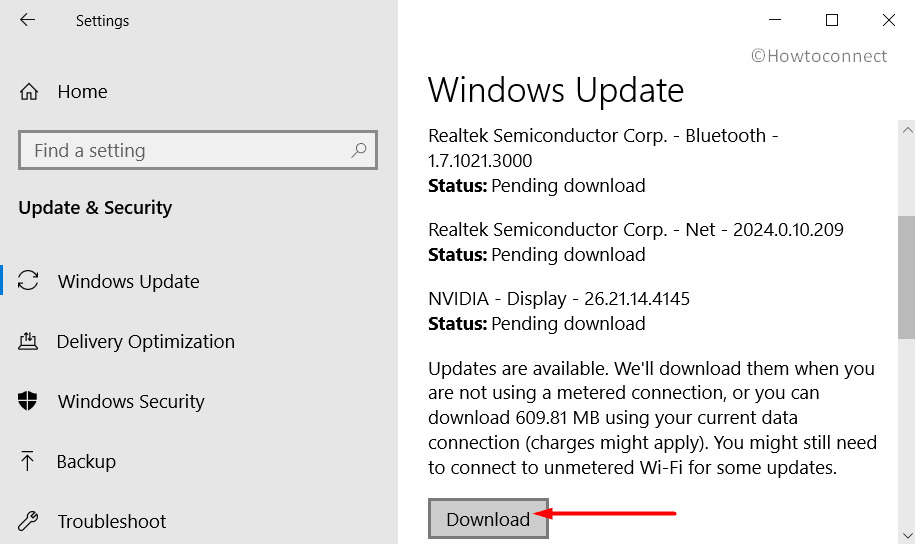
- Follow the directions of the updates to install them. Some don’t require any restart, but certain updates ask for a reboot to complete the installation. So, carry out as per instructions and after updating the system see for any BSOD error.
7] Execute a Memory Test to Fix Win32k_callout_watchdog_livedump
RAM issues are always a common cause of any BSOD to happen and the bad sectors in the memory are never considered for a healthy computer. Therefore it becomes necessary to check whether there occurs any problem with the hardware component or not. Windows Memory Diagnostic is a tool specifically designed to determine the condition of the RAM. Once you take this test, it would provide you a full report of the RAM and depend on the result, you can further take action accordingly. Go through these series of steps –
- On the taskbar search box, insert the command mdsched.exe and hit Enter.
- Once the tool opens up, choose the first option that states “Restart now and check for problems (Recommended).
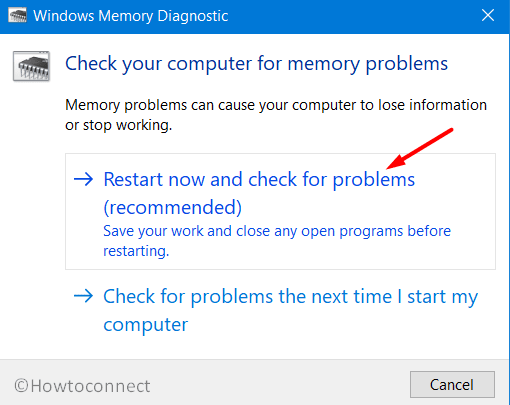
- The system will reboot and the detection for any possible issue in RAM will commence immediately. This tool cannot carry out its task while Windows is running and thus gets into the restart state to begin the scan.
- After the scan is over, the PC will boot up and on the system tray, you can view the scan result. See the result and take the necessary steps to prevent BSOD to happen again.
8] Ensure Disk Drive is Not Full
Common and prime factors for a PC to run flawlessly and smooth is to ensure that its system drive is not accumulated with the unwanted items. Most of the time, users are unaware that the disk drive, where Windows is installed is packed with the files that they don’t require at all. Temporary files, internet browser cache, Recycle Bin, old Windows installation data, and more are some of the items that consume valuable space. Regular cleaning of the disk drive is an essential activity in order to prevent any issues in this concern.
Disk Cleanup is the built-in tool that lets you know how much space is consumed by what category of items. Running this utility to scan system drive tells you the files and how much space they are occupying. All you need is to just select and delete them. Follow the given below steps to carry out this task –
- Get access to the Run dialog using any of your preferred methods. However, the easiest one is to do a right-click on the Start icon and selecting Run.
- Type in cleanmgr and click OK.
- Choose the system drive letter from the drop-down and click OK.
- The tool will scan the entire system and will display the list of items you can clear. Click Clean up system files.
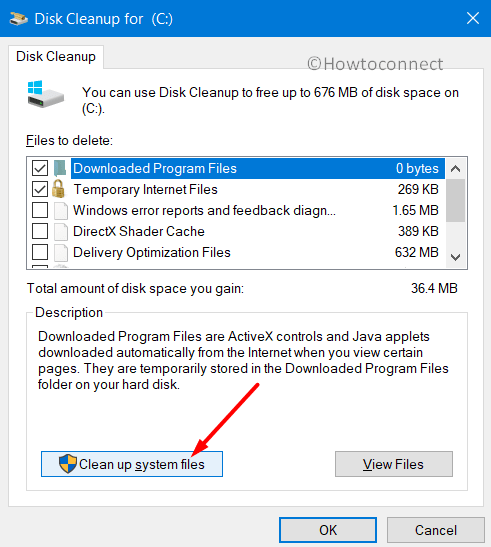
- Again choose the same disk drive letter and click OK.
- Once the utility shows the list, select all the checkboxes like Temporary files, Windows installation files, Thumbnails, Recycle Bin, Downloads, etc and click OK.
- After the cleanup, check for the Win32k_callout_watchdog_livedump error.
Important – If you are selecting the Downloads option in Disk Cleanup, make sure that you copied the required items from there to another safe location. Otherwise, every content in the folder would be deleted.
9] Uninstall Faulty Windows Update Files
While receiving updates on Windows 10, you need to take care of certain conditions. Low disk space, proper internet connection, choosing correct and compatible files, etc are some of the important things that should be considered. Failing these factors to fulfill, the installation might not happen properly and the updates files might get corrupted. The presence of such files is not considered to be healthy as they adversely affect the functioning of the Windows 10.
As a result, you might get a BSOD error Win32k_callout_watchdog_livedump. Therefore, another applicable workaround that you can carry out is to remove the last update that you installed. Following are the steps to perform the task –
- Do a joint press of Win+X keys to access the Power user menu, select Settings.
- Go to Update & Security.
- On the right pane of the following page, click View update history.
- Select Uninstall updates.
- Choose the last update that you installed and hit the Uninstall button.
- Follow the instructions on the screen and complete the removal process.
- After finishing the uninstallation of the update file, reboot the system for effective changes.
10] Fix Win32k_callout_watchdog_livedump by Running Blue Screen Troubleshooter
Windows 10 provides several built-in troubleshooting tools with a view to help you to solve the issues that occur in the operating system. To deal with the BSOD errors like Win32k_callout_watchdog_livedump, you have a dedicated tool, Blue Screen Troubleshooter. This tool will scan, detect, and make an attempt to resolve the areas that create BSODs in the system.
Important – However, users running Windows 10 v1809 and higher will not be able to use this tool as it is no longer there. But taking the walk-through process by Microsoft can help you resolve the error. All you need is to just visit the official Microsoft site of troubleshooting and follow the wizard to settle the BSOD.
- Press the Windows key on the keyboard and select the cog shape icon.
- In the app interface, locate and click Update & Security.
- On the left pane, go to the subsection Troubleshoot. Shift to the corresponding side and locate Blue Screen.
- Hit Run the troubleshooter button.
- Wait for the tool to detect and fix the problem for you. In the end, it will display you the result of the troubleshooting.
11] Check Hard Disk for Bad Areas
Continuous usage of the system can deplete the hard disk which further leads to various issues in the system. If the hard disk contains bad areas in it, you are likely to encounter Win32k_callout_watchdog_livedump error. You can run the chkdsk tool, powered by Microsoft, specially designed to determine the condition of the hard disk. Simply follow the given instructions and run the command-line tool to fix things –
- Right-click Start and choose Run. Type the command cmd and together press “Ctrl+Shift+Enter” keys to open Command Prompt as Admin from Run Dialog.
- Select Yes if User Account Control pops up.
- Type or copy-paste the command in the given format and hit Enter to continue.
chkdsk [Drive:] [parameters]
- The parameters are important in the command line as using the only chkdsk will display the disk status. It will not repair the problems with it. Therefore, you need to add
/f /r /xas well.
- The variable f will take the initiative to resolve the errors.
- Next, the parameter r will find out the dreadful areas in the drive. Furthermore, it will attempt to retrieve readable information also.
- Finally, x guides the disk drive to dismount before the commencement fo the process.
- Hence, the entire command along with the parameters will be this –
chkdsk C: /f /r /x
- Once the scanning gets over, reboot the PC and check for any BSOD errors in the system.
Note – In the above command, replace the letter C with the disk drive letter of your system.
12] Disable Unwanted Startup Programs
Many times, without your knowledge there are plenty of programs that start functioning quickly on startup. Some of them have a huge impact on Windows 10 and they create conflict with other settings of the system. Moreover, Windows also start with a set of services that generates unnecessary load on the computer. So it is best to disable such programs on startup so that Windows loads with the least number of required applications only. In other terms, it is also known as a clean boot. Follow the instructions below to accomplish the task –
- Use Win+R keys, insert the command msconfig and click OK.
- On the General tab, uncheck the boxes Load system services and Load startup items respectively.
- Switch to the Services tab and check the box namely “Hide all Microsoft services“. Click Disable all.
- Go to the Startup tab and click the only link “open Task Manager“.
- Locate the programs that are enabled during startup. Select them one by one and click Disable.
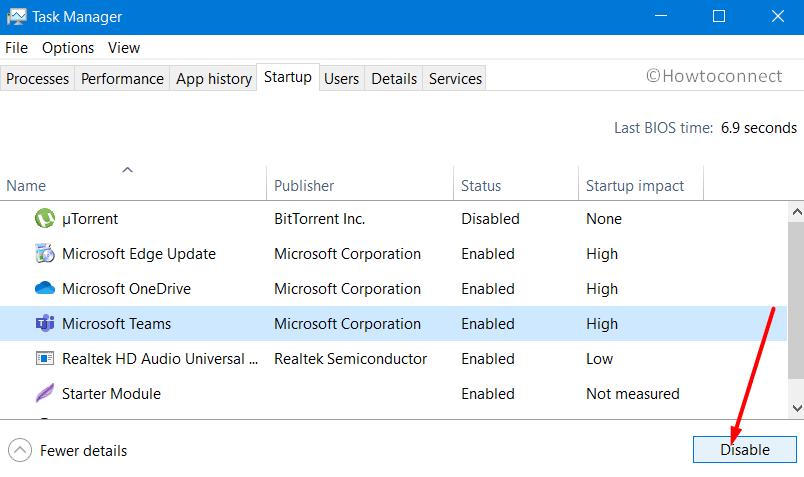
- Now, head to the System Configuration window again and click OK.
- This would reboot the PC and after startup, check for the BSOD error code Win32k_callout_watchdog_livedump. If the error does not occur, it means that one of the startup programs was the culprit.
13] Uninstall Applications with same Features
Customization of PC may need to install several applications but hardly you know that some of them might collide in their settings. Two or more programs in a computer having the same set of features often cause clashes in settings which further create incompatibility issues as well. Similar situations indicate that you need to uninstall those apps from the PC to avoid the occurrence of any BSOD error. This is how you will proceed –
- On the Start Menu, click the cog icon to access Settings.
- Click the Apps category.
- On the right side of the following page, locate and select the programs with the same functionalities.
- Click Uninstall.
- Go through the guidelines of the app to completely remove its settings from the system. Once you delete them, reboot the device for the result to be more effective.
14] Run the DISM Tool to Fix Win32k_callout_watchdog_livedump
Broken or faulty Windows image file always creates issues in the Windows 10. Fortunately, you have a designated tool, DISM in this regard that resolves Windows images files. Follow the below steps to execute this built-in command-line tool –
- Open Command Prompt with admin authority. The simplest way is to type cmd on the taskbar search and click “Run as administrator” from the extended pane.
- Click Yes when the UAC appears for consent.
- In the elevated Command Prompt, insert the below-mentioned commands and hit Enter to execute the tool.
Dism /Online /Cleanup-Image /CheckHealth
Dism /Online /Cleanup-Image /ScanHealth
Dism /Online /Cleanup-Image /RestoreHealth
- After the three scans are over, restart the PC and see if you still face the BSOD error or not.
15] Revert Back the System to the Error-free State
Failure of the above solutions to resolve Win32k_callout_watchdog_livedump error still leaves the last workaround – revert back the system to the state when everything was working perfectly. The feature is called System Restore which lets you roll back the device to the last generated restore point. Let us see how to make this workaround applicable –
- In the taskbar search box, type rstrui and hit Enter.
- When the System Restore wizard shows up, click Next.
- Choose “Show more restore points” and hit Next.
- Select the last point you have created and click the Next button.
- To commence the restoration process, click Finish.
Important – You will be only able to go ahead with this solution if you have already created a restore point earlier.
Methods:
1] Update Drivers
2] Remove Threats Using Windows Security
3] Use the System File Checker Tool
4] Uninstall 3rd Party Antivirus Programs
5] Unplug Non-essential External Hardware Accessories
6] Check and Install Windows Update
7] Execute a Memory Test
8] Ensure Disk Drive is Not Full
9] Uninstall Faulty Windows Update Files
10] Use Blue Screen Troubleshooter
11] Check Hard Disk for Bad Areas
12] Disable Unwanted Startup Programs
13] Uninstall Applications with same Features
14] Run the DISM Tool
15] Revert Back the System to the Error-free State
That’ all!!