Several Windows 10 users report on different forums about a strange issue with USB Tethering. Having said that, users continuously face issues such as Windows 10 Creates a New Network Connection on USB Tethering. Every time a user connects a PC to the mobile phone, the OS ends up in creating a new network connection profile (Network 1, Network 2, and so on). So, in this article, we will provide you certain possible workarounds to get rid of this tethering problem.
Windows 10 Creates a New Network Connection on USB Tethering Solutions
Here is How to Fix Windows 10 Creates a New Network Connection on USB Tethering –
1] Registry Tweak
Experts in several forums recommend a registry tweak that resolved this issue pretty efficiently. However, there is a limitation with this workaround. After modifying Registry keys, the network icon will not display that you are connected. So, you can go ahead with this solution if you don’t mind this small drawback and fix Windows 10 Creates a New Network Connection on USB Tethering. Let us see how to deploy this –
- Press the key combination “Win logo + R” to quickly open Run dialog box. Once into it, insert the command regedit and click OK.
- Click Yes upon the prompt of UAC dialog.
- This will let you access Registry Editor window, navigate to the below-given path on the left pane –
HKEY_LOCAL_MACHINE\SYSTEM\CurrentControlSet\Control\Class\{4D36E972-E325-11CE-BFC1-08002BE10318}
- Here, several subkeys are numbered starting with 0001. Go through the descending order and locate the one with the DriverDesc value displaying your phone’s RNDIS driver name. This is the same name that shows in your Network Connections view as the “Connect using” value.
- Once you find it, create a new DWORD (32-bit) Value and name it as *NdisDeviceType. While naming it, ensure put the asterisk * sign in front.
- Double-click on this DWORD and set the value data as 1 and click OK. The selection of Base wouldn’t matter here.
- After successfully editing the Registry, disable and re-enable USB tethering. This would stop the operating system from creating a New Network Connection on USB Tethering.
2] Change Properties of Remote NDIS based Internet Sharing Device
Windows 10 Creates a New Network Connection Each Time Phone is Tethered and this weird behavior is definitely annoying every user. So, another possible solution that is going around with every problematic computer is to modify the Internet Protocol version 4 properties. This is how you will make the changes –
- Get access to the Run command and insert the command ncpa.cpl and click OK.
- Network & Internet Settings page will open up, click on Change adapter options.
- On the window that shows up, perform a right-click on the tethered “Remote NDIS based Internet Sharing Device”. From the menu that appears, click on Status.
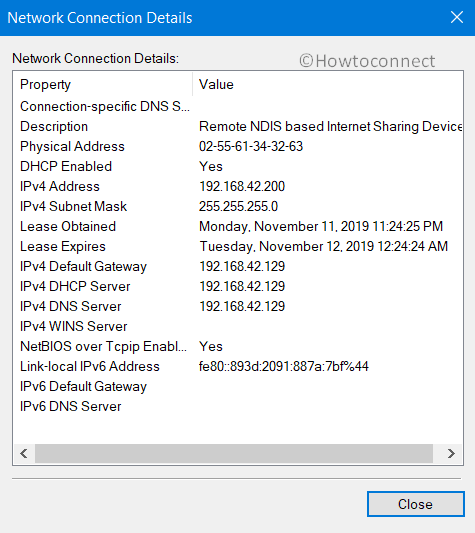
- Click the Details button.
- Here, from the list copy the entries of IPv4 Address, Subnet Mask, Default Gateway & DNS Servers respectively. Save the contents on a Notepad for a safer side.
- Again, execute a right-click on the tethered Remote NDIS based Internet Sharing Device and select Properties.
- In the wizard that is visible on the PC screen, highlight “Internet protocol version 4 (TCP/IPv4)” and hit the Properties button.
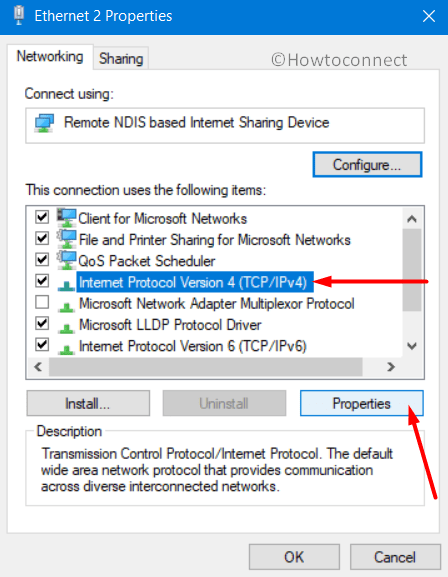
- Select Use the following IP address. Paste all the entries you have copied earlier in their respective fields.
- Click OK and close all the windows. This will eventually prevent your computer from creating Networks.
3] Disable Automatic Proxy Setup to fix Windows 10 Creates a New Network Connection on USB Tethering
You can also try to turn off the Automatic Proxy setup in order to bypass the issue that Windows 10 Creates a New Network Connection on USB Tethering. Go through the steps to carry out this task –
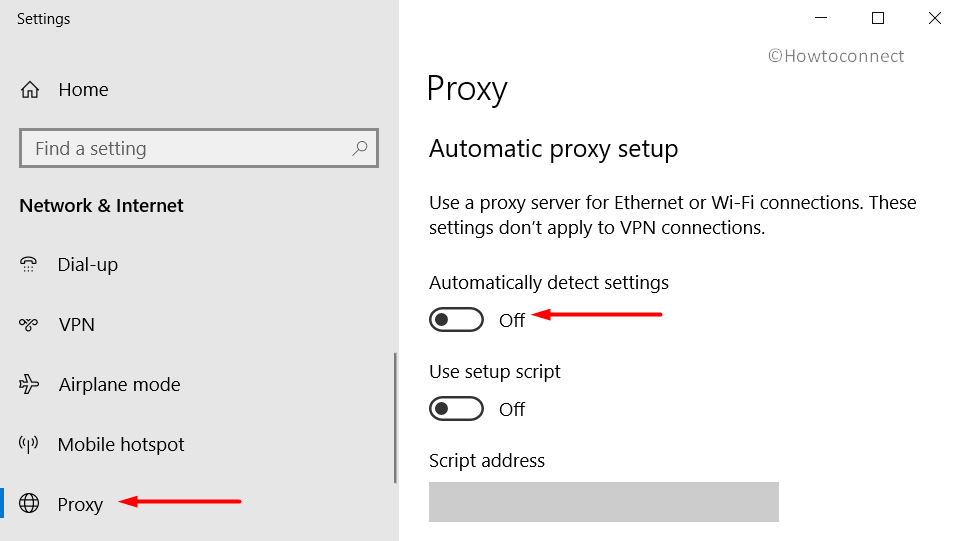
- Open Windows Settings, the built-in application by pressing Win logo + I keys together.
- Click the Network & Internet category.
- Select the Proxy subsection on the left sidebar. Switch to the right pane and go to the “Automatic proxy setup” section. Here, toggle OFF the option namely Automatically detect settings. Hopefully, with this, you will not face Windows 10 can’t forget wireless network trouble along with the creation of new networks on USB tethering.
Methods:
1] Registry Tweak
2] Make use of DISM command line
3] Reset Windows update service
That’s all!!
thanks finally get rid of it