Windows 11 and 10 users are found to raise complaints as they are getting Update Error 0x8007370 while installing cumulative patch KB4512508 sometimes others. Whereas the main reason is yet unknown, various probable issues may cause the setback. Few are like the process entangling in an unexpected loop of poor internet connection in the case of automatic installing of patches or the Windows update service is disabled somehow. Sometimes, corrupted system resources, dreadful windows update components; lack of free space in the system drive may be responsible for the error too. Fortunately, we have found some of the greatest workarounds to resolve the error easily. To get the solution in your case, hang on to the below processes tin it fixes. Let’s begin –
To fix Windows update Error 0x8007370, we have mentioned some workaround’s arranged in the below method list. Follow the quick links adhered to each to navigate straightway as you like –
Windows 11/10 Update Error 0x8007370
Here is to fix Windows 11/10 update Error 0x8007370 –
1] Install update patches manually
Microsoft releases the package of Windows update comprising of latest modification of attractive features, security enhancements as well as fixes for potential bugs. As the process is automatic, it can start anytime if the device is connected to an internet connection. In the end, show up various drawbacks like Update Error 0x8007370. Try once installing the patch manually for which you are getting the error in the following way –
- Go to Microsoft update catalog using this link.
- Type the KB number of the patch in the search box and press enter.
- Let the download complete and lastly, double click on the downloaded file to install.
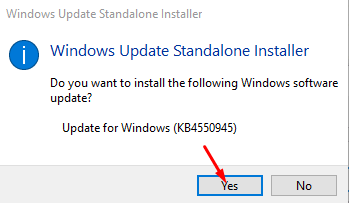
- Click Yes on Windows Update Standalone Installer.
- At last, select Restart now to complete the installation.
2] Utilize Windows Update Troubleshooter to fix update Error 0x8007370
Update Error 0x8007370 happens where the system faces difficulties during installation. Windows Update Troubleshooter is the best built-in utility to try when the issue appears. Here is how to use the tool –
Windows 10
- Open Windows Settings (Win+I).
- Select Update & Security from the Settings app interface.
- Choose Troubleshoot from the left pane.
- Click Windows Update on the right-side pane.
- Select Run the Troubleshooter button from expanded pane.
- The utility will now start looking for errors related to Windows Update and show up once searching ends.
- Follow the guidelines shown in the display to complete the process and resolve the error.
Windows 11
- Right-click Start button and choose – Settings.
- Move to the right of appearing window.
- Scroll down a bit and select – Troubleshoot.
- From next page, choose – Other troubleshooters.
- Click Run present next to Windows update.
3] Restart Windows Update Service
Windows Update service controls the updating process and associated tasks. Therefore, the service must be kept up and running in order to avoid any issues coming up from Windows update. Unfortunately, the service may turn off due to any third party tool or accidentally from a user. Restarting the Windows Update service will definitely fix the Update Error 0x8007370. To accomplish, follow the below steps –
- Invoke Run dialog pressing Win+R hotkeys together.
- Type services.msc in the provided text area on wizard.
- Press Enter key to launch Services app.
- Moving on to the Services window, scroll down to Windows Update.
- Do a double click on this service.
- In a moment, a new wizard will open up and you will be in its General tab.
- Move ahead to Startup Type section and click the dropdown menu beside it.
- Select Automatic from options.
- Scroll down more and click the Start button if it was stopped before.
- Finally, click the Apply button followed by hitting Ok.
As the changes are saved by now, the Update Error 0x8007370 should take a leave from your system.
4] Ensure EnableFeaturedSoftware Data DWORD is set to 1
Auto Update in the Windows Registry is often found to be disabled somehow because of the effect of 3rd party applications. You must confirm the EnableFeaturedSoftware Data is functional in Windows registry. If the DWORD is set to any other than 1, we need to change it. The whole process is as following –
- Open the Taskbar search and type regedit in the blank text space.
- Press Enter key and select Yes when UAC prompts for opening Registry Editor.
- In the newly opened window, navigate to the below path –
HKEY_LOCAL_MACHINE / SOFTWARE / Microsoft > Windows / CurrentVersion / Windows Update / Auto Update
Note – EnableFeaturedSoftware may appear in different name depending upon Windows versions.
- Click the Auto Update on the left side and jump to alongside pane.
- Make a double click on Default DWORD and insert Value data to 1.
- Finally, click the OK button and leave the Registry Editor.
Hopefully, you can now install the Windows update without error code 0x8007370.
5] Clean up the system drive
Disk Space is very much important for an update patch to be installed in the system. In the absence of having enough space in the system drive, the download doesn’t even take place often. We see oftentimes, the disk is full of junk files and most of them are useless. Instead, due to the shortage of space, the device shows up many abnormalities starting from slower speed to various issues including update Error 0x8007370. To wipe out these data in a bulk amount, Disk Cleanup tool comes handy. Use the utility proceeding through below guidelines –
- Open up Power user menu by pressing Win+X hotkeys together.
- Select Run from the list to invoke the wizard.
- Type cleanmgr in the blank box on Run and press Enter key.
- When a popup window prompts to choose the drive, select OS(C:) and click OK button.
- After a popup opens up entitled Disk Cleanup for OS(C:), scroll down in it.
- In the process, click Clean up system files.
- One more time, select OS (C:) from the dropdown menu when asked and press Enter key.
- From the next popup window, mark check boxed whose data you opt to remove from “Files to delete” section.
- Click OK button and also Delete Files once asked to start the cleanup.
Important – Make sure there is nothing left in the Recycle Bin or Downloads folder before checking them. It may cause data loss afterward.
6] Create .BAT file to resolve update Error 0x8007370
Few users have come up with a new idea to resolve the update Error 0x8007370 by creating a .BAT file in notepad and then running it in Command Prompt. To accomplish this task, you have to go through below instructions –
- Press Win+S hotkeys and type notepad in the text space.
- Select Notepad app from the list to open it.
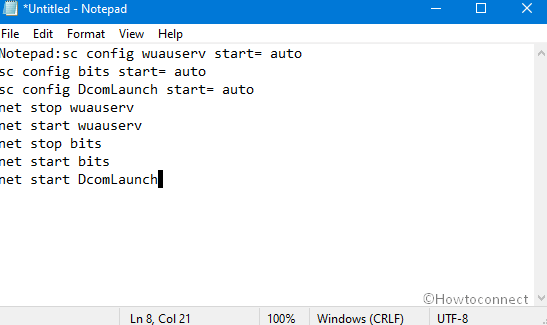
- Once in the window, copy the following texts and paste them in the notepad.
Notepad:sc config wuauserv start= auto
sc config bits start= auto
sc config DcomLaunch start= auto
net stop wuauserv
net start wuauserv
net stop bits
net start bits
net start DcomLaunch
- Click the File option and select Save.
- Enter the File name as fix.bat and select All Files from the dropdown menu next to Save as type.
- Click Save button next to complete.
- Navigate to the folder you have saved the fix.bat file and do a right-click on it.
- Select Run as Administrator option from appearing menu.
- User Account Control will prompt for permission, click Yes to continue.
- In a few seconds, Elevated Command Prompt will open and run the tool.
- When the process ends, reboot windows to save the changes.
7] Delete everything from the SoftwareDistbritution folder
Some of the files in the SoftwareDistribution folder may often be a cause to occur update Error 0x8007370. In order to rectify the setback, we need to delete all the files from there proceeding through below guidelines –
- Click the Search icon from Taskbar and write “services.msc” in the void text box.
- Press Enter to launch the console.
- Head over to the Background Intelligent Transfer Service.
- Right-click on the service and select Stop.
- Leave the Services app and open the File Explorer pressing Win+E hotkeys together.
- When the window opens, navigate to “C:\Windows\SoftwareDistribution“ folder.
- Moving on to the SoftwareDistribution folder, select all items pressing Ctrl+A hotkey at once.
- Do a right-click on any of the selected items and select Delete.

- When all the items are removed from here, leave the File Explorer.
- Open the Start menu pressing the Windows key.
- Click the Power cog. and select Restart.
- When the system will load back the new session, check for the error. Hopefully, this will resolve 0x8007370.
8] Ensure all the services associated with Windows update is running
Addition to Windows Update service, a few other processes, as well as services, are responsible for a smooth operation. They are also very much necessary to run Windows 11 and 10 in a hassle-free manner. If you have come across the update Error 0x8007370, make sure other services similar to DCOM Server Process Launcher, BitLocker Drive Encryption Service, Windows Defender Firewall, Networking Connections are running. If not, start them using below instructions –
- Press Windows key and type services.
- Select the app to launch in a separate window.
- Moving on to the services app UI, reach out to Networking Connection in the list.
- Check its current condition in the Status column. If it shows Running, means it is okay.
- If not, do a right click on the same and select Start from options.
- Proceed forward to Windows Defender Firewall, DCOM Server Process Launcher, BitLocker Drive Encryption Service in the list simultaneously.
- Check the status and Start the services if found Stopped.
Once all the services are up and running, there should not be any Windows update Error 0x8007370.
9] Enable or Disable Network List Service to fix update Error 0x8007370
Network list service is dedicated to tracing out the connected network with Windows and stores the properties of that vendor collecting from the data inherent to it. Many of the users have reported that they have successfully recovered from update Error 0x8007370 just after enabling or disabling the Network List service. The operation is usually variant and depends on the previous state. In easy words, if it was found in stopped condition, start it, and vice versa. The detailed process is as follows –
- Open the Services App using guidelines from above workaround.
- Head over to Network List Service in the list.
- Do a double click to reveal it’s pop up window.
- Head over to Startup type and select Automatic clicking the dropdown menu.
- Hit the Start button if it was stopped previously.
- Hit Apply button followed by clicking OK to save the changes.
- Now, if the service is already running, click the dropdown menu beside Startup type and choose Disabled.
- Hit the Stop button from this tab.
- Finally, click Apply button and then OK to disable this service.
10] Rectify all the corrupted system components
System files are responsible to keep the Windows Up and running always unless they are found corrupt somehow. Due to malicious infection in the system, they often lose the originality and standout as dreadful. Update Error 0x8007370 can a result of defective system files as well. System File Checker is the best utility to rectify those components well and eventually fix the error. To use the tool, sfc /scannow command needs to be run in Elevated Command Prompt. Follow the below instruction to complete this task –
- Open the Taskbar search and type cmd.exe in the blank text area.
- Do a right-click on Command Prompt when arrives in result.
- Select Run as Administrator from options.
- When UAC prompts, click Yes to provide consent.
- After moving into the black window, enter following command line tool –
Sfc /scannow
- Press Enter key to execute System file checker tool.
- This utility will go through all the system files and detect vulnerabilities. Once found any, it will be resolved automatically. The process may be a little lengthy, therefore, schedule accordingly.
- Once the task finishes, reboot the Windows to make all changes effective
11] Run the DISM tool to rectify Windows image files
Before any major update, Microsoft releases the ISO files and they also contain Windows image data in them. If these files get corrupted by means of an unfinished downloading or poor internet connection, update Error 0x8007370 may show up in the system. To fix the error, we have to fix the Windows image files first. DISM (Deployment Image Servicing and Management) tool can smoothly rectify those files from the ISO files when powered up in Elevated Command Prompt. Here are the guidelines to use the utility –
- Access to the Elevated Command Prompt.
- When the black window arrives, enter following command –
Dism /Online /Cleanup-image /Startcomponentcleanup
- When you will press the Enter key, the DISM tool will be executed and it will look for corrupted Windows image files in the system.
- If there is any dreadful file, the tool will rectify it automatically.
- Once the process ends up, reboot Windows and coming back to next session, check if the error exists.
12] Disable IPv6 to fix update Error 0x8007370
Many users across the world have confirmed to fix the update Error 0x8007370 just by disabling the IPv6. To carry out the task, follow the below steps –
- Press Win + R keys and invoke the Run dialog box.
- Type ncpa.cpl in the empty box and hit Enter.
- When the Network connections window opens, do a right click on the internet connection that is connected to your computer
- Choose Properties option from appearing menu.
- When a new pop up window unfolds, navigate to Internet Protocol Version 6 (TPC/IPv6).
- Remove the checkmark from the box against the option.
- Hit the OK button from bottom area and save changes.
- Lastly, Reboot the device and when a new session begins, check if the error exists in the system or is resolved.
Methods:
1] Install update patches manually
2] Utilize Windows Update Troubleshooter
3] Restart Windows Update Service
4] Ensure EnableFeaturedSoftware Data DWORD is set to 1
5] Clean up the system drive
6] Create .BAT file
7] Delete everything from the SoftwareDistbritution folder
8] Ensure all services associated with Windows update is running
9] Enable or Disable Network List Service
10] Rectify all the corrupted system components
11] Run the DISM tool
That’s all!!