One of the common issues that users come across while updating Windows or installing apps through Microsoft Store is Error Code 0x80240438. Most of the time, both Store and Windows Update encounter the same error code as they have an interlinked delivery mechanism. As each operating system has multiple characteristics, so the culprit of the issue also varies.
Some of the possible causes that put a hindrance in the Windows Update and Store service are proxy settings, Windows Firewall, IPV6, and more. Regardless of the versions of Windows 10 or 11 you are using, the resolutions will be same. So in the article, we will discuss some of the most verified workarounds to resolve bug code 0x80240438. Find out the solutions –
Windows 11 and 10 Update Error Code 0x80240438
Here is How to Fix Windows 11/10 Update Error Code 0x80240438 –
1] Install the Windows Update Manually
Microsoft is very much keen to release cumulative updates and features quite regularly packing latest modifications and fixes for bugs and issues. Most of these files start downloading and installation follows automatically in presence of an active internet connection. Error code 0x80240438 appears while the Windows Update feature is autonomous and this is just a cumulative patch, unlike feature update. Hence, we can proceed to install the update patch manually using below guidelines –
- Press Windows key and type in – update history.
- Hit – Enter.
- Explore the list of successful and failed updates.
- Check for the failed updates and then navigate to Microsoft Update Catalog.
- Here, search for the KB that got failed to install. Once you see it, download the compatible architecture and install the file manually.
2] Use the Windows Update Troubleshooter
Windows 10 and 11 Update Error code 0x80240438 comes in when the system encounters difficulties in installing related cumulative patch. Many of the similar drawbacks kept on haunting the users over the ages. To eradicate this issue, Microsoft came up with brand new idea of Windows Update Troubleshooter. The tool guides us on how to resolve a specific error that happens while installing an update. Here is how to use the tool –
For Windows 10
- Press Win+I hotkeys at once to launch the Windows Settings app.
- Click on the Update & Security tile to pass forward in the succeeding page.
- When the page arrives, select Troubleshoot from the left pane.
- Jump to alongside right and click – Additional troubleshooters.
- Select Windows Update option from there.
- Hit Run the Troubleshooter button from the expanded pane.

- The utility will now start looking for update errors in the system. It will also provide guidelines to solve the issue accordingly.
- Follow the instructions shown in the display to complete the process.
For Windows 11
- Right-click Start button and choose – Settings.
- Move to the right of Settings page.
- Scroll down a bit and click – Troubleshoot.
- Select – Other troubleshooters.
- From the next page, click Run present beside Windows update.
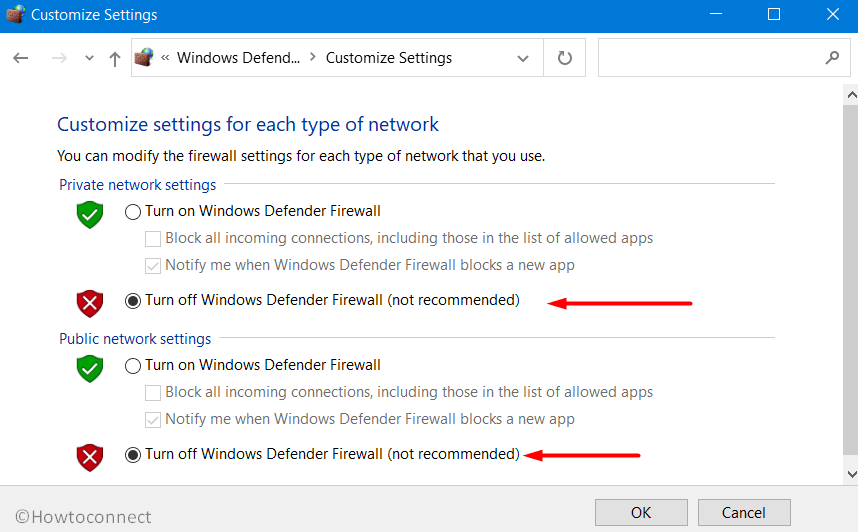
3] Disable Windows Firewall
Having an active security solution often can be detrimental for an update patch to be installed automatically as the tool will detect the file as malware. Windows Firewall provides us real-time protection against malicious invaders and offers maximum security. However, the same can also cause Error code 0x80240438 in Windows 10 and 11. In order to fix the error, we can disable Windows Firewall temporarily until the issue goes off. Here is how to disable the Windows Firewall –
- Open the Taskbar Search pressing Win+Q hotkey together.
- Type Windows Defender Firewall in the empty text space. Select the app after arriving in the result.
- Moving on to the app UI, click Turn Windows Defender Firewall on or off from left pane.
- After a new window unveils, click the radio button against Turn off Windows Firewall (not recommended) option for both the networks on this page.
- Click the OK button and save these changes and there will not be any more 0x80240438 update error.
4] Uninstall Third-party anti-malware tool
Like the Windows Security, any other third party application may often block an update patch and eventually users encounter 0x80240438 error. Moreover, keeping a 3rd party anti-malware solution may be detrimental parallel to Windows Security. So, make room to uninstall security solutions from outside sources right away using the below steps –
- Right-click on Start icon and choose Apps and Features from appearing Win+X menu.
- When the Apps Settings will open up, reach out to the third party security solution on the right pane.
- Select the same and hit Uninstall from expanded pane.
- When UAC prompts for permission, click Yes and follow on-screen guidelines until the process ends.
- Finally, reboot Windows to implement the modifications.
5] Disable IPV6 from Windows
Various forums are evident that disabling IPV6 resolves Error code 0x80240438 in Windows 11 and 10. Therefore we may also give it a try following below instructions –
- Press Win + R keys and invoke the Run dialog box.
- Type ncpa.cpl and click OK button located on wizard to open up Network connections window.
- Moving on to the new window, do a right-click on the internet connection that is connected to your computer.
- Select Properties option from appearing menu.
- Jump to another popup window and uncheck the box against Internet Protocol Version 6 (TPC/IPv6).
- Click on OK button from bottom area and save changes.
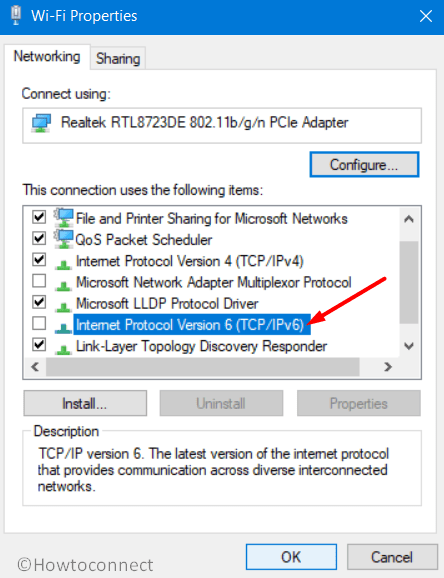
- Lastly, reboot the device and check if the error exists in the system when a new session begins.
6] Tweak Group Policy Editor
Tweaking policy in the Group Policy Editor will let you remove access from Windows Update. Enabling the settings will remove all the Windows Update features from system. Many users have confronted that they have fixed Error code 0x80240438 tweaking the policy. Follow the below guidelines to complete the task –
- Invoke the Run dialog and type gpedit.msc in its empty text box.
- Press Enter key to open Group Policy Editor and navigate to below path –
User Configuration > Administrative Templates > Windows Components > Windows Update
- Upon reaching to Windows Update, jump on the alongside right pane.
- Hereby, make a double click on Remove Access To Use All Windows Update Features.
- Select the radio button against Not Configured.
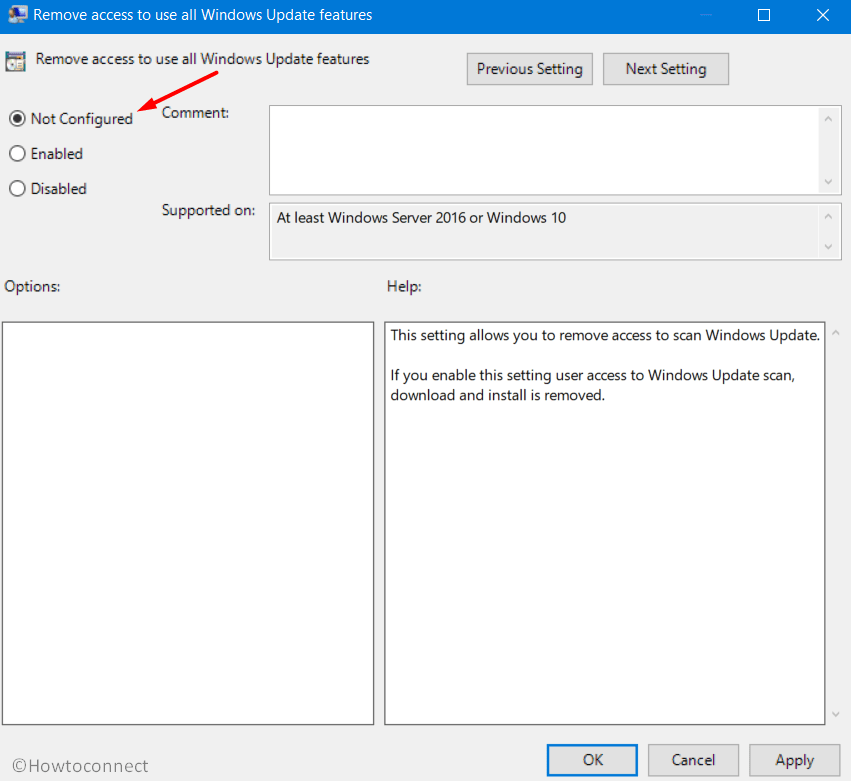
- If you see it is enabled, configure one of the below notification options –
0 = Do not show any notifications – This setting will remove all access to Windows Update features, and no notifications will be shown.
1 = Show restart required notifications – It will display notifications about restarts that are required to complete the installation.
- Click the OK button finally and close the Group Policy Editor window.
- Restart Windows PC to make changes effective.
7] Disable Proxy server connection
Disable Proxy server connection may also be pretty helpful in eliminating Error code 0x80240438 in Windows 11 and 10. To do so, follow the below steps –
- Press Windows key, type internet options and hit Enter key to access Internet Properties.
- Jump into the Connections tab.
- Move out to Local Area Network (LAN) settings area and click the LAN Settings.
- Upon opening a new settings page, uncheck the box that reads Use a proxy server for your LAN (These settings will not apply to dial-up or VPN connections) under Proxy Server section.
- Click the OK button and later on, reboot Windows to make the changes effective.
8] Clear off Microsoft Store Cache
Windows Update Error code 0x80240438 resembles the Microsoft Store issue as well hence, clearing the Store cache might help. Follow the below guidelines to clear the cache –
- Open Run dialog box pressing Windows key and R.
- Type wsreset in the void text space and press Enter.
- The Command Prompt will open up in a few moments and take over the task.
- Once the process ends, Command Prompt window will close automatically and open Microsoft Store.
See – How to Reset Cache of Windows Store
9] Rename Windows Store cache folder
If the Error code 0x80240438 is evolved from Microsoft Store, renaming the Store Cache folder will resolve the setback. For that –
- Get access to Run and enter following text in its empty search box and press Enter key eventually –
%localappdata%\\Packages\\Microsoft.WindowsStore_8wekyb3d8bbwe\\LocalState- Locate the cache folder, make a right-click on the same, and choose Rename option from menu.
- Name it as cache.old and hit Enter to save it.
- If you don’t find the cache folder in LocalState, make a right-click on empty space and choose New > Folder.
- Enter the name Cache and close File Explorer.
- Now open Windows Settings app and head over to Troubleshoot page.
For Windows 10, Go to Settings => Update & Security => Troubleshoot => Additional troubleshooters.
Windows 11 users, navigate to Settings => Troubleshoot (right column) => Other troubleshooters.
- Reach out to the Windows Store App and hit Run the Troubleshooter or Run button.
- After finishing the process, the error will resolve hopefully.
10] Remove everything from of C:\\Windows\\SoftwareDistribution folder
Some contents in the SoftwareDistribution folder may often be a cause for Error code 0x80240438 in Windows 10 and 11. In order to resolve the issue, delete everything from this folder going through below process –
- Open the Taskbar Search, write services in the void text box, and press Enter to launch the application.
- Move out for Background Intelligent Transfer Service, make a right-click on it and select Stop.
- Close the Services app and open File Explorer pressing Win+E hotkey at once.
- In the upcoming window, navigate to the “C:\Windows\SoftwareDistribution” folder.
- Select all items pressing Ctrl+A hotkey at once and press Delete key on the keyboard.
- Reboot Windows and when the system will load back, we can expect the error will resolve.
11] Modify Registry Editor
Modifying the DWORD value of “DisableWindowsUpdateAccess” is found to resolve Error code 0x80240438 in Windows 11 and10 easily. Follow the below guidelines to accomplish –
- Do a right-click on Start and select Run.
- In the empty text box of the wizard, type regedit and hit Enter to access Registry Editor.
- Navigate to the below directory in left-wing –
HKEY_CURRENT_USER=>Software=>Microsoft=>Windows=>CurrentVersion=>Policies=>WindowsUpdate- On the right pane of WindowsUpdate locate the DWORD DisableWindowsUpdateAccess.
- Make a double click on the same and set the value data as 0.
- Click OK and Restart Windows to implement registry settings.
- After the new session will begin, hopefully, there will be no more 0x80240438 error.
Methods:
1] Install the Windows Update Manually
2] Use the Windows Update Troubleshooter
3] Disable Windows Firewall
4] Uninstall Third party anti-malware tool
5] Disable IPV6 from Windows
6] Tweak Group PolicyEditor
7] Disable Proxy server connection
8] Clear off Microsoft Store Cache
9] Rename Windows Store cache folder
10] Remove everything from of C:\\Windows\\SoftwareDistribution folder
11] Modify Registry Editor
That’s all!!