While upgrading to Windows 11 or 10 from a lower version, you might conflict with different error codes that obstruct the smooth process. In the recent past, 0xc7700112 Update Error Code has been pretty common especially when a user runs Windows Update or Windows Update Assistant. This particular issue points out that there is something unusual with the setup process or the upgrade procedure is corrupted itself.
Windows Update Error Code 0xc7700112 generally arises when there are fragments and leftovers of the installation process from the last sessions within the BCD File. Fortunately, this issue is fixable and in most cases, clearing off the earlier Windows setup entries does the trick. But if the error code was triggered by some reason such as malware infection, software conflict, external hardware, or outdated driver you may need to try out some other workarounds to fix it easily and quickly.
0xc7700112 Update Error Code Solutions
Here is how to fix 0xc7700112 Update Error Code on Windows 11/10 PC –
1] Wipeout orphaned Windows setup entries from BCD
As we said earlier, traces of another installation process mostly obstruct the upgrading of Windows and throw the error 0xc7700112. So, the first thing you need to do is to remove the earlier entries and then go for up-gradation. Follow the steps –
- Press Win and R together as a shortcut.
- Type cmd.exe in the command box.
- Hit the Ctrl+Shift+Enter at once.
- When a User account control rolls out up, click Yes.
- Copy –
bcdedit /enum allpaste into the command prompt and hit Enter. - To collect the available data in text file, enter the following command line –
bcdedit /enum all > D:\bcd.txt
Note – Here, D:\bcd.txt points out that the bcd.text file will be saved in D partition. If you want to store the info in a different directory with some other name, replace the entry accordingly.
- Check the identifier code of Windows Setup that is present under Devices Options. These items are leftover files from earlier upgrade attempts and probably the main cause to hamper current installation. You will have to remove these entries so that a successful installation takes place. For that, run the below command –
bcdedit /delete {your-identifier}
- Replace, your-identifier with the entry you have got into your PC.
- Follow the same procedure for each Windows setup entry you see under Devices Options.
- Once you are done with removing all setup file entries, close Command Prompt.
- Reboot the Windows.
- After signing back in, again access elevated Command Prompt.
- Put in –
bcdedit /enum alland hit – Enter. - Check if the Windows setup entries are removed properly. In case there is any, clear the same by following the above steps.
- When all Windows old files get deleted, restart the PC.
- In the next session, the upgrade process should happen smoothly.
2] Take help of Windows update troubleshooter
Microsoft offers a troubleshooter tool for Windows update that not only detects the associated issues that trigger 0xc7700112 error code but also helps to resolve it. Here is how to run it –
For Windows 10
- Right-click over the Start and choose – Settings.
- Continue with Update & Security.
- Click the Troubleshoot present in left column.
- Move to the right pane.
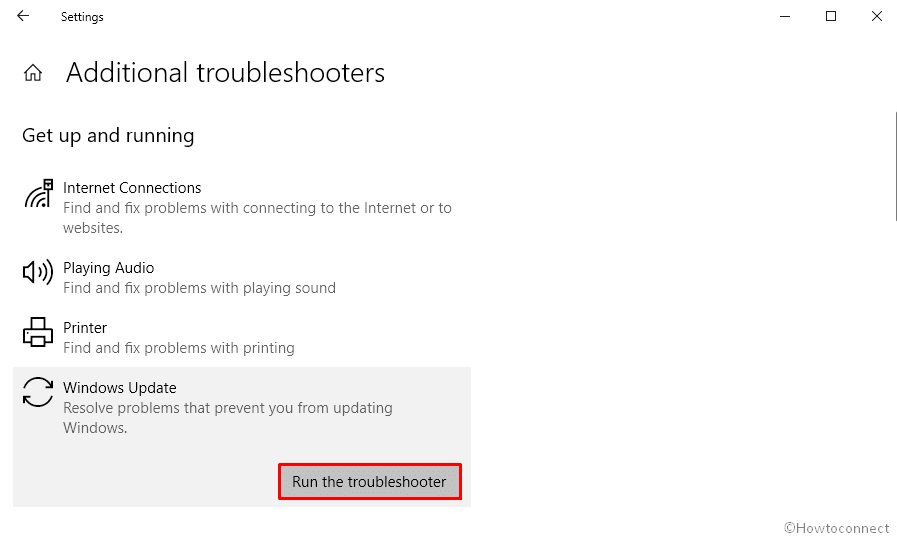
- Click the link that says – Additional troubleshooters.
- From the next page, select Windows Update.
- Click – Run the troubleshooter.
- When the troubleshooter suggests potential resolution, apply the fix.
- After the process gets completed try to upgrade.
For Windows 11
- Right-click Start button and choose – Settings.
- Move to the right of Settings page.
- Scroll down a bit and click – Troubleshoot.
- Opt for – Other troubleshooters.
- From the next page, click Run present next to Windows update.
3] Remove external hardware accessories if any
However, the reason is not clear yet, external peripherals like printer, scanner, mouse, and keyboard often generate update error 0xc7700112. Fortunately, this issue goes away once you unplug them from the computer. You just need to draw up the knobs of external accessories from the USB ports of your PC and reboot the system. After powering up, check if the upgradation happens without any hitch.
4] Disable Antimalware program for the time being to avoid error 0xc7700112
Many times, Windows update files clash with anti-malware program for not being compatible or for some other reason and result in 0xc7700112 Update Error. Antivirus program whether its a built-in one or third-party app keeps the system protected from vulnerable threats and malware attack moreover ensure your privacy. But when you have more than one antivirus active, they may conflict with the functions of each other and cause the error code. Therefore, we suggest to uninstall the third-party antivirus program and make use of Windows Security instead. To uninstall the app –
- Press the – Win+X.
- Choose – ‘Run‘.
- Type in appwiz.cpl in the dialog box and click OK.
- From the Programs and Features window, look for any installed antimalware program.
- Right-click on the same and choose the Uninstall.
- Comply with the further on-screen directions to remove the app completely from your PC.
If the update error still persists after removing the app, there is a high chance that Windows Security is somewhere making an obstacle in between the upgrading process. In such a case, disable the utility for a while and see what happens next. Here are the steps –
- Click the Start, type in security and then press – Enter.
- Select – Virus & threat protection.
- Choose the link that states – Manage settings.
- Click the toggle switch set for Real-time protection to turn off.
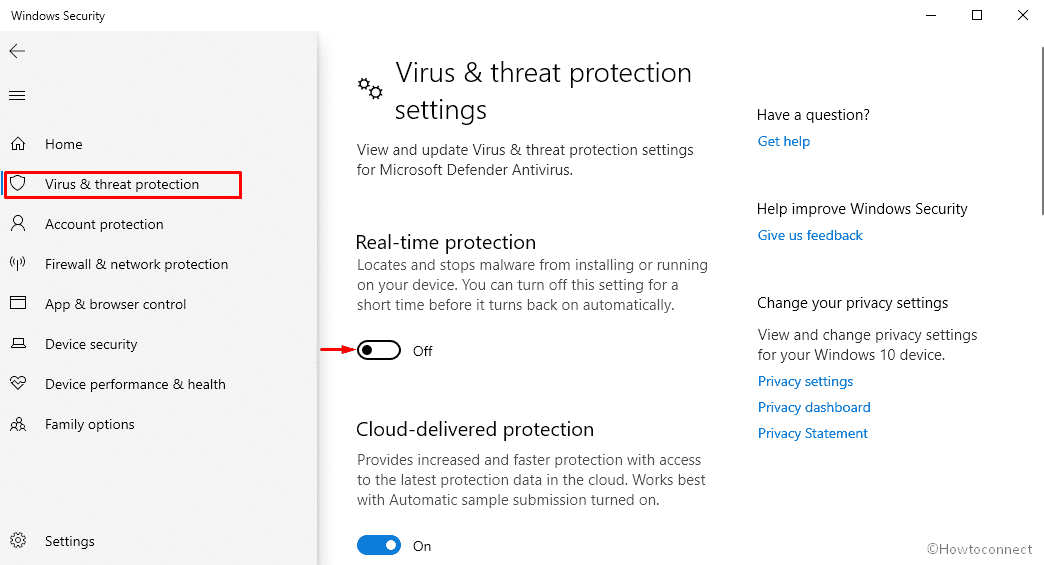
- Hit Yes to give final confirmation.
Note – Don’t forget to enable Real-time protection of Windows Security after resolving the error 0xc7700112.
5] Get rid of temporary files Windows update generates
$WINDOWS.~BT folder holds all temporary items such as update logs, downloaded files, and more that Windows update executes. These files not only occupy disk space unnecessarily but also result in conflict between the new update file and the stored ones. Deleting the same may help to get rid of 0xc7700112 update error code. Normally, $WINDOWS.~BT folder remains hidden. So, make sure you can see hidden files. To do so –
- Press the – Win+E.
- When File Explorer rolls out, click the View from the menu bar.
- Make sure the box set beside Hidden items is checked.
- If you are using Windows 11, click View => Show and then ensure Hidden items option is ticked.
- Now, navigate to C:\ drive.
- Right-click on $WINDOWS.~BT available here and choose Delete.
- If confirmation pop-up appears, click Continue to initiate the removing process.
See – Enable Hidden Files and Folders in Windows 10.
6] Reset Windows update components
If you are continuously struggling with update errors, it’s the right time to purge the Windows update components. Corrupted Windows update cache might cause 0xc7700112 Update Error. So, reset it to bring back its default state and obliterate the existing corruption.
- Hit the Win+S and type in cmd.
- Press – Ctrl + Shift + Enter.
- Select the Yes for User account control.
- Insert these following commands one after another and hit- Enter after each one –
net stop wuauserv
net stop cryptSvc
net stop bits
net stop msiserver
- Next, copy-paste the below texts and hit the enter. –
ren C:WindowsSoftwareDistribution SoftwareDistribution.old
ren C:WindowsSystem32catroot2 Catroot2.old
- To start the disabled services again, run the following commands –
net start wuauserv
net start cryptSvc
net start bits
net start msiserver
- Exit the Command Prompt and reboot the PC.
7] Make sure your drivers are compatible for Windows to upgrade the system without 0xc7700112
Update errors are more likely to occur into those machines whose manufacturer has not released the compatible drivers for Windows 11 and 10. To check whether suitable drivers are available or not, visit the vendor’s website and explore using your computer’s model.
In case, you are having trouble identifying the model, enter the serial number written on a sticker somewhere on your machine.
8] Do virus scan to check malware attack
Being safe in this modern digital environment is not so easy as malware is everywhere looking for a direction to enter our system. Once they become successful, mischief with system elements and result in corrupting genuine files that are necessary to operate the OS smoothly.
This might be the reason, your system is failing to upgrade Windows time and again. To get rid of such an issue moreover, eradicate the existing malware, here is the process you can follow –
- Press Windows key.
- Type in – Virus & threat protection.
- Hit – Enter.
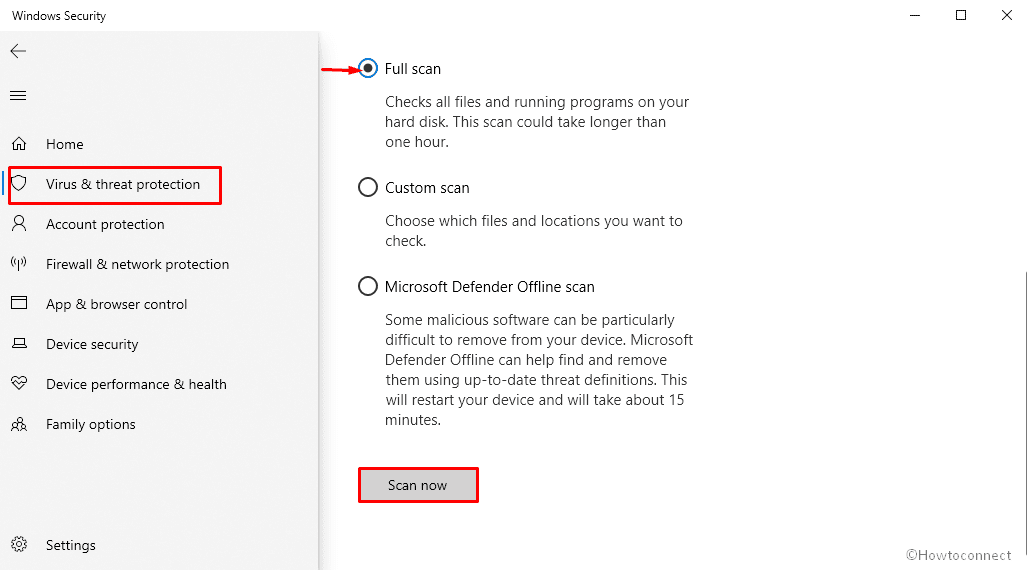
- Select the link – Scan options from right pane.
- Click the radio button set alongside Full scan.
- Hit – Scan now button from the bottom.
- If the utility gets any malware, click the Clean threats option.
- As the consequent move, click Remove and eventually Start actions.
- Upon completion of the removing process, reboot Windows.
9] Uninstall third-party apps with similar congruence
Apps are developed to ease your day-to-day work but the same can be troublesome especially when you end up installing so many programs that are used to perform one task. While attempting to run a particular task on a computer, the system elements of those applications fall in conflict and lost their own component and corrupt system elements as well.
0xc7700112 update error can be a result of the same collision if the file that is necessary for the upgrading process is missing. Also, try to remember if the issue first arrived after installing a particular software program. If so, uninstall the apps you recently installed and for further improvement remove unwanted programs as well. Follow the instructions –
- Hold down the Windows key hit X.
- Click – Apps & features.
- Go through the app list and click the one you want to remove.
- Click – Uninstall.
- If pop-up rolls out, again click “Uninstall” for final approval.
- Remove all apps you hardly use in this way.
10] Clean boot the PC to resolve 0xc7700112 update error
Clean boot is one of the most effective resolutions to troubleshoot any kind of update error code. Non-Microsoft programs and services oftentimes create a problem within the OS by doing mischief with genuine Windows components. If this the cause behind 0xc7700112 update error, clean boot will be worth trying as the procedure will let the system operate with a minimum number of drivers and services that are compulsory to run Windows. Also, you will get to know if any third-party programs and services are generating the update error. Here is how to proceed –
- Open Run dialog box.
- Write in msconfig in the command box.
- Hit the – Enter.
- Click the radio button present before – Selective startup.
- When the grayed options become ready to use, uncheck the box set alongside Load startup items.
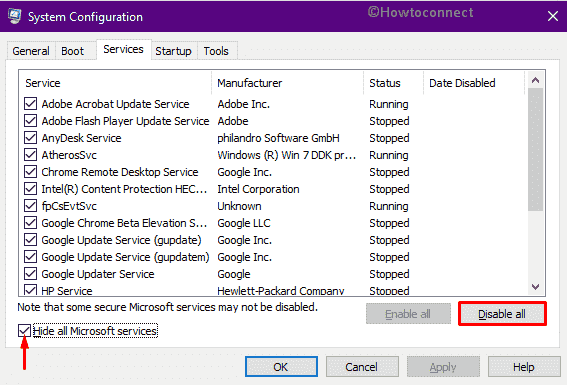
- Shift to Services tab.
- Click the checkbox of Hide all Microsoft services and hit Disable all.
- Now, move to the – Startup tab.
- Click the link – Open Task Manager.
- When Task Manager shows up, right-click on each program there, and choose Disable.
- Close the “Task Manager” and then head over to the System Configuration wizard.
- Click on Apply and afterward OK.
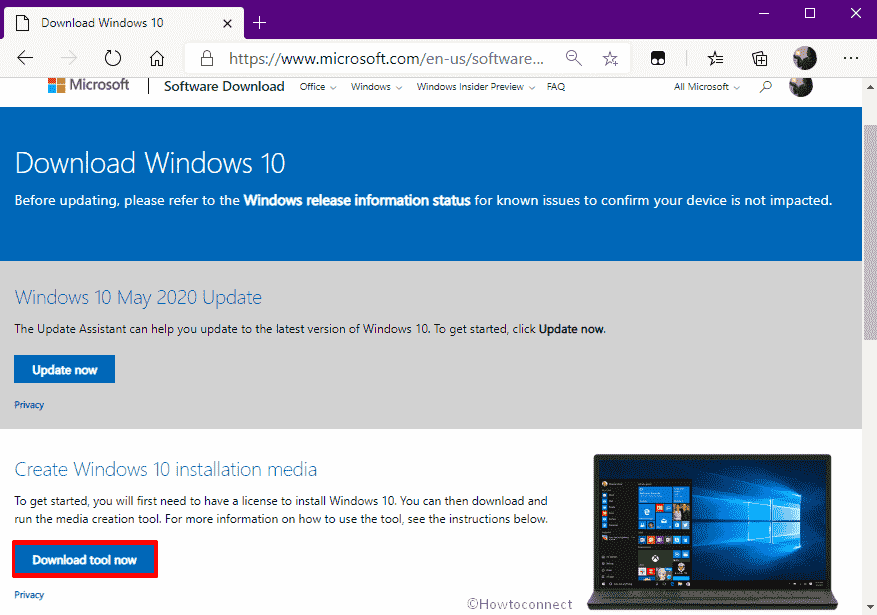
11] Create USB flash drive to clean install Windows
Usually, Windows updates happen automatically on the computer connected to an active internet with no data limit unless you haven’t changed default settings. During the process, there might be unbeknownst problems blocking the new update from being downloaded. However, there are alternative methods to install the same as well. Here is the one –
- Open the – Edge browser.
- Navigate the official webpage.
- Click – Download tool now.
- Choose a location where you like to store the file and hit Save button.
- Double-click the MediaCreationTool.exe (or similar name) of Media Creation Tool after the downloading gets over.
- Select the Yes when a User account control dialog prompts.
- Accept the terms & conditions the setup wizard shows.
- Opt for the radio button set before Create Installation Media for another PC and click Next.
- The subsequent page will come up with Language, Architecture, and Edition pre-selected. You just need to hit Next.
- From the next page, pick the option USB Flash Drive followed by clicking Next button.
- After completion, click on the Finish button.
- Use the USB to upgrade your recent Windows version.
12] Upgrade OS with ISO file to get rid of 0xc7700112 error
If the above procedure failed to install Windows 11 or 10, try out this alternative process for the same purpose. This way you can get Windows 10 without 0xc7700112 update error code. Here are the steps –
- First of all, insert a blank DVD with enough free space.
- Follow steps 1 to 9 discussed in the previous workaround.
- Select the option for ISO file rather than USB Flash Drive and click Next.
- Select a location and hit Save button.
- Once the downloading process concludes, click Finish to close Media Creation tool.
- Access the directory where you kept the file.
- Right-click on the downloaded file and click – MOUNT.
- After completion, open the DVD drive and double-click the setup file.
- Let the upgrading process finish without interruption.
13] Download the update or patch from uup.rg-adguard.net and install manually
Errors appearing during the automatic update of a patch can’t both bother you whenever uup.rg-adguard.net is available. The website offers Unified Update Platform from where you are able to download an update whether patch or build. Follow the instructions –
- Vistit – https://uup.rg-adguard.net/
- Select the Type, Version, Language, Edition, and Download from the available dropdowns.
- Choose Download ISO Compiler in Oneclick! in the last drop-down.
- Click on the link under File creatingISO.cmd.
- Run the .cmd file and follow on-screen instructions.
- Make the ISO downloaded from uup.rg-adguard bootable and follow How to Use Rufus to Install Windows 10.
Methods:
1] Wipeout orphaned Windows setup entries from BCD
2] Take help of Windows update troubleshooter
3] Remove external hardware accessories if any
4] Disable Antimalware program for the time being
5] Get rid of temporary files Windows update generates
6] Reset Windows update components
7] Make sure your drivers are compatible for Windows
8] Do virus scan to check malware attack
9] Uninstall third-party apps with similar congruence
10] Clean boot the PC
11] Create USB flash drive to clean install Windows
12] Upgrade OS with ISO file
13] Download the update or patch from uup.rg-adguard.net
That’s all!!