A blue Screen error is usually the unexpected result of a critical system crash occurring in Windows due to both software and hardware reasons. Today we will have an elaborated discussion on PDC_LOCK_WATCHDOG_LIVEDUMP Error in Windows 10 which is a BSOD error by nature. Alternatively being known as Stop errors, these drawbacks force the system to be inaccessible and stop all sorts of normal operation. The issue rises up in the system with an abnormal error message containing the name of the error in the first past and a significant bug check code in the end. Though the error code indicates the probable cause for the BSOD error, in most cases the exact root is always unknown. The mentioned Blue screen error has a bug check code of 0x0000017C indicating that a thread has been holding the PDC lock for too long.
PDC_LOCK_WATCHDOG_LIVEDUMP in Windows 10 can usually generate once the driver in the system will have incompatibilities. Some may have not been updated in time whereas few have received a defective update and this causing severe fatality. However, some other common causes stand out to generate the blue screen error like missing system resources, corrupted system files, outdated BIOS or Windows, defective areas in the hard disk from the software side. Furthermore, a bad RAM causing memory windows, defective hardware peripherals can sometimes cause a fatal system crash and thereby generate the stop error. It would be easier to resolve such issues if we could know the exact root clearly, unfortunately, that won’t happen and we have to keep on trying with the resolution process to be discussed below.
PDC_LOCK_WATCHDOG_LIVEDUMP
Here is how to fix PDC_LOCK_WATCHDOG_LIVEDUMP Error in Windows 10 –
1] Toggle Off Automatic Restart
When a BSOD appears in Windows 10, by the time a critical system crash would have been already taken place. Such issue in Windows 10 is generally very much destructive for the system and causes some crucial resources to go missing. Windows after sensing the obvious damage to it tends to shut down itself. Therefore, the desktop area seems inaccessible and no further actions can be taken to stop this.
Automatic Restarting is a very innovative idea from Microsoft in order to safeguard Windows. Despite being a safety feature, it will restrict users to troubleshoot the error properly. As a result, the fixing gets delayed and there might be a permanent disability to the system as well to some extent. Therefore, we have to disable this handy feature so make a better environment for fixing PDC_LOCK_WATCHDOG_LIVEDUMP Error in Windows 10. You can accomplish the task using the below guidelines –
- Before proceeding to the workaround, try to save the unfinished tasks you were doing and close them.
- Now, proceed to the Desktop area pressing Win+D hotkeys together.
- Do a right-click This PC icon from Desktop and select Properties.
- From the newly opened window, click Advanced system settings link located at the left pane.
- When the System Properties window will arrive, enter into the Advanced tab.
- Scroll down and reach to Startup and Recovery area.
- Click the Settings button to move ahead.
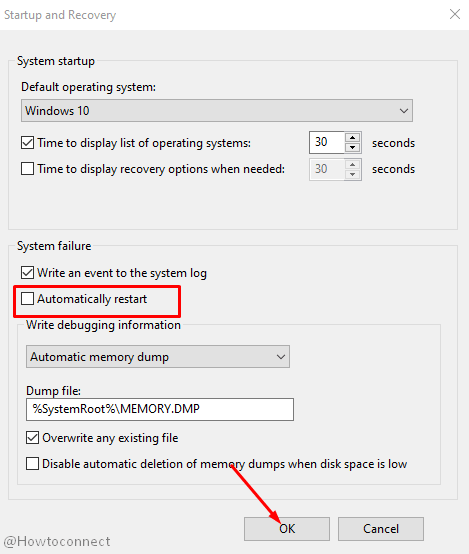
- When the succeeding popup opens, reach to System failure area.
- From here, uncheck box that reads “Automatically restart”.
- In the end, click the Ok button at the bottom and save these changes.
2] Run a Full Scan to fix PDC_LOCK_WATCHDOG_LIVEDUMP Error
Right from the initial stage of Windows, malware has been consistent enemies to it. These strongly coded bugs can easily penetrate the security layer of the system and stay in disguise like usual files on the computer. Without an effective anti-malware tool, you cannot detect them and the destruction will continue. Though the primary intention for making these bugs is to hack company data, personal information, making fraudulent transactions, they can cause other harms in the system too. Some of these can damage system files and lead the OS to face a fatal crash. Important components such as .dll files may also go missing because of them and generate PDC_LOCK_WATCHDOG_LIVEDUMP in Windows 10.
As the internet service is pretty easier nowadays, viruses can easily travel through links in web pages, spam mails. To stay safe from them, you need to strengthen the security of the system and a powerful anti-virus can guarantee it. For Windows 10 OS, Windows Security is the best-suited program and it’s a default utility as well. If there is any malware in the computer, a full system scan will be necessary to detect them and diminish accordingly. To perform a scan using Windows Security, follow the below steps –
- Press the Windows key and open up the Start menu.
- Scroll down alphabetically in the app list and locate Windows Security.
- Select the app and open in a separate window.
- From UI appearing next, click Virus & threat protection option lying on the left pane.
- Transfer to the adjacent right and click on Scan options link.
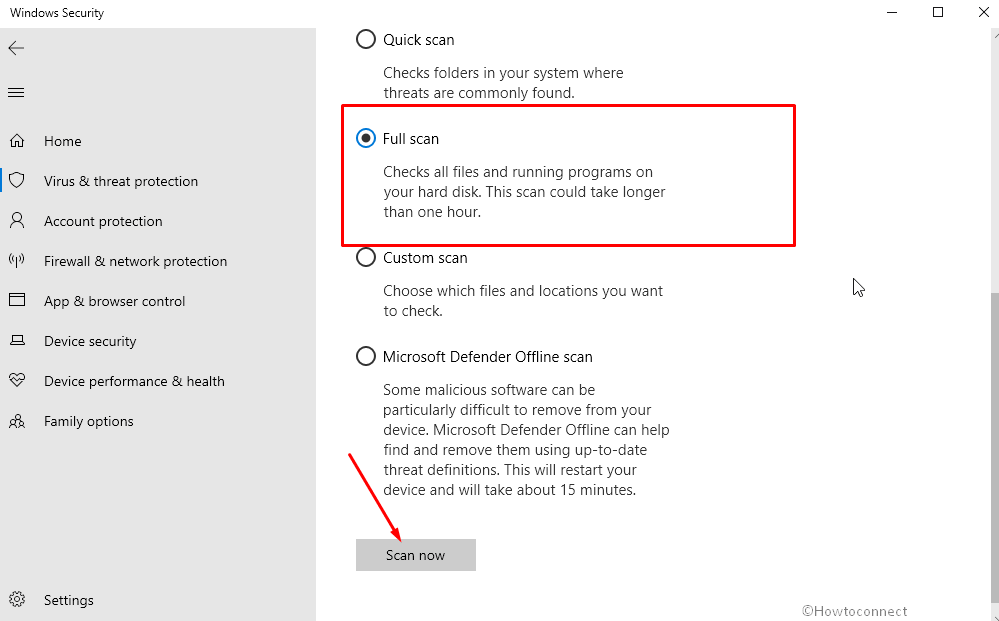
- After all the options being live, click the radio button set for Full scan.
- Click Scan now button and begin malware search in the entire system.
- If any malware is detected, the tool will present a list of threats on display.
- Click the Clean Threat option from this page.
- Upon shifting to the succeeding page, click Remove and then Start actions to clean up all the threats.
3] Install latest patches and update Windows 10
Updating Windows is an ideal way the system out of risk from malware, unexpected bugs, and some fatal errors. Every time Microsoft releases update patches, they include the latest modifications, necessary tools, and fixes of bugs as well as improved security features. Since the blue screen issues don’t always leave a clue to detect the exact cause of its generation, it becomes pretty hard to resolve using even the most effective resolutions. Instead, usual workarounds like installing the latest patches work efficiently to resolve PDC_LOCK_WATCHDOG_LIVEDUMP in Windows 10.
Usually the Windows Updating process in autonomous by default. The latest patches will be downloaded when there is an unmetered active wireless connection with the device. However, Microsoft often delays the automatic process and you may not receive the latest patch. In that case, the manual approach will be necessary as well as helpful. The guidelines are as follows –
- Open the Start menu and click the cog sign.
- When the Windows Settings app is displayed, click the Update & Security tile.
- When the succeeding page comes to view, select Windows Update lying at the left pane.
- Move to the adjacent right side and click on Check for updates link.
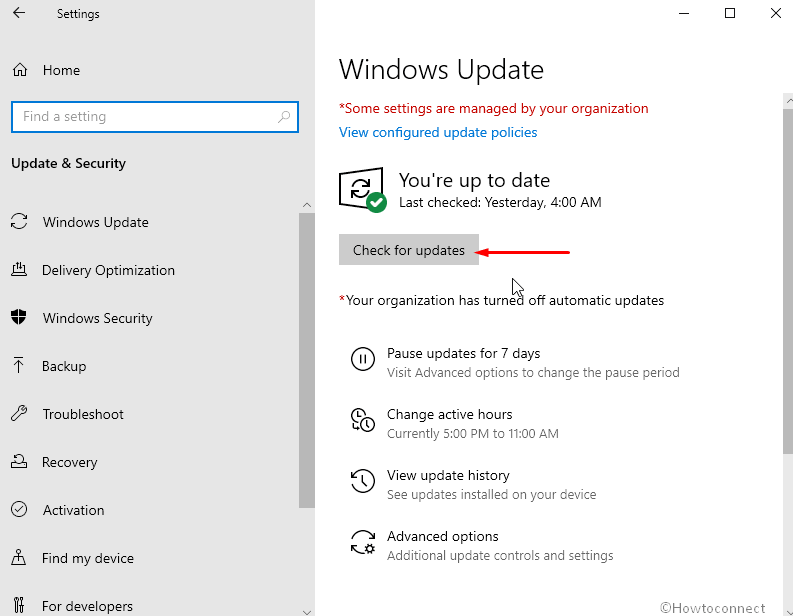
- After a while, all the latest patches will be available here. Click Download button to start the process.
- Upon finishing the downloading, installation will commence automatically.
- Follow the further instructions provided on the screen to complete the process.
4] Update the drivers to the latest version
Drivers are the critical components in the Windows as they maintain the intercommunication between computer bus and connected external hardware devices. The key part helps the system to detect a new device when connected and recognize its function. In case the drivers have some incompatibilities, Windows will fail to function well with the peripherals and a lot of unexpected issues will emerge. Especially when the drivers outdated, the system has a greater tendency to generate PDC_LOCK_WATCHDOG_LIVEDUMP in Windows 10.
Usually, all the drivers get updated at the time of upgrading Windows but software vendors deliver the updates frequently as well. You might face difficulties in detecting an outdated driver without taking help from a preferable application. For that, Microsoft included Windows Device Manager. With the help of this built-in program, you can easily trace out the outdated ones and simply install the latest version with a few clicks. To update the device drivers easily, follow the below guidelines –
- Press the Windows key and type devmgmt.msc.
- Select Device Manager from appearing list to open the app.
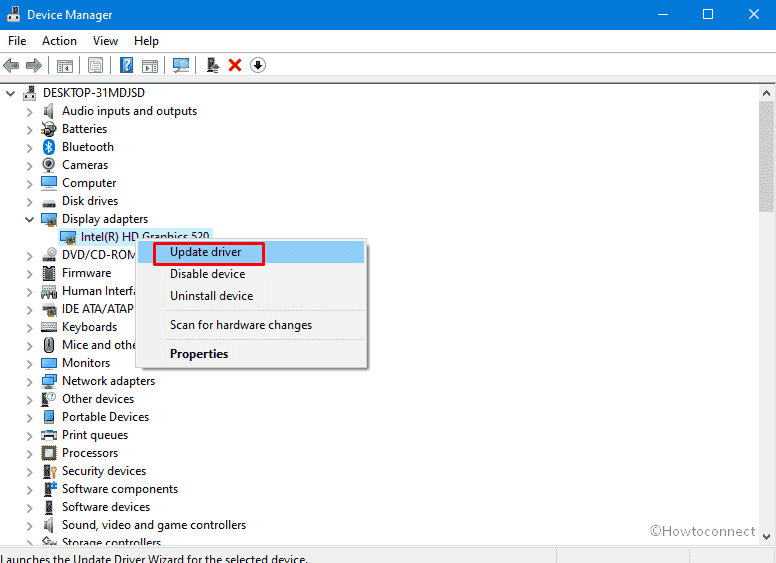
- Moving on to the new window, check if any device has any mark of exclamation.
- Split the driver by double-clicking the device.
- Right click the driver having yellow indication only.
- Select Update Driver option from context.
- From the next popup, click Search automatically for updated driver software option.
- Follow the on-screen guidelines to complete the process.
- Repeat the same process to update all the drivers.
5] Wipeout junk files to make free space in system drive
System drive i.e. OS (C:) stores all the temporary files, downloaded contents from internet, browsing data, cache, shadow copies, restore point data in it. When the disk space gets low, some unavoidable problems emerge in the system. Sometimes the unnecessary previously installed Windows Update files cover up gigabytes of space. Immediately effect if the low disk space is slow functionality of the system, continuous lags, and memory problems. Oftentimes there might be a fatal crash leading to generate the PDC_LOCK_WATCHDOG_LIVEDUMP in Windows 10.
We can always keep the OS (C:) minimum by deleting unnecessary files regularly and regain the optimum functionality. However, it’s not easy to move through files and check their size before deleting them. To eliminate this problem, you can use the Disk Cleaning tool in Windows 10. The utility is a built in application and let you the most suitable way to delete the junk files categorically. To use the tool, here are the steps –
- Invoke Run dialog pressing Win+R key combination.
- Type cleanmgr.exe in the void space and also click Ok button located on Run.
- In a moment, a small box will float up asking you to choose the drive where you like to run the cleanup task.
- Select C: Drive and then click the Ok button.
- After this tool calculates total recoverable space in the disk, it will let you choose areas to delete.
- Head over to bottom left end and click the Clean up system files option.
- From the upcoming popup, choose C: Drive again and press the Enter key.
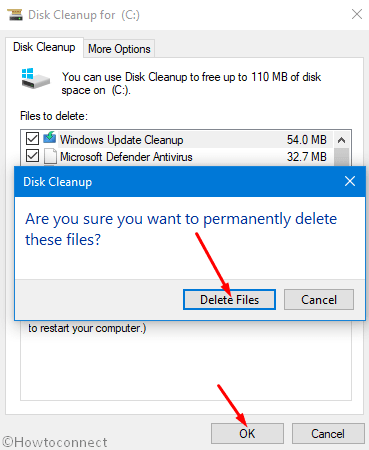
- After a while, Disk Cleanup for (C:) will appear calculating total space again.
- From this window, Check all boxes from Files to delete area. Leave Downloads unmarked and check Recycle Bin for any important material.
- Click Ok button and begin cleanup.
- Reboot the Windows after completing the action.
6] Uninstall the problematic programs from Windows 10
Despite having a large amount of effective built-in tools and applications in Windows 10, you may need some more for completing specific tasks. Some of them are available in the Microsoft Store and trustworthy for installing to the system. There are few other platforms from where you can download third-party applications as well. Unfortunately not vendors can be equally trusted and the system might be at risk if you install problematic software.
While installing a third party application, make sure you choose the necessary one, well compatible with the Windows, and downloaded from a reputed vendor. We recommend you not to install any unnecessary applications especially the ones with different names and same functionality. Such programs can cause a software collision in Windows and lead to a fatal crash. A lot of necessary system files may go missing after such an incident and will generate PDC_LOCK_WATCHDOG_LIVEDUMP in Windows 10. Therefore, if you have installed some of these programs, follow the below instructions to remove them –
- Open the Taskbar Search and type Control in it.
- Select the app to open in a window.
- From the Home page, reach to Programs category.
- Click the Uninstall a program link from there.
- After a new window opens, locate the application causing trouble.
- Right click the same and select Uninstall.
- Tap the Uninstall again from the confirmation popup.
- Follow on-screen guidelines to complete the process.
- Once done, Restart Windows 10 to make the changes into effect.
7] Re-install defective driver or Roll back it
Sometimes updating drivers is the ultimate solution for any blue screen error in Windows 10. Yet some of the users have found the PDC_LOCK_WATCHDOG_LIVEDUMP error coming up in their systems. We have traced out the fact that updates for the drivers can be corrupted so times or partially defective. Installing those will never fix a BSOD error rather; you will end up finding new errors.
If the same happens to your case, there are ways out to fix the blue screen error in the Windows Device Manager. You can simply uninstall the problematic driver and then reinstall again or rollback it to the older version. To do that, follow the below guidelines –
- Press the Windows key and X to open up the Power user menu.
- Click Device Manager from context to open it in a separate window.
- In the process, reach the device that has received an update recently.
- Double click it to unveil the hidden driver list.
- Right-click the defective driver and select the Properties option.
- When a popup floats on display, enter it’s Driver tab.
- Scroll to down and click the Roll back driver button.
- After the process ends, the defective update will be no longer available and the BSOD error must resolve.
In case Rolling back doesn’t resolve the error, you may have to uninstall the defective device and then reinstall once the system is up and running again. To do so, follow the below guidelines –
- locate the driver that has received a problematic update.
- Right click the same and select Uninstall device option.
- Once the warning message floats up, click Uninstall again.
- Once the process finishes completely, Restart Windows 10 and check if the error is fixed.
- Now, open the vendor’s official website for the latest driver using any browser.
- Download the compatible driver software and Install it on the computer.
8] Disable Fast Boot Mode to fix PDC_LOCK_WATCHDOG_LIVEDUMP Error
In order to execute the startup process quicker, Windows brought Fast Boot Mode. This is an amalgam of two power options i.e. Shut down and Hibernate making a brilliant idea to be used in case of emergency. The feature comes pre-enabled in Windows 10 and it will collect all the ongoing data from a running session. The same data to be carried out in the succeeding windows startup to make it faster.
Nevertheless, the idea is very much helpful, it might also carry over blue screen error data to the following windows session and the issue will not be resolved. Therefore, you need to stop carrying over the BSOD data by disabling Fast Boot Mode. For that, follow the below guidelines –
- Hove the cursor to the System tray area in the Taskbar and right-click battery icon.
- Select Power Options from appearing context.
- A new window will arrive from Control Panel and you need to click Choose what the power buttons do click lying on left pane.
- From the succeeding page, hit the link that says Change settings that are currently unavailable.
- Scroll down to Shutdown settings area and uncheck the box set for Turn on fast startup (recommended).
- Finally, click Save changes button to disable Fast Startup.
9] Perform System Restore and return back to old Windows state
Whenever the Windows faces critical damage like PDC_LOCK_WATCHDOG_LIVEDUMP error, users don’t have a clue to approach for accurate resolution. Some of us often fail to recover the system from BSOD error even after carrying out some most effective workarounds. In that case, the only way to fix the issue is to perform a System Restore and load the previous Windows state.
Windows Registry is often tweaked due to installing some applications or carrying out invalid operations. The same action will lead Windows to have a critical crash and eventually generate a blue screen error. Fixing Windows Registry is a completely professional task as any single mistake may immobilize the whole system. Therefore, System Restore is the best possible way to bypass a critical error. To complete this task, follow the below steps –
- Press Windows key and type recovery in the text area.
- Click “Recovery options” from the appeared results.
- When the window unveils from Control Panel, click the “Open System Restore” link.
- In the following popup, click the radio button set for Recommended restore to undo the most recent update.
- For going back to a different restore point, hit Choose a different restore point instead.
- Click Next button from the bottom end to proceed forward.
- In the following window, check the box set for Show more restore points.
- After all previous points become available, select anyone which you opt to restore.
- Click Next and form the succeeding window, confirm the selection.
- Lastly, click Finish to start the process.
- Windows will reboot and you will get a message confirming that “System Restore completed successfully”
10] Try Booting Windows in trustworthy Safe Mode
Safe Mode is a special startup mode precisely an advanced troubleshooting technique for detecting from where the trouble is originating. Whenever the system is subjected to a fatal crash, the only way to restart the device is to Boot in Safe Mode. The feature allows only the essential applications and tools to be loaded at the startup opting out third party ones. The troubleshooting becomes easier as you have to go through only the default applications. If the PDC_LOCK_WATCHDOG_LIVEDUMP error doesn’t show up in Safe Mode, you can be sure that no built-in program is causing it.
Booting in Safe Mode will not allow the network drivers and you won’t be able to access internet if needed. In internet access become necessary, you can try Safe Boot with Networking. The process is as following –
- Open the Taskbar Search clicking magnifier icon located on Taskbar.
- Edit the typing space and write MSConfig in it.
- When System Configuration arrives in the result, click it to open in a separate window.
- Moving on to the newly opened window, enter into the Boot tab.
- Move down to the second half in this tab i.e. Boot options area and check the box that reads Safe boot.
- Click the radio button set for Minimal.
- For Booting in Safe Mode with Networking, select the radio button set for Networking.
- Hit the Apply button and then Ok to save the changes.
- Close System Configuration and open Start menu.
- Click the Power icon and select Restart.
- System Will Boot to Safe Mode or Safe Mode with Networking based on what you have selected.
- If you want to get back to normal boot, remove checkmark from Safe Boot and save the changes.
- After restarting Windows, you will have the usual startup.
11] Rectify the defective Windows image files
Before any major Windows Upgrade, ISO files are released on the Microsoft website so that users can download them for experiencing new build. Windows image files are the components of ISO and they are saved in ISO-9660 format. The usage of them is to write identical copies of that build in CD-R or DVD-R format and distribute them easily. Oftentimes, these sensitive windows image files may face a corruption due to the effect of a third part application of malware attack. This is dangerous for a system as the same may result in a system crash and generate PDC_LOCK_WATCHDOG_LIVEDUMP blue screen error in Windows 10.
Deployment Image Servicing and Management i.e. DISM tool the most useful utility in Windows 10 as they can deal with these defective components and fix them. The outstanding benefit of this tool is, it can be used for offline images as well. For running this tool, you have to execute a specific command in the Elevated Command Prompt. To Run this, follow the below guidelines –
- Open the Taskbar Search pressing Win+Q hotkeys together.
- Type cmd.exe in there and right click Command Prompt when it shows up in the result.
- Choose Run as Administrator option followed by clicking Yes when UAC prompts.
- In the black window appearing next, enter the below command –
DISM /Online /Cleanup-Image /RestoreHealth
- Press Enter now will activate the DISM tool in here and this utility will detect as well as fix all the defective Windows image files in the process.
- The process may take a little longer, we recommend you schedule the task accordingly.
- Once done, Restart the computer and check if BSOD has resolved once the next session starts.
12] Disconnect external hardware peripherals momentarily
Although a bit unlikely but, hardware components like a mouse, keyboard, speakers, or a printer can also be a cause of PDC_LOCK_WATCHDOG_LIVEDUMP BSOD error sometimes. Such issues mostly come up due to problems in the hardware drivers and updating them will resolve the error. However, you might fail to resolve the error by only updating the drivers instead; a very simple fix i.e. disconnecting the problematic peripheral will work well. Many users have successfully resolved the error in this way; therefore you can also give a try. After disconnecting the USB connection, reboot Windows 10 eventually and check if the error is gone.
If the simple technique fails to resolve the BSOD error in your computer, the next way out is to run the Hardware Troubleshooter. Microsoft included this handy utility for fixing any hardware related incompatibilities easily. To run the tool, follow the below guidelines –
- Manage to enter into the Elevated Command Prompt using guidelines from the above method.
- Enter the following command to the blinking cursor –
msdt.exe -id DeviceDiagnostic
- Press Enter key to initiate the Hardware and Devices Troubleshooter page opening up immediately.
- Click Next button from the upcoming popup to go ahead.
- The utility will detect Hardware issues in the system if any and fix it automatically.
13] Run the System File Checker tool and fix PDC_LOCK_WATCHDOG_LIVEDUMP Error
Any file with the hidden system attribute enabled in it is a Windows System file in technical meaning. On these files, Windows depends to be operated properly in reality. These files can be dynamic link library contents (.dll) sometimes and also take up in making up Windows Registry, components of hardware driver configuration. When these files are subjected to corruption due to sudden power surge, power outage, malware attacking them, or due to a Windows Updating issue, System will face a severe crash. The effect can be worse as it may usually generate PDC_LOCK_WATCHDOG_LIVEDUMP blue screen error.
For recovering the system files from corruption and eventually resolving the BSOD error, you have to use the System File Checker tool. The utility comes built-in with potentials to recover the missing .dll files too when run. This tool will be activated in the Elevated Command Prompt but executing SFC command line. Follow the below steps to run the System File Checker –
- Invoke the Run dialog and type cmd in its empty text area.
- Now, Press Ctril+Shift+Enter keys combined.
- When the UAC prompts up, click Yes to provide consent.
- Being moved to the Elevated Command Prompt window, enter below command –
Sfc /scannow
- Press the Enter key to execute this command line tool and run the System File Checker tool.
- In the process, the tool will try detecting the corrupted system resources and fix them accordingly.
- Once finished, restart Windows and check if BSOD error is resolved.
14] Run the Memory Diagnostic tool and replace bad RAM if necessary
Memory problems in Windows can be very severe and the issue has a great role in generating the PDC_LOCK_WATCHDOG_LIVEDUMP BSOD error. Usually, memory problems are triggered by low storage in the disk especially OS (C:). Regular cleaning the junk files and keeping more space in the system drive can save you from this trouble. However, a bad RAM unit can also cause memory problems and you may have to replace it to fix memory problems.
Replacing RAM is not an easy task always and you have to ensure that it is causing the blue screen error. Therefore, you can run the Windows Memory Diagnostic tool and run tests to confirm RAM is defective. This is also a default utility in Windows 10 that sends complete reports depending up carried out diagnosis on memory issues. Later on, taking decision will be easier according to the diagnosis report. To run this tool, follow the below guidelines –
- Bring forth Run dialog pressing Windows key and R together.
- Type mdsched.exe in the given search box followed by clicking Ok.
- From the Windows Memory Diagnostic tool, click Restart now and check for problems (Recommended) option.
- Instantly, the Windows will boot into a blue screen and the utility will begin detecting problems.
- After this diagnosis reaches 100%, the computer will reboot again.
- After coming back to the operation again, you will get a notification in the System Tray from Windows Memory Diagnostic tool.
- Check the report and if there is any problem, step out to take action accordingly.
15] Remove the recently installed defective Windows update patch
Installing the latest update files released from Microsoft is always a better idea to keep the system out of trouble. We have seen the same process also helps in resolving the PDC_LOCK_WATCHDOG_LIVEDUMP blue screen error as well. However, you might have the same error coming again after carrying out Windows Update. The reason is, Microsoft often releases some patches that are partially broken, carry harmful bugs in them. Installing these files will cause additional problems rather than giving the Windows a better functionality.
If you are getting the blue screen error after installing a new Windows Update patch, remove it from the system immediately. Control Panel holds the ways to remove a problematic installed update file without troubling the progress. To complete this task, follow the below steps –
- Press the Windows key and I at once to open up the settings app.
- From the displayed UI, Click Update & Security tile.
- Once moved to the additional settings page, select Windows Update lying on the left pane.
- Jump to the corresponding right side and click View update history link.
- After the succeeding window opens up, click “Uninstall updates” link.
- In a moment, a new page will unveil from Control Panel where you will see all the past Installed Updates.
- Reach to the last installed patch in this list and right-click it.
- Select Uninstall option and click Uninstall when the confirmation message pops out.
- Once done, Reboot Windows 10 and check if the error is resolved.
16] Repair bad sectors to solve Fix PDC_LOCK_WATCHDOG_LIVEDUMP Error
A hard disk is considered as the soul of the system and put to service right after manufacturing a device. The same hard disk is used throughout lifetime and people seldom replace it unless facing irrecoverable trouble. If this essential part is ill-maintained, bad areas will form inside due to sudden power outage. Some users forcefully cancel an ongoing operation or pull out cable from CPU which adds momentum to create bad sectors in the hard disk.
Bad areas in the hard disk are very much likely to generate the PDC_LOCK_WATCHDOG_LIVEDUMP blue screen error in Windows 10. We can fix these areas easily with the help of disk checking utility. This default works in the elevated command prompt and repairs detected problematic parts of hard disk. To run this utility, follow the below instructions –
- Open the Start menu pressing the Windows key once.
- Click the Power icon and click the Restart option at the same time hold the Shift key.
- The window will perform a Restart and will boot to Automatic Repair.
- When the following blue screen shows up, select Troubleshoot > Advanced options > Command Prompt.
- Once directed to the Elevated Command Prompt window, enter the following text at blinking cursor –
chkdsk /f /r C:
- Execute the above command by pressing the Enter key.
- Disk checking tool will take quite a long time to detect the defective areas will fix eventually.
- Once done, restart the computer and check if the BSOD error has resolved already.
17] Update BIOS to resolve PDC_LOCK_WATCHDOG_LIVEDUMP Error
BIOS is an integral part of the System that comes pre-installed with the device and the ROM chip is located on the Motherboards. The firmware helps users to set up a new system afresh right after taking the computer home from store. It energizes the system as the software is the initial one to run when a device is powered On for the first time. Besides, it will also control data flow from Windows and the attached accessories such as video adapter, keyboard, mouse, printer, hard disk, etc.
An Outdated BIOS makes the system technically unstable, makes it non-functional, and fails to communicate well with the microprocessor. To some extent, this may also generate PDC_LOCK_WATCHDOG_LIVEDUMP blue screen error in Windows 10. Therefore updating BIOS is a must in order to avoid unexpected issues. To do that, you need to follow the below guidelines –
- Press Windows key and type msinfo32 in the text box provided.
- Select System Information when appears in the result to open it in a separate window.
- Scroll down on the page and reach to bottom area where the search box is located.
- Type BIOS in the search box and press the Enter key.
- When the information is displayed, note down the info shown on the adjacent right side pane for BIOS Version/Date.
- Close the System Information window and launch any web browser.
- Visit its manufacturer’s web page for your BIOS.
- Find the compatible BIOS file using the information you found earlier.
- Download the latest BIOS file for your device.
- Run the file to install the latest version of BIOS.
18] Check out Microsoft Blue Screen Troubleshooting page
In the above section, we have mentioned a good number of most effective workarounds and expect that you have already resolved PDC_LOCK_WATCHDOG_LIVEDUMP blue screen error. It’s understandable that you may need to try a bunch of processes as if having no fixed cause behind this issue. If the troubleshooting gets complicated, you may take help from Microsoft’s Blue Screen Troubleshooting page. The web page has pre-inserted resolutions for blue screen trouble and it will unveil stepwise tasks based on the information you will submit. Only following those steps will help you to resolve the error easily than trying out so many processes. To avail, follow the below steps –
- Open Windows Edge or any other preferred browser from your Windows.
- Click the address bar to edit and enter below URL –
https://support.microsoft.com/en-us/help/14238/windows-10-troubleshoot-blue-screen-errors
- Press the Enter key and the browser will take you to Microsoft’s online troubleshooting web page.
- Scroll down in the opened web page and reach to the When did you get the error? area.
- From the pre-determined causes listed here, choose any according to the problem you are getting.
- The page will be readjusted now and show you stepwise tasks in order to fix the Blue Screen error.
- Follow them to the point properly and fix the error accordingly.
Methods:
1] Toggle Off Automatic Restart
2] Run a Full Scan for the malware in the system
3] Install latest patches and update Windows 10
4] Update the drivers to latest version
5] Wipe out junk files to make free space in system drive
6] Uninstall the problematic programs from Windows 10
7] Re-install defective driver or Roll back it
8] Disable Fast Boot Mode in Windows
9] Perform System Restore and return back to old Windows state
10] Try Booting Windows in trustworthy Safe Mode
11] Rectify the defective Windows image files
12] Disconnect external hardware peripherals momentarily
13] Run the System File Checker tool and fix corrupted sources
14] Run the Memory Diagnostic tool and replace bad RAM if necessary
15] Remove the recently installed defective Windows update patch
16] Repair bad sectors in hard disk using CHKDSK command
17] Update BIOS for the Operating System
18] Check out Microsoft Blue Screen Troubleshooting page
That’s all!!