Unfortunately, a substantial number of users are getting the error 0x80071ab1 while trying to install .NET Framework in Windows 11. The same error may occasionally appear when you attempt to download or install a pending Windows update. This issue generally shows up because of common WU glitches and oftentimes gets fixed with a system reboot. If not, you will have to go through some advanced workaround to fix Windows 11 Update error 0x80071ab1. Resolving the issue is much-needed since .NET Framework is a fundamental requirement for many apps. With this error code persistent, neither you can use all the Windows apps especially the old ones properly nor receive the latest update patch.
Error 0x80071ab1 points out that some of the required members of the transaction are missing or corrupted. That is why the process to make space in the transactional resource manager’s log has not succeeded. As we said, problems with Windows features usually trigger this specific error code in Windows 11 but there are several different underlying causes that might be also responsible. Inappropriate infrastructure, corrupted update components, glitches in WU dependency, missing system elements, and recent software changes are mainly found to be guilty. Here’s a list of potential workarounds that you will help in resolving Update error 0x80071ab1 :
Windows 11 Update error 0x80071ab1
Here is how to fix Windows 11 Update error 0x80071ab1 –
Way-1: Ensure the internet connection is stable
For downloading a newly released patch or .NET Framework, you need to ensure a stable internet connection with your Windows PC. However, some connections are intermittent and stop in the half to cause failure to download the update files. Such an issue may give rise to error 0x80071ab1 and restrict the users from exploring the features. If it’s an ethernet connection, try unplugging it from the computer and then reconnect. You can also switch the networks or restart the router for ensuring the internet connection is really okay before proceeding.
Make sure the network is not set as Metered, otherwise the downloading will not commence. For saving the data usage in the device, Microsoft has introduced Metered connection which won’t let the device download large files if turned on. Once checked and ensured the correct connection, try to carry out the update that was causing the issue.
Way-2: Install problematic Windows Update Manually
As we said, a stable internet connection is mandatory to carry on any updating process smoothly but not always we can ensure such connectivity. Whenever on the move, in a vehicle, or staying in remote areas, updating process ends up getting into trouble and the system throws error codes.
However, with Microsoft Update Catalog you can download an update patch anytime when the internet is available and then install it the same at any preferable time. By doing the same, you can easily avoid issues like Windows 11 Update error 0x80071ab1. To download a certain patch from Microsoft Update Catalog, follow the below steps –
- Before starting the manual update, check the KB number system is failing to install.
- For that, press – Windows + S
- Type – update history.
- Hit – Enter.
- When the Settings page appears, note down the KB version showing the error.
- Visit – Microsoft Update Catalog webpage.
- Click the search bar and type the KB number you want to get.
- Press – Enter.
- Look for the version that goes with your system configuration.
- Click – Download present beside the suited version.
- A new page will prompt, click on the link that ends with msu.
- Once the MSU file is downloaded, double click on it.
- To allow User Account Control, click – Yes.
- Follow the on-screen instructions to install the update completely.
Way-3: Run Windows Update troubleshooter
Windows Updating process is autonomous, the device will get it immediately whenever there is a released patch available. However, there have been glitches always in this process over time and it often ends with showing various error codes. Users eventually face difficulties in continuing the task.
Microsoft has introduced Windows Update Troubleshooter in order to make the process error-free for the users. The utility will temporarily disable the automatic disk cleanup and install the available patch if the process is stuck in the middle with error codes. To fix Windows 11 Update error 0x80071ab1, run the default troubleshooter going through the following steps –
- Press – Windows + I.
- Once on the Settings page, choose – Troubleshoot.
- Click – Other troubleshooters.
- From the next page, hit – Run button present next to Windows update.

- Follow on-screen instructions to run the troubleshooter.
- When the utility will suggest an automatic fix, click – Apply this fix.
- Close troubleshooter.
- Reboot Windows to make the changes is effective.
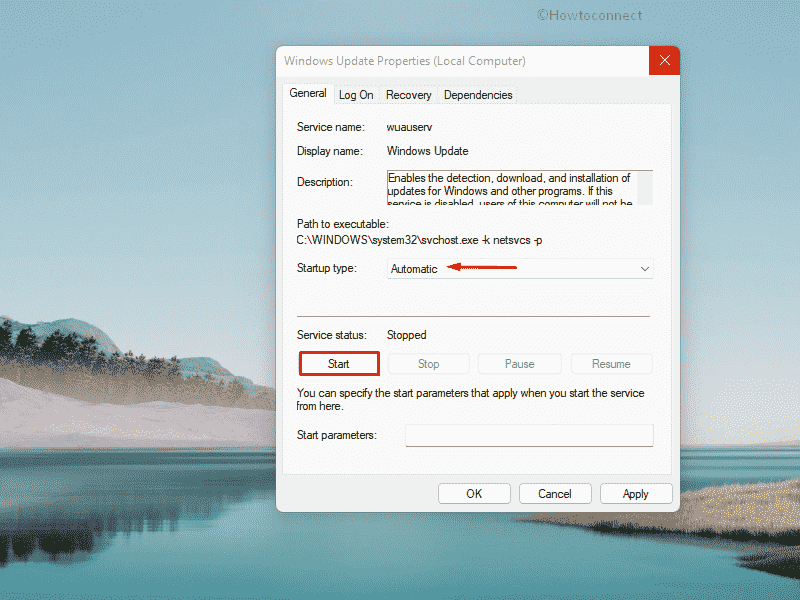
Way-4: Make sure Windows update services are running
If Windows update services get disabled accidentally or for reason, the system will no longer receive updates until you enable the same again. To check whether the service is running properly, follow the way –
- Press – Windows key.
- Type – services.
- Hit – Enter.
- When the window turns up, find – Windows Update.
- Double-click the same to open its properties.
- Set the Startup type to Automatic.
- If the service is not running, click – Start.
- Shift to – Log on tab.
- Select the radio button set for Local System account.
- Uncheck the box present before Allow service to interact with desktop.
- Click Apply and then OK.
- After that, check Background Intelligent Transfer Service, Event Log, and Remote Procedure Call (RPC) services by following a similar process.
Way-5: Reset update components
Windows Update components control everything in the process when the device proceeds for installing a new patch. Any corruption of these files will result in throwing error codes and users will not be able to complete the process. However, resetting the components from SoftwareDistribution folder will be just fine to resume the operation. All the associated files for an update are saved in this folder and you have to remove everything from here. After resetting it, all the components will reappear in the folder afresh and internet connection issues will be fixed too.
To carry out resetting Windows Update components for fixing Windows 11 Update error 0x80071ab1, follow the below guidelines –
- Press – Windows key.
- Type – cmd.
- Press – Ctrl + Shift + Enter.
- When User Account Control appears, click – Yes.
- In the Command Prompt, insert the following lines one after another and hit Enter after each –
net stop wuauserv
net stop bits
net stop appidsvc
ren %systemroot%\SoftwareDistribution SoftwareDistribution.bak
ren %systemroot%\system32\catroot2 catroot2.bak
Executing the commands will stop all update-related services moreover replace the existing SoftwareDistribution folder and Catroot2 folder with fresh ones. To run the stopped services again, execute the following line in the same Command Prompt –
net start wuauserv
net start bits
net start appidsvc
net start cryptsvc
- Close Command Prompt.
- Restart the PC and check if the error is fixed.
Way-6: Free up disk space
Every patch needs a certain amount of free disk space as a pre-requirement to install in the device. This often varies based on the build but usually stays a minimum of 16 GB free storage for installing 32-bit and 20 GB for 64-bit. So, you have to ensure the required space in there in the disk before proceeding to carry out an update.
The system drive is often full of junk files as a lot of unnecessary components like temporary files, browser caches, download items, and shader caches. But the killer here is previous windows update files which usually take up to a few gigabytes of space. You can delete these items as no changes will be made in the operating system rather, it will run faster after creating ample space in the disk. To clean these junk files altogether, Microsoft has provided Disk Cleaning utility. To run this tool, follow the below guidelines –
- Click the search icon from the taskbar.
- Type – cleanmgr.
- Hit – Enter.
- From the next pop-up, choose your system drive which is C: in most cases, and the system pre-selects it automatically. Click – OK.
- Once on the next wizard, hit – Clean up system files.
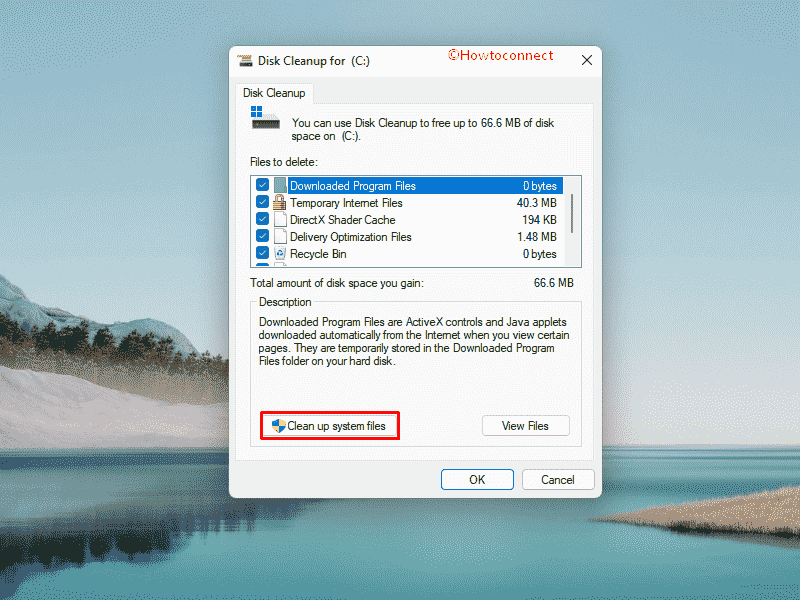
- For the next drive selection prompt, click – OK.
- After shifting to Disk cleanup wizard, hit – OK from the bottom.
- To give final consent, hit – Delete files.
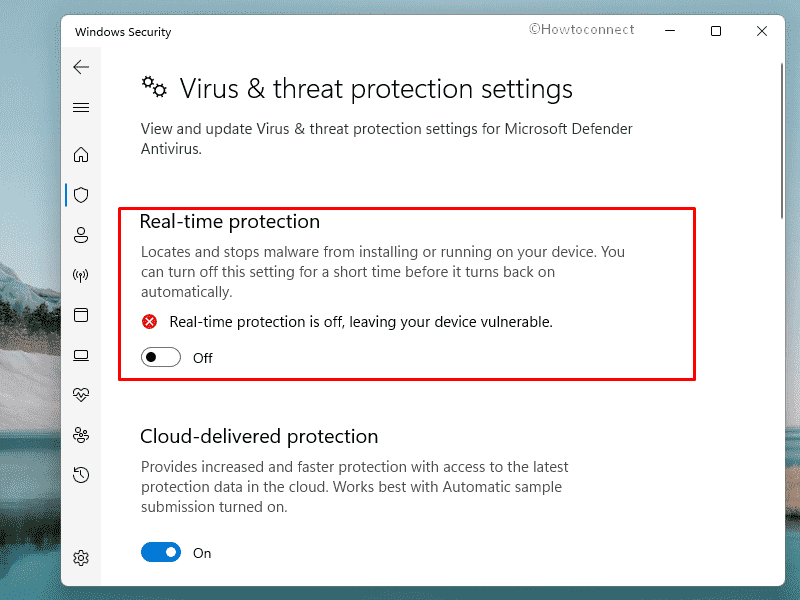
Way-7: Turn off the antivirus program
No doubt, anti-virus programs help the system to stay protected from all sorts of malware, worms, trojans that are always in a hunt to break the security interface of the device. Unfortunately, the program may also misinterpret the update file as malicious and eventually block it. If that happens, the Windows Updating process will be terminated showing error codes.
Therefore, to fix Windows 11 Update error 0x80071ab1, disable third-party anti-virus programs as well as Windows Firewall for the time being. Ensure the same is turned on after successful completion of the process.
Disable Windows Firewall
- Press Windows key.
- Type – security.
- Hit – Enter.
- Click – Virus & threat protection.
- From the right, hit the link – Manage settings.
- Turn off the switch button set for Real-time protection.
- To give consent, click – Yes.
- From the left sidebar of the app, choose – Firewall & network protection.
- Click – Private network.
- Switch the toggle button present under Microsoft Defender Firewall to left
- Confirm your action when asked.
- Click the back arrow icon from the top left corner.
- This time, choose – Public network.
- Disable the toggle button of Microsoft Defender Firewall for this network too.
Disable third-party antivirus
- Take your mouse pointer to the toolbar.
- Right-click on the third-party antimalware software icon. If it’s not there, click the Show hidden icons (up arrow symbol) to get the same.
- Choose – Disable.
- Choose a time slot for how long you want to keep the app disabled.
Note – The process may vary depending upon the software installed in your Windows 11 machine but it will be pretty much similar.
Way-8: Check for corrupted system components
System files are the most critical components in Windows as they help to operate the OS smoothly and keep the machine away from glitches. However, these components are sensitive and can easily get affected by malware, corrupted by sudden power surges, and outages. If there are similar programs installed in the system, some of the files may get erased due to software collision as well.
Having corrupted or missing system files in the OS will be detrimental as there will be a wide range of errors and issues in the time to come. Windows 11 Update error 0x80071ab1 may show up in the device for this issue too. You can easily fix such components by a default utility called System File Checker, which will also recover the missing ones. To run SFC scan, follow the below steps –
- Press – Windows + R.
- In the Run command, type – cmd.exe.
- Press – Ctrl + Shift + Enter.
- To approve User Account Control, click – Yes.
- When the black window opens up, insert –
sfc /scannowin it. - Hit – Enter.
- Let the process reaches 100% without interruption.
- Check the report to confirm whether the System file checker fixed the found corruption.
- If not, execute –
dism /online /cleanup-image /restorehealthin elevated command prompt. - Reboot your system once the process ends.
- When the system powers up, sign back in.
- Run sfc /scannow once again the same way we discussed above.
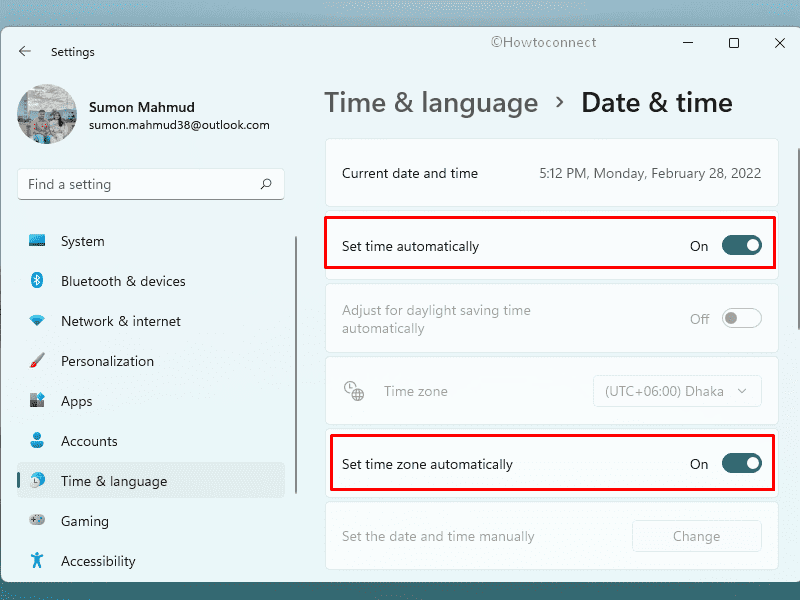
Way-9: Make sure the Date and Time is correct
Incorrect Time and Date settings in the device don’t let the system download the newly released update due to time zone restrictions. Microsoft always follows the DST and TZ before delivering the update to an OS and the operation will end up getting error in case the settings are not correct. Therefore, make sure to check this before you proceed for updating following below guidelines –
- Open Settings app.
- From left sidebar, choose – Time & language.
- Shift to the right.
- Select – Date & time.
- Switch on the toggle button of Set time automatically.
- Enable – Set time zone automatically too.
After that, go through the below process –
- Press – Windows+R.
- In Run command, type – control.
- Click – OK.
- Make sure the View by option is set to Category.
- Click – Clock and Region.
- From the right-hand side, hit – Date and Time.
- Shift to Internet Time tab.
- Click – Change settings.
- Check the box present before Synchronize with an Internet time server.
- Click – Update now.
- To save the changes, hit – OK.
Way-10: Try in-place upgrade
Performing in-place upgrade is a suitable alternative to install Windows updates without having an error or issue. The method allows users to upgrade the OS to the most recent build directly from Microsoft’s dedicated website.
If you are facing Windows 11 Update error 0x80071ab1, try in-place upgrade to avoid the glitch. To carry out this, follow the below steps –
- Navigate to official Software Download page of Microsoft.
- Click – Download tool now.
- Visit the directory where the system saves downloaded items.
- Double-click the setup file you got.
- To allow User Account Control, click – Yes.
- When the license terms page shows up, hit – Accept.
- Click the radio button set before – Upgrade this PC now.
- Hit – Next.
Methods list:
Way-1: Restart Windows
Way-2: Check internet connection
Way-3: Run Windows Store apps troubleshooter
Way-4: Disable antivirus programs for the time being
Way-5: Remove Windows Store cache
Way-6: Fix corrupted system components
Way-7: Repair Microsoft Store
Way-8: Create new administrator account
Way-9: Reset Microsoft store app
Way-10: Make Windows up-to-date
Way-11: Update Microsoft Store
Way-12: Reinstall Windows Store
That’s all!!